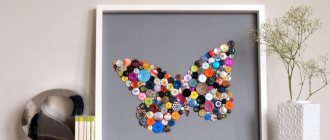
Interest in handmade products is growing every year. Do-it-yourself three-dimensional paintings are especially popular. And such concepts as quilt, patchwork, patchwork technique are already well-known. And now a new name has appeared in Russia - Kinusaiga techniques. They are used to create three-dimensional paintings.
In Japan, the birthplace of kimono, this unusually beautiful type of creativity originated. Patchwork, patchwork, quilting are all varieties of Kinusaig. Scraps of various materials are selected for work, and then panels are made from them.
The uniqueness of these works is that they are “sewn” without the use of threads and needles. The technique is relatively simple to perform, and the results can be stunning. Both a professional and a beginner can handle this type of work.
How to make a 3D painting with your own hands. Technology. Ready-made 3D paintings
Content
What are 3D paintings?
Greetings, dear, in touch. And in this article I want to tell you about how to make a 3D painting with your own hands. At first glance it may seem very difficult. But I assure you, if you know what needs to be done and how, then you will not have any difficulties. Believe me, I have already drawn about 1000 3D paintings of varying complexity and purpose, so I have something to surprise you with. You will also learn what to make such pictures from and how to install them. So the article promises to be extremely useful and informative, so read it to the end and very carefully.
3D paintings are a special three-dimensional image that takes on the correct three-dimensional appearance when viewed from a certain point.
Such paintings look as voluminous as possible in photographs, precisely for this reason, they have found their maximum distribution precisely where there is photo or video shooting ( 3D exhibitions , holiday decorations, 3D advertising, TV advertising, etc.).
As I said, the basis of such paintings is precisely a special image. That is, it’s all about the three-dimensional image, and not about the special material, as many people mistakenly believe.
If you have a three-dimensional image, you can print it on anything (banner, film, paper, fabric, plastic, etc.). If we take 3D paintings for an exhibition , then such paintings are printed on a regular banner. This is the optimal price-quality ratio.
The banner is quite durable, wear-resistant, the images are bright and saturated, and is inexpensive. So, where can you get a special three-dimensional image? There are two options here, let's start with the first - how to make a 3D painting with your own hands.
How to make a 3D painting with your own hands.
First, let's define the types of 3D paintings. There are two types of three-dimensional paintings. These are vertical ones, those that are mounted on the wall. And horizontal ones are those that are attached to the floor. Now let's move on to the question of how to make a 3D painting with your own hands. It’s very simple, I have two specialized courses on this topic.
The first is a mini-course called “3D drawings for the lazy or how to draw 50 3D drawings in 2 hours . In general, everything in this course is simple, here we do not delve into any technical details, but I simply provide you with a special universal form for converting to 3D and show you how to work with it. The duration of the course is only 60 minutes.
As a result, the entire process of creating a full-fledged floor 3D painting (or rather a three-dimensional image for it) comes down to just 3 stages. At the first stage, we select and decide on the image that we want to convert into 3D format.
At the second stage, we insert this image into a special universal form for translation into 3D .
At the third stage, using this form, literally in 1-2 minutes we convert the picture into 3D format and get a three-dimensional image.
Everything is so simple that using this form you can produce three-dimensional images for floor 3D paintings simply on an industrial scale.
And then these paintings can be used for various purposes, be it 3D exhibitions, 3D advertising or 3D paintings for holiday decoration
.
Professional course on 3D exhibitions and 3D paintings for them.
I also have a professional course on 3D exhibitions and paintings for them. The duration of the course is about 6-7 hours. In this course, I dedicate you to all the subtleties and nuances of creating both horizontal and vertical 3D paintings for exhibitions. There are also many useful points on the proper organization and operation of the exhibition itself. In a word, an indispensable course for those who want to open their own exhibition. Everyone who purchased this course was satisfied. Here are reviews about this course.
A set of ready-made 3D paintings.
Another simple option for making a 3D painting with your own hands is to take ready-made three-dimensional images and print them on a banner. I have a whole set of floor 3D paintings of different sizes and themes, completely ready for printing (about 50 pieces in total).
How to make a 3D painting with your own hands. Education. Ready-made 3D paintings
You can view all 3D paintings of the kit by clicking on the link below.
DOWNLOAD A SET OF READY 3D PICTURES.
And this is where my article comes to an end. I hope it was useful to you, and now you know how to make a 3D painting with your own hands. For any questions regarding purchasing a kit or training courses, please contact us by email, or leave your questions in the comments. And good luck to you all in your endeavors, bye.
If you liked the article, please do the following:
- Leave a comment. Just write whether you liked the article or not. Write what topic you would like to discuss in the following articles.
- Share this article with your friends.
- Subscribe to blog updates and my YouTube channel.
Best regards, Rustam Zakirov.
rz3d.ru
How to create a three-dimensional image on the wall
There are several ways to create 3D decor in your home. The easiest way to implement it would be to order a finished image printed on fabric or other material. After production, you just need to fix the coating in the right place and enjoy the result.
Another type of finished painting is a special type of wallpaper. Here you also don’t have to do anything yourself. You just need to go to the store and buy a suitable coating.
There are coating options in which the image is complemented by special materials that imitate sand, plaster or other similar materials.
The next way to decorate your home by placing 3D drawings on its walls is to buy wallpaper with pictures painted with special paint. The effect of volume appears on them only when the picture is illuminated with ultraviolet light. Under ordinary lighting, these are undistinguishable coverings, sometimes even without visible ornaments at all.
The last type of such decor is suitable only for those who have artistic talent - to create a three-dimensional drawing on the wall with their own hands. At the same time, there are several techniques that include not only the use of paints. You can create a picture from decorative plaster, sculpt it from plaster or use the appliqué method - there are a lot of ways.
3D paintings | Country of Masters
To work, choose ANY photo you like, except a portrait (although... It’s difficult, but you can do it) or any of your own (or someone else’s) drawing. Make several IDENTICAL photocopies.
We use one photocopy for the working drawing. Here we mark where and what layers will be. In one drawing you can get 3 layers or 33, it all depends on you. Take this work very seriously: if you make a mistake here, then you will have to redo all the work.
Looking at the working drawing, we cut out all the layers from the photocopies (one layer from one photocopy).
We glue corrugated cardboard or pieces of double-sided adhesive tape to the back of the layers.
All that remains is to paste the layers onto the photocopy background, frame it, hang it on the wall and admire your work.
In the same way, you can make your own house or cottage in volume.
Notes:
1. To avoid wrinkles, it is better to stick thin photocopies onto album sheets and then cut them out. For such purposes, I print photocopies on sheets from the “drawing folder”: there is no need to glue them.
2. I use corrugated cardboard to save on adhesive double-sided tape.
3. In the countries of the European Union, 3D paintings and 3D postcards are very popular. Many people make them. There is a whole industry there: you can buy a sheet of layer-by-layer prints at the Hobby Center. All that remains is to cut and paste. But in our Country of Masters I have not noticed such works and therefore I hasten to correct this shortcoming.
4. If any of you are in a hurry, you can send 3D New Year cards to your friends. And whoever is too lazy to invent something can do it
photocopies of a regular New Year's card and make a 3D version of it.
5. Good luck to you in your new business!
stranamasterov.ru
Bubble Mood
This drawing is an excellent option to hide any flaws in the design of the wall before renovation. The motif will look good in a child's room.
The template in this case is a circle cut out in a sheet of cardboard. To make a three-dimensional bubble you will need two contrasting paints. The dark one should be applied to the top of the template
Light paint is applied to the bottom of the template and another stroke is applied to the top of the dark circle.
The author added two strokes to the drop-bubble from below, but even without them it looks very interesting. If you regularly arrange such droplets, you will get a cheerful parade of caps
DIY 3D painting. Papertol or 3D decoupage – Fair of Masters
Do you want to feel like a little wizard? Then this is the place for you! Now I’ll tell you how to do this.
It all started with a gift brought from Europe by my friends. They know how to surprise and delight! When I opened the package, I was speechless for a moment. I have definitely never seen such mysterious beauty before! There was a microcosm in an unusual frame. It was a landscape with a perspective leading into beautiful distances. The alley and openwork trees were so realistic that it seemed that a gnome or an elf was about to peek out from behind the tree trunk. Looking at the picture, your fantasy plays out, and you can contemplate for a long time, being in this small world, forgetting about business and worries. Curiosity haunted me, how does it all work? The illusion of objects hovering in the air is created. After much thought, I had to dismantle all this beauty... The terrible secret was solved. Everything ingenious is simple! Now I devote all my free time to creating such three-dimensional paintings. I recommend you try it too. The result is striking in its liveliness and novelty of impressions. The picture seems to come to life before your eyes!
So, let's begin. We choose any picture or picture we like (to begin with, it’s not difficult to cut out) taking into account perspective and versatility. This is a very important aspect of the matter. Let's roughly estimate how many layers we need depending on the plan: 1st, 2nd, 3rd, etc. There can be 5, 6 or more if necessary. We print identical pictures based on the number of layers. In this case we have 6 of them.
To get started you will only need a few simple tools:
- Paper scissors.
- Nail scissors.
- Dummy knife.
- Double-sided tape (white or black)
- Corrugated cardboard (for interlayer between adhesive tape).
- Thick cardboard for the base of the picture.
We begin to cut out the first picture along the contour, only the sky. The second picture is cut along the outline of the house, etc. Each picture is a layer of the picture. The closer the layer is to us, the finer the details become, and on the topmost layer only the smallest details that are closest can be cut out. For example, a step or pots of flowers on the window.
It is advisable to tint the ends of all parts with a dark felt-tip pen, because... the white edges don't look neat.
We glue strips of tape on both sides of the corrugated cardboard (you can also use foam) to create more height between the layers. We cut the tape into squares and stick them on the back of each part.
All that remains is to glue the layers together. We glue the first whole picture onto cardboard, and mount all the other layers on it.
This is how the multi-layer “pie” turned out.
Now we insert it into a wooden box (I think we can’t do this without male help).
And we glue this entire structure to the frame with glass.
Your masterpiece is ready!
I am sure that you will look at your creation from different angles for a long time and watch with a smile as your friends try to look inside the picture and understand how it was made! But every master has his own secrets...
www.livemaster.ru
Methods for creating images on walls
In the first case, spatial vision skills are required. The absence of clear lines and contours in the sketch creates unusual impromptu images. It is enough to have rough sketches and be very good at using paints.
The simplicity and accessibility of this technique makes it acceptable for most wall graphics lovers. Quite original colorful compositions with varied details are created. The number of stencils can vary from two to ten.
Simple equipment requires the use of expensive equipment plus skills to work with it - a compression apparatus, a hose, a paint sprayer. Regular cans will not work. Great pressure prevents the creation of those very transitions, the subtlety of which determines the volume and reality of drawings on a large vertical surface.
3D paper paintings | Crafts Master
At first glance, these kinds of crafts seem to be products of incredible complexity, and I will not dissuade you from this. After all, you still have to work hard on them! And before you start work, the main thing is to understand the main principle of creating this kind of painting. How to make a 3D painting is the topic of today’s article.
How to make a picture out of paper
The name 3D itself suggests that the picture has not one layer, but two, three or more. The easiest way is to make a two-layer painting. For example, this birch tree: two layers of branches arranged differently create the effect of one whole, and this is achieved in the following way.
Each layer has a frame, which is made from the same sheet as the drawing itself. Thus, one frame is nested inside another, that is, it closes like a box of chocolates.
Birch on the wall
The figure shows that each picture has a corresponding pair. Simply print out the images, carefully cut out the design with a utility knife, then fold the frame along the fold lines and secure it with glue.
Then you insert both frames into each other.
3D paper paintings
But a painting depicting bamboo was made using the same principle!
3D bamboo
Bamboo on the wall
Recently, there has been a fairly fashionable tendency to create several paintings that continue each other’s plot.
Thus, completely separate paintings, hanging horizontally or vertically at a certain distance from each other, at the same time are one whole, although each lives a separate life. At the same time, most often you should follow a certain order in the arrangement of the pictures, so as not to lose the main plot and not get in return just a set of awkward pictures.
Experiment! Make your home beautiful!
Source
comments powered by HyperComments
masterpodelok.ru
Benefits and accessibility for self-expression
The advantages of this type of handmade creativity are obvious:
- economical, since the materials are available in every home;
- practical, because it uses what is often thrown away;
- accessible even for beginning craftswomen;
- durable;
- original;
- unique;
- Beautiful.
In addition to the above, such creativity is a wonderful option for self-expression and the realization of your fantasies, working together with children, as well as developing their creative imagination, perseverance and ability to work with fabric.
Do-it-yourself three-dimensional paintings: 3D technology in the house (52 photos)
We are looking for authors for our site who are VERY well versed in interior design. Contact by mail
05.12.2017
Interior decoration is the final stage of renovation or change of decor. Of course, exclusive decorations are valued above all else, but they are very expensive and do not always suit the decoration of the room. But many beautiful and modern things can be made with your own hands. For example, such a fashionable and unusual decoration as three-dimensional paintings. They can be made from a variety of materials: paper, cardboard, leather, wool, beads, putty. Undoubtedly, in every home there will be unnecessary leftovers from some kind of work, and the missing ones can easily be bought in craft stores.
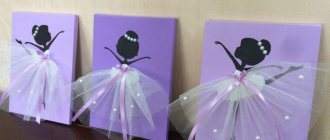
Three-dimensional paintings “Ballerinas”
Volumetric paintings made of paper
Do-it-yourself volumetric paper paintings
The easiest way to start is with a paper picture - paper is cheap, it’s easy to buy, and the range in stores is huge. To create a three-dimensional picture we will need:
- paper;
- stationery knife;
- scissors, paints;
- colored cardboard;
- PVA glue;
- frame with low sides;
- suitable plot.
Take the glass out of the frame and cover the backing with plain paper. It will serve as a background. Creating three-dimensional parts involves bending a piece cut out of paper or cardboard and partially gluing it to the background. Individual parts must be painted and allowed to dry before gluing.
Paper 3D painting
Three-dimensional painting made of wood
Butterflies, flowers, animal figures, and bouquets glued in this way look beautiful. The applique will be successfully complemented by individual elements made using the quilling technique. This is the name given to long strips of paper arranged in a composition, twisted into spirals. We will put the finished three-dimensional painting back into the frame and place it in a permanent place.
Three-dimensional painting in the nursery
Three-dimensional painting made of plaster
Volumetric paintings made of leather
To create such a picture it is not at all necessary to buy expensive new leather. Whole pieces from worn-out items will be used: bags, boots, raincoats and even gloves. Leather can be painted with acrylic paints if a suitable color is not found. In general, the technology for creating a three-dimensional painting from leather is no different from the same one from paper.
Three-dimensional painting in the living room
Three-dimensional painting in high-tech style
Volumetric paintings made of fabric
Each needlewoman has stocks of fabrics and many scraps left over from sewing. A good housewife will always find a use for them. Patchwork, a patchwork technique, has been known for a long time and combines the beauty of well-chosen patches and practicality. A skilled seamstress will be able to create from them a real work of art that you will want to look at for a long time.
Three-dimensional painting made of coffee
Volumetric fresco painting
roomplan.ru
Materials for work
What's so special about this technique:
- a 3D effect is created;
- quick execution, 3-4 hours is enough;
- no large investments are required, everything can be found in the creative workshop of any woman;
- such panels look good in any kitchen;
- this is a wonderful decoration for rooms in country or Provence style;
- You will always surprise your relatives and friends with a stylish gift.
For work, prepare:
- a sheet of foam plastic with a thickness of 2-2.5 cm and a density of 25;
- multi-colored scraps of thin fabric; coarse fabrics are not suitable for small details;
- sharp scissors;
- a diagram of the painting printed on a sheet of paper;
- carbon copy;
- stationery knife;
- felt-tip pen;
- PVA glue;
- ripper
DIY 3d painting
This decoration of the wall of your living room or bedroom will delight any guest who finds himself in your home. The 3D poppies are impressive and evoke true respect for the one who created this miracle. A minimal set of classic colors gives the painting a sense of style and modernity. How to make a 3D Maki painting - read on and follow the instructions in the photos.
Wall decoration
First, you will need to print out templates for all the components of the painting.
The secret to creating a painting with a 3D effect is multi-layering. You will have to use at least three layers. Cut each one out and overlap each other. To glue the layers, use thin strips of bulk tape (it should not be noticeable) or special glue drops, similar to those used by the author of the master class.
Here are templates of all the required layers and details for the real painting.
Print and cut out all the details of the picture from colored paper.
Collect in this order:
Three-dimensional picture
Paper painting
To create volume, gather the top petals of poppies a little, giving them a slight corrugated effect.
After all, the petals of a real poppy are so thin and delicate, almost transparent.
How to make a picture
Having glued all the petals, complete the decoration with the poppy core, which you should also work on.
This beautiful decor can be a wonderful gift for a sophisticated and refined nature.
Source
And:
lookathis.ru
steps
The best DIY home decorations: 110 photo ideas, an overview of the types and types of decorations. video of a master class on making home decorations
If you don’t know what exactly you can draw with a 3D pen or pencil, then start with the simplest. After all, making images look realistic is not at all so difficult, check out the photo tutorial below.
Stages of creating an image:
- Draw a figure using the same dimensions as shown in the photo, then select a triangle and a pentagon on the right.
- Draw parallel lines from the upper and lower corners of the pentagon, focusing on them, draw longitudinal and transverse lines. You will need to make a grid inside the pentagon.
- Draw steps at the bottom of the figure.
- Shade several areas with a pencil and pen.
- Finish shading the remaining areas of the figure.
- As you can see, volume can be added to a 3D pencil drawing by using various shading techniques.
Paper paintings: master class, volumetric paper omnitrix
Cutting out large multi-layered pictures from plain paper is an interesting hobby . If you decide to try your skills in this part of the art, start with simple paper paintings, the production of which will allow you to become familiar with the details of this type of craft.
We offer an easy and detailed master class, which will help you make a large picture cut out of paper with your own hands. This requires very little time, and the materials needed for the work can always be found at home.
Contents of the material
How to make a regular paper picture with your own hands
For work, we will need:
- Wooden frame.
- Paper blue, white, gold.
- Glitter in liquid form.
- Styrofoam.
- Wire.
- Stationery knife.
- Large tape.
- Glue, three different ones.
Process description
Before creating the picture, we will treat the wooden frame with white paint. It is easier to use aerosol paints. Remember that the front part of our product will be the back side of the frame . While the paint dries, you can move on to creating the background. To do this, cut out a rectangle from blue material. It must completely fit the internal dimensions of the frame.
On a white leaf, we will depict several trees with different intersecting branches. To make cutting easier, let's shade a couple of intersections with our pencil. Place a second leaf under the first leaf . Let's move on to cutting out the marked areas. After this, separate the leaves and trim the cuts with a knife.
Slowly fold the edges of both sheets to increase their volume. We will also tuck the tree trunks, creating small cuts and fixing them with our glue. This work is easier to do with an awl. Glue a couple of pieces of foam onto the bottom sheet, and then attach the second sheet to it. Space begins to appear between the paper snowdrifts, which gives the effect of layering and volume.
Now, using our stationery perforation knife, we make a couple of dozen round “snowflakes”. In the same way, cut out a couple of circles (circles) of different sizes from multi-colored paper. If we don’t have it, let’s start working with liquid glitter and make circles.
Let's cut out the moon in the form of a circle and animal figures , and make stars from the yellow material.
On the third leaf of our white material, we depict a tall tree with thin and long branches, and slowly cut it out. When all the details are done, you can move on to assembling the “cut-outs,” as paper paintings are also called. To do this, you need to glue the layers of paper on top of each other one by one.
We also recommend reading:
Our three-dimensional fake is done, it’s time to frame it. Measure the center at the top of the frame and screw the wire into the loop. Then we will pass a wire or rope through the loop so that the product can be hung on the wall. Glue a couple of strips of large tape inside the frame and place the picture evenly.
Craft completed! Now you can safely decorate your home with a paper painting you created yourself.
As you can see, with a little effort and patience, you can create unique paintings.
Gallery: paper paintings (25 photos)
3D paper painting, master class and diagram
To make a 3D picture we will need the following materials and certain simple tools:
- A large frame or a nice box of chocolates.
- A special knife or knife for decoupage.
- A simple pencil.
- Sharp scissors.
- Leaf with print.
- A sheet of white specialty paper or small cardboard.
- Ruler.
- PVA glue.
- First stage. We start by making a blank from white special paper or thin cardboard, in accordance with the dimensions of the selected frame.
- Second phase. Separately, on a piece of strong paper, draw by hand or print using a printer a small heart, measuring four cm in height and five in width. We calmly cut out the sketch we have made along the contour and get the template needed for making a 3D painting from paper.
- Third stage. Next, we apply the created template to our paper blank and trace it in a row a couple of times horizontally and vertically. In the end we will have an image with nine identical hearts. You may get more or fewer hearts, it all depends on the size of the picture frame and the base, according to which we cut everything out.
- Fourth stage. Then, taking a stationery knife or a decoupage knife , we create cuts on both sides of each heart made, leaving only the top and bottom middle of each image untouched.
- Fifth stage. After this, slowly bend both halves of each cut out heart to one side, so that it looks voluminous in appearance.
- Sixth stage. We will paste the created blank with large hearts onto scrap paper with a small print, so that it is visible through the holes made.
- Seventh stage. We insert the finished 3D paper painting into a frame and complete the work on its creation. In approximately the same way, you can make a picture from an accordion, the main thing in this work is that a person knows how to correctly assemble and cut out parts from paper.
Conclusion. Don’t be afraid to start making paper crafts; after simple products, you can start making paintings of flowers, and then you can also sell them.
Methods for creating a three-dimensional image effect
Pictures with a 3D effect are formed in various ways. Images on glass are the most popular. In addition to the usual format, modular sets are often found among them. Photo printing with a volume effect looks interesting; canvas and plastic sheets are used for these purposes. The painting created by the brush of a master always amazes the imagination. The category of 3D paintings includes decorative items not with visual, but with real volume, created by the hands of craftsmen. For these purposes, various materials are used, ranging from paper, beads and satin ribbons, to putty and leather.
Images on glass
Popular interior design trends include paintings under glass. The formation of a three-dimensional image seems to be a complex process only at first glance. In fact, creating a popular decor item requires creativity coupled with the right technological equipment. The initial stage of the process is printing the selected design on film. The second stage is to fix the picture face down on the glass.
Modern interiors welcome laconicism, so there is often no frame. The picture looks equally impressive in daylight and evening light.
Attention! When choosing a subject, be prepared that the white areas of the image will give a slight greenish tint after being applied to the glass.
The painting is fixed under glass on the wall using a remote holder. When choosing, they focus on the interior of the room; fasteners are found in nickel and gold with a matte or shiny surface.
Photos show beautiful 3D paintings for the home:
Canvas with photo printing
An image with a volume effect created on canvas using photo printing looks no less attractive in the interior. This sought-after decorative element is ordered from specialized companies. The consumer has the opportunity to choose a drawing from an extensive catalog, design his own photo in an original way, or become the owner of a famous reproduction.
The volume effect is formed thanks to special technology, when using eco-solvent printing the selected pattern is applied to cotton material. Subsequent modifications depend on the customer’s preferences:
- The panel on a stretcher looks modern and laconic in the interior. The canvas is stretched over the frame, as a result of which the continuation of the drawing can be seen on the sides of the picture. There is no traditional frame in this case.
- A classic of the genre is an image framed with a beautiful baguette. The customer has the opportunity to choose the width, shade and suitable pattern for the 3D painting, focusing on the interior of the room for which it is intended.
- Varnishing prolongs the attractiveness of the canvas and brings the painting closer to a real work of art.
- Drawing with a special gel or acrylic paints helps ensure maximum correspondence of the drawing to a realistic image.
- Individual subjects acquire sophistication when the service of imitation of antiquity is used.
In addition to the usual images on one canvas, volumetric printing can be designed in the form of a modular painting.
Available plastic
The interior of a youth cafe or a teenager’s room will be decorated with a three-dimensional design based on plastic. The image creation process includes the following steps:
- Self-adhesive film with a photo is fixed on PVC.
- The panels are laminated with an additional film, the surface of which can be matte or glossy. This measure will prevent damage to the image and add shine.
- The three-dimensional drawing is additionally framed. Depending on the overall interior, plot and color palette of the picture, it is decorated with a matte frame made of aluminum or metal imitating gold.
Examples of interiors with paintings on plastic are shown in the photo:
Special painting technique
The most complex and expensive way to achieve a three-dimensional image. Painters began creating masterpieces with a 3D effect relatively recently. The artists’ abilities amaze even the most experienced viewer. The interior of the room will definitely benefit from purchasing such a work of art.
Plane-breaking rhombuses
This drawing requires a diamond-shaped template. The diamonds are arranged in a checkerboard pattern and painted along the contour. The result is ambiguous and definitely breaks the even plane of the wall.
These are just 7 of the simplest examples of three-dimensional patterns on the walls. Agree, making them is not at all difficult, and you can definitely do it. Just remember to wear gloves: spray paint is very caustic and it’s difficult to wash your hands afterwards. And it is advisable to wear a mask during such work so as not to inhale the fine mixture.
It is possible that once you try to draw on the walls, you will no longer be able to stop and will train your artistic talent. Perhaps one day you will be able to create masterpieces like the ones in this video:
Watch this video on YouTube
PHOTO: YouTube channel Kotresh Koti
Previous STORIES We simplify the work of the master: a nail puller attachment for a screwdriver with our own hands Next STORIES It's time to forget about calluses on your hands: an automatic gun for sealant
Yarn – String Art
The string art technique is an original painting technique using hundreds of pins nailed to a plate and wire pulled over them. You can use any yarn, as long as it is reliable.
You need to tighten it thoroughly, otherwise, over time, the threads will stretch and the craft will lose its attractive appearance. Carnations are stuffed at a distance of up to one and a half cm from each other.
The product turns out transparent, so a background of the opposite shade is desirable. Such decoration, embodied on oval plywood or a ring, can represent bright symbolism or a dream catcher.
Denim creativity
You can create beautiful paintings from denim, or from denim fabric. They are made voluminous by combining different shades of this durable fabric. They make such paintings as ordinary appliqués from fabric. They select a plot, prepare a lot of scraps and glue them to the base with glue.
Artist Ian Berry has created many such works, we invite you to be inspired by his work.
Technique, examples
Textile painting varies greatly in design and style. It can look like a mosaic painted on Chinese silk, a panel, a three-dimensional pattern. The technique of creating paintings originated in the Japanese Empire, and then in Great Britain and the United States and the Russian Federation.
All possible types of execution of smooth and convex reproductions from the manufactory:
- kinusaiga;
- osie;
- patchwork quilt;
- quilling;
- string art;
- from openwork weaving;
- from felt;
- damp cloth;
- from jeans;
- 3D version.
Always make a sketch on paper with a pencil, then select the type of execution that is especially interesting to you.
Wet cloth
The fabric drapes quite easily. This property has found application in the creation of natural elements in paintings. Fabric moistened with paste is placed on the base (plywood) and draped by hand in the necessary places. This technique allows you to create clouds, water ripples, mountain range wrinkles and clothing on human figures. The remaining parts of the picture are drawn and supplemented with various natural elements. The technique is so simple that it is suitable even for beginners.