Almost every apartment has paintings or photographs hanging on the wall. But if you just stick a piece of art to the wall, it won't look good. For this purpose, frames were created - the design of paintings and photographs. They allow you to improve the design of the room by adding a little coziness.
Stores sell various frame options, but not all of them are suitable for a specific interior. Therefore, many craftsmen prefer to make such frames themselves, using different types of materials. This article will tell you more about how to make a wooden photo frame with your own hands.
DIY wooden photo frame
Design selection
Before you begin the frame manufacturing process, you need to decide on the design of the future product. When choosing a design, attention should be paid to the following nuances:
- will the finished frame fit the overall interior of the apartment;
- the frame should not match the walls of the room, but the image;
- the finished wooden frame should complement the photo or painting.
DIY craft - photo frame made from twigs
To achieve the desired result, attention should be paid not only to the design of the future structure, but also to the material from which it will be made. The frame can be made from various wooden products, for example, from sushi sticks or old unnecessary boards.
DIY photo frame made of wood
How to decide on the size
It is determined by the interior of the room in which you will hang the picture, and the actual size of the picture itself. If the canvas is small, it does not need a large frame with a wide mat.
Process Features
There are no restrictions as such when choosing material for the frame. The base can be made from different items, and choose decorative decorations at your discretion . The only condition is that the material must be strong and dense. The simplest option is old boards, from which you can easily make a frame of different sizes. The finished product needs to be painted or varnished so that it fits perfectly into almost any interior.
DIY photo frame
For decoration, improvised means can be suitable, for example, beads, small clothespins, sea pebbles or even pasta. You need to choose the material for decoration so that the finished frame complements the picture. For example, if the photo was taken on the beach, then it would be logical to decorate the frame with small shells or pebbles.
Original options for photo frames
Hidden Thorns
A rectangular tenon joint looks the neatest because the tenons are completely hidden.
Insert the tenons across the joining seam and as close to the inside of the frame as possible. The holes for the tenons are first drilled on one strip. Then, using marking pins inserted into the finished holes, the locations for drilling in another strip are determined.
There is another way of marking: small nails are driven into the bar, then they are bitten off with pliers. When two planks are tightly joined, the protruding tips will leave the necessary marks on the second workpiece.
Two or three tenons will add extra rigidity to any joint, even large, heavy frames.
Only with an exact match of the holes for the insert tenons can you obtain a perfect rectangular connection from two frame parts.
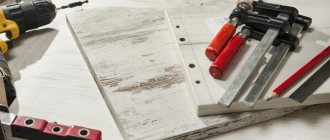
Preparing tools
As the main material, you can use various wooden products, for example, plywood or parts of pallets. You can easily make frames or other products from them. After choosing the design of the future frame, you need to prepare working tools.
Preparing tools
Table. Tools for making a wooden frame.
| Position name, photo | Description |
| Wooden elements | Various wooden options will work, such as popsicle sticks, unnecessary slats, or part of a pallet. Alternatively, you can buy ready-made wooden baguettes and make an elaborate frame out of them. |
| Fasteners | You can use wood glue or special finishing nails to join individual pieces of wood together. If the structure is very large and reliable fixation is needed, then these types of fastening can be combined. |
| Saw and miter box | Using these tools, you can cut pieces of wood at a certain angle, which is very important when creating a frame structure. The resulting joints are of the highest quality, which has a positive effect on the appearance and reliability of the frame. |
| Clamp | If you plan to seriously engage in the manufacture of frames in the future, then a clamp will allow you to obtain ideal quality products. It is needed to press the parts of the structure while gluing them, thereby maintaining the ideal geometry of the wooden craft. |
Note! Be sure to buy paints and varnishes to process the finished structure. For this purpose, acrylic paints, stains, impregnations, varnishes or other wood compounds can be used to give the frame an elegant appearance.
Master class: birch bark photo frame
Natural color
There are a stunning variety of photo frames with this theme. And almost all of them are made at home, using absolutely any natural materials.
Decorating the frame with moss, pine cones and acorns
While relaxing on the sea coast, do not forget to collect beautiful shells. Buy a regular frame and have a glue gun ready. From everything you have, first assemble the composition on a separate piece of paper. Carefully transfer your creation, insert your best vacation photo and enjoy the memories.
To decorate such a frame you need shells of various sizes.
And while walking through the forest, you can pick up not only mushrooms and berries, but a lot of material for decoration. The easiest option would be to take a cut of a small stump or a piece of tree bark. Treat the surface of the wood with termite repellents and varnish. And try a frame in the form of an ethnic wattle fence. To do this, you will need to collect small but elastic branches.
To decorate a small frame you will need a branch no more than a meter long, which must be peeled and cut into rings
Plywood photo frame
One of the simplest options for making a photo frame is using a plywood sheet. Thanks to its simple design, you can make such a frame in just a few steps.
Step 1. Prepare all the necessary tools for work.
Tools and materials
Step 2 . Paint the pre-cut boards some color, preferably dark tones.
Painting details
Step 3 . Wait a few minutes for the paint to dry.
Wait for the paint to dry
Step 4 . Apply double-sided tape to the wooden board.
Double-sided tape attached
Step 5 . Remove the backing from the double-sided tape.
Removing the backing
Step 6 . Carefully place your photo onto the tape.
Photo is pasted
Step 7: Adjust the dimensions of the photo if necessary - you may need to trim the edges of the photos so that the dimensions exactly match the dimensions of the frame.
The edges of the photo may need to be trimmed Cropping a photo
Result of work
Step 8 . That's all. The plywood photo frame is ready.
Finished frame You can make several of these frames
Such products are beautiful and elegant, and they are very easy to make. All that remains is to hang the finished craft on the wall and enjoy its look.
What will you need?
Today, photo frames are considered one of the most functional decorative items, since they not only allow photographs to be transformed, but are also a worthy interior decoration that attracts the attention of guests. Despite the fact that the market is represented by a huge range of these accessories, many prefer to make them with their own hands, as it is much cheaper and allows you to turn any design idea into reality
Before you start making such a craft, you need to not only decide on its color, shape, size, design, but also prepare in advance:
- for the base of the structure - paper or cardboard;
- for fixing parts - a brush with soft bristles, PVA glue;
- to prepare a template and cut out elements - a marker, ruler, scissors;
- all kinds of decorative “little things” (beads, pebbles, rhinestones, shells, multi-colored glass, peas, eggshells and coffee beans).
In addition to all of the above, you will need water, tweezers, a spray bottle, a paint brush and a can of paint (if you plan to paint).
Popsicle stick photo frame
Popsicle stick frames are beautiful and easy to make. Even children can make such crafts and give them to friends, family members or teachers. With a little time, you can also create your own stick frame.
Simple option
Step 1: Find 4 Popsicle sticks. You will need one stick for each side of the frame. If you need a thicker frame, glue 2 sticks together to make one wide one.
Popsicle sticks
Step 2 . Glue the sticks together to form a square and wait for the glue to dry. To do this, use regular PVA glue.
Gluing sticks
Step 3 . Paint and decorate the frame. This can be done using markers or acrylic paint. Let the frame dry and then decorate it. You can write something on the surface of the product, such as “Daddy and Me” or “I love you, Mommy.” You can also glue items such as glitter, gems or buttons onto it.
The frame of the product is decorated
Step 4 . Place the finished frame on the photo and trace it from the inside using a pen. Photos can be valuable, so it's best to use a copy instead of the original.
Marking is being applied
Step 5 . Cut out the photo. Try to go a little beyond the line you drew. This way your photo won't stick out from the frame.
Photo cut out
Step 6 . Glue the photo to the back of the frame. This manipulation will make the frame and photograph a permanent structure.
Pasting photos
Step 7 . Add ribbon to the back of the frame if you want to hang it on a nail. Cut a piece of tape, flip the frame over, and apply some glue to the top left and right corners. Press the ends of the tape for a few seconds to secure the tape. Let the glue dry and then hang the frame.
The tape is fixed at the back
Step 8 . If you wish, you can glue magnets to the back of the frame so that it can be attached to the surface of the refrigerator instead of a wall. Turn the frame over and apply some glue to the top and bottom of the frame. Press the magnet and wait for the glue to dry. Place the frame on the refrigerator door.
Gluing the magnet
Step 9 . The popsicle stick photo frame is ready. If desired, it can be hung on the wall or attached to the metal surface of the refrigerator.
This is what the finished craft looks like
Reusable frame
Step 1 . Line up 8 popsicle sticks side by side. Lay them horizontally. This will form the basis of your photo. You shouldn't glue them together.
8 popsicle sticks
Step 2: Use a hot glue gun to glue three sticks on top of the horizontal sticks. Place three sticks vertically. Glue one stick in the center of the base of the frame. Glue the other two sticks to the left and right of the base. This will serve as the basis for the entire structure.
3 more sticks are glued on top
Step 3 . Turn the frame over and place a photo of the appropriate size. Place the photo in the center of the design, but do not glue it. You will use the photo as a template.
Photo is placed
Step 4 . Draw a vertical line of glue on both sides of the photo. Make sure the line goes from the bottom of the frame to the top. Be sure to leave a small gap between the glue and the edge of the photo. This way the glue won't get into the photo.
There should be a gap between the glue and the photo
Step 5 . Place the popsicle sticks on the glued surface and press them with your fingers. Hold the chopsticks upright. Make sure the inside edge of each stick overlaps the photo. This will help secure the photo inside the frame. Otherwise, it will simply fall out.
Sticks are pressed with fingers
Step 6 . Glue one stick on top and bottom of the frame base. Apply glue to the surface of the sticks to be glued and fix them in the position as in the photo.
The same is done at the top and bottom of the frame.
Step 7 . Place three sticks on top of each other and secure them with glue. Make another element as in the photo. These will support the bottom of the frame so it can stand.
Creates additional frame support
Step 8 . Glue each stack to the bottom of the frame base. One of them will be in front of the photo, and the other will be behind. This will make the entire structure more stable.
This will make the frame more stable.
Step 9 . Decorate the finished product. Paint the frame and let it dry before decorating. You can write something on the surface of the frame, such as a name or a short message. You can also glue on various small objects, such as glitter, gems or buttons.
The frame can be further decorated
Step 10 . Slide the photo across the top of the frame. To put another photo or image, simply pull it out and replace it with a new one.
A photo is inserted at the end
Natural materials
Tastefully decorated frames in a natural style always attract attention. After all, we are all children of nature
Coffee beans, lentils, acorns
Everything can go into action and create unique compositions. Coffee beans will be useful to you not only for making an invigorating drink, they turn out to be an excellent material for decorating a photo frame with your own hands: they have a wonderful smell, an original texture, a noble color, and they do not spoil. The work won’t take much time either: it’s not so difficult to use a glue gun or PVA glue to tightly line a standard photo frame with coffee beans, which in its new guise is guaranteed to become a leading interior accessory.
A similar thing can be done by replacing coffee beans with lentils, pumpkin seeds, acorns, corks and just chopsticks
Creative craftsmen do not ignore ordinary pine cones: they use pliers to separate each scale and paste over the frame. A labor-intensive task, of course, but worth it - it turns out very beautifully
The work can be varnished.
Shells
This is one of the rewarding materials for decorating a photographic frame with your own hands. For decoration you need shells of various shapes and sizes. In addition to shells, it is appropriate to use interesting glass, sea pebbles and other finds made on the sea or river bank in inlay.
Paper
When creating an exclusive frame with your own hands, you can use paper, which under normal circumstances would face the sad fate of waste paper. Very original photo frames are decorated with paper tubes from newspapers and magazines that have served their purpose.
They can be either short (we stick them on the end) or oblong – we use them in a horizontal position. Another decor idea: birch bark is a very impressive type of natural material. Cut a piece of birch bark into five strips. Four will become the actual frame, the fifth can be made into a stand.
Salty dough
You can turn an ordinary photo frame into a designer one using salt dough. Everyone has their own ideas: some will decorate it with flowers, while others will add the name of the child shown in the picture. But first you need to make this very dough: knead it from a glass of salt, two glasses of flour and water. Having achieved the consistency of plasticine, start sculpting the intended decorative elements right on the corner of the photo frame - this way the dough will take the desired shape at the base, and you can easily glue it to the right place. Place it in the oven for 20 minutes. Let it cool, glue it to the frame and begin painting with any colors. You can even limit yourself to one from an aerosol can. The final stage consists of varnishing (it is better to do two layers) and drying.
Wooden half frame
Another option for making a photo frame using wood. Such a product can fit into more modern designs, and its manufacture does not require special skills. It is enough to follow all the rules and recommendations.
Tools and materials
To create a half frame, prepare the following:
- photo in the size you choose;
- two light wooden strips;
- a piece of fabric;
- natural rope;
- special eye screws large enough to pull the rope through;
- some polymer clay;
- stapler;
- universal glue;
- scissors;
- pencil and knife.
Making a wooden half frame
You also need to prepare a ruler or other measuring instrument. Once everything is ready, you can start working.
Instructions
Step 1 . Set the recommended temperature to preheat your oven to make polymer clay. Then, using a knife, cut the clay into two even pieces. Roll them in your palms to form smooth balls. Use a pencil to make a hole. The diameter of the hole should be slightly larger than the thickness of the rope. Place the finished clay on a baking sheet and bake for a few minutes until the material hardens.
A hole is made in the ball
Step 2 . While the clay is baking, use a cloth to rub the varnish or stain into the wood, giving it a deeper shade. Don't forget to add old sheets of paper to avoid damaging your home surface. Leave the wood until completely dry.
The wood is given a deeper shade
Step 3 . Take one of the wooden strips and, measuring about 3 cm from both ends, make marks with a pencil.
A wooden strip is marked
Step 4 . Screw both eye screws into these points until they are tight.
The eye screws are tightened
Step 5 . Place the top of the photo or painting face down on the top strip of wood (with screws). This will be the back of the picture. Carefully align the paper so that it is centered and straight. Then secure the canvas with a stapler and glue.
The paper is neatly aligned
Step 6 . Place both clay balls onto the rope and thread the end of the rope through one of the eye screws. Tie a tight knot and then do the same on the other side. Remove any excess rope and use all-purpose glue to secure the edges. This will protect the clay balls from wearing out and the knot from coming undone.
The edges of the nodes are fixed with universal glue
Step 7 . Now all that's left is to hang your new wall art in a place of honor.
The finished frame is hung on the wall Photo of the half-frame Another photo of the craft
The simplest children's crafts - photo frames that a child can make himself
A 6-9 year old child is very eager to do everything on his own. This quality is worth developing both in everyday activities and in handicrafts. You should trust the child to do the craft himself, without the help of adults. But for this you need to choose the appropriate difficulty level. At first it may be simple applications from colored sheets, but over time it is worth moving on to more interesting materials.
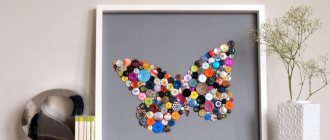
For example, you can make a photo frame and decorate it with buttons.
Necessary materials:
- corrugated cardboard;
- 2 sheets of A4 white cardboard;
- scissors;
- glue;
- buttons of different shapes, sizes and colors;
- pencil;
- ruler.
Frame making scheme accessible to children:
- Draw a frame silhouette on the back of regular cardboard. Cut out the shape.
- Make another such part from a white sheet, but make a hole for the photo card. Repeat these steps using corrugated cardboard. There should be three parts in total: 1 solid white, 1 white with a compartment and 1 brown with a similar slot.
- Glue two frames together. Glue must be applied around the entire perimeter, not forgetting the corners.
- Using all-purpose glue, add buttons. You need to place them very tightly, moving from top to bottom.
- Apply glue to the reverse side of the decorated part from the bottom and sides. Attach a white sheet base. There should be a slot at the top to place the photo inside.
Pallet picture frame
If you don’t know what to give to a friend or loved one, then a frame made from a pallet is a great gift. To make it, you don’t need any special tools or skills, so anyone can make such a picture frame. You just need to follow the step-by-step instructions below.
Step 1 . Find a whole pallet or small parts of it. Select four small boards to form the frame and make sure they are all long enough.
The boards must be long enough
On a note! If you have spare parts from an old pallet, you can use them to decorate the finished structure. They may also be needed if you made mistakes while working.
Step 2. Decide on the photo size. Take measurements and use them to control the wood you cut.
You need to decide on the size of the frame in advance.
Step 3 . Cut the wood pieces to size. Using your measurements, cut the pieces of wood to the width and length you need for the frame.
Elements of the future frame
Step 4 . Sand the surfaces of the wood pieces using a plane (or have someone do it for you). This must be done with each of the blanks.
Workpieces need to be processed
Step 5 . Form a square frame on a flat surface. Glue the four pieces together at the junctions. Use clamps to tightly connect the parts. Aim for a very neat and tight fit at every corner. Clamps (such as clamps) will help create the necessary pressure. Leave until the glue is completely dry before removing the clamps.
Glued frame
Step 6 . Apply varnish to the surface of the frame. If you want to decorate it, then after varnishing the product can be painted in different colors.
Frame after applying varnish
Step 7 . Glue a thick piece of cardboard to the back of the frame, leaving the top part unglued. The picture or photograph will need to be inserted into the frame through the top. Glue some string to the back and hang the finished frame on the wall. Instead of a loop, you can make a cardboard leg that is attached to the back of the product.
Corrugated cardboard is glued to the back
Step 8 . Insert the photo and hang the frame on the wall in a suitable place. Everything is done, all that remains is to enjoy the result of the work done.
Finished photo frame
The old fashioned way
Artists painted pictures when there was no trace of mechanization of production and mechanized tools. Since those ancient times, the traditional design of frames for prestigious paintings of high artistic and material value has developed.
The carved wooden frame with the painting is shown in section and from the back in pos. 1 pic:
Traditional expensive picture frame design
Mechanically (technically, structurally) its essence is that the main force load (including from the frame) is borne by the painting’s subframe (a frame made of wooden beams on which the canvas is stretched); The stretchers of large canvases are reinforced with crossbars, steel corner plates or plywood gussets. In the event of a painting falling, the frame acts as a collapsing damper - it falls into pieces, but the canvas (perhaps of immeasurable value) remains intact or, at least, suitable for restoration.
Such frames are made individually for paintings. The stretcher with the canvas is inserted into the frame and secured in it, using traditional technology, with small wooden wedges. The rope suspension is attached to the subframe.
Just because of the carved wooden frame alone, its cost is truly royal. The frame parts are connected by joinery joints, bevel tongue and groove (positions 2 and 3 in the figure on glue, and then the frame is held together in a wedge wedge, position 4. The whole technology requires a well-equipped carpentry workshop and worker(s) with solid carpenter skills -cabinet maker. This did not bother the medieval customers at all, on the contrary - since he can afford to order or buy a painting, then the frame should match it. A unique frame, a work of art in itself, frames the painting of the great master, and this lord (sir , sir, Herr) their owner - isn’t this evidence of nobility and dignity?
The original oil painting is still of great value, but line monochrome images and drawings (engravings, etchings, watercolors) in the old days were quite widespread in the homes of the middle classes and the poor. Works of applied art - embroidery, applique, modular (from real objects) compositions even more; The human attraction to beauty is eternal and ineradicable. Simpler pictures were inserted into cheaper frames made from profiled wooden slats; While there were no wood milling machines, the slats were planed into profiles manually using special planes - zenzubels - with shaped pieces of iron. Slatted picture frames are still in use today, but to make them you still need an equipped carpentry workshop, see for example. video:
Video: simple and durable picture frames (in the workshop)
Frame passe-partout Modeling design of MK stands for frame Cardboard Oilcloth
I needed an A4 frame, but I couldn’t find one with a stand to put it on a table, only one with loops to hang it on the wall. So I decided to make the stand myself.
I cut out 3 templates like this (you can do more, depending on how heavy the frame is)
And 2 such corners (a rectangle made of cardboard was bent in half)
I glued the templates together and glued the corner on one side and in the same way on the other side.
It should look like this.
I covered this blank with self-adhesive film and glued it to the frame.
Maybe it will be useful to someone.
Thanks for the tip, for some reason I’m having problems, I’ll try the same as yours.
it will come in handy.
I didn’t even have to look, I just came in and here,
I'm glad I posted my MK on time! It was probably you who gave me a sign with your thoughts, the photographs were stored in the camera for a long time, and today I decided to throw them off and post them in the Country. Exactly, magic)))
and I have a question for you,
or does it just seem that way?
No, it doesn’t seem like it))) This is a self-adhesive film, and I painted over the ends that were not sealed with gouache.
Thanks, I'll have to try it!
Thanks a lot. Super MK. Always useful.
It will be very useful! Thank you! I was looking all over the country and here was this idea.
Please use it! I'm always glad when my ideas are useful to at least someone)))
Thanks for the great idea!
Can I ask you: are your blanks made of regular paper or cardboard? :)
Source