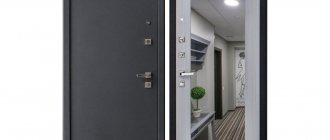
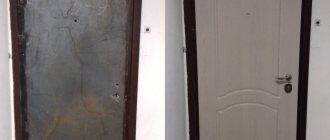
A metal entrance door is a reliable structure that protects the room from access by unauthorized persons, increases the level of energy efficiency, and is also part of the interior of the hallway or hall. As a rule, metal sheets are supplied complete with a framing box, locks and fasteners. After installing the enclosing structure, the owner of the premises thinks about how to select and install extensions on the front door.
Materials for additions
Extensions to entrance doors installed in apartments, private residential buildings or office premises are made from the following materials:
- Natural boards made of pine, oak, beech, birch, teak and other types of wood. As a rule, they are coated with translucent paints and varnishes that emphasize the structure of the material.
- Synthetic materials containing wood components - chipboard, MDF or fiberboard. Covered with laminated film with a selected texture and shade.
- Drywall - additions are arranged in cases where the design project involves finishing the opening using interior paints or wallpaper.
- Galvanized steel sheets with powder coating are optimal for technical premises, as the material has a high level of wear resistance and durability.
- Plastic linings - most often, economy class rooms, or balcony and terrace doors made of PVC profiles are finished in this way. They can have a traditional white color, or be covered with a laminated film.
- Porcelain tiles and glass frame elements are suitable for use in public kitchens in restaurants, cafes or hotels. They are quickly washed off from grease and dirt, and can be easily disinfected using various chemicals without damaging the surface.
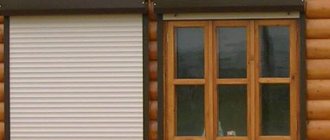
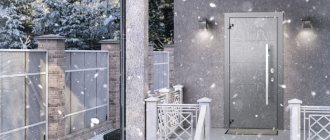
- Sandwich panels are an excellent solution for entrance doors to a private house from the street. The part is an effective insulation material, most often made of extruded polystyrene with metal or plastic protective sheets. They can be coated with different paints and varnishes or polymer textured films.
To select the right material, it is recommended to take into account not only the style of the room, but also the characteristics of the temperature and humidity conditions of the door structure.
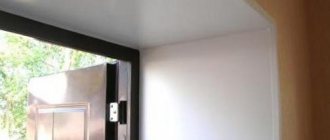
Methods for finishing slopes
You can trim slopes in different ways:
- Cement and carefully putty;
- Install slopes from a sandwich panel. This is an inexpensive type of finishing. But sandwich panels are fragile and short-lived.
- Install MDF slopes. This is a more expensive and at the same time reliable method of finishing. MDF slopes are more durable. In addition, they can be matched to the color of the door. Torex produces slopes that fully match the selected door model in color and texture.
You can perform any of these options either independently or with the help of professionals. You can order the installation of MDF slopes from a certified Torex team. In this case, we guarantee high quality of work performed. Since installing MDF slopes is the most complex and time-consuming, you need to know a number of nuances. If you decide to do this yourself, use our instructions.
Extension design
All framing elements for entrance doors are classified into 3 categories, according to design:
- Without finished edge. They are ordinary boards or MDF panels that can be cut to any size. When ordering such products, it is recommended to think in advance about the framing of the opening to cover the ends.
- With finished edge. Linear flat panels with a laminated coating, the ends of which are factory processed. These products can be installed without additional framing of the opening on the plane of the internal wall of the room.
- Telescopic. Complex structures that are supplied ready-made from the factory. They are equipped with a “groove-tenon” system, which guarantees a tight fit of adjacent parts to each other according to the design principle.
If the extensions are purchased before ordering and installing the door, it is recommended to choose products without edges with platbands covering the ends of the elements, since in this case the risk of size mismatch is eliminated, and the user can independently adjust any size.
Installation of telescopic extension strips
It is advisable to install a telescopic extension if the frame and platbands have a tongue-and-groove fastening. If you have a stationary circular saw and the appropriate skills, you can cut the tenon yourself.
Installation of finished structural elements is carried out without any particular difficulties. The planks are installed one by one in place. By adjusting the tenon-groove seating depth, the product is aligned along the plane of the wall and the joint line with the frame. Then we protect it from spacers in the standard way - with spacers or construction tape, moisten the dust-free surface of the opening with water, and fill the space with sealant.
How to make extras with your own hands
It is recommended to purchase extensions for framing doorways from the supplier, since factory production ensures quality and long service life. If this is not possible, these products can be made with your own hands, subject to the availability of certain tools and compliance with the following technological map:
- The doorway is measured along the perimeter and width.
- The master develops a preliminary design with joints of materials.
- The required material is selected. When purchasing boards made of natural wood, you need to pay attention to the percentage of moisture content in the structure of the lumber. Before purchasing MDF panels, you need to check the quality of adhesion of the laminated layer to the base.
- It should be noted that the extensions do not serve any constructive function and serve solely for decorative purposes, as well as to increase the level of energy efficiency of the room. In this regard, it is not recommended to purchase boards with a thickness of more than 20 mm.
- The boards are laid out on the floor and marked, according to the design, using a square, ruler and pencil.
- The material is cut strictly according to the applied markings.
- In the places where the jumper parts meet the risers, the ends of the extensions are sawed at an angle of 45 degrees, for which you may need a hand saw with a fine tooth and a miter box, or a special cross-cutting machine with a rotating bed.
- The free ends of the products are polished until a flat plane is achieved.
- The finished extensions are tried on in the opening.
- If necessary, the products are modified.
- At the final stage, the master primes and covers the panels with paints and varnishes, or sticks a laminated film on them.
When independently producing several similar extensions, it is recommended to assemble a slipway or jig in advance, which eliminates the accumulation of errors and allows you to assemble identical extensions.
How to install accessories correctly
All experts recommend following a certain algorithm when installing accessories. Installation begins with vertical posts, and at the final stage the horizontal part is installed at the level of the lintel. There are several ways to fix extensions, each of which has a number of distinctive features:
- With installation on the door frame. The extensions are mounted on corners or special brackets, which are installed using anchors to the elements of the supporting structure of the front door.
As a rule, such extensions are supplied for plastic or wooden enclosing structures, since when installing products on steel boxes using this technique, there is a significant difference in the coefficients of thermal expansion, which causes deformation of the material.
When purchasing accessories for fastening to a door frame, it is also recommended to take into account the design features of the leaf and its supporting part - extra holes can cause a weakening of the structure or a decrease in thermal characteristics.
- With installation on the end of the doorway. Products are fastened in one of two ways - using polyurethane foam, liquid nails or other adhesive compounds, or using dowel-nails, which are subsequently closed with decorative plastic plugs.
This type of installation is the most popular; it does not require the construction of additional structures or intervention in the structure of the door frame, which eliminates the formation of cold bridges and a decrease in mechanical strength.
- With the installation of framing elements on a special frame. Most often, galvanized or plasterboard additions are installed using this method, which require a subsystem and filling the resulting cavity with insulating materials - polystyrene, mineral wool or polyurethane foam.
The frame is a structure made of galvanized or steel profiles of a closed, U-shaped section, securely fastened to each other.
Mounted on anchor fastenings, or on dowel-nails, guides and distribution parts create a single alignment that makes it easy to mount the finishing surface of the panel.
They require additional space, which must be taken into account when preparing the opening and ordering the door.
The choice of a specific installation method depends on the width and height of the opening, the material, the presence of structural and functional requirements for the room, as well as the need for an additional heat or sound insulation layer.
Types of framing
We have figured out what a door accessory is, now let’s find out what types it comes in.
Products are divided according to the following parameters:
- Type of construction;
- The material from which they are made.
Diagram of the telescopic structure
Construction type
There are two types of product design:
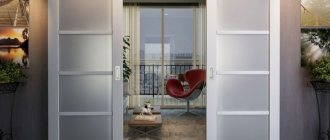
- Telescopic door extensions - the name of these models speaks for itself. Their main feature is the ability to adjust the width to the depth of the opening. This possibility is realized due to deep grooves and tongues of individual structural elements - panels and platbands. As a result, you can install extensions on a wide doorway or a narrow one without resorting to trimming;
- Edged - have a fixed width, which is slightly larger than the width of the opening. Therefore, before installation, the excess part of the panels is cut off.
Wood panels are the most durable and durable
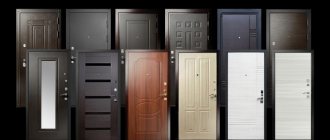
Material
As for the material, the following types of products can most often be found on sale:
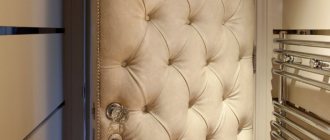
- Solid wood door panels are the most expensive, but have some disadvantages, such as the possibility of deformation and cracks, especially if low-quality wood was used. The surface of the panels can be covered with veneer of expensive types of wood, as well as varnish, impregnation or paint.
The advantages include the possibility of restoration, which increases their durability;
MDF is a pressed board made from wood chips
- Made from MDF, they are a cheaper option for additions, but visually they are not inferior to their wooden counterparts. Let us remember that MDF is a pressed board made from wood chips, denser and more uniform than chipboard. The surface of such panels can be veneered or laminated, i.e. covered with PVC film.
MDF products reliably imitate wood
MDF is a less moisture-resistant material than solid wood. In addition, such panels are practically impossible to restore. But they do not crack and have a more stable shape, and their price is usually lower than their wooden counterparts.
As you can see, all types of products have their pros and cons. Therefore, you must decide which of the above options you prefer.
The nuances of installing extensions without a groove
Extensions without a machined edge are more difficult to install, since the master must take into account a number of important nuances when installing products of this category:
- It is necessary to carefully measure the installation depth from the box to the nearest adjacent plane.
- It is recommended to install such products on a frame made of bars or galvanized profile elements.
- The extensions should not be attached to liquid nails or polyurethane foam, since the slightest temperature difference can cause the elements to bend and form a visible joint.
- When installing extensions from natural boards, provided that the thickness of the wall requires the installation of several boards in width, it is recommended to refine them to a perfectly smooth plane after fastening them to a static position.
Before installing such additions, it is also recommended to arrange mechanical fastenings of the boards to the frame elements at least every 400 - 500 mm along the entire length, which will reduce the risk of their deformation even during long-term use.
The nuances of installing and joining extensions with metal entrance doors
For successful operation of framing elements on a metal door, it is recommended to take into account a number of important details in advance:
- Installation should be carried out only after fixing and foaming the door frame.
- Before cutting or ordering elements, it is necessary to measure each rack in at least 3 places, and the jumper in 2 places.
- An installation gap must be created between the extension and the door frame and filled with silicone sealant, which is compensated for temperature deformations.
- It is recommended to cut the extensions strictly after applying the markings, which exactly repeat the preliminary design developed on the basis of the measurements taken.
- Regardless of the presence of a subsystem, it is necessary to secure the element to an elastic material.
- When mounted on polyurethane foam. It is imperative to provide spacers for the installation period, which will reduce the risk of squeezing out frame elements due to the self-expanding adhesive composition.
Designers recommend ordering extensions for entrance doors from the same companies that supply interior structures. In such cases, the property owner gets the opportunity to install the elements free of charge, and the material and its finish will exactly match the style of the room.
Preparatory work
When installing platbands from the extension side, as a rule, no problems arise. But on the side of the door frame, carpenters quite often encounter a situation where the door block is either slightly recessed into the opening or protrudes outward. In this case, it is necessary to carry out work to hide these shortcomings.
The box is recessed
If the structure of the door block is recessed into the opening, and there is no way to correct the mistake by adding more, a thick platband is taken and an undercut is made in the wall under it. The work order is as follows:
- the platband is attached to the box;
- the line of the platband is marked on the wall;
- using a grinder with a cutting wheel for concrete or brick, an incision is made into the wall along the drawn line;
- use a chisel and hammer to knock out a recess for the platband - no need to be afraid to make the cut deeper or go beyond the line;
- a small amount of cement mortar is made (it is better to use ready-made putty);
- the knocked-out recess is lightly covered with mortar and the casing is immediately applied, as tightly as possible. Excess mortar that appears is removed first with a trowel or spatula, and then with a rag or rag;
- The casing is removed, and the solution is given time to set.
To prevent the solution from sticking to the back of the plank, it is first moistened with water.
The platbands will look strange if the box is slightly recessed into the opening.
The box protrudes
If the box protrudes beyond the wall, a plane and wooden trim will help. The technology is simple: the size of the box is marked on the back side, after which a quarter is selected from the back side of the casing using a plane. You need to work slowly, constantly monitoring the process of selecting a recess for the box.