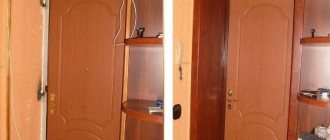
If the wall turns out to be wider than the door frame for the front door or the door to the room, then use additional inserts. Before installing such products, it is worth deciding on their dimensions. Then the installation of the extensions will be easier and of better quality. To find out the dimensions of the extensions for interior doors, it is not necessary to call a specialist. You can do this work yourself and save money. But you need to know a number of rules and follow the instructions. It is also useful to understand what kind of door frames there are for interior doors: the sizes of telescopes and products with straight sides.
What types of extensions are there: types according to materials and design
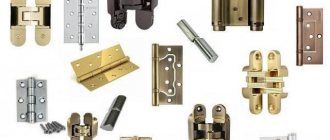
Manufacturers produce various additional elements for interior doors. Products can be divided into two groups according to design features: completely flat and telescopic. Inserts with smooth edges are a board that is butt-joined to the door frame with self-tapping screws. They come in different sizes. Can be equipped with decorative edge. Processing one of the ends of the additional strip prevents displacement of the casing. Such additions are not particularly convenient to install. You have to think about closing the outer parts of the screws, making sure that the strip does not split. Fastening is also possible using glue. Telescopic extensions have special grooves for alignment with the door frame. Therefore, they are more convenient and easier to install. You just need to drive the protrusion into the groove and tap. Also, this type of extension allows you to install a telescopic casing.
They make additional parts for interior doors from various materials. According to this parameter, they are divided into wooden, PVC and MDF. Wood planks are usually made from real wood. The most commonly used wood is oak, beech, pine, and ash.
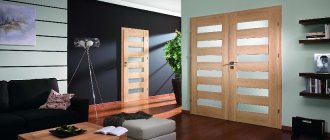
A wide range of additional boards makes it easy to choose the appropriate type of additional board for your existing door block. If the door leaf is wooden, then the trims should also be chosen from the same material. If the door leaf is made of PVC, plastic extensions would look logical.
Conclusion
As you can see, choosing and installing extensions on interior doors is not so difficult. The main thing is to figure out which of the methods described above suits you best. If the information was useful to you, click on the social media buttons below, and perhaps you will help one of your friends solve a similar problem.
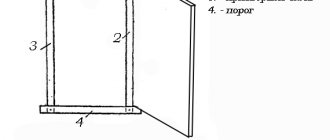
Several working diagrams for installing accessories.
Table of standard door frame sizes
The dimensions of the door frame extension vary widely. And it’s difficult to say unequivocally what size bars there are. The standard width of the trim is 10 cm. The thickness usually does not exceed 3 cm. As for the length, it may vary. Extensions with lengths of 200 and 220 cm are standardly produced. These parameters are regulated by GOST 475-2016. The table below will help you understand what sizes of extensions for interior doors there are.
| Wall width in cm | Extension width in cm | Extension thickness in cm | Extension length in cm |
| 9-16,5 | 10-20 | 1,5-2,5 | 200-220 |
| 21,5-26,5 | 20 | 2,5 | 200-220 |
| 7,5-9 | 10 | 1,5 | 200-220 |
| 16,5-21,5 | 15 | 2,5 | 200-220 |
At the request of the client, the extensions are made in other required sizes. This is true for door blocks with non-standard parameters.
If there is no quarter and the walls are slanted
If the quarter was not selected, you can do this:
- Having delved into the wood ½ of the thickness of the extension and taking a width of 10-12 mm, make the reverse quarter with a hand router. In case of a slight slope of the wall, a quarter can be made oblique in width; this will not affect the tightness of the elements.
- Or you can knock out a groove in the brick wall for the frame and insert a backing board there. This option may be preferable for those who find it easier to do rough and labor-intensive work instead of delicate work that requires saving energy.
In both cases, the extensions are installed by adjusting thin wedges, as is the case with straight slopes.
Rules for determining the width and length of an additional element for a door frame
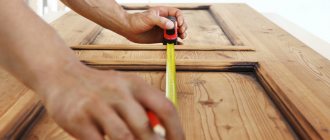
It is important to understand how to correctly determine the dimensions of additional boards for an interior door. The width of the extensions directly depends on the thickness of the doorway and the design of the door block. To calculate the width of the additional board, you need to measure the thickness of the doorway wall and subtract the width of the existing door frame from the resulting value. The width of the insert should match the result obtained or be slightly larger.
For example, the width of the wall is 27 cm. The width of the door frame is 7.5 cm. This means that an extension is required, the minimum width of which will be 19.5 cm. You can take an extension strip of 20 cm and then saw off the excess. You can also take two additional 10 cm strips and connect them in width, and then remove all excess.
To calculate the length of door trims, you should measure the length of the side components of the door frame. The resulting value will indicate what size bar is required. As a rule, the length of decorative strips corresponds to the standard parameters of the door leaf.
The main thing is not to make mistakes in the calculations. If you buy an extension that is smaller than what is needed for the interior door, then a lot of problems will arise. Therefore, you should carefully consider determining the size of the extensions. It is recommended to measure the thickness of the passage wall, width and height of the door frame several times.
When determining the width and length of additional strips, it is important to consider the following rules:
- The width of the remaining doorway for covering with a decorative strip is measured from the door frame to the edge of the wall.
- The dimensions of the extensions should be determined taking into account the maximum values obtained during the measurement of several places.
- The side and top panels must be measured separately and at several points. This is due to the unevenness of the surface.
Eliminating gaps after installation
Rice.
6. Closing gaps The immobility of the extensions can be ensured by fixing them to the frame and walls with masking tape. Spacers are placed between the two elements, and if they are missing, the gap is filled with foam. You should take a balloon and introduce foam in small portions (so that the structure does not move). After it dries, the excess is cut off with a knife at the level of the wall.
Door extensions allow you to aesthetically design the opening. With minimal skills in handling glue, nails, saws and foam, such work can be done independently.
How is the thickness of the trim for interior doors calculated?
The thickness of the additional strip should not exceed the dimensions of the door frame groove. On average, this parameter is 1-6 cm. Standard extensions in factories are made taking into account the dimensions of the partition. If the width of the wall does not exceed 9 cm, then the thickness of the insert is 1.5 cm, and if this parameter varies between 9-16.5 cm, then an additional thickness of 1.5 or 2.5 cm will be required. For walls with a width of 16, 5-26.5 cm, a decorative strip 2.5 cm thick is needed. This parameter should not exceed 3 cm. The thickness of the trim for non-standard door blocks is determined individually. For typical interior door structures, additional strips 1.5 cm thick are sufficient. For entrance doors, this parameter is higher and amounts to 1.5-2.5 cm.
Video
The video will tell you how to correctly measure trims and trim for interior doors.
We looked at the features of door extensions. As you can see, such a simple detail can decorate a door with high quality, make the entrance to the home and the space between rooms more presentable and neat. With the help of our tips, you can easily navigate the sizes and types of these parts, and you can even, with a little effort and diligence, install them yourself. If the width of the trim is smaller than you need, there is an article that describes how to finish door slopes after installing the front door.
What to do if the dimensions of the extensions do not correspond to the interior door
There are often situations when it turns out that purchased telescopic extensions or completely flat products are smaller or larger than the open section of the passage. Most often, this problem is faced by those who have interior doors, doorways with non-standard dimensions, who do not know which extension is best to buy, as well as those who made gross mistakes when calculating the size of regular or telescopic extensions. In any case, the question arises: what to do, how to carry out the installation? You can order new additional trims. Or you can bring them to the required size and get out of the situation without unnecessary financial expenses.
If the boards are too wide, then they are carefully reduced. To do this, use a hacksaw or saw. On the front side you need to make a groove for attaching the platbands. Difficulties in adjusting the size may arise with telescopic extensions. After all, such parts have grooves on both sides. Such boards are divided into pieces lengthwise with a saw. The spikes are removed from the platbands and attached to the smooth edge of the plank using nails.
If the thickness of the doorway wall is very large and the purchased additions cannot cover it, then several such elements are used for finishing. They are combined with each other using adhesive or furniture clips. Telescopic extensions are connected with pre-prepared thin strips. They are inserted into the recess of the two ends.
In general, the work of bringing the dimensions of telescopic extensions or planks with straight sides to the desired value is not accompanied by difficulties. Therefore, any home master can do it himself. All you need is the necessary tools and some free time.
Tools and accessories necessary for work
The tools listed below are usually either already at home, or can be purchased, asked from friends, or rented.
- Plane. It may be necessary if there is a measurement error and a wall protrusion that interferes with the installation of the frame dimensions already calculated for the door leaf.
- Carpenter's pencil and construction knife with replaceable blades.
- Hammer.
- Roulette up to 3 m.
- Construction corner.
- A jigsaw or at least a sharpened hacksaw with a fine tooth. As a last resort, use a grinder with a special cutting wheel. If you have a hand-held circular saw with a sliding support ruler, all problems disappear altogether.
- Clamps.
- Plumb.
- Level.
You may also need a compact machine for manual milling - but an untrained person should not use it, it is very dangerous.
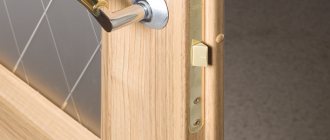
Telescopic
To install a telescopic door, it is important to have a factory-cut groove in the door frame.
There are planks on sale with a width of 90-400 mm and a length of up to 2300 mm. Installation of telescopic extensions:
- When preparing panels, consider how many grooves there are on the element. More common are planks equipped with slots on both sides. In this case, break off the back part, an L-shaped spike will form. It is necessary for mounting in the groove of the box.
- Perform trimming. In size, the top bar will have to “lie” on both sides on the end trims or come into contact with them at 45 0 C in case of a cut. Insert the top panel into the box, measure the side pieces according to it and cut them.
- If the opening requires a wider structure, it can be easily assembled from several panels. They are joined using special thin connecting strips. This element is also called a “slit extension” - it acts as a “spike” connecting the opposing grooves in the elements. It also allows you to keep the canvas flat. In this case, additional fixation of the canvas on the reverse side with bars is necessary.
- Secure the prepared elements in the grooves of the box, check with a level. Secure them with polyurethane foam.
Regular or classic straight
Simple strips are easiest to install on polyurethane foam.
The described technology is designed primarily for the fact that the door frame has a groove for additional elements. However, the described method is also suitable for other types of blocks. The thickness of the additional element must correspond to the groove cut located on the door frame itself. Typically, it has dimensions from 10 mm to 16 mm.
Installation technology for conventional additions:
- Take measurements of the opening and trim the panels. If you don't have a circular saw, you can use a jigsaw. Apply masking tape to the front part along the cut line - this will reduce chipping.
- Prepare a U-shaped structure from the extensions. To do this, use self-tapping screws or small nails to attach the top strip to the upper parts of the end panels.
- Insert the resulting structure into the groove of the door frame. If there is no groove cut, the extensions are attached flush to the quarter of the box using self-tapping screws.
- Secure its position with masking tape and check the vertical level. If necessary, use spacer wedges from available material
- To attach the panels to the wall and add rigidity to the structure, use polyurethane foam. Inside the gap between the extension and the wall, apply horizontal strips of foam every 10 cm. Before foaming, wet the surfaces with water.
- After the polyurethane foam has hardened, all that remains is to cut off its excess and install the trim.
Slopes with slope
When the doorway widens upward or downward, the extensions are installed with the door already in place. This will prevent the door frame from moving away from its normal position. In this case, it is necessary to bring the inner edge of the extension into a wedge, and the extensions themselves in this case acquire a slightly trapezoidal shape. If this is not done, in the wide gap of the place where the doorway widens, after the mounting foam there remains a space where the plaster adheres to this foam. This means that cracks will inevitably form there, and a piece of the wall may become loose, crumble and begin to fall out in pieces.