Inserting door hinges is one of the most important and critical moments when installing doors. This process requires special attention and scrupulousness, since any incorrect action will lead to irreversible consequences that will certainly affect the operation and appearance of the door structure. Even minor mistakes can lead to damage to the door leaf or frame, as well as to the fact that the door will not sit level in the opening. It will be very difficult or impossible to fix this. Therefore, it is very important that all points of the instructions are followed, and the installation process itself is carried out with the utmost care. This is the only way to do the work of inserting hinges with your own hands correctly.
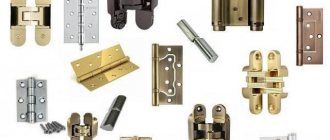
Before cutting in the hinges, you must, of course, select them. These elements differ not only in appearance, but also in technical characteristics. In this regard, different types of hinges are installed on different types of door structures based on the characteristics of the latter.
Types of door hinges
Door hinges are divided into different subcategories according to several criteria.
Depending on the material used for manufacturing, the most common types are distinguished:
- Hinges made of brass. The advantage of this material is that it is easy to process. It has high ductility, and therefore it is easy to polish or chrome plated.
- Steel products. The advantages of this material cannot be disputed, since steel is a very strong metal. The service life of such door hinges is several times longer than the service life of brass products. Unlike the first material, steel is not “eaten up” by friction over time and can withstand heavy loads.
- The last category includes products made from other alloys. On top they are coated with various compounds that imitate the color of brass, bronze, gold, etc.
Based on the installation method, door hinges are divided into the following groups:
- Overhead products. This type of hinges is good because they do not need to be cut in, which greatly simplifies the work process when doing the installation yourself. They are attached to the surface of the door leaf and frame. This reduces the risk of damaging the structure several times.
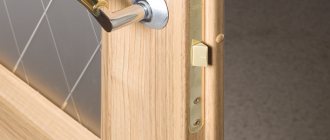
- Mortise hinges. To install them, the master will have to work hard. Physically, the insertion work is not difficult to perform. The main difficulty is that you need to work very carefully, since the insertion cannot always be done correctly the first time.
- Screw-in. They are attached to the door leaf and frame using pins provided by the design of the products.
Variety of species
Depending on the direction of rotation, there are:
- right-sided;
- left-sided;
- universal.
To choose the right hinges for installation on an interior door, you need to take into account all the technical characteristics of the first and second products. You need to imagine in advance the result that you want to see in the end. After all, each type of hinge has advantages and disadvantages and can, like no other, ideally suit a particular type of door.
Due to the fact that there are several types of door hinges, and the installation of each of them is different from the others, we will consider the most common one, namely the insert.
Card loops
They come in two designs, and these are the easiest hinges to install.
Invoices
Their halves differ in size and configuration. When the door is closed, they are simply recessed into one another. When installing them, no wood sampling is done; The parts are fastened directly to the end of the leaf and the jamb. The gap between them is sufficient so that the hinges of this group do not interfere with the door in any position.
Recommendations for installing hinges on doors found in individual articles, which say that canopies of this type are attached without drilling, should be treated with skepticism. The length of the leg of the hardware is quite long (otherwise strength is not ensured), and even if the blade is made of soft material (plastic, MDF, wood), it is quite difficult to screw it in exactly in the given direction.
Direct
This type of card loops must be “recessed”, by analogy with mortise awnings. And the technology is the same - wood sampling and fixation.
Corner
The difference from overhead loops is only in the shape of the “petals”. And the method of attaching them is absolutely the same.
Operating procedure
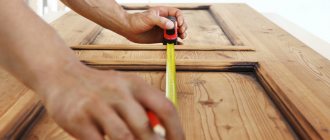
Careful measurements are required to carry out the work.
First of all, you need to mark the places where the hinges are attached to the door leaf. As a rule, hinges are installed at a distance of 20 cm from the edges of the door, but there are exceptions. If there are knots in the recommended places on the canvas, it is better to move the loop up or down. If you do not pay attention to this recommendation, there is a huge risk that you will have to buy a new interior door. The fact is that screwing screws into a knot is strictly prohibited. In such a place, at best it will go awry, at worst, the canvas will crack.
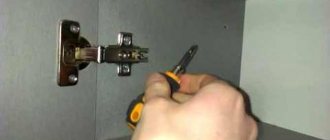
So, we put the loop in the right place so that the axis protrudes slightly beyond the canvas. We outline the contours of the loop with a pencil, which should be well sharpened.
Next, it is recommended to take a ruler and a wallpaper cutting knife and make small indentations along the designated lines. This will reduce the risk of the chisel moving off the line. It is advisable to do this, but not necessary. Now we take a chisel, a hammer and carefully beat off the edges of the future grooves. The recesses should be equal to the thickness of the loop.
When the edges are broken off, you can remove the top layer of coating. It would be much easier if the farm had a milling machine. With its help you can cut grooves faster and smoother. But if such a tool, as a rule, is available only to professional builders, then every conscientious owner has a chisel, and he will have to work with it.
After removing the covering, we put the loop in the groove and use an awl to mark the places where the screws are attached. We remove the loop and use a drill with a thin drill to make holes in the marked places. If you do not do them and tighten the screws “live”, the door leaf may crack. When the loop is installed and screwed, we perform the same procedure at the location where the second loop is attached.
Working with a router for inserting loops
The main thing is to be very careful when working, since the rotation of the collet is more than 30,000 revolutions and, accordingly, it must be well screwed in and, of course, we follow safety precautions.
Please note that the frame and the router stop are in contact with the surface of the door. There is also vibration, and if measures are not taken, the door leaf can be damaged. To avoid damage to the door leaf, you need to use sliding materials on the surface for the frame and stop; you can, of course, make templates, but this requires skills.
And so let's start selecting the door hinges, take it, set the depth on the stop of the router, for this we use the hinge, install it in a pressed state between the stop and adjust the depth of the depth. It doesn’t really affect what diameter of the collet you use for tapping, you can even use 12mm. – 18 mm. We set the limit stop along the edge, fix it and proceed to deepening. Clearly holding the milling machine and not going beyond the boundaries of the loops. We finish the rest with a chisel, in the end we get a clear seat and screw the hinges.
Installing hinges on a door frame
To correctly mark the box you will need to work a little. Be prepared for the fact that it will be difficult to do the work with your own hands, so it’s better to call an assistant.
So, we put the canvas in the box. We align them relative to each other, set the required gaps, and control the evenness with a building level. We place wooden wedges under the canvas from below. In this way, you can set the required position of the doors, which you want to see after the installation is completed and the leaf is installed in its rightful place.
When you are sure that the door is perfectly level, mark the places where the hinges are attached to the frame. To make the marking more accurately, it is advisable to remove the doors and attach the hinge to the frame in the same way as when inserting into the canvas. That is, trace the contours with a pencil.
Next, we perform the same steps of cutting grooves, marking and drilling places for attaching screws.
After completing the preparation of the grooves and holes, we lift the doors again, match the hinges with the prepared fastening points and tighten the screws. Having completed the fixation, we check the operation of the doors. If everything is done correctly, you will be pleased with the result.
Marking holes for fastening canopies
Before cutting the hinges into the interior door with your own hands, assemble the corner of the door frame, and measure the required length using a construction tape. In this case, the markings must coincide with the markings on the door leaf. Next, the side fastening element is applied directly to the door leaf. Here the distance from the bottom of the sash to the floor surface must be taken into account.
The sash is joined to the door frame and markings are applied. The holes for all other canopy attachment points are marked in the same way. Next, cuts are made using a chisel, or, if available, with a milling device. After making the recesses, the corners are aligned. Use an electric drill to drill holes for the mounting bolts. After completing all the necessary manipulations, you can fix the door leaf directly to the frame.
Professional installers of door blocks recommend using wooden pegs for proper installation and preliminary fixation of structural elements. After installation, be sure to check the evenness of the structure using a building level. If necessary, adjustments are made.
What is the difference between window hinges and door hinges?
As the name suggests, window hinges (another name is overhead) hinges are installed on windows, and door hinges, respectively, on doors. Let's imagine their main differences:
- Vent hinges are smaller in size and less massive. They are not suitable for holding a heavy target. Doors, due to their stronger construction, can cope with heavy loads.
Such designs make them suitable for window and balcony sashes, but not door sashes.
Sources
- https://arbolit.org/poleznoe/ustanavlivaem-petli-na-dver-tehnologiya-vrezki-razlichnyh-modeley.html
- https://uteplitel-minol.ru/remont-i-stroitelstvo/kak-ustanovit-petli-na-dver.html
- https://sauna-n.ru/remont-i-strojka/kak-postavit-dvernye-petli.html
- https://mebitex.ru/dveri/kak-pravilno-prikrutit-petli-na-dver.html
- https://gorodverey.ru/ustanovka-petel-na-mezhkomnatnuyu-dver.html
- https://topalexdoors.com/kak-vrezat-petli-v-mezhkomnatnuyu-dver/
- https://gorodverey.ru/ustanovka-petel-na-dver.html
- https://karniz-dv.ru/remont-i-strojka/kak-ustanovit-petli-na-mezhkomnatnuyu-dver.html
- https://1podveryam.ru/furnitura/kak-vrezat-petli-v-mezhkomnatnuyu.html
- https://magnumdveri.ru/kak-pravilno-ustanovit-petli-na-dver/
- https://artelle-doors.ru/articles/instruktsiya-po-vrezke-petel-v-mezhkomnatnye-dveri-svoimi-rukami/
[collapse]
Post Views: 3,488
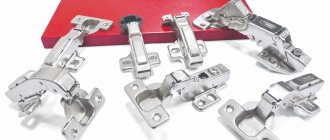
Adjustment
So, let's look at how to adjust card hinges on an interior or metal door? If the structure is loose, it is necessary to tighten the screws. Modern products have a mechanism in their design that is adjusted using a hex key and allows you to tighten the door to the required level.
Now let's look at how to adjust hidden door hinges. This can only be done in the open position. You must first remove the decorative trims, then tighten the screw using a hex key. Thanks to the design features, the door position can be adjusted in three planes.
Inserting door hinges is a rather troublesome task, but nevertheless quite simple to do it yourself. By following our recommendations, each of you will be able to properly secure and adjust any type of door hinge.
Selecting the type and number of hinges depending on the parameters of interior doors
Card loops are in wide consumer demand. Such popularity was deserved due to its inexpensive cost and ease of installation. No specialist help is required here. The configuration of such a mechanism is also not complicated: two plates, which are also called wings or cards, on which there are eyelets for fastening elements - self-tapping screws.
Photo 2 The number of hinges directly depends on the weight of the interior door.
This type of product has been predetermined by its configuration since the 80s, when their mass production began. The simplest steel options with two eyelets on one card are in most cases used for non-residential premises, such as country sheds or outdoor showers. But in order to protect yourself, doors are installed not using self-tapping screws, but with screws with large pitches. The production of such products has not been relevant for a long time.
Modern production of hinges for interior doors offers a wider variety of both colors and sizes. The sizes are divided into four- and five-inch parts. In the first version, the hanging elements have four eyelets, in the second, respectively, five. When choosing the right type of hinges, you should definitely take into account the massiveness of the door leaf. The greater the weight of the door, the larger the size of the awnings. For a very heavy door leaf, it is necessary to install additional hinges, at least one.
Necessary tool
The preparatory process is very important. It is necessary not only to purchase the selected hinges, but also to prepare hardware and related tools:
- Hammer;
- Chisel;
- Screwdriver Set;
- Screwdriver;
- Drill;
- Drill;
- Self-tapping screws;
- Construction pencil;
- Level.
Before installing the hinges, it is worth deciding whether the fittings will be inserted or whether the fittings will be attached to the interior door using an overhead method. It is also important to take care of markings and measurements. If you carry out this procedure approximately, you may later discover that the door leaf is not hanging evenly.
If you choose the insertion method, you may also need a hand router and wedges for spacers.
Installation of corner card models
For doors with a rebate, it is better to choose corner hinges; in essence, these are the same samples as simple card hinges, but their halves have the shape of a corner. How to install corner hinges in a door? In exactly the same way as straight lines - one part is fixed on the loot, and the other at the end of the canvas.
Corner models have a design in the form of two corners and are mounted in a mortise manner
Caring for door hinges
Any mechanism requires maintenance and hinges are no exception.
Don't miss: Types of walls during construction
Before starting work, you need to clean the hinges from accumulated dust and dirt.
The first enemy of hinges, which adversely affects their performance properties, is friction. Over time, the factory lubricant loses its characteristics, which leads to the appearance of squeaks and disruption of the ease of movement of doors.
To avoid this, it is enough to carry out preventive maintenance once a year - lubricate the hinges. You can lubricate detachable hinges with machine oil or lithol, slightly separating the hinge.
For universal hinges, you can use WD-40 spray.
After these operations, the doors need to be opened and closed several times to ensure even distribution of the lubricant. If any dirt gets on the door leaf, you need to wash the stain immediately.
To prevent damage to the paintwork, do not wipe them with abrasive substances, and also do not paint over the hinges, as was done before. Damage to the coating will lead to corrosion of the material and failure of the hinge.
Preparation for the process
Before starting work, it is necessary to prepare and place in the work area the necessary devices for inserting hinges. Tools and equipment needed include:
- Door hinges selected at the previous stage.
- Chisel and hammer.
- A screwdriver and a set of screws of the required size.
- Pencil needed for marking.
- Set of wooden wedges.
- Building level.
A carriage for inserting hinges can also be used - a universal tool with which you can quickly and easily complete the task. It will help you mill the seat for the hinge accurately and quickly.
Carriage for milling the seat for hinges
Place the tools immediately at hand so that you are not distracted by small details during the installation process.
If you don't want to make a lot of noise when installing, you can use a rubber-handled hammer or a wooden mallet. This will allow you to work more quietly and not disturb your neighbors.
Basic steps of the tapping process
Do-it-yourself insertion of hinges begins with the formation of recesses for their placement. In this case, you should strictly monitor the depth - if it even slightly exceeds the thickness of the door hinges, during further use the door leaf will be deformed, which may subsequently lead to the need to replace it, as well as replace the hinges themselves.
Procedure for cutting recesses
To correctly cut the recesses for the hinges, follow the following instructions:
- Place the chisel on the drawn line.
- Tap the chisel with a hammer to carefully “outline” the outline.
- Remove a small layer of wood.
- Repeat steps 2-3 until you get a recess of the desired size.
Marking the door hinge socket
Make sure that there are no knots or other wood defects where the hinges are installed. Installing hinges in these places can lead to cracking of the door leaf.
Forming a recess for installing a door hinge
Similar actions must be carried out for the relative door leaf. Using wedges, install the sash in the door frame and outline the contours opposite those on the sash. Next, use a chisel and hammer to form recesses of the required depth and clean them.
Interior door weight
This is one of the basic characteristics, taking into account which the fittings are selected. It is clear that overhead models made of aluminum alloy will not cope with heavy glass sheets, so they cannot be attached, and powerful hidden ones will make opening and closing a light plastic sash quite difficult.
The most common materials for interior doors are as follows.
- Plastic is an option for the office. Budget-friendly, lightweight, but not too durable. It will require the simplest light fittings.
- The panel door is a wooden frame lined with MDF sheets. The weight is minimal, the strength is low, the appearance is much more presentable. You can hang overhead and mortise fittings.
- Chipboard - a canvas made from a whole sheet - has quite decent strength. So you can install any fittings that are suitable in weight.
- MDF - an interior door made from MDF sheet weighs noticeably more, is stronger, more durable, is not afraid of water, and has a very aesthetic appearance. Fittings can be mounted of any kind - forged overhead models, hidden, mortise, etc. It may be necessary to install more than 2 elements for larger sizes.
- Solid wood canvas is the most elegant and expensive option. The heaviest - here you will probably need not 2, but more elements.