Attaching individual hardware elements (handles, eyes) to the canvas only affects ease of use and its appearance. If the insertion of door hinges is done incorrectly, then the consequences of errors and omissions will be the most negative. A loose fit of the sash to the frame, difficulties with opening/closing it, creaks, discrepancies between the lock tongue and the bar on the block - and this is not all the troubles that will be the consequences of improper installation of awnings.
How to install a hinge on a cabinet?
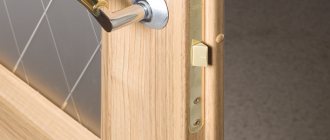
The hinge bowl is fixed using fastening screws to the cabinet door. Then, holding the façade suspended, the hinge arm is placed on the striker plate and secured with installation screws. A 1-2mm gap must be left between the end of the case and the cabinet door to allow for further adjustment.
Interesting materials:
How to recover files on a flash drive with shortcuts? How to restore your voice after stress? How to restore government services through MFC? How to recover the keys to the safe? How to restore indoor flowers? How to restore the Recycle Bin on the Windows 10 desktop? How to restore patent leather shoes? How to recover your Gmail email password? How to recover lost data in Excel? How to restore Samsung keyboard app?
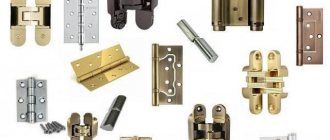
Popular types of canopies
Canopies for interior doors are among the main elements of the door system. Without them, the entire structure can be considered useless. Today, the retail chain offers numerous types of loops with different characteristics. Therefore, before purchasing, you need to decide on the type and function that the door leaf will perform, as well as the direction of opening.
Butterfly overlays
This type of canopy has a simple design and is easily installed on the door leaf of interior doors.
The appearance of the canopies resembles the wings of a butterfly when opened.
Mortise card
They are among the most common types of loops. They consist of two parts, which are attached to the structure with simple wood screws. They are buried into the end of the sash with screws. Loops are divided into universal, right and left. Therefore, when purchasing canopies, you need to know which way the door will open.
The universal type of hinge has two pairs of bearings. They are used on all sashes. They have a long service life.
Corner
Used in rebated door systems. It is not the plates that are attached to the central axis, but the corners.
This design crashes into the door end and is reinforced with self-tapping screws. Corner products provide the door with a tight rebate.
Hidden
They have a high degree of protection against “uninvited guests”. Hidden structures with a closer are installed directly on the sash and frame. To do this, notches of considerable depth are cut at the installation site. They are mainly used for entrance doors.
Installing a door with an overlay ensures camouflage of fasteners, an aesthetic appearance and eliminates cutting of hinges from the outside.
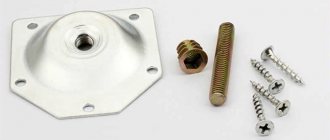
Screw-in
This species is significantly different from other analogues. It does not have the usual wings on the awnings, and the pins are screwed directly into the wooden door frame and leaf. Only the hinge remains visible. Screw-in hinges are usually installed on doors that have a rebate.
They are not recommended for installation on structures made of soft and low-grade wood materials. Otherwise, distortions, cracks and disruption of the structure of the canvas may appear.
Double sided
They are installed on doors in places with high traffic.
Their design resembles card loops with three plates. On one of them there are two axes of rotation on the sides.
Common Mistakes
The most harmless thing is that it may be an incorrect indentation from the edge of the canvas. If the hinges are installed correctly, but too close to the edges, then you will simply ruin the appearance.
The distance to the edge of the canvas is too small.
The next and most common mistake is when people confuse the installation locations: the small inner part of the hinge is attached to the box, and the large outer part is attached to the canvas. This setup is dangerous for several reasons.
If the outer part of the loop runs along the edge of the canvas, then the holes will be at a distance of a couple of millimeters from the edge, respectively, if you slightly skew the screw and it will come out from the side, or you may get caught in a knot and then the outer edge will break off altogether.
The holes are too close to the edge.
If installed correctly, the holes in the small part of the butterfly will be located almost in the center of the door leaf, which means there is no need to worry about any cracks or distortions.
Correct installation of the loop on the canvas.
Things are no better with the box. The photo shows that the holes are too close, and the thickness of the lightweight box is small, so it can burst under load.
The inner part of the butterfly cannot be attached to the box.
In addition, the box is usually attached to the wall with anchors in 3 places - these are two points under the hinges and one in the lock area. If we do everything as expected, then we will have 2 places left where we can drive the anchor and cover it with a loop, otherwise the anchor will be visible, which is also not very good.
Points at which fastening anchors for the box can be driven.
There is one more nuance: during installation, all hinges must be strictly parallel to each other. The slightest distortion vertically or horizontally will lead to the door starting to “play” and eventually the hinge will burst or the screws will break out.
Vertical and horizontal skew of the loop is unacceptable
Standard sizes and selection of hinges for interior doors
There are several standard hinge sizes for interior doors. If we consider card loops, they differ in three dimensional characteristics: the thickness of the half, the height of the half and the width of the open loop. The thickness of door hinges
is found in three sizes: 2; 2.5 and 3 millimeters. This characteristic does not greatly affect the reliability of the product; even a 2 mm loop is unlikely to ever bend or wear out.
The height (length) of door hinges
comes in two main sizes: 100 and 125 millimeters.
The latter are distinguished by a longer hinge pin, which makes them more resistant to wear and subsidence. In terms of width,
there are two types of hinges for interior doors - 62 and 75 millimeters. Narrower hinges are used on doors with a thin leaf - 33-34 millimeters so that the embedded hinge protrudes from the door block at a minimum distance in the closed position.
Based on these sizes, you can find any combination of them in the finished product. The most popular sizes of card-type door hinges:
100×75×2,5 100×62×2,5 125×75×3
The dimensions can be found in the designations on the factory packaging of the loops, or measure the product with a ruler. The packaging also indicates the opening side of the hinges: right - R, left - L, universal - BB, overhead - 2BB.
Selection of sizes and number of loops
for interior doors is carried out in accordance with the recommendations of the door block manufacturer, since it is the manufacturer who knows the configuration of this product and its requirements for fittings. If such recommendations are not provided, you can use the universal table of the number of mortise and overhead hinges relative to the weight of the door leaf.
| Web/Loop Weight | Mortise 100 mm | Mortise 120 mm | Overhead 100 mm |
| <40 kg | 2 pcs | 2 pcs | |
| 40-60 kg | 3 pcs | 2 pcs | 3 pcs |
| >60 kg | 3 pcs | 4 things |
Installing a butterfly in 4 steps
It is really not difficult to secure such a loop, but butterflies are very sensitive to installation errors; a poorly installed mechanism will break very quickly.
Step No. 1. Marking
First we need to mark the location of the hinge. Absolutely all hinges for interior and entrance doors are installed at a distance of 200 - 250 mm from the edge, both from above and from below. We take a tape measure and mark on the canvas with a pencil the point where the loop will begin.
Mark the location of the loop installation.
Remember: the inner (small) part of the hinge is always attached to the door leaf, and the outer part is mounted on the frame.
Next you need to put marks under the screws. It is inconvenient to mark with a pencil; it is better to use an awl for these purposes, in this case you seem to be marking the point and it is more difficult for the screw to move to the side. First, mark the 2 extreme points; if the loop moves, you can correct everything by using the 2 middle holes.
Initial marking with an awl.
Step No. 2. Attaching the hinge to the door leaf
It is highly undesirable to drive self-tapping screws directly into the doors; first, small holes are drilled for them. The diameter of the drill should be 1 mm less than the diameter of the self-tapping screw, a standard self-tapping screw is 3.5 mm, which means we take a 2.5 mm drill.
We drill holes for the screws.
Now we put the hinge in place, screw in both screws and fold back the strike plate to measure the gaps between the edges of the hinge and the door leaf, they should be the same.
Checking the gap.
If an error is detected, as in our case, then one of the screws is unscrewed and the loop is adjusted.
We adjust the gaps between the loop and the canvas.
Next we will correct the error using the middle holes. In the same way, we poke one of the middle holes with an awl, after which we drill and drive a self-tapping screw into it.
Fix the loop after adjustment.
If the hinge is level, then you can drill the remaining holes, drive screws into them and move on to the next step.
Step No. 3. Marking on the box
Ideally, the installation of hinges is done before installing the door frame, but if the frame is already embedded, then you will have to insert the door into it and adjust its position using wedges.
When everything is combined, we mark the mounting points of the hinges on the box, and if you bought hinges the same as in the photo, then we minus the top and bottom caps because they protrude beyond the plate. Then we remove the doors and draw markings on the frame.
Markings on the box.
Step No. 4. Attaching the hinge to the box
If the loop was attached to the canvas with small gaps along the edges, then it is attached tightly to the box. Otherwise the technology is absolutely the same:
Attaching the loop to the box.
- Apply and fill the 2 outer holes with an awl;
- Drill holes for screws and drive screws into them;
- Check the correct installation and if everything is in order, drive in the 2 remaining screws.
Installed butterfly loop.
Don’t forget that installing hinges is only part of the story; they still need to be properly looked after, and most importantly, lubricated on time; you can learn about all the intricacies of this process “here”.
Product features, advantages and disadvantages
First you need to understand the essence of the design of butterfly loops. They belong to the category of card models; in appearance, these parts resemble a butterfly, which is why they received their name.
Standard mortise hinges are installed flush, that is, it is necessary to make a recess in the door and frame by removing a few millimeters of material. Overhead types in this regard have fundamental differences; they can be attached directly to the lining of the canvas itself, without preliminary preparation of the surface.
Such installation of overhead hinge models without insertion is possible thanks to a number of nuances. The fact is that when closing the door, both halves of the fasteners must ensure a tight fit of the end of the leaf to the door. In this case, this is possible due to the design features of the plates. In ordinary products they are straight and therefore need to be deepened into the material. Here, the two halves are elements of a whole plate; they are cut in such a way that when closed, one part fits into the other without forming gaps.
The main advantage of overhead hinges is their ease of installation; you just need to determine their position and secure it with self-tapping screws. However, it is worth considering a number of disadvantages.
Disadvantages of butterfly loops:
- the doors cannot be removed from the hinge, that is, if such a need arises, the hinges will have to be completely unscrewed;
- Over time, distortions may occur that impede the movement of the canvas;
- These models are only suitable for installing lightweight doors;
- their installation requires a perfectly flat surface.
The special design of these models allows installation without insertion, but this installation method has its disadvantages
It is for these reasons that mortise models are mainly used. If you are installing doors for the first time, overhead options will be the best choice for you.