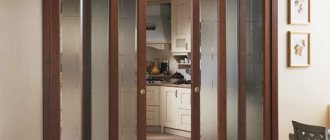
Interior doors are often decorated with additional decorative elements; you can often see the decor in the form of a glass insert. But if you use low-quality glass inserts or improper and careless use of the door leaf, you may need to dismantle this fragile part. Today we will talk about how to properly replace glass in an interior door.
Instructions for replacing glass in an interior door
It is necessary to remove the canvas from the fastenings and place it on a flat and hard surface.
It is advisable to place cardboard so as not to spoil the finish with fragments if they fall out of the opening. The sheet itself must be secured with masking tape. If the damage is so severe that the glass has split into several fragments, they are removed one by one, starting from the top of the frame. Replacing glass depending on the door design:
- Shield ones. Such designs are most common in houses built from the 50s to the 90s of the last century. The insert is held in place by glazing beads and several layers of paint. In most cases, the tree has already served its useful life, so new fasteners should be prepared immediately. The old one is removed first from the bottom, then from the sides and lastly from the top. Before inserting new glass, you should go around the perimeter with sealant, and then secure the glass with glazing beads.
- Paneled. The canvas consists of many parts. To gain access to the decorative elements, you need to separate the top crossbar and move the racks apart. After that, the glass is removed from the canvas, new ones are cut out according to their shape and size and installed in the same place. If the tongue-and-groove joint is fixed with glue, the joints need to be tapped with a hammer, preferably a rubber one. After all the fragments have been installed, they must be fixed with a rubber seal, silicone or liquid nails.
- Tsargovye. These structures have side reinforcements that add rigidity to the entire structure. Replacing glass in such products is somewhat more difficult, but quite accessible with your own hands. First, the plugs are removed, then the canvas is removed. Then the bolts on the inside of the hinges are unscrewed. The door panel is laid on a flat horizontal surface. The plugs located along the edges of the canvas are removed. The drawer is detached from the bottom up along the entire perimeter of the removed canvas. Then it is separated and the defective sheet is removed. All that remains is to insert the new glass and carry out the installation in the reverse order.
With a sliding system, the actions are similar. The main thing is to figure out how to remove the moving element from the hangers.
Metal-plastic doors
Repairing a plastic door with your own hands most often comes down to just adjusting it. The problem of door leaf sagging is not limited to wooden and steel doors, and in all cases it is eliminated in different ways.
Adjusting the narthex
When repairing plastic doors, you do not need to plan or put anything in the hinges, since the position of the leaf is adjusted using a hexagon or wrench bent at a right angle.
The hinges on plastic doors have a special design. At their end there is an adjustment hole into which the hexagon is actually inserted.
So:
When it rotates to the right, the blade will rise, but if you turn the key counterclockwise, it will lower. Sometimes it is necessary to move the sash not up or down, but in one direction or another. Usually this needs to be done when cracks appear in the vestibule and it begins to blow through them.
Repair of a plastic door: adjusting the rebate
Elimination of a similar problem is also carried out using a hexagon, only now it is inserted into the holes on the hinges, facing, as we see in the photo, inside the opening. You can bring the sash closer to the frame, or vice versa, move it away, by rotating the hex key in one direction or another.
Instead of adjustment holes, the door may have clamping screws that are rotated with a flat wrench. A lot here also depends on the door opening mechanism. If this is a swing option, then they most often have hidden hinges with holes for adjustment. But by and large, it doesn’t make much difference whether there are holes or screws.
Replacing parts
Plastic doors may require more serious repairs - such as replacing a dented threshold, a broken sandwich filling, or a broken double-glazed window. At first, when the popularity of plastic balcony doors was just gaining momentum, the thresholds were made of plastic, which, as time has shown, does not always withstand the weight of a person. The version of the threshold, made of gypsum fiber sheet, also somehow did not take root.
But it is simply impossible to push through a threshold made from a thick plastic window sill. We recommend! The window sill board is very durable, and not only does not break, but also does not bend. Its surface is not afraid of mechanical influences - except that scratches may appear on it, which can be easily removed using liquid plastic.
Thresholds from window sill boards
To manufacture a new double-glazed window to replace the damaged old one, you will have to contact the manufacturer
You need to go with the dimensions, which you will have to remove yourself - and here it is very important not to make a mistake. When possible, it is best to rely on an old double-glazed window, since some manufacturers indicate its size on the aluminum frame located between the glasses
If there is no such inscription, then you need to measure to the nearest millimeter, making sure to remove the glazing bead from the opening. First you need to pry off the long glazing beads with a spatula or chisel, and then remove the short ones.
This should be done by two people, so that the second person holds the glass sheet. After the opening is cleared, a new double-glazed window is installed in it, and the same beads are snapped into place.
How to change?
Before directly replacing the damaged part, it is necessary to free the door from it.
First, you should remove the door from its hinges (for more convenient operation) and acquire some devices.
- Thick gloves to protect against cuts.
- Slotted wide screwdriver. With this tool you can pry off the wooden trims that hold the glass in the door. If your canvas is paneled (collapsible), then a screwdriver may not be useful at all.
- Chisel. You cannot do without this tool when working with materials such as wood.
- Small hammer. A hammer will be needed to secure the glazing beads with small finishing nails. If you are working with a paneled model, it is better to buy a special rubber hammer to lightly hammer the panels while assembling the structure.
- Stationery knife. Such a knife will be needed to remove the old sealant at the installation site of the new glass.
- Rubberized insert or sealant. Special seals not only ensure high-quality shrinkage of the fragile insert, but also prevent the occurrence of rattling during operation of the door leaf. A loose structure may also rattle during use.
- Construction paper bag, cardboard box or piece of thick paper. The paper will be needed to carefully and safely wrap and remove the fragments remaining from the previous glass insert.
The following designs are used to install glazed interior doors.
- Shield ones. These are products where glass is attached using special glazing beads by overlaying.
- With grooves for insertion on one of the sides (they are also drawer grooves). These are models in which the glass is installed in the cavity of the door leaf.
- Paneled. In these models, the glass is inserted into grooves.
Paneled
In order to repair paneled panels, they must be almost completely disassembled into different parts. Many people are intimidated by the large number of parts that go into a door like this, but don't panic.
The structure does not need to be disassembled, but just opens access to the glass.
To do this, you need to know the design of such a door.
- Support in a vertical position – side door pillars;
- Transverse support – holds longitudinal parts and glass;
- Panels are thin components of inserts located between the transverse elements;
- The baguette part is the same transverse support, but serves as a decorative insert.
Many panel doors are made using the tongue-and-groove principle. They are very easy and simple to understand. Faced with such options, you will not have to clean the necessary areas of old sealant. After removing the damaged insert, a new glass is installed in the same place, and the door is assembled in the reverse order, after which it can be installed in its original place in the apartment.
Tsargovye
To replace the glass in a side door, it is also removed from its hinges and laid on a flat surface. After this, using a ruler and a chisel, you need to remove all the plugs located at the edges of the base. Using a screwdriver, remove all fasteners. Now you need to take a small hammer and a block and use them to separate the drawer over the entire surface of the canvas. This needs to be done from the bottom up.
After removing the drawer, you need to remove the old glass from the grooves along with the silicone (while wearing gloves, of course). At the end, you can safely install a new glass sheet of a suitable size into the grooves, place the frame in its original place, assemble the structure and install it on the hinges in the opening.
Panel
As a rule, glass in such traditional panels is installed on the sash using glazing beads (wooden fasteners). To replace the insert, it is better to purchase new parts, since the old ones can easily be damaged during installation or dismantling of the glass.
After this, the remains of the old glass are removed. Do not forget about removing the previous sealing compound from the door leaf.
The new glass insert in such products is installed in the lumen, previously treated with sealant. If necessary, glass sealant can be used. Glazing beads are installed on top.
Installation procedure for the insert
Standard fabric
The most convenient option. Replacing damaged glass on such a sash is quite simple. There are so-called quarters on it, similar in appearance to the well-known glazing beads. The whole job will take no more than half an hour.
- The strips are attached to the canvas with small nails. They are easy to tear off with a sharp-tipped tool. A chisel, cobbler's knife or screwdriver will do. The nuance is that it is necessary to follow the rule determining the order of dismantling. When deciding how to replace glass in a door, it is worth considering whether the whole part can be used elsewhere. Therefore, it is advisable to keep a large fragment intact if the fabric is not removed from the hinges. The scheme for removing quarters is as follows: sides, then bottom. By carefully holding the glass, it is easy to pull it out of its seat.
- Making an analogue. Installation of glass in an interior door is done “one to one”, otherwise there will be difficulties with placing it in the sash opening and further fixing it with fastening strips. This is why dimensions are taken after removing the quarters.
- Covering a fragment with film if regular or decorative glass is broken and is replaced with plastic or chipboard.
- Placing the sample in the landing “nest”.
- Overlay of quarters, clamping and fixing with nails.
Non-standard version of the canvas
The technology is much more complex. There are no fastening strips on such sashes, and they themselves are glued structures. How to change the “filling” of the canvas in this case?
Before inserting glass into the door, it will have to be almost completely disassembled. Unfortunately, if the model is not from a well-known manufacturer, this does not always work out. And first of all, this applies specifically to the canvas.
- You can determine the likelihood of removing damaged glass from an interior door by examining the corners of the sash. If there are decorative plugs at its ends, then replacement is provided.
- The canvas is removed from the hinges and laid on the floor.
- The plugs are removed only from one side, and the fasteners are unscrewed in the upper and lower parts of the sash.
- The side frame support should be easy to remove.
- All that remains is to remove the damaged glass, take the dimensions, make (select) an analogue and install it in place.
Everything else is in reverse order. But here there is a small nuance. Inserting glass into an interior door is not all. It is necessary to eliminate the possibility of its rattling, and for this it is necessary to install a seal. It happens that it is either damaged or worn out to such an extent that its further use is impractical. There is a good solution - after replacing the broken glass of the door, a soap solution is poured into the gap between it and the panel. As soon as the water evaporates, the insert will stop “playing”. True, such a seal will not last long and will have to be updated regularly.
It turns out that there is nothing complicated about replacing glass. And if you show your imagination, the door can be modernized at the same time. For example, organize lighting of the canvas. There are more than enough options on how to transform it.
Glass fastening schemes
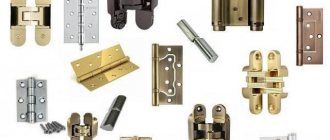
Some manufacturers are always trying to improve the fastening technology; as a result, the door can be very difficult to disassemble at home. In total, there are only a few standard ways of fixing glass in interior doors:
- Triplex is a multilayer glass, the layers of which are connected by a polymer film. If the door has this kind of fastening, then it will have to be taken to the factory to replace the glass. The cost of such a service is such that it will be easier to buy and install another door from another company.
- The main feature of a collapsible panel structure is that it is made of several elements; they are connected according to the principle of a tongue-and-groove joint. This means that there is no need to disassemble everything; it will be enough to simply provide access to the glass. To do this, you need to remove the top crossbar and then move the racks apart a little. Then you need to remove the inserts from the door and put in new ones.
In many domestically produced doors, glass is secured using glazing beads. A number of simple rules will help you understand how to insert glass into an interior door. This type of fastening is the easiest to dismantle. Replacing glass in interior doors of this type is carried out as follows:
Using a screwdriver or other similar tool, you need to carefully undermine the glazing bead, a little, but so that the nails appear outward. When the nails become visible, you need to remove them with pliers. However, the beads must be removed in a certain order, otherwise there is a chance that the glass will fall out and break.
Therefore, first remove the side beads, then the bottom one, and lastly remove the top one, when working with which you must be careful. All. The beads have been removed. Next, you need to remove the glass, take measurements and send them to a glass workshop. In the case of decorative glass, you just need to install it in the canvas and put the glazing beads in place. If it was decided to use ordinary glass, it will have to be covered with a special self-adhesive film. Before using it, it is better to slightly wet the glass with soap and water. In addition, during gluing, you need to level and expel excess air from under the film. An ordinary plastic spatula is perfect for this job.
In general, the procedure is quite simple. The main thing to understand is that glass is an extremely fragile material. It should be handled very carefully - when removing glazing beads there is a chance of damaging the decorative finish of the door.
There is also a non-standard fastening option, in which the door is a solid structure made of wood and glass, created without the use of glazing beads. In such cases, you can replace broken glass on an interior door of this type like this:
First you need to find the plugs; they are usually located at the end of the door leaf. Under them are the main fasteners, most often these are long self-tapping screws.
You need to remove the fabric from the loops and place it on a flat surface.
Next, you need to carefully remove the plugs and unscrew the fasteners. Then remove the long side panel, and then remove the glass
Then remove the long side panel, and then remove the glass.
All that remains is to supply a replacement and put the door back together.
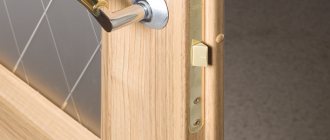
Handle repair
The interior handle is subject to heavy loads. Especially if you have small children, then their breakdown may be a common occurrence due to rolling on the doors, getting caught on the handle, although there are other reasons for breakdowns of interior handles.
Let's look at the most common problems that arise when using an interior door:
- The handle gets stuck. When you press the handle, you feel resistance. To open the door you have to make an effort, and sometimes you also have to pull the door handle.
- The latch is stuck. This failure occurs in the design of handles with a lock. The movement of the crossbars is difficult both when opening and closing.
- Loose handle. In this case, there is sagging, the handle itself moves away from the canvas and wobbles. With such a breakdown, the entire locking mechanism may also become loose.
- The handle does not return to its position after pressing. During normal operation, the handle should instantly spring back to its original position.
- The tongue doesn't move. The halyard tongue either sinks or does not work.
Aluminum handle
All these damages can be repaired yourself at home
To do this, it is important to know the types of products:
- Stationary. Such models are rarely used today. The “button” or “bracket” handles are simply screwed to the door leaf.
- Push. This model has a push mechanism. To hide the tongue, the mechanism must be pressed on it and moved down.
- Rotary. This model uses round handles. To open such doors, the handle must be turned to one side.
Door knob
Moreover, it is important to know the components of the handle mechanism:
- Lock. The main element is the crossbar.
- Square pin. It is brought out. The pin drives the internal part, connecting to the handle.
- Lever. A handle that is subjected to force to open a door.
- Decorative overlay. Gives the door an attractive appearance.
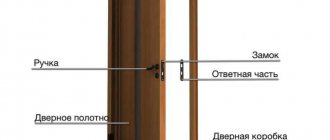
- Reply part. It is located on the door frame. There are holes in it into which the halyard tongue goes.
So, if the handle has some damage, then if you deal with all these details, you can make the repair yourself.
The most common breakdown is lack of lubrication. It's very easy to fix this problem. Disassemble the handle and apply lubricant. You can drop sewing machine oil onto the bolt and then turn the handle several times. By doing this, you can completely prevent the handle from squeaking or jamming. Moreover, lubrication will increase the service life. Sometimes it is necessary to tighten the mounting screws and also adjust the fittings. This is in case the lock and handle are loose.
Handle installation
If this is not enough, then it will be necessary to disassemble the product. To do this, remove the decorative trim. Underneath there are mounting bolts that need to be unscrewed. After this you can get to the inside of the mechanism. It is not necessary to remove it. Now look at the key washer and torsion spring. To view the washer, you must remove the retaining ring. Often the problem lies precisely in this mechanism. As for the spring, it sets the tongue in motion. Make sure these items are in good working order and free of defects. Perhaps the spring will be out of place; it can be simply adjusted.
If after this it was not possible to determine the problem, then the entire mechanism will have to be completely removed from the door leaf. If broken elements are found, they must be completely replaced. When assembling the lock, be sure to install the parts in the same order as they were disassembled. If the breakdown cannot be eliminated in any way, then you may have to call a technician or completely replace the opening mechanism.
Kinds
There are four types of glass that can be installed in doors.
Transparent
Most often, transparent glass is installed in door structures, which differ from other types at an affordable price. Among the disadvantages is fragility, since such material breaks easily. If the transparent glass is not severely cracked, it can be glued together with decorative film.
Matte
Sometimes apartments have doors with frosted glass inserts. Such an interior door not only decorates the interior of the room, but also protects it from the penetration of bright sunlight.
With a pattern, corrugated and stained glass
The main feature of this type of glass inserts is their uneven surface and opacity. The advantages of corrugated coatings include a low level of sound permeability, thanks to which it is possible to protect the room from extraneous noise.
Tinted or mirrored
Mirrored and tinted glass inserts are more often used in shopping centers, but some manufacturers install them in interior doors. Tinting the glass surface impairs the transmission of light through the glass and makes it less transparent.
Required Tools
Before installing new glass in the door structure, prepare in advance the tools that will be needed during the work process. These include:
- Hammer. Will be needed for driving nails and adjusting the position of the bead. A special furniture or rubberized hammer that does not damage the material is suitable for the job.
- 3 cm screws and a screwdriver.
- Ruler or tape measure.
- Fine-grained sandpaper.
- Pliers.
- Construction knife.
- Glass cutter.
- Chisel. May be needed when replacing glass.
- Gloves. Will help protect your hands from cuts.
- Scoop and broom. In order to collect broken old glass and remove debris left after installing a new one.
Crops for areas with high humidity
Moisture-loving plants are divided into two classes:
- beautifully flowering with attractive leaves;
- deciduous and decorative with inconspicuous flowering.
There are lovers of damp soil among both annual and perennial plants. Most of these crops belong to the group of trees and shrubs (for example, viburnum, serviceberry, hydrangea) or to the herbaceous class of perennial plants that can live in one place for several decades. Such varieties grow naturally in shallow waters, swamps, and water bodies. They are also perfect for artificial plantings in summer cottages.
Moisture-loving shrubs and trees have the ability to drain the soil around them. To eliminate excess moisture in a summer cottage, you can plant a birch tree, which, after reaching maturity, drains the soil within a radius of about 10 meters. Moisture-loving trees also include elderberry, maple, and willow. Examples of moisture-loving shrubs are silver currant, viburnum, cranberry, etc. Fruit-bearing bushes can be planted in a small summer cottage with high soil moisture. However, it must be taken into account that even moisture-loving plants do not bear fruit in overly swampy and damp soil.
Do-it-yourself shaky glass repair
There are several tools you can use to repair loose inserts.
Sealant
To stop the installed canvas from wobbling, you can use a liquid sealant. It is poured into the grooves located between the door and the glass. After hardening, the glass tab will stop loosening.
Matches
Matches are considered the most accessible means to eliminate wobbly glass. Several matches are installed in the corners of the grooves so that the insert is better fixed and does not dangle.
Cork pieces
If there are large gaps between the glass insert and the door, you can use pieces of cork. They are installed in the gap and filled around the perimeter with liquid glue or sealant.
Reinstallation of glazing beads
Over time, the glazing beads no longer hold the inserts properly and you have to replace them with new ones. To do this, you need to get rid of the old planks and clean the grooves from any remaining glue.
Reasons for damage to glass inserts
In fact, a modern interior door is quite strong, but there are several factors that contribute to damage to the glass inserts:
- Poor quality material. Typically, the manufacturer uses fairly durable glass, which additionally serves as decorated inserts. But it happens that a material made not in accordance with the technological process becomes brittle and vulnerable, and becomes unusable at the slightest blow.
- Careless handling. Sometimes the door is subjected to a sharp slam, causing the glass to break. Most often this happens in families with small children. They can also deteriorate after contact with animals that like to close the door with their paws, causing it to slam.
How to install glass in an interior door
In addition to their immediate functional purpose - dividing space, interior doors can decorate a room. So, for example, you can install multi-colored glass in an interior door rather than ordinary transparent glass, or even create a mosaic pattern.
An interior door not only divides the space, but also adds originality to the interior.
Installing glass in a door can sometimes be difficult. However, it is possible to install glass into the door yourself if you carefully follow the installation sequence. Of course, you can hire a craftsman to carry out work on replacing glass in interior doors, but, in addition to the financial costs of glazing work, you may have to replace the entire door block if the craftsman turns out to be a layman.
energy efficient house - construction principles
The main goal of building an energy-efficient house is to minimize energy consumption, especially during periods of winter cold. The basic principles of construction are as follows:
- building up a 15-centimeter thermal insulation layer;
- simple shape of the roof and perimeter of the building;
- use of warm, environmentally friendly materials;
- creating a mechanical rather than natural (or gravitational) ventilation system;
- use of natural renewable energy;
- the orientation of the house is in the south direction;
- complete elimination of “cold bridges”;
- absolute tightness.
Most Russian standard buildings have natural (or gravitational) ventilation, which is extremely ineffective and leads to significant heat loss. In summer, such a system does not work at all, and in winter, constant ventilation is needed to bring in fresh air. Installing an air recuperator allows you to use already heated air to heat the incoming air and vice versa. The recovery system is capable of providing from 60 to 90 percent of the heat by heating the air, that is, it eliminates the need for water radiators, boilers, and pipes.
Recuperation allows heat to be transferred from exhaust air to fresh air.
Detailed information on the construction of a ventilation system is contained in the article: supply and exhaust ventilation, principles of effective construction.
You should not build a house with a larger area than is needed for actual living. Heating of unnecessary unused rooms is unacceptable. The house must be designed for exactly the number of people who will permanently live in it. The remaining rooms are heated, including due to the heat naturally generated by humans, the operation of computers, household appliances, etc.
An energy efficient home must be built to take maximum advantage of climate conditions. A large number of sunny days a year or constant winds should be a hint for choosing alternative energy sources.
It is important to ensure tightness not only by sealing windows and doors, but also by using double-sided plaster, wind, heat and vapor barriers for the walls and roof. It should be taken into account that a large glazing area will lead to inevitable heat loss
Replacing rectangular glass
Replacing glass with a traditional rectangular shape in a regular door leaf is not difficult. Often, a glass sheet or insert is mounted through the upper end.
https://youtube.com/watch?v=R7y-djZjGCA
So, the first step is to remove the old glass shards from the door. Then measurements are taken of the space in which the new glass sheet will be installed. After that, glass of suitable sizes and thickness is purchased. It is then very carefully inserted through the top of the door leaf. To strengthen the insert, you can use silicone gel - it is applied around the perimeter of the glass element.
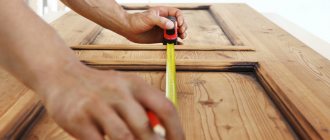
When taking measurements, it is necessary to take into account the depth of the groove where part of the glass goes. Its value must be added to the overall dimensions of the glass sheet. To measure it, lower a metal ruler into the groove.
If the glass is held on the door leaf using so-called “beads”, then both measurements and installation work are carried out in the same order, except that the bead must first be dismantled. Then, after installing the glass, it is installed back using small nails.
Double-glazed window installation process
You need to act according to this scheme.
Firstly, the glass unit is installed in the frame. The frame has a groove on one side. A rubber seal is installed in it, along the entire perimeter.
Sealing rubber for double glazed windows
Secondly, rubber pads are placed on the horizontal base and vertical walls of the frame.
Thirdly, the prepared glass unit is inserted into the frame using linings. In this way it is possible to set it according to the level.
Inserting a glass unit
Fourthly, the exposed package is pressed with glazing beads. A rubber seal is installed in them in advance.
Fifthly, the bead is driven into the groove. Use either a plastic or rubber hammer.
Fixing the glass unit with glazing beads
How to do it
In fact, this process is very complex and must be performed by people with certain experience. In addition, a certain type of door structure has its own installation features.
Rectangular glass
To insert rectangular glass into a regular door leaf, you don’t need to make any special efforts. As a rule, glass is installed through the upper end. First, you need to take measurements of the space that will accommodate the glass installation. Then you need to go to the store and buy a product that fits the shape and thickness
Carefully insert it into the top of the door. Silicone gel will be used to fix the insert.
Apply it around the perimeter of the glass element.
You can also use glazing beads to secure glass. To install them, small nails are used. But this installation option can only be performed by professional technicians. Otherwise, there is a risk of compromising the integrity of the glass insert.
It may also be useful for you to learn more about how butterfly hinges are installed on interior doors.
Video installation of rectangular glass:
Installation of glass in premium structures
The process of installing glass elements in such door structures is very complex. Such doors require a more special approach. Most often it has a tightly collapsible structure, so you first have to disassemble the entire structure, install the glass, and then put everything back together again. Of course, such work can be done by specialists, although if the investigator has a clear plan, then everything can be done with his own hands. For these purposes, it is necessary to understand how one or another model of a door structure is disassembled.
When the door leaf is made not of wood, but of metal, the process of installing glass and disassembling the door has its own nuances. It is highly undesirable for glass and metal to come into contact with each other. During installation you will need to use a rubber lining.
You can find out what kind of installation kit is needed to install interior doors from this article.
On video, glass for a premium door:
Insertion of non-standard glasses
If we talk about modern door models, their design involves the presence of glass inserts made in a unique design. The shape of the glass can be very different, but it is best if it is an oval. The glass in the door leaf is mounted through the top, so first you need to take a marker and trace the existing hole along the contour on paper. Now all that remains is to order the glass of the required shape, and then simply install it in the existing space using glue.
But how to lubricate door hinges to prevent them from squeaking, and how to do it yourself, is indicated here.
The video shows the procedure for installing non-standard glass in an interior door:
On paneled structures
Paneled doors are in great demand today. When installing glass elements, it is necessary to disassemble the door structure. This is not difficult to do if you follow certain instructions. The design of the door leaf may involve the presence of a vertical and transverse support, glass that is located between them, as well as a baguette - a decorative element. Such as an extension, but how to install a door extension is indicated here.
The connection is carried out according to the type of locking system - tongue and groove. There is no need to disassemble the door into small elements. It is necessary that access to the glass is open. Afterwards, you can install new glass and reassemble the door structure. It will also be useful for you to learn more about how to properly install an interior door with your own hands.
Installation in sliding doors
Not only hinged ones, but also sliding ones can have glass inserts. When installing glass, it is necessary to dismantle the panel and also remove the metal door frame. Since the structure is large, minor difficulties may arise. Taking into account the method chosen for attaching the glass element, its installation is carried out. It must be inserted into a special groove, which is located at the top of the door leaf.
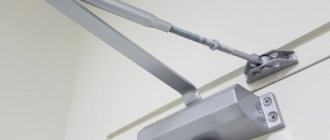
It may also be useful for you to learn how to install a door closer on a metal door.
What to use?
Of course, interior doors with glass inserts look impressive and stylish, but due to the fragility of the material, situations often arise when the decorative element needs to be replaced. Owners prefer to replace the part with a similar one; they waste a lot of time searching for a suitable element, but this is not always possible.
Advice
If the search for a similar part is not successful, ordinary glass, frosted or any other, is replaced with one of the alternative materials produced according to modern technologies.
Fiberboard sheet
A temporary and budget option is laminated fiberboard, folded in half so that the smooth side is on the outside. Or a regular, non-laminated type of fiberboard, on the front surface of which an opaque decorative film is then applied. This method is considered the least aesthetically attractive and short-lived, therefore it most often serves as a temporary way to hide the missing glass element in the overall door structure.
Decorative film
If the glass is cracked but does not crumble, or if there are small chips, all parts of the structure are covered with decorative film. In this way, not only defects are hidden, but also integrity and harmony in the appearance of the door structure are achieved.
Stained glass insert
It is one of the most expensive materials used by manufacturers in the manufacture of interior doors. This glass adds style and uniqueness to the door; it is quite durable and does not require additional modification. The only drawback is the difficulty in finding parts with similar decor, so you will have to change all the parts, which costs a significant amount.
Regular
Transparent material without additional decor at an affordable price is considered one of the most suitable for replacing a broken element. After taking measurements, the glass is ordered from a glazier and inserted in place of the damaged element. If you have the necessary tools, a glass cutter, for example, you can do the cutting and cutting yourself. Then the surface is decorated with a special film or any other suitable material.
Organic
In other words, it is a transparent plastic that resembles glass in appearance. It is also called monolithic polycarbonate, a durable, unbreakable material, the only drawback of which is the clouding of the structure. This is due to the appearance of scratches on the surface of the material. The application of decorative film will help protect the plexiglass or hide existing defects, which will additionally serve as a decoration for the door.
Tempered
Ordinary glass, made using a special technology, which has undergone heat treatment, giving the material not only increased strength, but also fire safety and sound insulation.
Option four: if the glass is of irregular shape
Even standard rectangular glass can be inserted once you have some experience in this matter
If it is oval or even zigzag... It is important to guess the size so that you don’t have to buy it again and again. It is better to take the dimensions of the broken glass onto cardboard
But the work must be exquisite. The permissible deviation from the exact dimensions should not exceed 3–5 millimeters. And when using paper to remove patterns, it can reach 7 millimeters...
In fact, there are many more options. Almost the same number as manufacturers of interior doors. In laminated glass, for example, sometimes the glass is attached to a glazing bead that cannot be seen from the outside. Such a door cannot be repaired at all; it is not the glass that will have to be replaced, but the entire door.
But laminated one is at least inexpensive. It will be a shame if you take on the repair of a designer door and completely break it... So if you are not confident in your glazing abilities, it is better to call a specialist. Or buy a new door. Because there is something odd here: a branded door repair will almost certainly cost you more than installing a new one.
Prevention
To avoid replacing broken glass material in the future, you must use the door carefully. Do not slam it when opening or closing it, as a strong impact may cause the canvas to become cracked.
Sources
- https://ODveryah.ru/remont/zamena-stekla-v-mezhkomnatnoj-dveri
- https://vitdoors.ru/dveri/kak-zamenit-steklo-v-mezhkomnatnoy-dveri-svoimi-rukami.html
- https://gosfasad.ru/dveri/kak-razobrat-mezhkomnatnuyu-dver-dlya-zameny-stekla.html
- https://dveri-provance.com/zamena-stekla-v-mezhkomnatnoj-dveri
- https://oboiman.ru/inside/zamena-stekla-v-mezkomnatnoj-dveri-33-foto-remont-razbitogo-stekla-kak-vstavit-ili-pomenat-svoimi-rukami.html
- https://okcomfort.com/dveri/zamena-stekla-v-mezhkomnatnoy.html
- https://stroy-podskazka.ru/dveri/mezhkomnatnye/zamena-stekla/
- https://gorodverey.ru/zamena-stekla-v-mezhkomnatnoj-dveri-svoimi-rukami.html
- https://dekoriko.ru/dveri/mezhkomnatnye/zamena-stekla/
[collapse]
Post Views: 7,633
Glass replacement: recommendations
To insert glass into an interior door, you need: sealant, a construction gun, a new sealing tape if the old one is unsuitable for further use, a glazing bead if it was damaged when dismantling the old glazing. The bead should be chosen either in the same color as the door leaf, or in a contrasting color, which will further highlight the glass in the interior door. If the required glazing bead is not found, then instead you can use a wax pencil, which is sold in a specialized store.
In order to install glass in interior doors, the door leaf should be removed from its hinges and placed horizontally. In this case, the surface on which the door will be located must be flat, for example, a long wide table on which it is placed entirely.
Glass installation is carried out in the following sequence:
Installation diagram of an interior door with glass.
- Using a construction gun, apply a layer of silicone for windows and glass around the entire perimeter of the door leaf where the new glass will be placed.
- The glass is tucked into the gasket and then carefully inserted into the mounting location. Do not press or rush: this may damage the glass. If considerable effort is made to insert the glass, then you need to slightly cut off the gasket with a sharp knife in places that clearly do not correspond to the door leaf.
- After installation, the glass is re-treated with sealant.
- New or reusable glazing beads can be secured with small nails or using sealant.
- Excess sealant is removed immediately, without allowing it to harden, otherwise this will be difficult to do.
After the silicone has completely set (after about 1-2 hours), the door leaf can be hung on the hinges.
Decorative elements that can be placed on glass can be fixed using liquid nails.
But this is done when the door leaf is already hung and tightly fixed. But if you do this before, but after the sealant has hardened, it will turn out more accurately, and the work itself will be more convenient.
If the interior door has non-standard glass of an unusual shape, then its measurements must be taken especially carefully. In order to achieve perfect dimensional accuracy, the removed old glass can be attached to cardboard and outlined with a pencil. In this case, deviations when making a pattern should not be more than 3-5 mm.
If, in addition, the glass consists of several elements of different colors, then these individual parts must be measured separately and the entire glass sheet. In this case, when marking the component parts and making new parts of the future glass, maximum accuracy will be achieved, and when gluing to obtain the final glass sheet, the required dimensions will be obtained.
Selection of material
Frosted or corrugated glass is used where a view of the room from the outside is undesirable: in the bathroom, bathroom, bedroom. These types of material have a greater thickness than transparent window glass: it reaches 4-6 mm. A home craftsman will not always be able to handle cutting on his own. Therefore, after dismantling the old glass, it is recommended to take the dimensions of the opening for insertion and order a replacement from the workshop of a construction company.
For the living room, decorative glass for doors is more often selected: with an engraved pattern, made using complex technology and surface treatment with a sandblasting unit, stained glass, consisting of colored pieces connected together. If desired, you can use both corrugated and frosted glass if the interior design is not particularly luxurious or is made in a minimalist style.
Both transparent and any other can be installed in the kitchen. A budget option is a simple window glass covered with film, or decorative curtains on a glazed structure.
How to remove templates for further glass cutting
If you decide to do everything yourself, the following tips will help you with this:
1st stage
First of all, you need to choose the right material for the template.
Materials that are definitely not suitable for this:
- newsprint, thin paper;
- textile;
- oilcloth;
- paper that is wrinkled or glued together from different parts with tape;
- drywall and the like.
To do this, you should take hard cardboard, fiberboard or plywood. Perhaps even old glass that used to be in the door (this is if it is being replaced with a new one). Thick paper Whatman paper can also be a good solution. In some cases, you can use dense wallpaper residues.
2nd stage
Take a normal metal tape measure or an accurate wooden meter. A shoe meter is not suitable. It's just stretching.
Carefully remove the wooden bead. Measure the dimensions and write them down in millimeters. Subtract 1.5–2 mm from each side from the resulting size.
That is, if you measured the height of one of the glasses, and it was 385 mm, and the width turned out to be 272 mm, then for cutting you need 382x268 mm. Height is always listed first in dimensions.
These dimensions should be noted on the template by writing a height of 382 mm along the vertically drawn arrow (if it is glass with a figured top, we focus on the highest point of the template) and a width of 268 mm along the horizontal arrow.
3rd stage
Draw on a separate sheet of paper (or on one of the templates) a schematic drawing with the number of pieces of glass on each of them, where you should depict the contours of the glass figures and their number on the wooden canvas.
We measure the opening for new glass
There are also two options here: call a glazier or take the measurements yourself. If the broken glass had a complex shape, then it is better to use the first option.
Moreover, it is better to call a master from a workshop where this glass will be cut out immediately. With the correct and simple glass shapes, you will be able to take the required dimensions yourself.
You can buy glass in construction stores or special workshops where they cut out products. Modern manufacturers offer a wide selection of products with different relief patterns, levels of transparency, shade or resistance to damage. If children live in the house, then it is important to purchase glass for the interior door with high impact resistance.
The peculiarity of calculating the parameters of an insert item is the measurement of the doorway. To this indicator you will need to add a few millimeters of depth for inserting the product. It is better to take all measurements using a ruler to determine the exact distance of the bed. Otherwise, the dimensions will be inaccurate, which makes installation impossible.
Important! Glass should never fit closely into its bed! That is, its dimensions should be 1.5-2 mm smaller than the stock on each side.
Baguette for floating ceilings | PVC
Plastic baguette for floating ceilings (wall). The idea of a floating ceiling initially implies the creation of a halo on the wall from 10 to 20 cm. This is achieved by placing the light source at a certain angle. This was made possible thanks to the floating profile. The profile is offered with a special translucent insert, which has a special transmission layer (transmits 90% of light, blocks ultraviolet radiation, uniform dispersion). And also a unique advantage of the profile is the ability to install and dismantle the LED strip.
Material: PVC plastic.
Manufacturer: Russia.
Successful examples and options
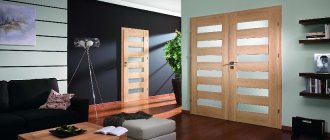
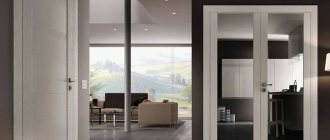
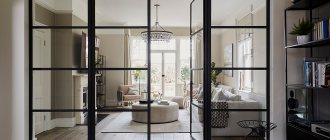
Doors with glass look organic in many interiors, and it doesn’t matter at all whether they have stained glass or ordinary inserts. The main thing is to choose a design of a suitable style and color.
You should consider several organic and stylish ensembles that feature elegant doors with glass inserts.
- A fashionable black side door with transparent glass inserts will stand out effectively against the background of snow-white walls and a glossy milky floor. Next to such a detail you can place a small light chair and a metal floor lamp with a bell-shaped lampshade.
- The design of a dense chocolate shade with a thin glass line in the middle can be installed in a white room with an accent wall, similar in shade to the door leaf. The floor in such an environment should also be finished with white materials and furniture in snow-white and coffee tones should be placed in it.
- A luxurious dark chocolate colored door with a long black glass insert will look perfect in a white room with a gray floor trimmed with glossy tiles. Reinforce the dark canvas with wall shelves in a similar shade and a low-finish wood table.
- Light wooden doors with glass details will look good in a hallway with gray and white walls and a dark laminate floor. To give the atmosphere a special style and make it more original, you can use blue LED lighting under the wall borders and blue wall lamps near the doors.
- If you like modern and progressive ensembles, then you will like the laconic chocolate door with a long strip of glass located in the center. A similar model can be installed in a beige room with a dark red laminate floor. Highlight the modern ensemble with a metal lamp with red shades, a brown leather pouf and a large corner sofa with an animalistic carpet on the floor.
- A brown door with beautiful, gracefully shaped glass will look good in a room with rich purple walls and red parquet floors. In such interiors, it is worth placing furniture and decor in neutral and classic colors so that the image does not seem too colorful. For example, this could be a snow-white sofa with round shapes and wall paintings with white frames.
- In a luxurious milky-colored hallway with a floor trimmed with expensive pale peach tiles, white doors with graceful curved handles and large glass inserts in a soft blue color with beautiful patterns will look organic. Decorate such a presentable setting with a tall, light, antique-style vase with a floral pattern.
- In a spacious room with pale yellow walls and caramel tiles, good-quality doors made of natural brown wood with wavy inserts made of embossed thick glass will look great. Support such details with a wooden tall cabinet in a similar shade.
- A door of a delicate shade with a frosted glass insert will look great against the background of sky blue or blue walls and a white glossy floor. Add to this setting a black table with a tall blue flower vase, a glass floor vase with decorative “driftwood” and a snow-white bench near one of the walls.
The video will help you remove the glass from the door yourself.
Options for final replacement
Stained glass look - durability and beauty
Recommended types for installation are presented in the plate.
| View | Description |
| Organic | The main advantages are high wear resistance and shock resistance. Its characteristics resemble high-quality plastic. Requires additional finishing with decorative film. |
| Stained glass | Expensive. Designed to improve the interior. Installation is carried out according to a complicated scheme. |
| Standard | Can be matte or transparent. |
| Tempered | Advantages - fire resistance, strength, provision of additional sound insulation. |
Main types:
- "tulip";
- "Dali"
- satin;
- with dot pattern;
- colored in mass;
- with a relief pattern;
- "diamond";
- "flower garden";
- with bamboo pattern.