Interior doors in our modern understanding have long ago transformed from ordinary structural elements of partitions into full-fledged interior details. Before ordering canvases, the apartment owner analyzes the products of many manufacturing enterprises and selects exactly what he needs from a wide range.
However, for comfort, coziness and convenient long-term use, beauty and practical materials alone are clearly not enough - hinges play a huge role here. Silent and easy opening of a door is one of the main criteria for its ease of use when living indoors.
Many domestic enterprises offer an integrated approach to solving the problem of filling a doorway, and install hinges at the production stage according to the customer’s decision. But this does not always happen for various reasons, and from time to time the owner of the premises is forced to turn to professionals or install the hinges with his own hands.
How to choose door hinges
Before you begin installing door hinges, you need to purchase them in the required quantity. This is not as easy to do as you might think at first - hangers are divided according to the size of the perceived load, the quantity on the canvas, the materials used, the type of fastening and other criteria:
- The main thing that affects the number of loops is the weight of the fabric. Moreover, when closed, the door is tightly fixed in the frame and framed by load-bearing elements on all sides. When the canvas is opened, the load on the hinges increases sharply - a pair of forces is formed - pulling forces in the upper part, and compressive forces in the lower part. These loads inevitably act on the hinge landing rods, and as a result of incorrect selection, they can break or become deformed.
- At the same time, in any position, the screws holding the door hangers work for shearing, and their strength is also important. As a rule, each standard hinge has template holes for the device from 4 to 6 screws, and the hardware itself is included in the kit. Before purchasing, they must be inspected visually, and if their strength is in doubt, it is better to additionally purchase other hardware made from high-strength steel.
- For ease of operation of heavy, massive products, it is better to use hangers with ball bearings, which absorb the main load and minimize the friction force.
- If you are installing hinges yourself, it is better to ask a consultant about products with the possibility of minor straightening, since the lack of professional tools often leads to fatal mistakes. The best solution for a novice craftsman would be to purchase hinges with adjusting washers and oval holes for fastening. All this will ensure the possibility of play in the already mounted element and eliminate additional expenses in case of inaccurate fixation.
- When installing a door to a bathroom, you should remember that this is a room with high humidity conditions, and all metal elements may be subject to corrosion. Therefore, for this type of space it is better to purchase hinges with a special coating, either stainless steel or brass.
- Particular attention should be paid to the design of the door, first of all, to its thickness, since the contact surface of the hinge should not protrude beyond its end. It is best to choose products with a width 3 - 4 mm less than the thickness of the canvas itself. In this case, it will be possible to hide the fastening elements, while ensuring the aesthetic appearance of the door.
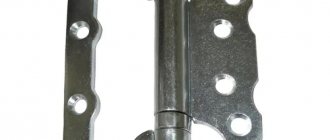
Rice. 2. Professionally installed gimbal
Any professional consultant in the store has special tables for selecting door hinges depending on the listed parameters. This will help you quickly select the structural elements of interest with the maximum degree of reliability and in the required quantity.
Lock markings
Immediately estimate the height at which it would be convenient for you to place the door handle. For some it is better to take 80 centimeters from the bottom of the door leaf, for others it is better to raise it to a meter. a handle height of about 90 cm is usually comfortable . This is where we start when marking.
We place the mortise lock on the door frame so that its bar is flush with the end of the door. Mark with a pencil the point where the handle will be located.
@youtube.com, channel DIY apartment renovation (Remontkv.pro)
Next, insert the door leaf into the latches with the lock side up. We apply the strip to the end, outline it, making sure that it is attached to the door evenly, without distortions. After this, use a chisel to carefully knock out the outline around the perimeter of the marking. To clearly determine the seat for the lock, I advise you to make auxiliary vertical markings on the lock end of the door , finding the middle of its thickness, as a rule, this is 16-20 millimeters . It will come in handy when drilling a socket with a feather drill.
How to mark a door leaf for inserting hinges
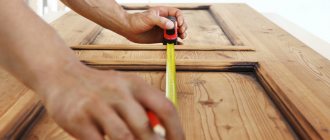
A Russian folk proverb says: “Measure seven times, cut once.” These words are perfect for inserting hinges into the door structure. This type of work is preceded by numerous stages of marking and measurements. Thus, to achieve the best result, it is better for a novice master to follow the following tips:
- In the case of a two-hinged door canopy, a distance of 200 - 250 mm is measured from each end of the leaf, after which the hinge is applied to the site of future installation and completely traced with a pencil both along the contour and in the place of the holes for the screws.
- If it is necessary to install a third loop, under no circumstances should it be installed in the center of the canvas - only offset to the upper part. This is due to the action of the bending moment when the door is in the open position. When installing this suspension in the middle of the canvas, the pair of forces completely ceases to act on the structural element, since at the point of equilibrium of the circuit its value is zero, and such a loop will be useless.
Rice. 3. Door leaves with 3 hinges
- Each hinge has a top and a bottom, and the door must strictly fit onto the elements on top. In this regard, before marking, it is necessary to determine the correct position of the suspension. Many manufacturers often mark the correct position with arrows, which makes the life of a beginner much easier when performing work.
- When applying markings, the rod hinge element should be directed only to the front part of the canvas.
- Any inaccuracy in the outline of the hinges will lead to gaps; in the case of self-tapping screws, it will not allow them to completely enter the thickness of the wood, and all this will inevitably affect the functioning of the structure. All hardware must be deepened to the limit, without creating additional play for the plate.
After marking, it is necessary to temporarily fix the fittings to check the accuracy of its positioning, and, if necessary, adjust the measurements.
Main settings
Once you have decided what type of router you will use, it is also a good idea to decide on a specific model. Each of them has a number of important factors.
One of them is power. Everything is quite simple here. The higher the power, the larger the layer the cutter can immediately remove. Therefore, experienced professionals usually buy powerful milling cutters in order to quickly cope with a large amount of work. But for a home craftsman, a tool with medium power is better suited. After all, you have to pay for power - such models cost much more, and even have more weight. Often, beginners, when they pick up a powerful router, simply cannot handle it and damage the work surface. Therefore, there is no point in chasing high power.
It is also worth paying attention to the presence of a speed control function. And here it is advisable not to save money - take a model with this function. Thanks to this, it will be possible to select the optimal speed mode for performing any job. Select a high speed for roughing and a slower speed for fine finishing. Then the result of the work will be more accurate.
Some models have a backlight function. This is not a waste of money at all - if you work in low light conditions, it can be difficult to get the job done really smoothly. Therefore, it is definitely worth investing in a tool with such a function.
A backlit router is often needed when working in low light
The remaining functions (unless you are a professional choosing a universal tool) can be considered unnecessary, increasing the cost of the router and the complexity of working with it.
Finally, it wouldn’t hurt to simply hold the router in your hands, weigh it, estimate how ergonomic its handles are, and whether it will be convenient to work with. Be sure to make sure that the model you choose is not too heavy for you. Otherwise, when using the tool, you will not concentrate so much on the work as on not dropping the router.
Loop insertion algorithm
To use the finished door correctly, the hinges need to be deepened into the wood to the thickness of their metal - usually 3 - 5 mm. In order to do this, of course, it is better to turn to professionals who use clamps and special milling machines with a diamond cutting edge. This will ensure that the hinge fits perfectly into the leaf without damaging the main material of the door. Otherwise, if this is not possible, you can use a regular chisel by performing the following steps:
- Using a chisel with a narrow cutting edge, you must carefully, step by step, hollow out a narrow, neat slot in the thickness of the wood, following the pencil markings. When performing this work, you must always monitor the depth of immersion of the metal into the wood.
- After the contour is hollowed out, you can begin to remove the thickness of the wood to install the hinges, forming a seat.
- When removing chips, the chisel should be directed with the beveled side down, at an angle to the horizontal cutting surface of about 30 degrees. It is better to start work from the side of the blade, tracking every millimeter of contact with the cutting edge. If the chisel is turned with the angular cut upward, then under shock load the cutting tool will not begin to remove chips, but will sink more and more into the thickness of the wood, which is unacceptable.
- After removing excess wood, the surface is not smooth enough and must be carefully sanded with a file. As a result, a flat and smooth surface should form at the insertion site, which will ensure the tightest possible connection of the steel plate with subsequent fixation.
Rice. 4. Inserting loops into the canvas
Upon completion of the work, you need to attach the hinge to the formed seat and see how much its surface coincides with the main end of the door. If the depth is insufficient, the procedure must be repeated.
The same manipulations must be done after preliminary marking with the door frame, taking into account the mandatory gap between the canvas and the clean floor of 3 - 5 mm. For accurate measurements, it is better to apply markings in two ways - using a tape measure or ruler, as well as by physically applying the door leaf to eliminate error.
The essence of the technique
Instead of hollowing out a groove in the wood with a hammer and chisel after marking the loop, we resort to another method. Using a finger cutter , we will make these indentations much faster and more beautiful.
@youtube.com, channel Repairman School
Please note: it is better to make a socket for a mortise lock using a feather drill, without making a face or reconfiguring the router. Next I will describe this technique.
Step-by-step instructions for constructing hinges
In principle, if the insertion is successful and the hinges fit perfectly into the seat, then the most difficult stage of the work is already over. However, it is too early to talk about completing the installation, since the hangers need to be firmly fixed both in the canvas and in the box. In order to do this, you need to follow a simple algorithm of clear actions:
- The loop is again applied to the prepared seating recess, and the master marks with a pencil the points for installing the self-tapping screws.
- It should be noted that, regardless of the quality of the hardware and door material, screwing them in without guide holes is very risky - the leaf material can easily crack, losing its aesthetic appearance and, most importantly, the reliability of fixing the suspension.
- Next, you need to take a regular drill, switch it to drilling mode, install a thin drill, 1 diameter smaller than the screw size, mark the depth of metal immersion and make a hole, holding the tool strictly perpendicular to the surface of the blade edge.
- Repeat the operation for each location where the hardware is installed, depending on the number of holes on the hinge itself.
- Carefully place the hanger at the insertion point, tighten all the screws one by one and, using a hand screwdriver or a screwdriver with limited torque, secure all the screws together with the hinge. Repeat this action for each suspension.
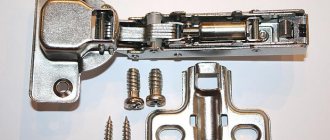
Rice. 5. Installing hangers yourself
After completing the work on fixing the hinges, you should check the alignment of all the landing rods on the door and do the same process with the mating part of each hanger on the door frame.
Required Tools
In order for the installation process to proceed without complications, you need to prepare the necessary tools in advance:
- door hinges;
- pencil for marking;
- ruler;
- screws;
- screwdriver;
- level;
- chisel;
- hammer;
- drill with a thin drill bit.
To install mortise structures, specialists use a milling machine. In this case, the selection for the loop will be the most even. You can replace the machine with a chisel and a hammer.
Installing the door after installing the hinges
If all the hinges are installed and fixed, the alignment of the rods is checked both on the frame and on the door leaf, you can begin its installation.
Before fixing the door to the frame, you need to make sure that all sliding elements on the contact elements are in place. They are ball bearings, washers or special sliding gaskets, including adjusting elements.
All rods and grooves must be carefully lubricated for comfortable operation of the door in the future, and, immediately before installing the door leaf, it is advisable to try to forcefully swing the hinge, making sure that it is securely fixed using self-tapping screws.
For installation, it is better to resort to the help of another person, since, regardless of the number of hangers, mounting must occur simultaneously on all landing rods. With a large door mass, this is difficult to do, and if the hinge hits only one fixing rod, there is a risk of its deformation and misalignment.
When all the rods hit the mating parts of the hinges, the door can be considered installed. All that remains is to check it with several cycles of opening and closing. Ideally, the leaf should not touch the floor or door frame when closing, and the gap between them should be constant. In addition, you need to monitor the alignment of the canvas when abutting - it must remain unchanged. If this is not the case, then the door is “blocked”, and in the future this will affect operation.
Rice. 6. Inserting hinges into the box
The fabric should slide easily around the loop and not move without external force. If the structure closes or opens automatically, this indicates a violation of verticality.
Of course, this type of work is difficult to classify as primitive processes, and it requires a certain skill, dexterity and the availability of good tools. At the same time, the interior door is installed for many years and must meet all requirements. That is why the best solution would be not to resort to self-installation, but to seek help from specialists who will install the structure perfectly, providing it with a guarantee. It is worth remembering that errors identified at the final stage of door inspection are extremely difficult to correct.
Features of working with different types
Installation differs depending on the type of fittings. Types of mortise hinges :
Detachable hinges are easier to install, since the two parts are installed separately, after which the door is hung. This type is used when you have to frequently remove the interior door, for example, when moving furniture. Divided into left and right. When purchasing them, you must take this point into account. Detachable hinges require clear markings, without the slightest errors.
It is more difficult to install a universal hinge, since the hinge is fixed to the box after the second part is secured to the canvas. Therefore, the door must be held in weight or use stops. This type is one-piece. If you need to remove the door, you will have to unscrew the hinge.
According to the installation method, mortise hinges also include hidden hinges. It can be difficult for a non-professional to install them, because the body with a hinge is placed inside the canvas. Using a router, a deep seat is made. Installation requires extreme precision.
Setting up the router before work
In many ways, the ease and quality of work depends on how correctly the router for door hinges is configured. So, before you start cutting the grooves for the door hinges, you need to do certain things. The most important thing here is the depth to which the cutter will cut into the surface being processed. It depends on the thickness of the hinges that will be installed on the door. Therefore, it is advisable to already have them on hand in order to be able to correctly configure the router.
All work can be done in several stages:
As you can see, there is nothing complicated here - every beginner can cope with this work.