Advantages of do-it-yourself reupholstery
The undoubted advantage of such work is the significant time savings - you do not need to wait for the master to arrive, and sometimes you do not have to take the furniture to the workshop, which will add additional financial costs to the family budget.
By choosing the necessary material, the appropriate color and doing the reupholstery yourself, you can get significant savings on the work of a specialist, the cost of whose services is quite high.
Upholstery of upholstered furniture is advisable in the following cases:
- there are significant damages in visible places (holes, stains, abrasions)
- noticeable deformation of the inner layer, expressed in noticeable recesses of the back and seat
- changing requirements for the external colors of upholstered furniture
Common breakdowns
As noted above, an office chair is a rather complex device and any of its structural elements can fail.
Damage to the cross
The problem with this element may be destruction at the junction of the beams. The material from which the cross is made is important here.
As a rule, the base is a hollow structure into which a polypropylene pipe of suitable size and cross-section can be inserted. It, in turn, must be rigidly fixed to the base and the damaged beam.
In order to dismantle the crosspiece of an office chair, you need:
- Remove the rollers. As a rule, they do not have a rigid fixation and are quite simply removed from the mounting sockets. To illustrate the process, it is recommended to watch the video:
The process technology and dismantling device are shown in the video:
Destruction of the swing mechanism
If the chair does not hold the “horizon”, then the problem is most likely in the destruction of the swing mechanism.
Fastening to the seat is done with four screws using a shaped screwdriver. The element is dismantled as follows:
- The bolts that secure the rocking mechanism from the seat are unscrewed
- The gas lift is knocked out of the device mount.
This element is made of metal.
It should be noted that most chairs originating from the Middle Kingdom are not suitable for domestic spare parts. This concerns, first of all, the swing mechanisms (size discrepancy).
- Chinese mechanisms: 200 x 200 mm.
- Domestic: 200 x 150 mm.
In order not to re-drill holes when replacing an element, we suggest using adapter plates. How it looks assembled can be seen in the figure below.
Air chuck failure
The pneumatic cartridge of the chair is a two-chamber structure filled with air. When you press the adjustment lever, the valve stops the flow of air between the chambers.
If, when pressing on the valve, the gas lift rod does not extend, it means that the integrity of the piston, seal, etc. is compromised.
The dismantling process is described above. To clarify the process, watch the video about replacing the gas cartridge on office chairs:
A fairly common cause of gas lift failure is the bending of the adjustment lever, which does not allow pressing on the cartridge valve. In this case, the repair can be easily carried out independently: you need to bend the lever to its original state.
Basic requirements for upholstery materials
Before you reupholster a chair with your own hands, it would be a good idea to learn about the materials used for these purposes.
The fabric used for upholstering upholstered furniture must meet several basic requirements. These include:
- strength qualities
- practicality of the material
- sufficient density
Properly selected material for upholstered furniture will be the key to long-term and high-quality operation in the future.
The most popular fabrics for such work are:
- flock
- nubuck
- jacquard
- eco leather
Each of the above materials has its own advantages and disadvantages; having studied their qualities in more detail, you can choose exactly the fabric that will meet the operating conditions.
Office chair repair
Organizations often send chairs for repair. Reupholstering is a simple task, but when the amount of work is large, only professionals can handle it quickly and efficiently. They can come to your office or home, take measurements for free and calculate the exact cost of the work. Also pick up products for repair and bring them back at the appointed time. Often the entire work takes no more than 2-3 days.
Not only upholstery replacement is included in the work of such companies. They can repair the chair frame itself, replace casters and legs, foam rubber and plywood. The cost of the service will depend on the volume and urgency of the work performed. The calculation is based on what parts were used and how much time was spent.
Flock for upholstery of upholstered furniture
Essentially, such fabric is a synthetic material made by applying synthetic fibers to a non-woven polymer base.
The advantages of this material include:
- great appearance
- pleasant to the touch
- quite long service life
- low price
Along with its positive qualities, flock has a number of disadvantages:
- the material is not breathable
- possibility of allergic reactions
- requires special care products
This type of fabric is advisable to use for furniture in a home where there are pets. Due to the nature of the production of such material, animals cannot remove the internal fibers from the outside, which cannot be said about ordinary fabric. Thanks to this quality, upholstered flock furniture retains its attractive appearance for a long time, despite the presence of pets.
How to choose fabric?
When choosing fabric for furniture, it is necessary to take into account factors such as wear resistance and strength. Today, fabrics are presented in a diverse range.
- If the chair will be in the living room, you can choose jacquard; this fabric has a printed pattern and retains its good appearance for a long time.
- A children's room is a place that should be not only cozy, but also practical. It is best to choose a fabric like flock; it is easy to clean and very practical to use. Flock is also chosen if there are animals in the house, this saves the furniture from the claws of a pet.
- Chenille is very resistant to various odors, it is great for the kitchen and balcony if people smoke on it.
In addition, you can opt for velor, leatherette, matting, suede and similar fabrics.
Nubuck for upholstery of upholstered furniture
As a rule, an artificial analogue of nubuck is used for the manufacture of upholstered furniture.
Despite this, this material has an attractive and solid appearance. Due to the manufacturing features, the material is quite resistant to external influences.
The advantages of nubuck are:
- wear resistance and durability
- nice appearance
- pleasant to the touch
The main disadvantage of this material is its high cost in comparison with conventional upholstery materials.
Along with the use of nubuck when reupholstering home upholstered furniture, it can also be used for reupholstering car seats.
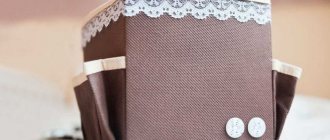
How to sew chair covers
To prevent the furniture upholstery from being wiped out or damaged by children and pets, a cover is sewn on it. It is advisable that within the same room all objects are decorated with the same material - this way the decor will not be disjointed. Fabrics used are cotton, velor, as well as flock, chenille, and microfiber.
Design solutions for capes are very different - they are country and loft, Provence and shabby chic, high-tech and baroque. Usually the cover completely covers the product, reaching the floor. Parts List:
- back – front, back, side;
- seat – upper, front part;
- armrests – two side, two end parts.
The patterns are traced on the fabric with allowances for a loose fit and seams, one or two cm. The parts are sewn on the wrong side, the cover is turned inside out and tried on. If the model provides for it, a valance skirt is sewn to the bottom. The latter is made multi-layered, lace, contrasting (the color matches the sides of the back and armrests), it will require a lot of fabric.
The cover is usually made from one or two shades of textile; it is not recommended to use more than three colors.
Jacquard for upholstered furniture
The described fabric is widely used in furniture production due to such qualities as density and rigidity. The fabric has such qualities due to certain features in its manufacture - it is not subject to unraveling.
The advantages of jacquard include:
- practicality and durability
- pleasant to the touch
- inclusion of cotton threads suggests good ventilation
The disadvantages of jacquard fabrics include their rather high cost.
The fabric can be used both for upholstering home furniture and for upholstering office chairs, which is advisable due to the ventilation properties of the fabric.
Accessories
Modern chairs are made from various materials. The design of such modifications consists of many elements that can be replaced if necessary. Often these chairs include office models that are equipped with a gas lift mechanism. To restore such products, you may need several types of components:
Rollers. This mechanism is made from various types of plastic.
When choosing this product, it is important to consider its purpose, connector type and fixation method.
Gas lift. Almost all office chairs are equipped with this element, which allows you to hold the chair at a certain height. Today there are several types of these designs on the market. It is important to pay attention to the type of mechanism that was previously used in the damaged chair.
Cross. Acts as a supporting element
They are made in the form of a 5-ray star, to which rollers are attached. When purchasing, it is important to pay attention to the quality of the material and the method of connecting the parts.
There are many other components that will be needed when repairing such furniture. This can include everything from small handles and bolts to specialized fabrics.
Eco-leather for upholstery of upholstered furniture
It is a fairly common material for furniture upholstery. It is used for covering both soft and hard elements of furniture construction.
The advantages of eco-leather include:
- great appearance
- the material is resistant to tearing and rubbing
- pleasant tactile sensations
The disadvantages of the material include difficulties in masking damage, so for owners with pets, reupholstering an old chair with eco-leather with their own hands can cause additional problems.
Preparation of tools and materials
Reupholstering an old chair does not require special equipment. All tools and materials are easy to buy in the store.
The list includes:
- batting, foam rubber, polyurethane foam or other filler option;
- upholstery material – tapestry, jacquard, mixed fabric, flock;
- stapler for furniture - for attaching upholstery to the frame;
- flat screwdriver or pry bar;
- pliers, hammer, adjustable wrench and scissors, preferably sewing;
- sandpaper - for repairing wooden parts, armrests;
- tailor's chalk or pencil;
- varnish and paint for finishing hard parts;
- sewing machine for sewing folds.
Reupholstering a chair requires the ability to sew. Here you cannot do without patterns, especially if you decide to make a one-piece cover, and not upholster each piece of furniture separately.
How to take measurements
The easiest way to measure: disassemble the chair into individual parts, remove the old covering from it, lay the fragments on a piece of new fabric and circle around the perimeter. In this way, ideal blanks for covering furniture are obtained.
However, this option is not always possible, especially if you decide to sew a one-piece cover. In addition, during use, the upholstery on the chair stretches and the fragments of the covering are actually too large.
To measure the chair, use a tape measure or centimeter. The algorithm is simple.
- Each element - backrest, seat, seat cushion, armrests - is measured in the center and as close to the edges as possible.
- Measure the width, length and thickness of the part. 10–15% is added to the results for allowances.
- The measurements are used to create patterns. In this case, fabric blanks are cut without allowances, since they are taken into account in the pattern.
On average, to decorate a home chair you need a piece of fabric measuring 350 by 140 cm. Upholstering an office chair requires less fabric - 170 by 140 cm.
Ivan Bokorezov
Furniture columnist and designer
Ask a Question
If the design of the chair is complex, includes folds, valances, ruffles, more material is required - by 40–70%. If the upholstery has a large pattern and when cutting it is necessary to combine the blanks according to the pattern, you will also need more fabric.
How to choose upholstery
To decorate the chair, you can use almost any fabric, leather or other non-woven material. However, in most cases, not only the decorativeness of furniture is important, but also practicality. So the choice is shifting towards materials that are wear-resistant, durable, do not fade in the sun and are easy to wash. The latter is especially true if it is furniture for a children's room.
Upholstery textiles are divided into 9 groups. Group zero includes the thinnest and fastest-wearing fabrics, group 8 includes the most durable and wear-resistant fabrics. The latter are usually more expensive, but there are exceptions, such as velvet and silk.
Upholstery fabric is chosen taking into account a variety of criteria: whether there are children in the family, whether they have a dog or cat in the house, whether adults have time to care for delicate fabric, etc.
Flock is a universal, durable, wrinkle-resistant material. Easy to clean, resistant to claws, does not fade in the sun.
Chenille and fleece - very easy to wash from any kind of dirt, recommended for children. The fabric is soft, but not fleecy, and is not afraid of claws.
Jacquard is a durable, dense fabric obtained by complex weaving of threads. Lasts at least 10 years, does not fade in the sun and is resistant to pollution.
Matting is a mixed fabric based on linen and cotton. Imitates canvas and has a characteristic structure. The fabric is durable, easy to wash, and does not fade. However, due to its texture, it is not suitable for all styles.
You can also use leather to reupholster with your own hands. However, genuine leather is a very expensive material. It is advisable to work with him if you have some experience.
Necessary tools for reupholstering furniture
In addition to upholstery fabric, for covering upholstered furniture, you should prepare the following tools:
- stationery knife
- wood stapler with staples
- a set of tools necessary for removing old coating
- equipment for cutting future cladding; if you don’t have it, you can get by with a strong needle or awl
- furniture foam rubber, if the old one has become unusable
Depending on the type of upholstered furniture structure, the tools for disassembling and assembling it may vary slightly.
Removing and disassembling seats
To reupholster the seats, you must first dismantle them, remove them from the interior to the workplace, disassemble them and remove the old upholstery. Each car interior has its own characteristics. Therefore, it is impossible to create one instruction that is universally suitable for all seats. Let's look at the main points that are similar for most cars.
- Most front seats are fairly easy to remove from the interior. The front seats slide on the tracks (slides). They are bolted to the floor at the front and back. Typically, the places where the slide is attached to the floor are covered with plastic covers. To get to the bolts, you need to move the chair to its extreme position (forward or backward, in turn).
Front seat mounting
- Before removing the seats, you must disconnect all electrical wiring plugs at the bottom. If the seats have side airbags, you need to disconnect the battery and wait 3 minutes before disconnecting the connectors at the bottom of the seats.
- Carefully remove the seat from the interior, do not scratch the plastic trim of the interior with the slide. You can wrap the sharp corners of the seat slide with rags before dismantling. This will protect the interior from accidental scratches. The second front seat is removed in a similar way.
- To remove the rear seat, you usually need to first remove the lower part of the seat. There are two different methods that are used to secure the bottom of the rear seat. These are two bolts or two latches on the front that secure the seat to the floor. You need to unscrew or snap off the bottom of the seat and pull it out. After removing the lower part, the bolts securing the rear seat back become visible. After unscrewing them, you need to move the seat back up and remove it.
- Disassemble the seat. You will need a large area in which to work comfortably with the seats. This can be done either on a large table or on the floor. First you need to disconnect the seat back from the seat itself. You need to fully recline the backrest with the seat mechanism. Remove the skids. To disassemble the front seats, it may be necessary to remove plastic trim parts.
- Before removing the upholstery, the headrest must be removed.
- Remove the old upholstery from the seat and backrest. The upholstery is usually attached to the seat frame and soft base with special staples. There can be quite a lot of such staples (rings). To remove the old upholstery you need to cut off all these rings. They are not easy to cut. You can use a special tool, wire cutters or metal scissors. It is necessary to draw a diagram of the location of the fastening rings so that, when installing new upholstery, you know where to install the new brackets. During disassembly, you can also take photographs of the stages. This way, you will know which bolt was unscrewed and where it came from.
- The upholstery can be attached with rings to metal rods built into the upholstered part of the seat structure. In this case, the seat upholstery must be lifted from the edges to see the fastening points, and all fastenings (rings) must be cut off. Instead of rings, there may be textile fasteners (Velcro), then you just need to pull the upholstery to remove it.
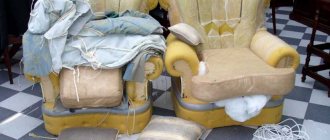
Features of disassembling upholstered furniture
Before starting work on removing old upholstery, it is necessary to dismantle structural elements that may interfere with its dismantling.
The fabric must be carefully removed, trying to avoid damage, as it will help to obtain a pattern for future covering.
It is advisable to combine the restoration of the external upholstery with the restoration of the frame of the product. Damaged parts are repaired and, if impossible, replaced with new ones.
Weakened areas of the wooden structure are stretched or reinforced with additional screws.
Before starting assembly work, wooden parts are cleaned of dust and dirt. Foam rubber that has visible deformation must be replaced.
We disassemble the sofa and assess the scale of work
Reupholstering a sofa begins with disassembling it. During the process, you will be able to assess the extent of the damage and decide what exactly you need to do. For this part of the job you will need:
- a large screwdriver to unscrew visible bolts (if any);
- a small flat-head screwdriver, pliers or staple remover - to remove the staples that secure the upholstery.
The main thing is to remove the old upholstery. Then everything will become clear
Actually, that's all. First, remove the individual pillows, if any, and remove the side panels. It’s difficult to suggest here - there are many designs. Look carefully, you are sure to find something. If you have retractable parts, you can try starting with them.
Separating the upholstery
The next step is to separate the fabric from the frame. It is attached with staples to the wooden bars of the frame. We pry the staples with a flat screwdriver and pull them out. Some may fit very tightly; it is easier to pull them out by grabbing them by the raised back with pliers or pliers.
We disassemble the sofa: remove the staples
We remove the fabric carefully, trying not to damage it too much. We will then use it as a sample for new sofa upholstery. There are several layers underneath the upholstery fabric. Maybe felt, padding polyester, some kind of fabric. If the sofa repair was started only to replace the upholstery, look at the condition of these materials. If there are signs of wear, it is better to replace. After all, it will be a shame if in a few months the sofa needs to be reupholstered again, but this time because the layers of the lining have been removed.
If the sofa is old, there may be a picture like this
Once the fabric is removed, it's time to evaluate which parts you'll need to replace. Everything is clear with the upholstery and lining underneath. It is advisable to keep the pie in the same composition. If old materials were used that are not currently on sale or are too expensive, replace them with modern analogues. The main thing for folding sofas is to reach the same height of the seat and back that were before, since folding mechanisms are designed for certain parameters of the “pillows”. In order not to be mistaken with the thickness of materials, find unworn (or least worn) areas and measure the thickness.
Assessing the damage
This stage is needed if the sofa seat is uneven, there are humps and depressions, protruding springs (and from below too). In seats that consist only of foam rubber, everything is simple: they are usually replaced. They can be made from high-density foam rubber by folding several layers; you can order ready-made foam rubber at a store that sells furniture spare parts. It is wise to order a latex mattress according to exact dimensions (measure after removing the fabric and all layers).
If the sofa has springs, remove all the covering layers to get to them. If there are no burst springs, the frame and its connections are strong, without play or cracks, the backing for the springs is in good condition, you can stop there. We change the covering layers, sew a new cover, stretch it and fasten it. This completes the reupholstery of the sofa.
One of the common defects in spring blocks is a broken spring.
If there is any damage listed above, the spring unit will have to be separated. It is attached to the frame frame using U-shaped brackets or nails. Now you have completely disassembled your sofa into its components. Next is the replacement and repair of damaged parts, and then reassembly.
Cutting material for reupholstery
You should buy upholstery material after measuring the old fabric. To the obtained measurement result, it is necessary to add an additional 10-15 percent of the area of the old cladding.
The easiest way to get the correct pattern is to transfer the old dimensions to the new material by overlapping and tracing it with chalk with a small margin.
In cases where the elements of the old cladding consist of several parts, they are sewn together using a sewing machine, after cutting.
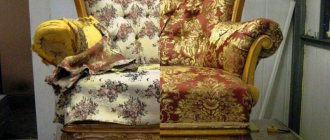
Chair upholstery with fabric
The back must be cut from the first meter of fabric, and the seat from what remains. Try on a piece of fabric to the chair so as not to make mistakes in the measurements.
The cover is attached to the frame with a stapler; if you cannot sew the covers yourself, it is best to contact a sewing workshop. The tension should be done in your direction, when the cover is nailed to the frame, the distance between the staples or nails should be no more than four centimeters.
When doing work, you need to be careful. It is worth remembering that it is important to have properly sewn covers of suitable sizes, and then the reupholstery will certainly work out.
Assembly work on reupholstering furniture
Upholstered furniture is assembled in the reverse order.
Instead of old foam rubber, filler (foam rubber) is placed in the back of the chair; in cases where the material is thick, sharp corners should be smoothed out using a stationery knife.
Batting is placed on top of the foam rubber and secured to the back wall. The material should be well stretched and free of folds and sagging.
The finished upholstery material is applied to the filler and secured with staples around the entire perimeter, with simultaneous tension.
The cladding of the remaining structural elements is carried out similarly.
After finishing work on covering all structural elements, they proceed to assembling the furniture. Assembly is carried out in reverse order.
The back wall of the chair is secured last with staples along the entire perimeter of the back of the chair.
Reupholstering upholstered furniture is not something complicated. A person who has minimal skills in working with a tool can easily cope without experiencing any difficulties. If you have any questions, you can always refer to the video tutorials on how to reupholster a chair with your own hands.
Additional working parts
When buying a topcoat, you need to remember about other auxiliary materials:
- About decorative fittings. About nails (fasteners) with wide heads similar in tone to the front surface.
- About foam rubber, the required size, with a certain thickness. The total size should be equal to the area covered by the chair and all its parts. In order not to end up with a shortage of material, it is worth buying foam rubber with a reserve, just like eco-leather. Sometimes felt is used as a filler. You can also use padding polyester or batting;
- To disguise seams and places where staples are sewn, edgings are used.
Photo of DIY chair reupholstery
Types of seams used when reupholstering seats
The main point when reupholstering the interior is to create seams using a sewing machine. Practice as much as possible. You need to learn how to easily make even seams on a sewing machine.
Let's look at the main types of seams used when reupholstering car seats with your own hands. How the seams are made will determine not only their appearance, but also their strength.
Basic seams:
Right side of a simple connecting seam (stitch seam)
- Basic connecting seam (so-called stitch seam). Two parts of the material are applied to each other with their front sides, a certain indentation is made from the edges, and the materials are sewn together with a single seam. The edges on the reverse side can be folded to one side or each edge separately in its own direction, ironed and glued. This will create a flat seam.
- Adjustment seam. It is done as follows. First, two parts of the material are taken, joined with the front side and sewn together with a distance from the edges of approximately 1.5 - 2 cm. In the second stage, we move the sewn part to the side, the front part of the material remains on top and one edge hangs over one of the parts of the material (see photo). A second seam is made along it. This seam will be visible, so it needs to be made even. It must pass through all layers of material underneath.
Adjustment stitch
- The French seam (double) begins in the same way as the previous seam. Two pieces of material are sewn together, right sides pressed against each other. The distance from the edge should be greater (2–2.5 cm). Next, on the reverse side, between the edges of the two parts, a strip of the same material (or stronger, but thinner, so as not to increase the thickness of the seam) is sewn with two seams. The seams go through all layers of materials. For convenience, before sewing, the strip can first be glued to the material. This strip will not be visible from the front side. It reinforces the main seam. The two seams on the front side must be smooth and symmetrical relative to the junction of the two materials. To improve the appearance of the seam, thicker threads are often used. The French seam is often used in the manufacture of upholstery made of natural and artificial leather. When sewing thinner materials and in sewing other than upholstery, the French seam may have a different technique. This seam turns out beautiful, but not the most durable. All threads and folded edges of the material are exposed to sun and abrasion.
French (double) seam
- Seam with elastic cord insertion (edging seam). The purpose of the cord is to create an even and tightly wrapped material. After this, it is included in the process of creating a common seam. This requires a special cord and setting the sewing machine in a certain way. First you need to align the base material and the strip with the cord and carefully sew them (3 layers are sewn). Next, the second part of the material is placed face down on the stitched strip of material with a cord and sewn. To properly stitch the insert with the cord, you need to use a special foot on your sewing machine. This allows the sewing machine to hold the cord and fabric close to the needle for more precise stitch control. This seam can be called the most durable. The cord provides protection to the seam and edges of the material, eliminating the destructive effects of the sun and abrasion. After the insert wears out, it can be replaced with a new one.
Seam with cord insertion (edging seam)
- When making new upholstery, non-structural, decorative seams can be sewn. This is done to add detail to the upholstery design. There are two basic ways to create such seams. The first and most common is to simply stitch a seam through the upholstery to which the lining is glued. A certain relief is created, as the seam presses the upholstery, compressing the soft lining. The second method is a folded seam. First, a seam is made as described in the first case. Next, the material is folded along the seam line, right sides facing each other. Then a second seam is sewn on the reverse side, approximately 3 mm from the edge of the fold. This way the front side looks like two separate pieces are sewn together (see photo). In addition to an additional design element, such a seam has practical benefits. It is hidden and indestructible.
Decorative seams
- The beginning and end of the seam must be secured so that the seam does not unravel. This is done by the reverse function on the sewing machine. You need to sew 1 cm forward, then 1 cm back and continue the seam. It turns out that 3 lines go through one place and the thread is secured. Also, modern models may have a built-in thread fastening function. On sewing machines that do not have a built-in reverse or thread-locking function, you can do the same thing by raising the foot, leaving the needle down and turning the fabric 360 degrees.
Seat reupholstery with airbag
Airbag-equipped seats may have a plastic cover that deploys when the airbag deploys, similar to that found on the dashboard or steering wheel. However, most often, the area with the airbag on the seat is simply covered with upholstery. At this point, the upholstery has a weakened seam that should rip easily when the airbag deploys.
If the seams in the side of the seat where the airbag is located do not meet certain specifications, then in a crash it may deploy too late or in the wrong direction.
Sewing station for sewing upholstery with control of seam characteristics.
There is special equipment (Durkopp Adler sewing station 550–867) for stitch control when sewing upholstery for seats with airbag. Thread tension and stitch length are controlled to meet industry standards. The sewing station produces a seam that is strong enough for the seat to be used and, at the same time, must ensure that the seam breaks when the airbag deploys. Such a system is expensive and not available to every workshop.
You can use the following technique for seats with airbags. Sew with thread of normal thickness on the top and bottom of the area where the airbag should fire. The seams are secured at the ends. The place where the seam should separate when the airbag deploys is stitched with a thinner thread. A seam with a thinner thread is made to overlap the previous seams, but is not secured.
For the top seam, use nylon thread (Bonded Nylon Upholstery #69 T70). The stitch length should be at least 6 mm and the tension should be reduced.
The airbag deploys with tremendous force and speed. A seam with such threads and with such a stitch length will not be able to hold such force.
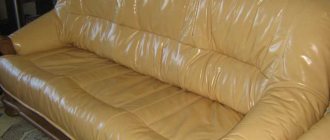
Restoration of a leather chair
The main value of a leather sofa is its upholstery. Over time, scuffs, cracks, and sometimes holes appear on it. The filler also suffers.
Leather furniture should be completely restored, but try to preserve the upholstery as much as possible.
You can restore it in the following ways:
By painting. You need to purchase a special composition, sold in cans. The material takes on a presentable appearance, is waterproof, and small cracks are filled with a solution.
Installing patches. Torn edges are trimmed and smoothed. Then they are glued to a fabric of a suitable color. After painting, the repaired area will not be noticeable.
Partial replacement. Usually this operation is carried out on the armrests, which suffer the most during operation. A budget option is leatherette, which can be found in any haberdashery store.
Andrey Peregubsky
Furniture handyman
Ask a Question
However, updated leather will not brighten up a dented seat or eliminate squeaks and play. The chair will have to be disassembled, the frame repaired, the filling replaced, and the wood undergoes sanitary and technological treatment. It takes time, but the end result is worth it.