Features of porcelain stoneware
Thanks to the special properties of ceramic granite, it is suitable for creating various types of furniture, since the countertops produced can be made from either thin or thick granite.
Depending on the taste preferences and wishes of the customer, it is possible to produce furniture elements of various sizes, taking into account the types of other kitchen equipment that are planned to be combined with the countertop.
- The choice of porcelain stoneware as a raw material for the manufacture of countertops is explained by the fact that it is particularly durable and can be used for many years.
- Thin ceramic granite is used in cases where it is necessary to connect the kitchen with the dining room.
- This is explained by the fact that furniture coverings in other rooms besides the kitchen should not be thick, so as not to mentally put pressure on household members.
Thick porcelain stoneware is used for cutting meat and cooking, so decorating other rooms with it is not appropriate.
The cost of the product directly depends on the color of the material.
Manufacturing process: step-by-step instructions
- Preliminary preparation
Before you begin assembling it yourself, you need to prepare all the components and parts of the future array. They are cut out from the selected material using a jigsaw. Their saw cuts need to be sanded. Sandpaper works well for this purpose. To prevent moisture and mold from entering, a melamine edging tape is placed on each of the cuts. In order for the dimensions of all elements to be clearly verified, it is advisable to create a cutting map. There are special services for this on the Internet. This preliminary work will allow you to avoid errors in cutting. In addition, this diagram will take into account the size of the saw cut.
The initial stage of the kitchen furniture manufacturing process
- Assembly of elements
Assembling upper cabinets in the kitchen
After taking into account all the measurements, individual parts and elements have been prepared, they need to be laid out in order of assembly. This will make the assembly process more streamlined.
Kitchen cabinets are assembled according to the following algorithm:
- If there are drawers, then the guides are installed first. In this case, be sure to use a level.
- If shelves are provided, you need to drill holes to attach them.
- Separate holes are drilled for inter-wall fastening.
- Its side walls are attached to the bottom of the cabinet.
- The top part is attached.
- The legs are attached.
Once all the products are assembled, you can begin their installation.
Kitchen furniture assembly
- Installation
If the kitchen assembly process coincides with the renovation, then all construction work should be completed before installation begins. The walls and floor of the room must be prepared for fastening furniture. You can take a piece of MDF as an apron. Installation usually begins with the lower elements. To do this, use a level. After all the products are connected to each other (Euro-ties are used for this), a common wall is fixed behind the entire array.
DIY kitchen installation and assembly
In the countertop you need to mark the location of the stove, work surface and sink. At each section, corresponding holes are cut out and treated with construction sealant. The tabletop itself is attached with self-tapping screws to the finished cabinets.
Installing a countertop is a responsible process
After this, the upper elements are installed. The most optimal distance between the tabletop and the bottom of the upper cabinets is 650 mm. In order to determine the height of the canvas for fastening the upper elements, it is necessary to add to the indicated distance the height of the cabinets and 10 mm occupied by the fastening structure. The upper tiers are secured with special canopies installed on the rear walls.
At the end of the kitchen installation, you fix the doors in the open position with your own hands. To do this, the door hinge is fixed on the door, and then mounted in the wall.
Installed doors in open position
After installing the headset itself, electronics, built-in elements and various accessories (handles, rails, dryers, etc.) are installed.
Installation of an oven and built-in hob
Advantages of porcelain stoneware
Its characteristics can tell about the undeniable advantages of the material.
- Firstly, it is a durable material that is not susceptible to mechanical stress, which prevents damage.
- Secondly, porcelain stoneware looks very attractive and fits well into almost any interior.
- Thirdly, it helps to increase the resistance of the furniture to which it is attached from the harmful effects of moisture and temperature.
Surfaces finished with porcelain stoneware are light in weight. Thanks to this, the structure itself does not deform. Porcelain stoneware countertops can be laid on concrete, metal, wood and plastic.
Previously, this material was used exclusively for floor coverings. However, the positive characteristics of porcelain stoneware made it possible to use it for tiling the entire kitchen.
This material copes well with temperature changes, abrasive chemicals and is easy to clean. It can be easily polished and freed from various chips.
The advantages of porcelain stoneware are:
- Resistance to high temperature and moisture;
- Environmental friendliness;
- Long service life;
- Practicality;
- Easy to care for;
- Affordable price;
- Possibility of carrying out repair work.
The environmental friendliness of this material is evidenced by the absence of harmful substances, dyes and other things. Moreover, the strength qualities of such countertops will allow you to do without cutting boards.
Also, the surface of porcelain stoneware does not allow fats to penetrate inside and is unsuitable for the growth of harmful bacteria. On such a surface you can only place pots or pans removed from the stove without fear, and no harm will be done to the material.
Types of tiles
How to make a laminate countertop with your own hands
To cover a kitchen surface, you need to choose glazed tiles with a 5th protection class. Kitchen tiles should not be afraid of grease, hot and cold objects, should not absorb moisture and should be easy to clean. There are a great variety of kitchen tiles, let's look at the most interesting options:
- Tiles imitating brickwork. These tiles are in the Italian and Provence style; they will fill the kitchen with warmth and comfort.
- Stone effect tiles. It will decorate the kitchen in Country and Classic styles, giving the kitchen individuality and novelty.
- I imitate leather on tiles. It will fill the kitchen with an atmosphere of chic and glamor. The imitation of snake and crocodile skin looks impressive.
- Tiles with crystals, painting or hand-decorated. These luxurious products are created for the rich decoration of the kitchen. They will give the interior uniqueness.
- Tiles with ornaments. They embody the most colorful and unusual design ideas. The kitchen will be decorated with patterns, prints, ornaments, drawings, and abstraction.
- Mosaic tiles. Gives off notes of oriental and Arabic interiors. It is very practical, but you need to take it with a reserve in order to select a design.
- Tile with photo printing. You can take any picture or photograph as an image. Thanks to special technology, the image on the tile does not erase, fade or drip.
- 3D tiles. It will add dynamics to the calm interior of the kitchen and make the design as interesting as possible.
- Tile with texture. Trend of the season: a glossy pattern is applied to a matte surface, it looks cool and tasteful.
- Figured tiles. The tiles are produced in the form of polygons, trapezoids, and round shapes. These tiles will turn your walls into a beautiful decoration.
Decorating a kitchen countertop with figured tiles.
Ceramic variety
To cover a countertop with ceramic tiles, you must choose glazed tiles. Preference should be given to small sizes of 10 × 10 cm - such a surface will look neat and elegant. For the edges and ends of the kitchen surface, plastic or metal baseboards, corners and borders are purchased. A variety of colors makes it possible to realize the most daring design solutions.
Covering the kitchen countertop with ceramic tiles.
Mosaic wealth
Mosaic is a very small tile up to 2.5 cm. Made from porcelain stoneware or marble, malachite or onyx, and other natural stones. Mosaic fragments can be of very different shapes. Tabletops decorated with mosaics look perfect and impressive at the same time. Mediterranean or Moorish styles will look very harmonious.
Surface tiling with mosaic tiles.
Mosaic for cladding is divided into the following types:
- Glass is the most common type of mosaic; it can be matte, transparent, glass, with various shades and additions;
- Metal mosaic;
- Smalt is the most expensive, but also the most reliable;
- Stone made of travertine, marble, lapis lazuli.
There are 3 types of mosaics for countertop cladding.
Reliability and a unique appearance are the qualities of mosaic. Small tiles can be used to create pictures and patterns.
Eternal Granite
Granite countertops are very popular, but they are quite expensive. Granite has a great advantage over tiles and ceramic tiles. A kitchen surface made of polished granite has excellent water-repellent properties - this will not allow bacteria to accumulate on such a surface. It is distinguished by increased mechanical strength - only diamond is stronger than granite. This table top will serve you for a really long time. Granite is a beautiful stone with many unique patterns and colors.
Kitchen surface made of polished granite.
Porcelain tiles
Porcelain stoneware is a mixture of quartz sand, clay, kaolin, and feldspar. This mixture undergoes heat treatment and high pressure treatment. In appearance it is difficult to distinguish it from granite. Tiles made from porcelain stoneware are extremely durable. And it has a number of advantages:
- Porcelain tiles are much cheaper than stone;
- Increased strength, it is not afraid of sharp objects, there are no scratches or chips on it, it withstands all detergents;
- Wear resistance, long-term use of the surface;
- Heat resistance, porcelain stoneware does not deform due to temperature changes;
- Increased hygiene, dirt is not absorbed into the tabletop; to remove it, just wipe it with a cloth;
- Lack of pores, protection of porcelain stoneware countertops from mold;
- Similarity to natural granite;
- Unlimited length of the product, allows you to make a tabletop without joints;
- Variety of color palettes.
The porcelain stoneware countertop has sound insulation properties.
Disadvantages of porcelain stoneware
On the one hand, the cost of porcelain stoneware is several times less than other natural materials, but, on the other hand, installation work is priced too high. Moreover, the cladding process itself is quite labor-intensive and time-consuming. In addition, it is necessary to unstitch the seams from time to time.
If the slab has an uneven surface or is not installed correctly, then caring for it will be very, very difficult. Every day it is necessary to rub the countertop with a special polish several times a day so that it does not lose its glossy shine.
What to choose?
The countertop in the kitchen should cover the base cabinets. The best option would be a cladding that has no joints. The cut holes for the sink, hob, etc. must be arranged so that moisture does not penetrate inside. Of all the materials considered, a countertop finished with ceramic tiles or mosaics has the greatest number of advantages.
- This is the price side. This material can be afforded by anyone who wants to beautifully and properly update their kitchen space.
- This is the satisfaction of all requirements that can be presented to the quality of the coating. It is the intensity of operation that puts forward these requirements. And as we know, a penny saves a ruble.
- A tabletop made of natural or acrylic stone will seem more respectable to some, but the price will dampen the ardor. Ceramics and mosaics can replace natural coatings and will be in no way inferior to them in quality.
- You can make a work area with a high-quality tabletop yourself.
All that remains is to choose - ceramics or mosaic. Both coatings are wear-resistant. They can easily withstand high temperature shocks, changes, and spills of various aggressive liquids. These coatings are identical in quality. But their differences lie in completely different reasons.
- Ceramic tiles have been a well-known material for a long time. The production of this material has been established for a long time. Therefore, there are practically no manufacturing defects here. The same applies to the so-called related materials: adhesives, grouts, putties. In addition, this material is laid by experienced craftsmen who have long been “trained” and perform all the work efficiently.
- Mosaic is more elegant. It is convenient to paste over any, even the most complex surfaces, such as columns, arches, and, of course, kitchen tables and countertops. The side of the plates (they have either a square or round shape) is 13–20 mm. This means that you can lay out the most complex curve without even resorting to a tile cutter. Mosaic components are twice as thin as tiles. And this plus also plays a role in ease of installation.
Ceramic tiles have already proven themselves as a reliable material, and mosaic is only gaining momentum. This promising material allows you to create surfaces that look very rich and elegant. New items appear every day, perhaps mosaic will soon catch up with its popularity in full
It is worth noting that there is still little competition in the mosaic market, so it costs twice as much as tiles
Tile grout will cost less than mosaic grout. No wonder. Mosaic joints require more grout material. However, ceramic tiles and mosaics can work well together.
For tile countertop design ideas, see the following video.
How to choose porcelain tiles
When choosing ceramic granite for a countertop, you should be guided by the criteria that determine the texture of the tile and its size.
The texture of such tiles can be of several types:
- Matte (also called untreated);
- Semi-matte;
- Smooth, polished;
- Covered with a special glaze that prevents slipping;
- Embossed.
Glazed and embossed porcelain tiles are considered difficult to maintain, making them extremely impractical. Moreover, the second type, due to its structure, is difficult to clean.
When choosing sheets of ceramic granite that are too wide, keep in mind that they will need to be cut very precisely. Cutting is possible using a grinder. A tabletop with small-format sheets will look more sophisticated.
Which one is used where?
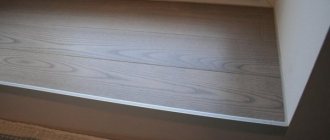
For the end, shaped tiles are used, which have an L-shape in appearance. With its help, they simultaneously cover the first row and cover the end. The top tile can hang over the end dies, protruding by 2–4 mm.
The ends give the countertop a finished look and increase its aesthetic appeal. You can decorate the top surface of the table in different ways. For example, on a horizontal surface, a die can be laid out in such a way that the edge of the glued fragment hangs over the thickness of the porcelain stoneware. Then the remaining dies are cut into strips and glued at the end edge.
As for laying at an angle of 45 degrees, professionals can do this. The downside of this type of tabletop design is the large amount of trimming, which increases the number of glued fragments. In addition, a professional master can handle this work. Therefore, this design may require labor costs for the tiler.
For the countertop itself, you can use large elements, which will simplify maintenance and also speed up the cladding process, reducing the number of joints. However, if the kitchen is small, then it is preferable to use small tiles. This eliminates the possibility of introducing an imbalance, which can visually reduce the already insufficient square meters of the room.
If possible, the sizes can be increased. By the way, the size can determine the thickness of the dies used, which should not be forgotten before purchasing durable and high-quality material.
As for the use of mosaic for the tabletop, professional tilers can choose it. Even if you want to, working with it requires care and experience, and a beginner will not be able to make all the joints perfectly identical.
How to lay porcelain tiles
Before starting installation, make sure to prepare all the necessary accessories. The work process is somewhat reminiscent of tiling surfaces. In other words, the same materials and tools will be used in the work, from adhesive to spatulas.
Using a special tool, you need to level the glue laid on the surface. A spatula is suitable for applying glue to the work surface.
- Regarding the distance between the plates, it would not be amiss to mention that the gaps should be no more than 2 mm in width. This way, the installed parts of the countertop will look neat, and dirt will be less likely to get into the seams.
- Thin the glue gradually as it can dry and harden in a short time. The slabs themselves are placed on the treated surface. Be sure to use a level to check whether a particular piece is lying level.
Don't forget about the ends. They are finished in the same way as tiles are laid on the countertop. To attach the material more securely, it is advisable to use special tape. After the adhesive has dried, the tape is removed.
Tile laying
It is quite possible to lay porcelain stoneware on the countertop with your own hands. First of all, marking is done. To do this, you can lay porcelain tiles for the kitchen on a dry surface and think about its direction.
It’s good if the trimmings are near the wall. Make the calculation so that a solid tile lies along the edges. Immediately before laying porcelain stoneware, the countertop should be primed.
As for the seams, there are two options: use plastic crosses to form an even seam or lay porcelain tiles without a seam. Regardless of the method chosen, carefully control and follow the lines up and down.
Important! The cutout for the sink must be lined so that the edge of the sink rests on the tile. There should be no gaps
At the same time, leave a small gap in the opening so that the sink fits in freely without effort. This also applies to the built-in hob.
A tile cutter is used to cut porcelain tiles. First lay all the solid tiles, and then make all the cuts near the wall. After laying the surface of the tabletop, you should also cover the end of the two-layer plywood.
Upon completion of all work, all that remains is to carefully fill all the seams with a special grout. For countertops, preference is given to compositions based on epoxy resin. This grout is resistant to:
- temperature changes;
- fats;
- oils;
- reagents.
Grouting is done with a rubber spatula, which will not damage the tiles. When the grout has dried, all residues can be easily removed from the surface with a damp rag.
Conclusion So, as you can see, making a kitchen countertop from porcelain stoneware with your own hands is not particularly difficult. The main thing is to make a quality base.
This can be the most painstaking process. If you already have experience in laying tiles, then laying it on the countertop will not be difficult. We hope this material was useful to you.
Additionally, we suggest watching introductory videos
Tips from the master
If you are installing a countertop yourself, consider the following tips to help you avoid some problems and common mistakes:
- To ensure that the sheets are cut accurately, use special diamond-coated grinder discs. For the first time, you may not be able to cut the sheets accurately, since this requires experience and a certain skill.
- From time to time the seams will have to be unstitched, as the grout becomes dirty over time.
- Buy smooth sheets of porcelain stoneware. Caring for embossed sheets is more difficult due to their porous structure.
Wall mosaic
Where can I get broken tiles?
To make a mosaic from broken ceramic tiles, you don’t have to buy whole building materials and crumble them in your backyard. Many hardware stores throw away the broken ceramic or sell it at a reasonable price as recyclable materials.
You can also purchase remnants of ceramic tiles, which are also much cheaper.
The most ideal option is tiles left after renovation in your home. Don’t rush to throw away even small fragments, because they can become an indispensable addition to a future multi-colored mosaic!
Thrift is not a vice. On the contrary, rational economy develops resourcefulness and creates the basis for the release of your creative potential. Who knows, maybe if it weren’t for the remains of broken tiles, the great architect and sculptor Gaudi would not have created his famous benches in Barcelona’s Park Güell...
Preparing for work
Before you start working, you need to mentally imagine the result of your creative efforts. Imagine all the smallest nuances - composition, scale, colors... Even if you want to create an abstraction, you need to think about the order in which the shades will go, etc. Chaotically placed fragments are much simpler than a mosaic with a specific image, so if you are not confident in your abilities, it is best to start with abstraction.
Draw a rough sketch on paper according to the scale of the wall. This will be your work plan, following which you will create an accurate and beautiful drawing on the wall.
Wall treatment
Before applying markings to the wall, it should be cleaned. If the wall is covered with wallpaper, remove it completely. To quickly remove wallpaper, peel the paper from bottom to top, picking it up with the tip of a knife or spatula. Moisten the remaining pieces with a wet sponge, then they will easily peel off without damaging the smooth surface of the wall.
If during the cleaning process the wall develops uneven spots or chips, fill them with putty. The surface must be flat and smooth so that the tile pieces stick well.
Draw a sketch of the future drawing on the wall. If it is a large image, it will be difficult for an inexperienced person to accurately transfer it to the wall, maintaining all proportions. To make things easier for yourself, you can use the artistic grid method or project the design onto the surface using a projector.
Helpful advice: to ensure that the tiles stick well, make sure that the room temperature is from +5C to +30C.
Tile mortar
Ceramic tile mortar can be purchased at any hardware store. It is advisable to use a white tile base so that your work looks “clean” and light. If you will be using glass in addition to broken ceramic tiles, it is best to look for a clear solution. It costs a little more, but is perfect for working with glass elements.
Apply the solution to the wall using a spatula. You shouldn’t cover the entire surface with it at once—start with an area of the same color. Let's say if your design has a blue cloud, apply the solution only to this segment of the design and lay out ceramic shards of the corresponding color.
Laying out a drawing
There are several universal rules for laying out mosaics:
- To make your composition as even and proportional as possible, start laying it out from the center, gradually expanding to the sides.
- First lay out the figures (people, plants, animals) and secondary elements (river, sun, etc.).
- The background of the picture is laid out last.
Final stage
Allow the ceramic tile mosaic to dry for 24 hours. When the solution has completely hardened, wipe the surface of the mosaic with a damp cloth, removing any remaining glue from it.
Then start grouting the mosaic. Grout can also be purchased at a hardware store. Apply it in parts, carefully processing each segment of the pattern. About 15-20 minutes after application, the grout will darken and you can remove the excess with a damp cloth.
Mosaic care
Mosaic, like any ceramic tile coating, does not require special care, but there are still several rules that are worth remembering:
- Do not wipe the mosaic with wax, oily substances or products that contain phosphoric acid.
- Do not use abrasive products for cleaning.
- If the mosaic is very dirty, use neutral, low-acid cleaning products, then rinse the surface thoroughly with running water.
Caring for porcelain tiles
It is believed that this type of material does not require excessive care. It is enough just to wipe the surface 1-2 times a day with a soft cloth soaked in warm water.
Although porcelain stoneware is resistant to aggressive chemicals, try to use acidic compounds as little as possible.