Ten years ago, to the question: is it possible to lay tiles on chipboard or OSB, the answer was one - no, and there was a good reason for this, the lack of materials that could effectively combat the hygroscopicity and unreliability of the slabs themselves. But nothing stands still, so now tiles are often laid on such not always strong wooden bases.
In order for the cladding to be strong and durable, you need to follow some basic rules. All the important points of how to lay tiles on an OSB slab will be covered in the article.
Let's get straight to the decoding. Chipboard is a chipboard, and OSB is oriented strand board, popularly called OSB because it is a Canadian invention - OSB from the English oriented strand board. In terms of properties, OSB is approximately 2 times stronger and has less release of harmful resins, unlike its predecessor chipboard, but in fact both are made from wood shavings and therefore are generally similar.
This video details how chipboard is made.
And here you can see the production of OSB
OSB boards: pros and cons
OSB boards have undoubted advantages and benefits. The tree itself is susceptible to rotting, afraid of water, may swell, and mold may appear on it.
Thanks to modifying additives and a dense structure, OSB boards show improved characteristics.
- High strength: the plate can withstand significant loads, constant friction, as well as mechanical stress.
- Relatively high moisture resistance: chemical impregnation promotes hydrophobicity, so that water is poorly absorbed.
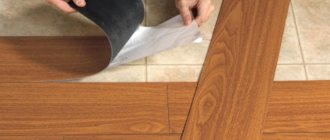
The affordable cost has made the material a popular option for flooring. But there is a significant drawback: OSB boards cannot be considered a finishing coating.
You still need additional cladding, for example, painting or linoleum. Is it possible to lay tiles on an OSB board? This remains to be seen.
About the characteristics of OSB, see this video story
Ideally, the fiberboard flooring would have to be removed to create a level and solid base. If we are talking about an old floor made of boards in an apartment with a Soviet renovation, then the fiberboard, all boards and joists should be dismantled in order to get to the panel between the floors.
After which you should take care of waterproofing and lay plastic film around the entire perimeter of the floor. A screed is made along the exposed beacons, which will serve as the basis for future floor tiles. But many people come to the conclusion that it is expensive. So they want to lay tiles on what they have.
So let's begin. It is worth noting that the principles of laying tiles on the wall and on the floor are similar.
Plywood
Since it is almost impossible to reliably glue tiles onto finished plywood, care must be taken to improve the adhesive properties of this material. First you need to treat it with an antiseptic and a waterproofing mixture, even if moisture-resistant sheets were used. After this, to improve adhesion to the coating, it is recommended to lay and secure a serpyanka mesh on it. Prime the plywood in several layers. This will not only improve adhesion, but will also provide additional protection against moisture, especially if the material will be used in the bathroom.
Plywood and similar materials must be laid correctly - this is the basis for a high-quality tile covering
Next, laying ceramic tiles on the plywood floor is carried out according to the standard scheme. Before laying the covering on the wall, you need to secure the support rail so that the coating, which has not yet adhered to the base, does not creep down.
An important point that should be taken into account not only when laying the tiled flooring, but also when installing the plywood itself: the material changes in size depending on environmental conditions, so small gaps should remain between the slabs and around the perimeter of the room to compensate for the movement of the sheets. To prevent them from forming voids, you can fill the joints with polyurethane foam.
Preparing the base
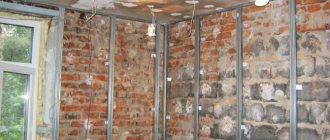
Concrete screed is durable and reliable, while OSB panels can be unreliably fastened and move around a little. These defects must be eliminated so that the surface is smooth, durable and monolithic.
- Check the reliability of the OSB panels. To be on the safe side, use double fasteners: holes are drilled around the entire perimeter, and then the sheet can be glued to liquid nails. After this, in small increments, the OSB panel is secured with wood screws.
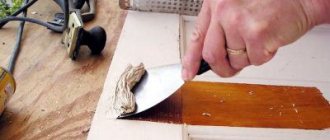
- The surface must be monolithic: the seams must be cleaned and then sealed with a special putty, if available.
- The surface can be strengthened with special deep penetration primers or using a reinforcing mesh. If you use a polymer mesh, then attach it to the OSB board with staples using a construction stapler. After this, you need to tighten the surface with a liquid layer of glue so that it gets into all the cells.
If the choice is between a metal mesh and a polymer one, then choose the polymer option. Installation of metal mesh is more difficult, but polymer products are not susceptible to moisture, are easy to attach and play the role of good reinforcement.
Basic rules for laying tiles on chipboard and OSB can be learned from this video
The metal mesh must be well tensioned and secured so that it does not cause additional irregularities. When joining, the reinforcing mesh should overlap by several cm.
With a primer everything is easier. The most popular and trustworthy option is the “Betonokontakt” primer. It contains quartz sand, which creates roughness on the surface.
After this, adhesion increases and a good result is achieved. The advantage of primer is that it shows noticeable shading, so it’s easy to see where you still need to prime.
Not everyone agrees with this position, because concrete contact is poorly absorbed into a wooden surface and remains in the form of a film.
Checking geometric parameters
If the answer to the question whether it is possible to lay tiles on chipboard and other materials is obvious, then it is also important to understand the coating itself. Technical characteristics can be selected according to the data given above, and now you should pay attention to the geometry of the panels.
The most important thing is that these are the diagonals and they must match without any tolerances, so you can spot check several copies from different boxes. Place the two panels face to face, place them end to end on a flat surface and check that the corners match. If one corner is at least half a millimeter higher than the other, then this indicates that there is no 90ᵒ, the diagonals are knocked down and the seam will be uneven.
To check the plane, also attach them to each other with the same surfaces and pay attention to the contact of the edges - there should be no gaps. And, finally, the clarity of the edges - if you put them next to each other, then there should be no gaps there either. If they are, the tile seam will be uneven.
How to prime the surface correctly?
The issue of priming needs to be discussed separately. Before starting priming, you should make sure that the OSB panels are well secured and that there is no dust or dirt on them, as well as grease stains and mold. Otherwise, the primer will not have such an effect.
You can go over the OSB with sandpaper to remove the smoothness and make the surface rough. Then a deep penetration primer is used, which should strengthen the wooden base.
How to prime and process OSB board in this video
The primer should be applied in two layers, one hour apart, after which the surface should dry well for 12 hours. It is better to prime with a roller, which will speed up the process and reduce consumption.
Installation of ceramic coating
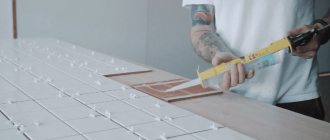
As a rule, the adhesive is applied to the base with a notched trowel with a comb height of 10 mm, but if you are using BI class ceramics, the composition is also applied to the tile itself. To do this, coat the working side with glue, and then peel it off with an ordinary steel spatula or small spoon - a layer of no more than 1 mm remains.
Lay the tiles starting from the far corner of the room, gradually moving towards the exit to finish the installation at the doors. Despite the fact that the base must be level, the cladding elements may lie on a slope, so they should be constantly checked by level and/or building regulations. Grouting of joints is done no earlier than after 3-4 days.
You learned how to lay tiles on chipboard and that it is quite possible. It also shows what else you should pay attention to during preparation and installation. Follow the directions given above and you should be able to avoid adhesion problems.
Glue selection
You can lay tiles on chipboard using conventional adhesives, but it is recommended to use tile adhesives with higher ductility and adhesion specifically to the wooden base.
Video story about how to glue tiles onto chipboard
Here are some popular options:
- Ceresit CM17 - used for problematic substrates that can spring, such as OSB panels and fiberboard. It will provide high adhesion, and the good elasticity of the mixture guarantees the durability of the cladding. The photo below shows one of the features of the glue: it is resistant to tiles slipping, which is important for us.
- Knauf-Flexkleber is positioned as a universal product for laying tiles on problematic substrates. Low consumption, excellent technical characteristics, in particular elasticity, are the advantages of this option.
- Litokol - choose two-component epoxy adhesives based on epoxy resins. The glue can cope with heavy loads, is elastic and has high adhesion. Ready-mix is more expensive, but there is simply no option for laying tiles in high-traffic areas.
Technical parameters to pay attention to
The technical and geometric features of the tile are of great importance when laying it on any base, especially on a vibrating one, which is chipboard. ISO 105-45-7 is an international standard by which the density of tiles is determined and there are 5 categories - the higher the number, the lower the abrasion:
- PEI-I - very high abrasion, therefore, use is only possible for walls and ceilings;
- PEI-II – suitable for floors with low traffic (bathtub, toilet);
- PEI-III - the load can be increased - such tiles can cover the floor in the kitchen, hallway or hallway;
- PEI-IV – used for shops, hospitals and public buildings of various types;
- PEI-V - can be laid in enterprises in workshops where light vehicles (trucks, loaders) are used.
Mechanical strength depends on the porosity of the ceramic; therefore, the looser the tile, the softer it is, and at the same time, water absorption and frost resistance increase. There are 3 classes in total, these are:
- B-III is the most porous tile, it cuts and breaks easily, but it is not advisable to lay it on the floor - only on the wall or ceiling;
- B-II – suitable for indoor flooring. Not frost-resistant;
- BI – used for both indoors and outdoors. Frost-resistant and very dense.
Laying tiles
Laying tiles on OSB, provided that the surface has been prepared and strengthened using the methods described above, is done in the traditional way. Make a mark to find out how many tiles you need.
The sequence of stages of laying tiles on an OSB board in this video
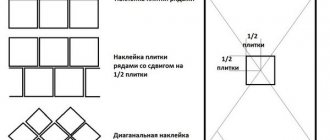
This will also help you think of beautiful geometry and avoid unnecessary trimming. Start laying from the center so that the trim is in the corners, where it can be hidden by thresholds or baseboards.
- If the surface is smooth, use a notched trowel. The tool allows you to apply the same thickness of tile adhesive and remove excess. Installation becomes quick and simple.
- Identical seams between the tiles are achieved using special crosses.
- From time to time you should check the plane with a level or rule.
What to consider when marking the floor
And now it’s time to figure out how to lay tiles on chipboard or OSB when the slabs are ready for installation (reinforcing mesh, “Betonokontakt”, dry screed and primer). First of all, the floor is marked, that is, you need to calculate the laying so that the cut pieces along the edges have the same width. But if any of the edges is covered by furniture or plumbing, then all the trimmings can be placed there - they still won’t be visible.
In addition, when making calculations, you should take into account the thickness of the seam - most often it is 3 mm, but you can use crosses of other sizes at your discretion. Also, we should not forget that not all corners in a room can have 90ᵒ, which means that the trim will be different in width. Therefore, the side that attracts more attention should be the smoothest.
There is always an alternative
If the previous description and all this preparatory work seemed complicated and time-consuming to you, then laying tiles on chipboard is also possible in alternative ways. Using “liquid nails” glue will allow you to glue the tiles directly onto the OSB panel.
What to do?
- The surface must be clean and dry and firmly secured. The last requirement is universal for all tile installation options. The fact is that tiles, unlike wooden panels, cannot bend; they will simply burst.
- Liquid nails are applied to the back of the tile like a snake, thanks to which the glue occupies a larger area than small nails.
- The tile is pressed tightly to the surface and fixed in the desired position for 5 minutes. After this, the tile will firmly adhere to the surface, and the glue will dry completely in a few hours.
Silicone sealants will also allow you to firmly and securely attach ceramic tiles to wood.
- Apply silicone sealant to a cleaned and degreased surface.
- The tiles are laid and then pressed to ensure good adhesion.
- The time for complete fixation will be less than when using liquid nails, but you need to wait a couple of hours.
Please note
Alternative installation options are not popular due to their high cost. It is rational to use this method if you need to lay just a few tiles.
Bottom line
So, how to lay tiles on chipboard or OSB board? To glue ceramic tiles to chipboard or OSB panels, you need to carry out preparatory work. The surface must be durable and clean, it must be primed.
Use special adhesives that will ensure high adhesion. And yet, ideally, avoid such cladding, but remove the old wooden base and make a concrete screed.
Base primer
Waterproofing Sopro DSF 423 allows you to level the surface and does not require subsequent reinforcement.
The next stage is treating the base with a special primer to increase the strength of the connection. As such a primer, a solution that has stood the test of time, the adhesive primer “Betonkontakt,” can be used.
This solution has fairly high adhesion rates for materials, as it is reinforced with special additives, for example, marble particles.
The surface treated with “Betonkontakt” (which has a special tinting that allows the treated areas not to be missed) becomes rough, which ensures high-quality adhesion to the tiles.
The Betonkontakt primer is applied in one layer only to a dry and clean surface. Contamination, getting wet and detachment of chipboard areas for treatment with “Betonkontakt” are unacceptable, since these areas will be destroyed under the tiles.
The Betonkontakt primer has a drying time of 24 hours.
Preparatory work
If you are going to lay tiles on particle boards, you need to ensure that the base is rigid. In this case, the chipboard sheets must rest on the concrete screed with their entire plane. The work is carried out according to a specific plan:
- For reliability, we perform double fastening. To do this, you first need to glue the sheets with liquid nails, drilling holes around the entire perimeter, in increments of 300-400 mm, and then additionally nail nails between the glue application points;
Attract the chipboard sheets to the base - We clean the gaps between the individual slabs and fill them with putty mixture. If the chipboard base is old, you will have to prime it to avoid delamination when applying glue. It is best to use deep penetration soils for these purposes. In this case, it is imperative to take into account the compatibility of the primer composition with the adhesive on which we plan to lay ceramic tiles;
We recommend using a polymer reinforcing mesh
To ensure optimal adhesion of the tiles to the chipboard sheets, we attach a reinforcing mesh to the slabs in 150 mm increments. The easiest and fastest way to do this job is to use a spring furniture stapler with construction staples, but you can also use small nails if you have enough patience for this labor-intensive process;
Should I choose a polymer or metal mesh? Polymer materials are impervious to moisture and are quite plastic, perfectly withstanding loads and deformations. And their price is quite affordable, although their service life is somewhat shorter than that of metal.
If you want to fill the screed instead of a wooden floor
This desire can be fulfilled when the floor is above ground or on a concrete floor. In this case, you need to do the following:
- Remove skirting boards, floorboards and dismantle joists;
Dismantle the old floor
- Clean the concrete base, remove fallen cement, develop every crack, or level the soil and fill in expanded clay;
Clean the concrete base
- The concrete floor is primed or insulated with heat-insulating materials (expanded clay, expanded polystyrene);
Insulated with thermal insulation materials
- Lay the damper tape;
Lay damper tape
- A leveling screed is poured (a cement mixture for a self-leveling floor may be suitable for this); if a cement mortar is used, beacons are placed before pouring the screed; Afterwards, it is advisable to fill such a screed with a self-leveling mixture;
Fill the leveling screed
- Wait for the screed to dry completely and begin laying the tiles.
Start laying tiles