Hi all! Today I decided to talk to you about how to hang a bathroom mirror on tiles. I recently encountered a similar situation. A friend asked for help after a painting fell off his wall. He didn't understand why this happened.
So let's remember my friend's mistakes, and also talk about existing methods of hanging on tiles.
There are several options. Including some pretty simple ones. But I advise you to focus on maximum reliability.
Good location and height for installing a mirror in the bathroom ↑
The mirror can be installed in any place in the room you like. However, in order for its location to be most successful, it is worth considering a few very simple rules:
- The distance from the floor to the top edge of the accessory must be at least 1.7 m, which corresponds to the average height of an adult.
- The mirror must hang strictly vertically, otherwise the image will be distorted.
- The width of the selected accessory is determined by the overall design of the room.
- If you want to see your image in full height, you should buy a product with a height of 140 cm. For a half-length image, a height of 60 cm will be sufficient. To see only the face and shoulders, choose a height of 40 cm.
- To avoid quick damage to the accessory, the mirror in the bathroom is mounted as far as possible from heat sources.
- The lower edge of the accessory installed above the sink must be at least 20 cm above its level. Otherwise, drops and splashes will constantly fall on the glass and stain it.
Markup rules
In order to securely fasten the canvas to the wall, you must first apply auxiliary markings:
- draw an upper or lower axis, which will be the installation boundary of the corresponding edge;
- determine the place for the middle of the canvas, and then outline the corners;
- mark the fastening points with a marker;
When taking measurements, it is necessary to take into account all previous measurements and the height above the washbasin.
What distance should be between the sink and the mirror?
The height of the lower edge of the mirror from the washbasin should be 30-40 cm. This distance is enough to prevent splashes of water from flying onto the reflective surface.
It can be positioned lower if the sink is built into the countertop and is located at a sufficient distance from the wall with the mirror.
What types of wall structures are there?
If you are planning to renovate your bathroom, you first need to decide what you will use to decorate the walls. Today there is a wide variety of finishing materials. Of course, you need to remember such qualities as good quality, hygiene, resistance to moisture, basic care, as well as resistance to various detergents and temperature changes.
This is where difficulties arise, since the walls are not the same everywhere, and the mass of the mirror is always different.
The main thing is that you create a cozy, unique interior in the bathroom.
What materials can be used as finishing
| Material | Application |
| Ceramic tiles | The most common material. This type of finish can be seen in almost every bathroom. Rich colors, variety of sizes, moisture resistance, reliability. Even if one tile is deformed, it can be easily replaced. The material has a smooth surface, so dirt is washed off quite easily. |
| Mosaic | It has almost the same properties as tiles. It has the most varied and interesting shape, variety of texture and color. There is only one drawback - a considerable price equivalent. |
| Painting | The most affordable and economical option. The paint, of course, must be moisture resistant. |
| Plaster finishing | Allows you to create an original interior, ease of use. |
| Wallpaper | Most people would never agree to wallpaper their bathroom walls. Of course, not all wallpapers are suitable here, only moisture-resistant ones. The positive aspects of this type of finishing include a unique interior, a large selection of colors, the lowest cost and time savings. They can be changed to another material at any time. It is best to use glass wallpaper, liquid wallpaper, in addition, acrylic and vinyl are suitable. |
| Drywall | Not a very common option, but it will perfectly help hide unevenness. With the help of plasterboard you can recreate a new decoration in the bathroom. The advantages include low cost, low weight, excellent heat and sound insulation. It is worth using only moisture-resistant drywall - it is usually green. |
| Plastic panels | They are also used when decorating the bathroom. They have a number of advantages: low price, variety of choice, easy to install, they can be used to disguise pipes and communications, serve for quite a long time, withstand temperature changes, are moisture resistant, and easy to care for. |
| Natural stone | Very expensive, the safest material. Its structure allows the walls to “breathe”. One of the disadvantages is its large mass. It needs to be carefully looked after and has a low degree of resistance to products containing acid. |
| Artificial stone | It differs from natural in a number of advantages: a large selection of materials, different colors, size and texture, reliability, ease of care and installation. It is not subject to mechanical stress and the appearance of fungus and mold, it is hygienic, and many times more economical than natural stone. |
| Self-adhesive film | The cheapest and most original option. A variety of colors, easy to apply to the wall, waterproof, easy to care for. |
Decoration methods may vary.
Attention! Whatever option you choose, remember to ensure that the material meets all the necessary requirements for bathrooms.
Tools
Properly selected tools not only create possible conditions for performing the work, but also greatly facilitate the process, so neglecting any items is highly not recommended. Each method of installing mirrors has its own, namely:
- Gluing - hybrid or polyurethane glue, sealant, double-sided tape;
- Hang on the wall - hammer, grooves, drill, spacers, screw caps, staples and dowels with screws;
- Insert instead of tiles - sealant, mirror with self-adhesive or glue, plaster.
Important! For large and heavy mirrors, be sure to use supports, otherwise the mirror will slide down and become deformed.
Nuances of work taking into account the type of surface
There are several types of wall surfaces on which mirrors can be attached:
- concrete;
- drywall;
- brickwork;
- PVC panels;
- tile.
Is it possible to hang a mirror opposite the front door in the hallway according to Feng Shui?
When installing a mirror on a wall, preliminary preparation is required. The choice of fixation method depends on the type of surface on which the canvas needs to be fixed.
| Surface type | Method of preparation | Mounting type | Tools, materials | Surface strength, mirror weight |
| Concrete | Coat with primer | Glue, sealant | Hammer, primer, glue, sealant, construction gun | Lasting, weight - 8–10 kg |
| Drywall | Clean from dirt and dust | Anchor bolts, butterfly dowels | Drill, screwdriver | Fragile, maximum weight - 20 kg |
| Brick | Coat with primer | Glue, sealant | Hammer, primer, glue, sealant, construction gun | Durable, medium weight |
| PVC panels | Installation of sheathing | Glue, tape | Glue, sealant, construction gun | Lightweight models, as the surface is fragile |
| Tile | Clean from dirt and dust | Dowel screw, glue, sealant | Concrete drills, electric drill | Not very heavy, medium surface strength |
The mounting method is selected based on the design, weight of the product, as well as the type of wall
A light mirror can be glued to a flat wall with liquid nails
You can hang a mirror on a plasterboard wall using a butterfly dowel
Rules for determining mirror installation height
Necessary materials
We will need the following materials for work: a mirror, “liquid nails”, glue for gluing tiles and mirrors, a degreaser for treating tiles, a U-shaped galvanized profile, moisture-resistant drywall (if you decide to mount the mirror surface on gypsum plasterboard), self-tapping screws, screws , dowels, individual mirror mount, rubber gaskets, tape.
Today, there are several ways to mount a mirror covering on a wall.
Do we glue or drill?
How to hang a mirror in the bathroom? Today, there are several ways to mount a mirror covering on a wall. Each of them has its own advantages or some disadvantages.
For greater reliability, an adhesive should be used.
Only small mirrors, the area of which is one square meter, no more, are glued to tape. This fastening system is extremely unreliable - the mirror may fall after some time. But the simplest one. Absolutely anyone can handle it.
We make markings on the wall, preferably with a water marker.
If mounted with special glue, the mirror will hold very firmly. But when you want to remove it, it will be extremely problematic to do so. You need to use glue for gluing mirrors, for example, polyurethane “Soudal”, silicone, hybrid - for all types of mirrors. Be very careful when choosing glue, as an unsuitable one can ruin the amalgam.
If you are planning to renovate your bathroom, you first need to decide what you will use to decorate the walls.
Using screws and special fasteners while working, in the future, if you decide to make repairs or simply rehang or change the mirror, it will be quite easy to remove it and hang it back. The labor-intensive part of this mounting option will be drilling holes in the mirror and in the wall.
It is necessary to use waterproof tape that can withstand high humidity and temperature fluctuations.
Which option you choose is up to you.
Today there is a wide variety of finishing materials.
Mirror mounting methods
So, without being distracted by other questions, I’ll tell you how to mount a mirror in the bathroom. There are several options that depend on the design of this decorative element, the stage of the work and the type of decorative material with which the walls in the sanitary room are lined.
Using glue
Attaching mirrors in the bathroom with glue is a convenient, labor- and money-intensive method. Here the glue serves as an elastic layer between the wall and the mirror. Thanks to it, the back side will not be scratched, and the product itself will not crack.
If it cracks during use, the glass will not shatter into pieces, but will remain on the glue. This installation method is chosen if the mirror is not heavy and is of medium size.
Which glue to choose
You should select a special glue to fix the mirrors. They contain synthetic rubber and resin. The following characteristics of glue selection are important:
- does not corrode the amalgam coating of the mirror;
- lasting;
- dries quickly;
- elastic;
- withstands temperature changes;
- moisture resistant;
- does not leave stains when dried;
- safe, does not release toxic substances after drying.
Glue Titan
One of the most popular quality products for installing a mirror in the bathroom is Titan. The glue contains synthetic resins and rubber. It can be used to install the element on any type of surface, for example, concrete, brick, wood, drywall. The color of the composition is beige.
Complete drying of the material occurs in 3 days. Able to withstand sudden changes in temperature.
After drying, it remains elastic and durable at the same time. It has a high level of water resistance and adhesion without damaging the amalgam.
Loclite glue
Another popular adhesive, Loclite, is often used to attach mirrors to tiles. It is a two-component product. It is made from modified acrylic ester. The second component is the activator.
Before using the adhesive material, the components are mixed and distributed evenly over the surface of the canvas from the reverse side.
The composition dries quickly, does not change its color, and does not flow.
For liquid nails
You can attach the mirror using liquid nails. Thus, it is installed in niches if there is a plasterboard gasket between the wall and the mirror or on a tiled surface. The product must be moisture resistant and not destroy the amalgam.
Before applying the product, the surface is thoroughly degreased, and control marks are made on the wall - landmarks. It is best to completely circle the mirror. Then an adhesive substance is applied to its back side.
Liquid nails are applied along the perimeter, retreating 2-3 cm from the edge and pointwise or in a grid - in the middle. After this, the sheet is lightly pressed against the wall, torn off for 1 minute and pressed again. The composition will dry within 24 hours. During this time, it is better to fix the mirror with a support.
Using screws
Another way to hang a mirror in the bathroom is using screws with decorative plugs. This option is used for large and heavy accessories. Often the mount is included in the kit, but if necessary, you can purchase it yourself, choosing those that suit the overall look of the bathroom.
The number of attachment points depends on the size of the canvas. In addition to screws, you will need dowels and rubber gaskets, which are placed between the tile and the mirror, as well as between its front side and the plug.
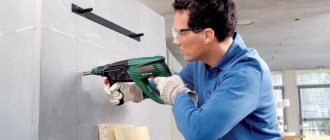
It’s good if the accessory already has holes. But if there are no holes, you can make them yourself using a drill and a diamond drill bit. During operation, the drill must be constantly cooled to avoid damaging the glass; the holes must be cleaned. You can entrust this work to a professional glazier.
The prepared mirror is applied to the wall and the points for fastening are marked with a marker. Then, using a drill, holes are drilled in the tiles into which dowels are hammered. After this, the sheet is applied to the wall, aligning the holes and tightening the screws with plugs.
Using double-sided tape
If the mirror is light and thin enough, you can use moisture-resistant double-sided tape to install it; in this case, we install it like this:
- We mark horizontal and vertical guide lines on the wall using a level.
- Degrease and dry the surface of the tile and the back side of the mirror sheet.
- Place double-sided tape on the back of the sheet in stripes.
- Moisture-resistant silicone sealant can be applied between the strips of tape for more reliable fixation.
- We remove the protective film from the tape and carefully, focusing on the control lines, fix the mirror on the wall.
Using double-sided tape, installation must be carried out carefully, because it will be difficult to fix something.
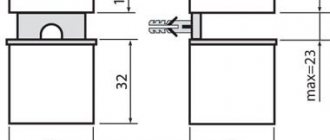
Decorative hardware
The next option, which allows you to attach mirror elements to a smooth tile surface in the bathroom, looks like this:
- 4 through holes are drilled in the mirror with special drills closer to the corners;
Drilling a mirror with a special drill. - Contour lines are made on the tile along the perimeter of the reflective element, taking into account the horizontal and vertical levels;
- the mirror is leaned against the marking lines, dots or crosses are applied inside the holes with a marker;
- Blind holes are drilled in the tiles and plastic dowels are driven into them;
- At the last stage, the mirror is attached with self-tapping screws with protective and decorative caps.
Fixing the mirror through through holes with decorative screws.
Attention: The self-tapping screws must be fitted with cable braided casings of a suitable size, taking into account the existing gap. The length of the bushings should be equal to the thickness of the glass so that the material does not crawl out. This will prevent the glass from breaking.
Pendant on a cord
For some types of interior, the mirror can be hung on a hook or self-tapping screw using a cord. There are several options for this:
- make a frame/frame for the reflective element with eyes for cord knots;
Homemade frame for attaching rope. - buy a mirror with a cord;
Factory made mirror with cord. - drill holes for the rope;
The cord is passed through the drilled holes. - attach a decorative cord around the perimeter of the reflective element using a glue gun with a thermoplastic rod;
Gluing rope to a mirror.
The desired option is selected depending on the interior design of the bathroom and how much the user is willing to spend on finishing the bathroom.
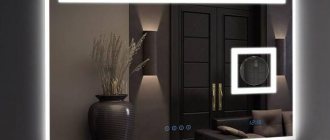
Swivel mount
There are mirrors with one or more degrees of mobility of the hinge elements. They are small in size, but have a magnifying effect. This mirror element dramatically improves the quality of shaving, hair removal, and other hygiene procedures.
For this type of mirrors, installation is standard - using the included hardware, screwed into plastic dowels inside blind holes drilled in the wall.
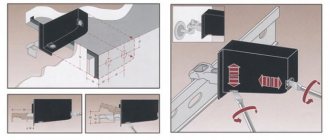
Plate holder
The industry produces special holders for household mirrors in the form of a metal plate with mounting holes. The plate itself is glued to the back of the glass with amalgam, then the entire structure is hung on two anchor hooks.
The sealant is applied in a continuous layer with a spatula, similar to putty compounds.
Therefore, this method can be attributed to both the gluing technology and the method of fixation with special holders.
Attention: The reliability of neutral silicone sealant is evidenced by the fact that the reflective elements of the car’s side mirrors are attached with this particular compound. The adhesive retains its strength under the influence of atmospheric and vibration loads.
Option 1 - using glue
You can glue a mirror to the wall in the bathroom using tile adhesive or a special substance designed for mirrors. This method is best suited for medium-sized accessories. Its main advantage is the absence of fastening elements on the surface of the canvas.
Installing a mirror with glue
Before work, you need to prepare a place under the mirror - degrease and dry the tiles, as well as the back of the mirror. If it must be installed level with the cladding, the tile is removed and the surface is leveled with putty and primed.
In this case, the thickness of the accessory should match the thickness of the tile (6-10 mm). To fix heavy sheets until the adhesive dries, you will need a support to support and prevent the mirror from slipping.
Which glue to choose
Mirror adhesive must meet the following requirements:
- The substance must not emit toxic substances after drying and must not be toxic.
- The chosen product must be resistant to large changes in temperature and humidity.
- The composition should not destroy the amalgam.
- After drying, the glue should not change color so that dark spots are not visible through the surface.
- The glue should remain elastic after drying. If the mixture hardens, stress will develop in the glass in a room with elevated temperature and humidity. This may cause the accessory to peel or crack.
- The substance should cover the surface evenly. It’s good if the mirror sticks quickly and you don’t have to hold it for long.
According to the composition they are distinguished:
- Adhesives based on organic solvents. They are the cheapest. When choosing, you need to pay attention to whether the solvent-based product is suitable for working with mirrors and whether it contains substances that destroy amalgam. Their advantage is that they dry quickly.
- Silicone products. These are chemically neutral substances that are adhesive to most surfaces. The products form a film that ensures reliable adhesion of the treated surfaces and the formation of a strong elastic seam. Their disadvantage is a slow hardening period.
- Hybrid - consisting of adhesive and hardening components. They provide a high-quality, elastic, moisture-resistant seam, while being easy to apply and dry quickly.
The final stage is decoration
You can make your own mirror decor:
- make an original frame using various materials - mosaic tiles, wood, drywall. Paint the surface and cover with moisture-resistant varnish;
- glue beads, shells, bugles to the mirror in any order or in the form of a pattern;
- Apply a design using a stencil or by hand using stained glass or acrylic paints.
Installing a mirror is a responsible job, complicated by the fragility of the material. Be precise, careful, and never rush. Then your efforts will not be in vain, and the bathroom will acquire a complete, harmonious look.
Fastening methods
Mounting a mirror on a wall is done using the following methods:
- using mounting tape;
- adhesive compositions;
- screws;
- liquid nails to tiles;
- suction cups;
- cord;
- hinges with several degrees of freedom.
These methods are suitable for working in standard bathrooms.
Between tiles
Walls are damaged during the process of drilling holes for fasteners. The tile has the ability to crack and burst during the procedure. It is advisable to drill in the seams between the panels, but it is possible to make a recess in the tile itself. It is better to take a special drill designed for tiled surfaces.
How to make a mirror instead of tiles?
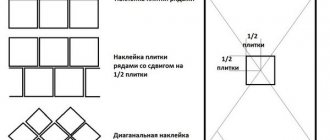
When the bathroom renovation work has just begun, and you are full of enthusiasm and perfectionism, try placing a mirror in a certain area instead of tiles:
- To begin, lay out the tiles, having previously marked the location of the mirror.
- Be sure to cover this area with plaster, otherwise the product will become distorted or even burst.
- If the tile is wider than the mirror, order glass to fill the gaps. It should be 0.15 - 0.3 mm smaller in parameters than the mirror.
- Glue it onto the sealant, applying the product in dots. Fill the free space with it.
- Even if there is self-adhesive on the mirror, do not be lazy to apply half as much sealant as on the previous surface.
Other ideas for using mosaics
With mosaics you can make many things special. Here are some ideas.
- Mosaic bath. If it's freestanding, decorate the outside walls with small pieces of glass tiles. Sand the surface and carefully glue the mosaic using waterproof adhesive. Sand the surface and enjoy the excellent result.
- An old chair is a table stand. A bedside table is truly a must-have item. Take an old chair, sand it and paint it white. Select pieces of colored glass and glue them to the surface. You can mix colors or come up with your own design.
- Remaking the table. You can use an old scratched table and turn it into a new one using paint and mosaic. Sand the legs and side and then apply a coat of paint. Select several glass tiles and place them on the surface. Using glue and grout, finish the job.
You can use mosaics in a variety of projects. With the help of beautiful and bright details you can turn even the most ordinary thing into something individual and unusual.
Found a violation? Report content
Possible mistakes
The most common mistakes that people often make when installing a mirror on tiles in the bathroom:
- They choose the wrong place. You should not be hasty when deciding on the placement of the product. Lack of lighting or incorrect level will lead to the need to change the location of the accessory. As a result, unsightly holes or traces of tape will remain at the site of the first installation.
- The marks are placed incorrectly. It is important that the fasteners on the mirror and the holes on the wall are identical in location to each other. Failure to comply with this rule will result in a discrepancy during installation.
- The adhesive properties of tape are underestimated. When using it, it is important to level the product until it comes into contact with the wall surface, since the fixing substance sets very quickly.
- The accessory is not installed securely. When working with large and heavy products, you should use several strong fasteners. Otherwise, the accessory may break.
So, you can attach a mirror to the tiles in the bathroom using a drill or double-sided tape. Following these recommendations will help you cope with the task easily.
Several useful lifehacks
In conclusion, I would like to give some useful tips, using which you can hang a mirror in the bathroom without any problems.
- Tip 1.
You need to make sides from plasticine or dough around the place where you drill the mirror, and pour water inside to cool the surface. This will help avoid overheating.
- Tip 2.
After finishing drilling, the hole must be carefully processed using fine-grained sandpaper to make it round.
- Tip 3
. To prevent the mirror in the bathroom from fogging up while washing or taking water procedures, you can use one folk remedy. The surface treated with a mixture of a teaspoon of gelatin and 50 ml of water does not sweat. The solution creates a protective film on the surface that prevents fogging.