The bathroom occupies an important place in a person's life. In the morning we gain vigor and strength, in the evening we relieve tension and fatigue. If you want to enjoy these sensations to the fullest, it is necessary that the interior of the bathroom is perfectly thought out. You can’t do without a good, high-quality cabinet. Companies that manufacture bathroom cabinets present a wide variety of models with all sorts of fillings, but who, if not you yourself, knows what you need for comfort in the first place; there is no better option than hanging a cabinet in the bathroom with your own hands.
Common mistakes
Each private furniture maker has his own secrets on how to quickly and accurately assemble furniture.
Some professionals use a table to assemble furniture, while other craftsmen can mount a large tall cabinet on the floor and install the finished structure, measuring the diagonal of the room and the product. To become a professional assembler, the future master must be able to draw up a project, calculate the consumption of materials, perform detailing and cutting of chipboard, MDF boards, use equipment, tools and have some design skills. Then the finished product will be distinguished by its impeccable quality, durability, and long service life. Frequent mistakes that novice craftsmen make when assembling furniture:
start work without first checking the availability of the mounting kit, basic structural elements, and without studying the manufacturer’s instructions; Universal prefabricated furniture begins to be assembled by connecting large parts - you need to decompose all the elements into units (drawers, cabinets, tables), and try to assemble a small structure; they don’t pay attention to the specifications in the instructions - in vain, at first glance the parts are similar, but there are left and right elements, fronts of upper and lower cabinets, and other assembly nuances; ignore the need to assemble the product on a hard, clean surface
For work you need a sufficient amount of free space; you can use a device for assembling furniture; panels made of MDF material can be damaged by using an electric tool (drill, screwdriver) - use screwdrivers until you acquire the necessary assembly skills; do not change the diagonal of cabinets (compartments, bedside tables, chests of drawers) before installing the back wall made of fiberboard - this leads to distortion of the part and the entire structure; do not take into account the assembly order specified by the manufacturer in the instructions. The result is low quality assembly, dismantling and re-installation of the product; they do not check the holes for fixing the fasteners, do not measure the distance between them to ensure compliance with the drawing - as a result, they have to cover the defects with plugs.
There are craftsmen from whom you can hear that they violate assembly technology in order to quickly complete the work - for example, “I hang the top of the kitchen unit before installing the lower cabinets.” Technically, this is not true - the assembly of a complex kitchen structure begins with the installation of the lower corner cabinet (often a sink), then install the remaining floor units, connect them together with self-tapping screws or intersection ties, cut in the sink, install the countertop, and only then proceed to install the upper tier of the kitchen headset There are many such subtleties in the process, and to do the job accurately, watch the video on assembling furniture.
When the master has assembled a furniture structure using simple equipment, fasteners, tools and accessories, he must make adjustments, check that there are no visible technological gaps, and that the doors are diagonal. Distributing and assembling furniture is not an easy task, but after acquiring the appropriate skills, everyone will be able to gain valuable experience in assembling furniture units of various designs. To make furniture assembly easier, the video below will help you understand the process.
This activity can be used as a business option in several steps - ordering factory furniture, delivery to the consumer in your car, installation at the installation site. Presenting photos of assembled furniture will expand your customer base if the furniture assembler is interested.
Types of toilet furniture according to installation method
To determine what type of useful design should have, you should first look on the Internet for a photo of the toilet cabinet. Already having an idea of what the result should be, you can interpret the option you like to suit your room. The closet in the restroom can be placed as a separate piece of furniture, built-in or hung on the wall. Learn more about each type.
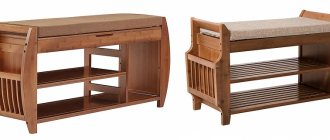
The first option is a free-standing structure, or a cabinet with legs. An interior item made in this way is usually U-shaped. The shelves in it can be completely open, hidden behind the door, or of a mixed type. The opening in the cabinet is designed to be installed above any toilet.
A wall cabinet is the most popular type of furniture for toilet rooms, which is available in a wide range. It can be mounted directly above the toilet or in an already organized niche
The modular system allows you to focus your attention only on design and size when choosing. But, like the first option, it doesn’t reach the plumbing
Installing a cabinet in the bathroom
After the cabinet is assembled, the only remaining question is how to install the cabinet in the bathroom. In the case of a classic pencil case, there should be no difficulties - we just put it in a predetermined place. If you made a cabinet with legs, take care to equip them with adjusting mechanisms so that the installation of the cabinet in the bathroom is reliable, especially when the floor is imperfect.
For a wall cabinet, you need to proceed differently. Before you make a bathroom cabinet, you need to decide whether to do it using a mounting strip or ordinary furniture hinges.
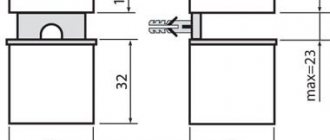
Attaching the cabinet to the mounting plate
This fastening mechanism facilitates the process of installing a wall cabinet, will allow you to eliminate small errors in markings, and will not take much effort and time. The mounting strip consists of two parts: a special strip and a hanging hook, which is attached to the back wall of the cabinet and remains invisible. The disadvantage of this method of fastening is the high price of the kit itself, but it is worth considering that it will save you effort and time.
Before hanging the cabinet in the bathroom, we make markings. First, mark the top level of the cabinet on both sides and draw a line. From this line we measure down the distance to the canopy hook and draw a second line - this will be the place where the mounting strip is attached. Next, we fasten the bar with dowels and hang the cabinet, immediately adjusting it in the vertical direction, using awnings for this.
Fastening with furniture hinges
This method is much cheaper than the previous one, it may take longer and will require an assistant. If you have these resources, then the question of how to hang a cabinet in the bathroom can be solved using these fasteners. For fastening, hooks are used, which are mounted in the wall and furniture hinges, which are attached to the back wall of the cabinet.
Before installing the bathroom cabinet mount, you need to determine the upper boundaries and draw a horizontal line. In this case, the accuracy of the line must be checked with a level; due to uneven walls or floors, the line may be visually distorted. After this, measure the distance to the furniture hinges and mark them on the wall. Having drilled the first hole and secured the hanging hook in it, it is necessary to hang the cabinet from it and accurately determine the location of the other hook, since in the future, if there is an error, it will not be possible to adjust the position.
Making a bathroom cabinet can be an interesting and, most importantly, useful activity for you. In addition, the result will bring order and zest to the interior if you approach this issue with imagination.
Conclusion
Now you know how to quickly and securely hang a bathroom cabinet without any help. The video covers the topic in even more detail, so watch that too. If you have any questions, feel free to write them in the comments.
Did you like the article? Subscribe to our Yandex.Zen channel
March 7, 2022
Accessories, Bathroom, Bathroom and toilet design
If you want to express gratitude, add a clarification or objection, or ask the author something, add a comment or say thank you!
Bathroom cabinet with mirror
The shapes and sizes of the bathroom can be very different, which determines the size of the cabinet. The latter also depend on the availability of free space on the wall above the washbasin. It is better to design a small cabinet with one door and without a lower open shelf (Fig. 1). The cabinet can have one or two doors, and to keep it clean, it’s a good idea to provide it with removable shelves.
To place tall items in the cabinet, we suggest limiting yourself to one horizontal shelf. At the bottom there is an open shelf for soap dishes, toothpaste and other small items.
You can provide an open shelf on both the left and right sides of the cabinet. Fastening the cabinet to the wall will be provided by steel overhead hinges or hidden brackets
It is important that the mirror is located strictly above the sink. Shelves can be made from regular or acrylic glass in a glass workshop
The shelves are relatively small, so we recommend ordering them from tempered glass - it’s safer. For a home first aid kit, it makes sense to organize your own small compartment, and if you do not exclude children from accessing it, then a door with a lock will be useful.
Related link: DIY storage system - drawings and photos
The cabinet has a compartment without a door, a mirror is attached to the back wall, and a lamp is mounted above the latter. Some lamp models are additionally equipped with a socket. It can be useful for electrical appliances - a hair dryer, electric razor or rechargeable toothbrush. In the open compartment you can mount a stand for toothbrushes, made, for example, of tinted plexiglass. It is recommended to use laminated 15 mm chipboard for the cabinet body, and waterproof plywood 6 mm thick is suitable for the back wall. Connections of chipboard parts are made with dowels and glue. Waterproof paint should be used for the surface of the cabinet. You can attach the cabinet to the wall using pendants.
How should the mirror cabinet door open?
Many potential buyers pay attention to the size, style and material from which the washable bathroom cabinet with mirror is made. But after he takes his rightful place, these parameters will fade into the background.
Before purchasing, it is important to decide or imagine the cabinet doors as to how they will open more conveniently:
- right;
- left;
- swing doors in front;
- hinged door fixed at the top.
It is important to consider how the doors will swing open, whether the cabinet has closers that return the doors to their original position. Closers or closing clamps are very convenient, the doors will not slam, and after use you don’t need to think about how to close the cabinet when your hands are full.
There are also sliding doors that can be moved to the right or left. This is convenient - the cabinet above the washbasin occupies a decent part of the free space, plus the doors are open in front of the nose. Optimally, when the cabinet is located close to the adjacent wall, the door swings open along the adjacent surface.
The degree of door opening is important, especially in corner models. It’s not very convenient when they stick out in front without swinging completely open. They may not be fixed in the way that is most comfortable for use. It is relevant when there are mirrors on the inner surface - an angle is formed that resembles a trellis.
Interior mirrors are convenient for those women who do their own hair in the bathroom in the morning. The ability to see yourself from all sides is almost a 3D effect.
This model is not only designed to save time on a neat hairstyle, it makes it possible to do without outside help or the services of a hairdresser, as far as possible. Cutting bangs, styling after washing, curling curls, creating a bun, donut or ponytail on the top of the head - every morning a new version in a few minutes.
The same hinged mirror is also convenient for men who are accustomed to carefully shaving their beards and straightening their temples and mustaches. Therefore, the method of opening the doors and the possibility of using mirrors to the maximum is an important issue. In the photo of the options for a mirrored bathroom cabinet, you can evaluate the merits of each design so as not to make a mistake with your choice.
Edge processing
For gluing you will need a clamping clamp, an iron, trim tape, a grout block and a sharp mounting knife. It is very difficult to work alone, call an assistant or use a clamp. The fact is that when pasting you will have to do several jobs at the same time, and you only have two hands.
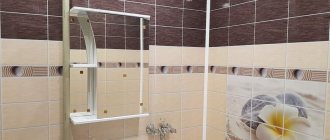
| The wall must be completely ready. In our case, it is lined with ceramic tiles, the seams are sealed, and a wire is routed in the right place, from which we will power the lighting in the cabinet. You can’t hang furniture on an unlined wall, since then you’ll have to redo the whole job from start to finish. |
| The necessary measurements are taken to determine the position of the cabinet on the wall. In our case, it will hang on the side of the bathtub, so we need to find the middle of the empty space, this will be the center from which we will make all the marks. The width of the bathtub is marked, it is 70 cm, and the wall gap is measured, for us it is 110 cm. Therefore, we set the mark at 55 cm. |
Key requirements for kitchen furniture
When choosing a kitchen set, you need to take into account a number of basic requirements. The following criteria are of great importance:
- Appearance. Taking into account your own preferences and the general style of the room, you should choose the appropriate set that will harmoniously complement the existing design.
- Number and purpose of cabinets. Depending on your individual needs, you should decide in advance on the type of lockers. When calculating the quantity, you need to be guided by the free space in the room.
- Fastening mechanisms. The best option is a hidden ball mechanism that can withstand high loads. The use of high-quality fasteners has a positive effect on the service life of the entire structure.
Peculiarities
The bathroom is different from other rooms in the house, as it has specific features. There is always high humidity and there is a temperature difference. Therefore, furniture for this room must be selected taking into account these features.
Bathroom furniture must have a number of mandatory properties that will ensure its long and high-quality operation.
- Moisture resistance. Bathroom cabinets should not be afraid of either direct contact with water or high humidity in the room.
- Heat resistance. Furniture must be able to withstand large temperature changes well.
- Strength. Since cabinets are primarily designed for storing household chemicals, cosmetics and bath accessories, they should successfully withstand even the heaviest loads.
- Functionality. It is better if the furniture performs several functions at once.
- Quality. Furniture installed in the most adverse conditions must be of high quality for long-term use.
- Price. A high price is not always a guarantee of high quality, so you should approach the choice of furniture especially carefully, taking into account all its various characteristics.
There are also additional factors to consider when purchasing bathroom cabinets.
- Dimensions. They are always purely individual, selected strictly in accordance with the size of the room, so as not to cause discomfort during operation.
- Exterior design. Selected depending on the style of the bathroom and personal preferences. The main thing is that the furniture is harmoniously combined with the plumbing and decoration of the room.
- Manufacturer. The manufacturer plays an important role in the selection of furniture. It is undesirable to buy cabinets from unknown companies, which most likely will not even be able to be responsible for the quality of their products.
Only by taking into account all the above factors together, you can choose the ideal cabinets for the bathroom, which will be durable in use and will emphasize the special style of this room.
Hanging on foam blocks
Foam block, although not drywall, is still not a durable material: it crumbles easily, and when drilling, the hole often breaks even from the slightest beating of the drill chuck. Therefore, you need to provide everything for reliable fastening.
Fasteners:
- Long dowels.
- Dowels for foam concrete.
- A metal plug that can be opened with a screw.
- Rake with self-tapping screws.
- Nylon dowels with a diameter of more than 10 mm. They screw into the wall.
- Chemical anchor. In it, a special capsule is broken during installation, and the chemical composition strengthens the hole, reinforcing it
Installing cabinets on concrete is more difficult due to the special strength of the wall material. If you have a hammer drill and concrete dowels, the issue is resolved by itself.
Expert advice on choosing and installing hanging fasteners
To hang a kitchen yourself, you will need experience and attention to the recommendations of existing craftsmen:
- Before installing the furniture, determine how the kitchen apron will look like - overlapping or butt. The markings and final appearance of the structure will depend on this.
- When using a mounting plate, secure the hooks in it with special screws.
- Please note that the mounting rail should be located 3–4 cm below the top edge of the back wall of the cabinet.
- When drilling into walls, make small holes with a punch first and then continue drilling.
- If the plaster cannot withstand drilling, drill a small hole first and then drill it out to the correct size.
The most important thing when choosing canopies for kitchen modules is to monitor the quality of materials. It is necessary to check the work done to avoid mistakes and delays.
Arrangement of the hallway and bedroom
The internal design of the wardrobe directly depends on what exactly is planned to be stored in it. This means that when designing a piece of furniture for the hallway, bedroom or living room, you need to clearly know what things will be located there.
Most often, the dimensions of the hallway do not allow for a wardrobe with a depth of more than 40 cm.
Taking into account the fact that about 10 cm is spent on the sliding system, there is very little space left for placing outerwear - jackets, coats, raincoats. And standard hangers simply don’t fit in such a narrow closet. End rods, which are mounted instead of standard ones, will help make the internal structure more functional. They come in both retractable and stationary types. It is unlikely that they will be able to fit the entire outer wardrobe of the family into them, but the basic things can be done.
To store shoes, wire niches are installed where you can place 2-3 pairs of shoes or boots. The rest will have to be stored in boxes. Small pull-out elements will help make the closet convenient, where you can put brushes for shoes and clothes, creams, spare keys, and other small items.
The closet in the hallway is a place where umbrellas, packages, and bags are stored, so you need to take care of the required number of hooks where you can hang everything you need. Using a mirror on the door will not only visually expand the room, but also allow you to see yourself in full size before leaving the house.
A wardrobe for a bedroom is a place to store casual, work clothes, and bed linen. Therefore, before you start making furniture with your own hands, you need to carefully consider all the options for filling it. The most popular are:
- Baskets. They can be made of metal, plastic and are universal for storing things. They can hold both socks and shirts.
- Pantograph. This is a clothes rail equipped with a handle and a mechanism for lowering it down. This option is suitable for those who want to use the upper space as efficiently as possible.
- Iron holder and built-in ironing board.
- Hangers for ties, belts, trousers.
- Drawers for underwear.
- Mounts for storing shoes.
As for built-in wardrobes, many people prefer to make niches for TVs and computers in them. This allows you to unload the room and free up more space.
Types of corner cabinets
Types of corner bathroom cabinet designs
It would seem that pieces of furniture that are identical in location and installed in an unused space in the bathroom are also divided into several types:
- Floor-standing corner bathroom cabinets are installed in the most unclaimed corner of the room. Occupying a small area, the corner bathroom cabinet has a developed vertical structure, divided into many compartments for various purposes. With the standard height of traditional furniture not exceeding two meters, objects designed to maximize the use of volume “grow” to the ceiling of the room. The resulting corner column for the bathroom can serve not only for storing many necessary things, but also for visual zoning of space;
- The wall-mounted corner cabinet in the bathroom, thanks to its convenient design and small size, is successfully placed at the desired height above the plumbing equipment, which is rigidly attached to utilities. Occupying the empty space above the installed items, corner hanging cabinets for the bathroom, equipped with convenient drawers and niches, will serve for storing hygiene items.
Corner cabinet dimensions
Standard sizes of corner cabinets
Increasing consumer needs force manufacturers to include a large range of products of various sizes in the production program of furniture enterprises:
- Corner speakers for the bathroom about 2.5 meters high, occupying space up to the ceiling of the room with a vertical division of compartments;
- Corner wall cabinet for the bathroom, up to 1.5 m in size, which is placed above the side of the bathtub or at some distance above the sink. The space it occupies does not affect the convenience of using the bathroom for its intended purpose, and serves for convenient placement of shampoos and cosmetics;
- A floor-mounted corner cabinet for a bathroom with a height of 0.75 to 1 meter, placed in a free corner of the room next to a sink or mirror, can serve as a convenient dressing table and at the same time a compact cabinet for linen with a folding door and a lattice basket.
Variety of facades
Variety of fronts for wall-mounted and floor-standing corner cabinets
Modern materials used in the production of furniture for wet rooms can take on a wide variety of shapes and form a flat or curved surface. Corner wall cabinets for a bathroom with a semicircular facade are combined with the smooth oval shapes of an acrylic bathtub. They fit organically into the overall appearance of the room and have a slightly larger volume compared to furniture with a flat facade.
Mirror furniture facades have always enjoyed well-deserved popularity. The advent of waterproof mirror amalgam made it possible to create combined facades for furniture designed for rooms with high humidity. A corner mirror cabinet for a bathroom can serve not only as a convenient functional element, but also significantly change the aesthetic perception of the interior.
A corner cabinet for a bathroom, made of modern inexpensive materials, can be equipped with a facade made of natural waterproof wood with a lattice door decorated with carvings or inlays. Combined cabinets are much cheaper than all-natural analogues, which made them accessible to a wider range of buyers.
Compact, roomy furniture installed in the bathroom allows you to turn this complex room into a cozy corner for taking water treatments and relaxing. A vanity cabinet and corner bathroom vanity, chosen in size, style and color, can make a big difference in the appearance of even the smallest bathroom.
How to carry out work
We’ll figure out what’s needed for installation and how to properly organize the workflow to achieve a good result.
There is nothing complicated in installation, but it is very important to do everything carefully and accurately so that the furniture hangs perfectly evenly
Materials and tools
First, let's figure out what materials are needed. The set is quite simple:
The fasteners must be strong, because they support the weight of the cabinet
Wire connectors allow you to do the job efficiently and safely
As for the tools, you will need the following set:
A special ceramic drill allows you to make holes in tiles without the risk of damaging them
Installation process
| Illustration | Description |
| The cabinet is completely assembled. This is necessary so that you can take all the necessary measurements and not make mistakes when drilling holes. Most often, the work takes little time and no special problems arise at this stage. | |
| The wall must be completely ready. In our case, it is lined with ceramic tiles, the seams are sealed, and a wire is routed in the right place, from which we will power the lighting in the cabinet. You can’t hang furniture on an unlined wall, since then you’ll have to redo the whole job from start to finish. | |
| The necessary measurements are taken to determine the position of the cabinet on the wall. In our case, it will hang on the side of the bathtub, so we need to find the middle of the empty space, this will be the center from which we will make all the marks. The width of the bathtub is marked, it is 70 cm, and the wall gap is measured, for us it is 110 cm. Therefore, we set the mark at 55 cm. | |
| The height of the structure is determined. It all depends on the type of locker and the height of family members. First of all, a mark is placed along the bottom edge so that we can see at what height from the floor the furniture will be located. | |
| The height of the hangers on the cabinet is measured. After this, it is laid on the wall from the bottom edge. First you need to make a mark on one side. Since our tile lies flat, it will serve as a good guide, and we will not be mistaken with the horizontal line. | |
| The distance between the fastenings on the cabinet is measured. The indicator is divided by two and this distance is set aside from the center to the sides. This is how we find the exact locations of the dowels and place a mark in the right places. | |
| Drilling points must be marked on the surface. A core is used to make a hole on a smooth ceramic surface. | |
| The holes are drilled in two stages: All that remains is to connect the lighting using connectors. |
Practical advice
When installing various plumbing fixtures and equipment, the same problem can be solved in several ways. Which one is better is up to you to decide. We give only professional advice from masters, but there is no consensus among them.
Options for sealing a sink with a wall
- Silicone is applied outside around the perimeter of the sink. The traditional method is used in most cases.
Disadvantages - low-quality material peels off over time, dirt gets into the gap between it and the sink and becomes very noticeable. You have to periodically remove the old silicone and apply new one. After a year or two, black spots appear on all types of silicone, even on the most expensive ones with antiseptic additives. In addition, over time, it changes its original color, fades, and various stains appear on the surface. It is impossible to eliminate this drawback by cleaning or washing; you have to completely remove the old silicone and apply new one. You can apply sealant to the joint between the bowl and the cabinet
Advice. Match the color of the sealant to the color of the ceramic tile, not the color of the sink. Due to this, it is possible to make deviations in the width of the gap invisible.
- Silicone is applied around the perimeter of the sink from the back side until it is fixed to the wall. The thickness of the layer and the location of its application are selected in such a way that after pressing against the wall, excess does not appear on the surface. The disadvantage is that over time the cracks have to be cleaned of dirt.
Applying sealant to the back of a sink
- Using rubber seals for windows and doors. They have glue on one side, a thickness of approximately 5 mm, and are characterized by high elasticity and long service life. The seals are carefully glued around the perimeter on the back side of the sink before installation, and after pressing they ensure a complete tight fit. Many professional plumbers consider this sealing method to be the most optimal. Nothing peels off, accumulated dirt can be easily removed if necessary, and the service life of the seals is practically unlimited.
Eliminating the gap between the cabinet and the sink
Some washbasins do not have a lip over the side surfaces of the hanging cabinet; water can get into the ends. Responsible manufacturers complete their products with special self-adhesive tape; it is glued before installation on the sink cabinet and closes the cracks. Unfortunately, for various reasons, the thickness of the tape is not enough to compensate for all the gaps.
It is recommended to use rubber window sealant instead of tape, the same as we recommended above. It is glued around the perimeter of the cabinet, after which the sink is put in place.
Seals
Adhesive sealant
The sealing is complete, the possibility of water ingress is completely eliminated. It is not recommended to use silicone sealant for the same reasons. The disadvantage of this method is that there is no additional fixation of the sink to the bathroom. Factory tapes hold the structures together quite firmly, the cabinet and sink work as a single unit.
Below is shown how to eliminate the gap between the washbasin and the cabinet.
Tools required for installation
Below is an instrumental set that you can hardly do without:
- marker;
- roulette;
- drill (+ glass drill and wall drill);
- building level.
First, it is recommended to mark out the bathroom area. This is done using a tape measure, a building level and an ordinary marker. After this, you can proceed to drilling holes.
It is extremely important to use a glass drill bit. But even in this case, we start only at a low speed, gradually increasing
We put almost no pressure on the drill. After the drill hits the wall, you will feel it.
If the walls are made of reinforced concrete, you cannot do without a hammer drill. To avoid damaging the tile, it is recommended to drill a hole in the tile itself that is larger in diameter. That is, it is necessary to ensure that the drill on the concrete does not transmit impacts to the tiles. This can only be avoided if the drill does not touch the tile in principle.
Harmonious mirror arrangement
The mirror must fit into the existing interior. Therefore, when selecting and installing it, you need to take into account the size of the room, its design and the location of furniture and plumbing fixtures.
It is important to hang the canvas correctly, this will add light and harmony to the room
If the interior allows, you can install a large or small mirrored cabinet, which will eliminate the need to attach open shelves for cosmetics, soap, etc. In small bathrooms, such a cabinet installed above the washbasin will save space, and in large bathrooms, a tall cabinet with reflective doors up to the ceiling with lighting will also be a wonderful decoration.
A reflective surface with an original frame or colored coating will help create a harmonious space. Sometimes designers recommend installing small matte additional mirror surfaces next to the main one.
The mirror can be of any shape:
- Square or rectangular. This is a classic option and has a larger reflective surface compared to others.
- Round or oval, which are best suited for small rooms.
- Complex shape. Suitable only for large rooms, made to order and preferably after consulting a designer.
The reflective surface must be installed so that it is completely open. A shelf with accessories under the mirror or other objects should not block visibility.
Mirror cabinet location
The convenience of using wall shelves and cabinets lies not only in how they open, but also where they are hung. Ideally, this important attribute for the bathroom should be shallow, so that it is convenient to use, located above the washbasin. But the reality of the layout of city apartments is such that free space has to be saved to the maximum.
A mirrored hanging cabinet for a combined type bathroom is very convenient, where one part is closed with doors, the other with open shelves. As you know, open glass shelves create the illusion of free space. But they pose some danger if the bathroom floors are slippery.
Although the edges of the glass shelves are polished as much as possible, it is important that they are not located along the trajectory of a possible fall. However, you can “fly into” closed cabinet furniture, but safety issues cannot be ignored.
Options for placing a mirror cabinet:
- above the washbasin;
- in a free corner;
- on the side wall;
- in any free place;
- above the bathtub (from the end or longitudinal wall);
- above the washing machine;
- for other attributes of the hygiene room.
When there are problems with the lack of a section of the wall where the cabinet would be most appropriate, you have to be content with what you have. It’s quite normal when you have to wash your face without a reflective surface and clean yourself up somewhere else.
You don’t have to limit yourself to one mirror; there are people who like to look at their reflection on different surfaces. A hygienic room may have more than one wall-mounted mirror cabinet; it will be advantageously complemented by a mirror shield under the bathroom, glossy floors and ceilings, and mirrored tiles.
But everything should be in moderation, and the main functionality of the closet is filling it with all kinds of personal hygiene products.
Installing a wall cabinet in the bathroom
Installing a wall-hung pencil case in the bathroom is not difficult, regardless of the type of product. If you decide to carry out the installation yourself, then for the work you will need the following tools:
Preparing for installation
Let's consider step by step the option of installing a pencil case above a sink on a tiled wall, since this finishing option is the most common.
When installing hanging cabinets for the bathroom, you should always start by marking the surface of the wall on which they will be mounted. First of all, we determine the installation height that is comfortable for us and, using a water level, draw a horizontal line on the wall surface, which will determine the height of the top of the cabinet. In most cases, a hanging cabinet for a bathroom is installed at a height of 1.6 or 2 meters from the floor level, this depends on the type of cabinet itself.
At the next stage we need to mark the center of the washbasin. To do this, we measure the washbasin with a tape measure and divide its width by two - this will be exactly the center of our washstand. We make a mark on the wall indicating the center and draw a vertical axis upward from it using a water level.
Once we have marked the central axis and determined the height of the cabinet, we can begin marking and drilling holes. Each bathroom wall cabinet has special metal ears with holes for mounting it on the wall. In order to transfer these dimensions to the wall surface, you need to measure the distance between the lugs, divide it into two again and measure this distance from the central axis in both directions along a horizontal line. Remember that the holes should be slightly above the horizontal line and not on it, otherwise your wall cabinet will end up a little lower.
Installation principles: leaving the tiles safe and sound
The worst thing that can happen during installation is that the tiles will crack. To prevent this from happening, you need to take your time drilling holes for the brackets. It may take more time, but the appearance will remain impeccable.
To mark the holes, you must use a building level. It is extremely important to position the cabinet completely horizontally. After the brackets are installed, we check them again using a level.
It should be remembered that the cabinet is installed without fittings and shelves. The doors are removable. This will make installation easier.
After the cabinet is installed in its rightful place and electrical communications are properly connected, you can begin installing previously dismantled parts: doors, shelves, etc.
- The video will demonstrate the process of installing a mirror cabinet in a bathroom (hanging):
The bathroom is usually finished with ceramic tiles. Moreover, finishing is carried out not only on the floor, but also on the walls. Thanks to this, the surfaces are protected from excessive moisture content in the bathroom.
However, the bathroom needs furniture. And to save space, most of it requires placement on the walls. This is the main difficulty - it is necessary to hang cabinets, for example, in such a way as not to damage the finish. Find bathroom furniture clearance items here. Below we describe the basic recommendations that will allow you to hang furniture in the bathroom without destroying the tiles.
How to carry out work
We’ll figure out what’s needed for installation and how to properly organize the workflow to achieve a good result.
There is nothing complicated in installation, but it is very important to do everything carefully and accurately so that the furniture hangs perfectly evenly
Materials and tools
First, let's figure out what materials are needed. The set is quite simple:
Wall cabinet. Most often sold assembled with lugs for wall mounting
When choosing an element to suit the decor of your bathroom, it is important to find something that will fit organically into the interior and will meet all your needs. Most often, the design is combined with a mirror or the doors are made in the form of mirrors, which is very convenient;
Locker fastener
You need two dowels with a diameter of 6 mm and two L-shaped screws on which the structure will be hung. You can purchase these kits from hardware stores, but often everything you need is already included in the package, so check to see if you have the fasteners and inspect them. Often the manufacturer saves on these elements and uses low-quality dowels and screws; in this case, it is better to purchase other, more reliable ones;
Wire connectors. Necessary if the cabinet has lighting. It is better to choose modern terminals that reliably and firmly connect the wires and provide a high level of security. Twists and electrical tape are a thing of the past, and it is better to abandon this option.
As for the tools, you will need the following set:
- Roulette and pencil
. There will be a lot of measuring and marking, so you can’t do without these simple devices. If you have a smooth wall, then you will need a level to draw the ideal horizontal line; if there are tiles on the wall, then there will already be guidelines, if, of course, it is laid evenly; - Hammer
. Essential for drilling holes in tiles and concrete walls. Therefore, you should have at least 2 drills in your kit: a drill with a Pobedit tip for concrete and a special drill for ceramics. Both options are selected according to the diameter of the dowels that you will use during the installation process.
Installation process
Now let's figure out how to hang the cabinet. The process is not complicated, but requires accuracy and precision:
| Illustration | Description |
| The cabinet is completely assembled . This is necessary so that you can take all the necessary measurements and not make mistakes when drilling holes. Most often, the work takes little time and no special problems arise at this stage. | |
| The wall must be completely ready . In our case, it is lined with ceramic tiles, the seams are sealed, and a wire is routed in the right place, from which we will power the lighting in the cabinet. You can’t hang furniture on an unlined wall, since then you’ll have to redo the whole job from start to finish. | |
| The necessary measurements are taken to determine the position of the cabinet on the wall . In our case, it will hang on the side of the bathtub, so we need to find the middle of the empty space, this will be the center from which we will make all the marks. The width of the bathtub is marked, it is 70 cm, and the wall gap is measured, for us it is 110 cm. Therefore, we set the mark at 55 cm. | |
| The height of the structure is determined . It all depends on the type of locker and the height of family members. First of all, a mark is placed along the bottom edge so that we can see at what height from the floor the furniture will be located. | |
| The height of the hangers on the cabinet is measured . After this, it is laid on the wall from the bottom edge. First you need to make a mark on one side. Since our tile lies flat, it will serve as a good guide, and we will not be mistaken with the horizontal line. | |
| The distance between the fastenings on the cabinet is measured . The indicator is divided by two and this distance is set aside from the center to the sides. This is how we find the exact locations of the dowels and place a mark in the right places. | |
| Drilling points must be marked on the surface . A core is used to make a hole on a smooth ceramic surface. | |
| Holes are drilled in two stages :
| |
| Dowels are inserted into the holes and screws are screwed in . Then the cabinet is carefully hung on them and leveled, the work is finished. All that remains is to connect the backlight using connectors. |
Design and internal content of wall-mounted cabinet furniture
The appearance of all items in the bathroom should be in harmony and correspond to the chosen style. A straight or corner mirrored bathroom cabinet is selected to match the overall design.
For Japanese minimalism, a half-open multifunctional accessory with a sandblasted pattern on the doors with hieroglyphs, in the form of bamboo or a branch of cherry blossoms is suitable.
A minimalist interior will benefit from a compact mirrored cabinet with one sliding or hinged door.
Stained glass inserts are an attribute of Gothic, Art Nouveau and postmodernism.
Mirrors on the door with frames are a classic example, oval frames are a proposal from the times of English classics, conservatism or the Victorian era.
A wardrobe mirror in an expensive frame will fit perfectly into any historical interior or palace style. As a rule, in such an environment a whole bathroom set is required, including a console with a mirror and a bench (pouf).
Cabinets with moldings and an “aged” effect are sought for in Provencal, country or retro style.
Wall-hung units of unusual shape will complement bathroom furniture in a modern style, futuristic and avant-garde interior, and can also become the final chord in the author’s search.
The convenience of a cabinet largely depends not only on the method of opening the cabinet doors and its location, but also on the internal layout. Some people don’t like it when there are a lot of small items, shampoos and other hygiene products in the bathroom. There is a need to put all this away in closets.
Others, on the contrary, buy a variety of bathroom accessories in beautiful bottles and packaging, lovingly displaying them in a prominent place. All this “wealth” is partially placed on shelves and directly on the washbasin. Based on these preferences, furniture is selected for the bathroom, where the total amount of space behind the cabinet doors should be taken into account.
It is very convenient when there are grooves inside the cabinet for moving shelves (like refrigerator doors). This arrangement of the internal space makes it possible to reorganize as the cabinet is filled with new jars, bottles and cosmetics.
If there are several cabinets, most often cosmetics, combs and a hairdryer are stored behind glass doors, in other places less in demand items are stored.
It is not advisable to repurpose an ordinary wall cabinet intended for the kitchen or hallway into cabinet furniture for the bathroom. Likewise, you should not cover open bookshelves with mirrored doors for placement in bathrooms. They are made from materials that quickly absorb moisture and odors in a humid room, and mirror amalgam deteriorates and smolders.
For those who don’t know how to hang a cabinet with a mirror in the bathroom, you should start by marking it vertically and horizontally. This is done using a plumb line and level or a universal construction tool. From one point, other points are marked to eliminate curvature.
Very convenient are cabinets with adjustable brackets, in which it is easy to adjust the degree of fit to the wall and the inclination of the doors, which are also adjusted to the building level.
Pay attention to the illuminated cabinets - there is external lighting (along the perimeter of the mirrors) and internal lighting. The only difficulty is to make hidden wiring and protect the hanging accessory as much as possible from humidity, which is detrimental to lighting fixtures. Sometimes home craftsmen make this improvement on their own, using diode strip or point diodes on the sticky back side.
A mirror cabinet is often included in a modular bathroom set, which can be easily rearranged depending on the area of the wall along which the cabinet furniture will be located.
Also on sale are inverted cabinets that can be hung with the door to the right or left, and the shelves can be rearranged along the grooves. This is convenient when the house is planned for redevelopment or radical reconstruction with a major overhaul, then the mirror cabinet does not need to be changed.
The depth of wall cabinets varies significantly; there are almost flat models, where only shampoos and bottles are placed in one row behind the mirror. And there are deep wall-mounted models, but they are only appropriate in a spacious bathroom. It is inconvenient to wash over them, bending over the sink.
For a small bathroom, narrow and tall modular cabinet furniture is suitable. Such cabinets are located right up to the ceiling. They are compact and roomy, but it is not very convenient to climb onto the top shelves. There may be items that are rarely used - bulk packs of washing powder, supplies of clean towels, intimate hygiene products hidden from children.
Let's look at an example of how to hang a cabinet in the kitchen using a mounting rail.
Tools you will need:
- Impact drill or hammer drill.
- Several dowels with a diameter of 10 mm and a length of at least 6 mm.
- Two canopies and a mounting plate.
- Metal scissors or jigsaw.
- Concrete drill with a diameter of 10 mm.
- Drills 4 and 2 mm.
Fastening awnings
Let's prepare a cabinet for attaching awnings. To do this, if it is not removed, dismantle the back wall. It is usually made of fiberboard. We insert the canopy inside the cabinet and make sure that its upper part fits snugly against the cabinet body.
The hook, when released, should extend beyond the cabinet body by 4mm.
Use a 4 mm drill to drill a through hole for attaching the canopy.
We do not drill the second hole for fastening the canopy through it, but go through it with a 2 mm drill to screw in the screw.
In practice, two fastenings use screws, but for greater reliability it was decided to use a through screw and nut. The disadvantage of this method is that the screw head will be visible on the side of the cabinet. But even with ordinary screws the cabinet will not fall off.
When the hole is ready, fasten the parts with a screw and washers.
You should not clamp them too tightly so as not to break the canopy body.
We screw the screw into the second hole.
We do the same on the opposite side.
There are “left” and “right” canopies, and they need to be inserted accordingly.
The body is marked with the letters “L” and “R”.
Having secured the canopies to the side walls of the cabinet, we cover the back wall of the fiberboard with a panel, cutting out the places where the hooks exit. This can be done either with metal scissors or with a regular jigsaw.
We nail the panel to the body with thin nails.
Installing the mounting plate
The cabinet is prepared, we determine the height of the mounting plate. It should be assumed that the distance from the sink or countertop to the bottom of the cabinet in the kitchen should be 500 - 600 mm. If this value is less than 450 mm, the cabinet may interfere with work on the work surface of the kitchen countertop. Consider the height of the owner and the depth of the closet. When we have decided on this value, we add it to the distance from the bottom edge of the cabinet to the hooks. This will be the height of the mounting plate.
We mark the calculated value with a marker on the wall, apply a bar at this level and mark the places for drilling holes.
The standard strip is 2000mm long and if you are planning to hang a row of cabinets there is no need to cut it. In the case where two cabinets will be suspended at a distance, cut pieces of the required length. To save the bar, it can be broken into several parts, securing it only in the place where the hook will be located.
It is better to make the first hole from one of the edges. Next, without clamping the screw, place a level on the bar and, having chosen the optimal value, make a mark on the other side and in the middle.
Lower the bar and drill holes according to the markings.
We insert the plastic dowels into the holes and screw the screws through the bar.
We check the level and reliability of fastening. We lift the cabinet and place its hooks on the mounting plate.
All that remains is to adjust the tilt with the corresponding canopy screws. This can be done with a Phillips screwdriver. When the work is finished, you can safely lay out the dishes; the awnings will reliably support their weight.
Cabinet creation process
First of all, choose the material for the future cabinet and take the necessary measurements.
Important! It is best to create a drawing to determine the exact amount of material needed and the method of fastening.
General recommendations:
- With all the abundance of material, wood remains the most popular. We recommend using natural materials for the relaxation room.
- To effectively use every corner of the room, you can make a cabinet for the bath.
- Carry out the work on making the cabinet in a room that is located near the bathroom, so that you can go in at any time and make the necessary adjustments.
Assembly
The process of creating a cabinet is quite simple:
- Make future shelves and walls from the boards.
- Mark the mounting locations for the shelves on the side walls.
- If you plan to add lighting inside, then make holes in the side board to connect the furniture to electricity.
- Fasten all the parts using a furniture corner and self-tapping screws. A more professional connection involves the use of minifix and rafix.
- Install cabinet doors on hinges. We recommend using chrome hinges.
Important! If the design involves mirrored doors, then use more massive hinges for reliability. For mirrored doors, take care of the hinge closers so as not to damage the mirror when closing.
Kitchen cabinet with sliding door
Convenient kitchen cabinet with sliding door. It's attractive because dishes and attractive items can be placed on one side, and things like grocery boxes, canned goods and vegetables can be stacked on the other side. The door slides on rollers, so it moves easily, does not interfere with anyone, and both sides of the cabinet are equally accessible. The construction for this project was surprisingly simple. It's basically just a large shelf with a simple wheeled door attached to the front. The kitchen cabinet featured in this project measures 230cm high, 185cm wide and 34cm deep. This is, of course, a solid design, so before making it, make sure that the cabinet will fit into your doorways. How to make such a cabinet for the kitchen or pantry, see the step-by-step photos.
Photo source www.ana-white.com/2018/04/free_plans/barn-door-cabinet-or-pantry
Wall sliding wardrobe
It's no secret that the world is full of coffee lovers, so this project will appeal to many! If you're looking for a fun way to store all your coffee supplies, this coffee bar would be a great addition to your kitchen.
You can read how to make this sliding cabinet for the kitchen on the website of the author of the project, where you will find a list of all the necessary tools and step-by-step instructions. See step-by-step photos below.
Photo source www.ryobitools.com/nation/projects/barn-door-coffee-bar_10043
How to make a bathroom sink
The style of vanity cabinet shown in this photo is more common in America and is very popular with British designers.
If you like this design, the gallery below contains 105 step-by-step photos of how to assemble a bathroom vanity cabinet.
Sink cabinet drawing
This simple vanity cabinet with doors will add an interesting design to your bathroom decor. Poplar planks and cheap sanded plywood were used for the project. If you don't want to use poplar, you can use pine boards, although they also have their drawbacks - seals around the knots, and pine discolors the paint. Cabinet doors are designed for hinged hinges, and the design dimensions are for open racks. If you don't want to buy legs, cut the bars to make the cabinet a height that suits you. A few notes for assembly. Before applying glue, dry fit the body to make sure everything is in place. Make adjustments if necessary. If you paint, skip the necks. Apply glue to all joints and assemble the cabinet. Use a hidden support at the top of the back of the cabinet to maintain the desired distance. Use clamps to secure all pieces while the design dries. Remove excess glue.
The assembly process is shown in the drawings in the gallery.
Photo source: www.ana-white.com/2014/01/plans/vanity-sink-cabinet-plan
Vintage bathroom cabinet
Finding your own bathroom style that you like is a difficult task. Most powder room cabinets are units with doors and have no style.
A DIY bathroom vanity cabinet allows you to create a unique design in your bathroom, and another plus is that you will spend significantly less money on materials to make the cabinet than buying a finished product in a store.
You may think that this bathroom cabinet is too complicated a design for you, but if you have at least minimal skills, then the main thing is to start, and you will soon realize that everything is not so scary.
This is what this cabinet looks like in the drawing. If necessary, detailed instructions are on the website, and below are step-by-step photos.
Note: For added protection, apply two coats of clear polyurethane inside to unpainted sections. This increases protection and reduces the risk of swelling.
Photo source: www.home-dzine.co.za/bathroom/bathroom-vintage-vanity.htm
Alternative options
In addition to standard methods, you can use other ideas on how to hang a bathroom cabinet on tiles.
Idea 1
If you feel sorry for drilling tiles, then there are alternative options: “liquid nails”, sealant, special suction cups. These options have both their pros and cons:
- Suction cups can be used for small, light, mesh, generally “non-risky” shelves.
- “Liquid nails” are more reliable (1 drop of glue can hold the weight of 50 kg) than sealant, but it is very difficult to remove glue from tiles.
- The suction cup can also be glued with superglue for reliability, but later, if you want to remove the suction cup, it will be quite difficult to scrape off the glue.
Important! To use glue, sealant or suction cups, first degrease the surface of the tile, dry it and warm it up a little. It is advisable to sand the gluing area with a little fine sandpaper.
Idea 2
You can use non-flat hooks for small shelves if you embed them in the seams. Proceed this way:
- Make a workpiece in the shape of the letter T from 1 mm thick stainless steel. The length of the upper “crossbar” and legs should be approximately 25-30 mm, and the width should be 5 mm.
- Insert the bar into the horizontal seam and bend the leg down.
- The seam must first be cleared with a piece of a hacksaw.
- After installing the workpiece, treat the seam with grout.
- After the grout has dried, bend the end upward with a hook.
Important! The advantage of this method: if necessary, the hook can be removed and the seam can be rubbed again, without leaving any traces. Disadvantage: the hook can only support 5 kg.
Types of toilet furniture according to installation method
To determine what type of useful design should have, you should first look on the Internet for a photo of the toilet cabinet. Already having an idea of what the result should be, you can interpret the option you like to suit your room. The closet in the restroom can be placed as a separate piece of furniture, built-in or hung on the wall. Learn more about each type.
The first option is a free-standing structure, or a cabinet with legs. An interior item made in this way is usually U-shaped. The shelves in it can be completely open, hidden behind the door, or of a mixed type. The opening in the cabinet is designed to be installed above any toilet.
A wall cabinet is the most popular type of furniture for toilet rooms, which is available in a wide range. It can be mounted directly above the toilet or in an already organized niche
The modular system allows you to focus your attention only on design and size when choosing. But, like the first option, it doesn’t reach the plumbing
In terms of organization, this method is the most labor-intensive and requires attention to some details:
- When choosing materials, you should give preference to moisture-resistant ones. This type of cabinet is located close to the pipes, and condensation or small leaks can have a bad effect on its condition.
- Before starting work, you should make accurate measurements and markings.