A significant part of furniture manufacturers produce their products in disassembled form. This reduces delivery costs and promotes the safety of packaged parts. If upholstered furniture is delivered to the buyer assembled, then cabinets will most likely have to be received in separate parts, accompanied by instructions. Self-assembly of kitchen furniture is a way to save money and an opportunity to show off your skills. You can immediately order assembly in the store, but this is expensive, since the cost of the service sometimes reaches 10% of the total price of the kit, depending on the number of items. You can handle this yourself with minimal skills in working with tools.
The nuances of self-installation of the kitchen
What to pay attention to to avoid installation errors:
- If the set is corner, then it is recommended to start installation work from the corner.
- If the set is linear, assembly begins with the cabinet that will rest against the wall.
- You don't need to assemble all the cabinets at once. Assembly of the next module begins only after the previous one is installed in place.
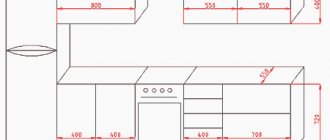
- In order to correctly install the kitchen set, it is necessary to take into account that the distance between the wall and the countertop should be 0.5 cm.
- It is not recommended to install doors on hanging elements immediately. The module is easier to hang without doors.
- Drawer slides are attached to the interior sidewall surface before the cabinets are assembled.
Correct installation of the kitchen requires prior familiarization with the features of installation work.
How much does it cost to assemble a kitchen set?
Regarding how much it costs to assemble kitchen furniture - in each case the price is negotiated individually, depending on the complexity of the task ahead. Be that as it may, the pricing policy implemented by our company will pleasantly surprise you.
Entrust the services of assembling kitchen furniture to the employees of our company, and you can save not only time, but also money, and also save yourself from negative emotions, the occurrence of which will be caused by boring and tedious work. But the most important advantage in this situation will be the guarantee of quality work!
Required Tools
In order to install a kitchen set with your own hands, you will need the following tools:
- Hammer. Necessary for drilling deep holes in a concrete wall when installing kitchen wall units.
- A jigsaw or hacksaw for metal, a file, a saw. Needed for cutting wooden kitchen components. They are used to make cuts. They are also used to cut out a hole for a sink.
- Screwdriver. This tool allows you to speed up the build process.
- Hex key.
- Hammer, pliers, cutter knife.
- Level, tape measure, square. Necessary for taking measurements and monitoring the correct step-by-step assembly of kitchen cabinets.
Fasteners you will need to install the kitchen:
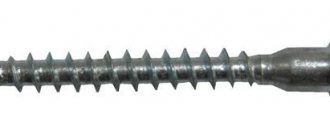
- euroscrew;
- furniture nails;
- rail or fastening strip for hanging;
- sealant based on silicone;
- 3.5x30mm self-tapping screws are also used in the work;
- anchor bolts;
- corner;
- furniture ties for fastening;
- dowels.
Connecting a faucet in the kitchen with your own hands
It is clear that the installation of the mixer can be carried out after attaching the sink. But there is a possibility that it can be damaged during the process of hanging the upper cabinets. Therefore, it is best to install a kitchen faucet yourself after finishing work on the cabinets.
Connecting the mixer consists of the following steps:
- threaded elements are wrapped with FUM tape;
- there is no need to wrap the tip, since there is a gasket on the hose;
- The ends of both hoses are screwed into the holes of the mixer with an open-end wrench (do not tighten the hose too much, as this can damage the lining);
- 2 pins are screwed into the mixer;
- an O-ring is placed in the lower part of the mixer;
- the mixer is placed on the sink;
- there should be hoses and pins in the mounting hole of the sink;
- two rubber seals and a metal washer are connected under the sink through hoses (they protect the sink body from premature wear);
- nuts are screwed onto the pins;
- hoses are supplied to and connected to pipes with hot and cold water.
Video about installing a kitchen with your own hands:
Installing the bottom row of the kitchen
Kitchen installation should begin from the lower tier. At this stage, floor cabinets, countertops, a sink are installed, and a wall panel (apron) is installed. It is important to remember that it is better to install doors on the upper tier after installing the module.
Floor stands
There is a water supply in the floor-mounted corner cabinet, so you need to make cuts for the water supply and other communications. The position of all components and their angle of degrees must be controlled using a building level and a square.
Instructions for assembling floor stands:
- Using self-tapping screws, install cross-shaped fastenings for doors to the side surface of the kitchen walls.
- Screw the roller guides to the inner side surfaces.
- Insert all wooden dowels into blind holes.
- Screw furniture screws into dowels.
- Screw on the adjustable legs.
- After making a mark on the wall, adjust the furniture to the height.
- Place the cabinets in their place against the wall.
- Tie all the cabinets together with self-tapping screws (3 cm).
Installation of countertops and sinks
At this stage it is necessary:
- Place the tabletop on the lower cabinets.
- Leave a gap of 5 cm between the tabletop and the wall.
- Measure the blade and make marks for cutting.
- Place the sink on the underside of the structure and trace the outline of the sink with a pencil.
- Using a drill, make several through holes along the drawn line.
- Using a jigsaw, cut a hole for the sink.
- File the cut area.
- Use fasteners to secure the tabletop to the cabinets.
- Cover the end with covers that are secured with self-tapping screws.
- Install a sink into the hole made.
- Attach the siphon.
Wall panel installation
To protect the kitchen work area from contamination, wall panels are used. To install them, it is necessary to mark the surface, install the frame, and cover the sheathing with panels.
The covering starts from the corner. The panels are installed from top to bottom.
Door fastening
Door fixing guide:
- Screw the screws into the façade.
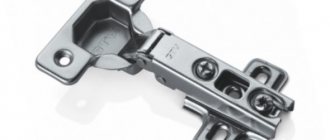
- Fix the cabinet hinges in special recesses.
- There should be cross-shaped plates on the inside of the case. Doors are hung on these plates. This also applies to glass kitchen cabinet doors.
- Tighten the hinges using a screwdriver.
- Check that the doors operate correctly.
Preparatory stage
If you are assembling the kitchen yourself, then before starting assembly work, you need to prepare the area, clear it of old furniture, check the sockets, wash and dry the walls and floors, which will later end up behind the cabinets. The primary preparatory stage begins even before the furniture set for the kitchen is purchased. At this stage, the arrangement is planned:
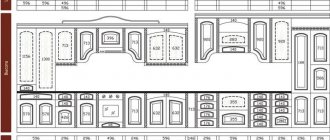
- a room plan is drawn up indicating the dimensions, configuration, stationary structures;
- the location for the working and dining areas is determined, the issue of furniture placement is resolved (linear, corner, U-shaped);
- Dimensions and number of cabinets are calculated, taking into account the stove, refrigerator and other household appliances.
Since the kitchen is a place where housewives spend a lot of time, it is necessary to think in advance (even at the renovation stage) about how and where exactly all the fittings will be installed. It is necessary that it is convenient, comfortable, and we must not forget about the aesthetic appearance - the furnishings must be in harmony with other rooms. If the room is closer in shape to a square, then the work area can be divided into two walls with hanging cabinets. It is better to place the refrigerator and table parallel to the stove and sink, with shelves or wall cabinets on top.
The zoning of the kitchen depends on the configuration of the room. The work area is located where the sink and gas stove are installed. The dining area is located near a free wall or near a window.
Since by the time of purchase it is already known where each cabinet will be installed, all that remains is to mount it and then arrange all the structures in the prepared area.
Types of corner kitchen cabinets, rules for choosing them
Drawing up a room plan
Solving the problem of furniture placement
Calculation of dimensions and number of cabinets
Installation of wall cabinets
The standard dimensions of kitchen cabinets are 90 cm, the height from the base of the countertop to the cabinet is 50-60 cm.
From the base of the tabletop you need to measure upward 50-60 cm and put a mark (this will be the bottom of the cabinet). Then add the height of the cabinet to this point and put another mark. All lines are drawn using a level.
Before starting work, it is necessary to assemble the hanging elements.
Fastening to furniture hinges
To hang cabinets on furniture hinges you must:
- Measure the height of the fasteners.
- Screw furniture hinges to the back of the body.
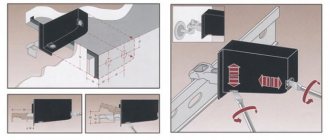
Rail mounting
This method of hanging upper cabinets on a rail is considered more reliable. The tire is installed horizontally, 3-4 cm below the top mark for installing cabinets. Hooks are attached to the inside of the side walls of the housing. A mounting plate is used to install these elements.
Final work
The final work includes installing a plinth in the kitchen. Then they move on to installing built-in furniture.
In order to install the base, you will need the following tools:
- roulette;
- level;
- file;
- screwdriver, self-tapping screws, small nails and hammer;
- plinth system with connecting elements and fastening clips.
The base part is attached to the outer legs and several intermediate ones every 0.8-1.2 m. Special plugs are used to decorate the corners.
Assembly of a corner kitchen
Installing a corner kitchen can significantly save space, but in technical terms it has a number of features. That is why it makes sense to entrust the assembly of a corner kitchen to us - professionals in their field who know all the nuances and will carry out the work taking into account all the requirements of practicality and design. The kitchen corner will be assembled within an hour, and you can immediately start using the new set, appreciating all its advantages. If necessary, we can advise you on the layout - how best to arrange the furniture in such a way as to maintain functionality with the specified interior style.
Problems installing the headset
Problems that arise when installing kitchen units include:
- uneven floor;
- fragile walls;
- gas pipes and meters.
Gas pipes and meter
To prevent gas pipes and meters from spoiling the appearance of the kitchen, you need to insert them into the kitchen wall cabinet. To do this, you need to cut the necessary holes in the back wall of the cabinet.
Uneven floor
To solve this problem, it is recommended to trim the lower decorative plinth using a jigsaw. Cover the cut edge with sealant.
Stages of assembling kitchen furniture
How to assemble kitchen furniture? The kitchen installation procedure is carried out in several successive stages. The process begins with assembling the box, after which the drawers are assembled and the upper cabinets are mounted. Only then are the lower drawers of the structure installed.
Box assembly
Furniture assembly begins with the formation of a box. To do this, follow the following steps:
- the side wall of the box is installed on a solid and flat surface with its end facing, and the fronts should be located at the top;
- the wall of the cabinet is correctly connected to the bottom, and only at a right angle, after which they are connected to each other, for which confirmations are used, and for Euroscrews in factory-made kitchens there are already holes;
- on the other side, the second side wall is fixed in the same way;
- two upper strips are mounted on each side of the structure if lower drawers are assembled, and a lid is installed for wall drawers;
- the cabinet is laid with the front facing down, after which its diagonal is measured using a ruler, since the values obtained in different cabinets are not allowed to differ from each other by more than 1.5 mm;
- the back wall is attached to the cabinets, for which staples or small nails are usually used;
- for floor-standing cabinets, legs are attached to the bottom, and they can be made of plastic or metal.
During work, it is necessary to check that the ends of all side walls of the boxes are flush with the bottom and lid, for which measuring equipment is used.
Installing the side wall
Installing a second side wall
Two top slats of the box
Cabinet Layout
Fixing the back wall
Assembling drawers
The next stage of kitchen installation is the correct assembly of the drawers, which are required in this design. Without them, any kitchen becomes uncomfortable and roomy. To do this, follow the following steps:
- a box is made, for which four planks are fixed to each other at right angles;
- all such blanks must have the same diagonal;
- guides are attached to the side walls of each resulting box;
- facades are fixed using screws;
- At the bottom of the drawer, special response latches are mounted, allowing you to attach the drawers to the guides.
Once the drawers are ready, installation of the upper wall cabinets begins.
Create a box
We fasten the guides
We fix the facades
Fixing the latches
Installation of upper cabinets
They must be securely and efficiently attached to the wall of the room. At the same time, using kitchen furniture for its intended purpose will not be difficult. This process is divided into successive stages:
- Initially, the attachment points of all cabinets are marked, for which the optimal height is set aside from the floor, which determines the distance from it to the bottom shelf of the cabinet;
- when choosing the optimal height, the height of the person who acts as a regular user of the kitchen is taken into account;
- the height of the tabletop is also determined in advance so that there is a distance of at least 0.6 m from it to the top cabinet;
- lines are drawn from the applied marks, indicating the locations of future fasteners, and with a level you should make sure that the line is perfectly straight;
- a hanging method is selected, for which standard mounting loops can be used, as well as a rail equipped with special hooks for fixing cabinets;
- for hinges, holes are made in the walls with a puncher, and fasteners are inserted into them;
- The cabinets are hung on the received fasteners, after which they are carefully aligned, which will allow you to correctly determine the location of the second fastener.
If you plan to lay any pipelines through the upper cabinet, then corresponding holes must be made in advance with a jigsaw for them in the rear wall.
Creating markup
Creating holes
Insert fasteners
Hanging cabinets
Installation of lower cabinets
The lower drawers of the set are usually installed after the upper ones are secured. Installation of kitchen furniture in this case is divided into stages:
- installation of the first cabinet begins from the corner of the room;
- the legs of each cabinet are adjusted correctly to avoid distortions;
- all cabinets are lined up;
- adjacent elements are tightened together using a clamp, and then a furniture tie is used.
The next stage involves installing a countertop, in which a hole for washing is first made using a jigsaw. The countertop should be properly aligned so that there are no distortions that reduce its service life and negatively affect the use of the entire kitchen as a whole. For a large kitchen, you have to use two parts of the countertop, and special metal strips are used to connect them securely and correctly. These connections must be treated with sealant. After the two elements are securely connected, they are attached to the lower cabinets, for which special furniture corners are used.
Pulling together the lockers
We display lockers
Adjusting the legs
Final stage
It is not difficult to install furniture in the kitchen yourself. After completing the main tasks, the final stages of work are carried out. You should be especially careful, since the appearance of the entire created structure depends on the processes implemented. Installation at this stage is divided into processes:
- in the place where the tabletop is adjacent to the wall, you must use a special plinth that closes the existing gap, since otherwise dirt and water will constantly penetrate into it, which negatively affects the service life of the entire set;
- the doors are fastened to all cabinets of the structure, and their adjustment is easily accomplished using special new hinges;
- pre-assembled drawers are inserted into the set, and various built-in appliances and furniture are installed;
- the kitchen must be well and efficiently lit, so at this stage various lighting and lamps in the set are additionally connected;
- the base strip is installed;
- we assemble and install the sink, after which it is connected to the necessary communication systems;
- The areas where the sink connects to the countertop must be treated with a high-quality sealant.
The procedure for installing a kitchen unit is considered quite complex, so in order to prevent possible errors, it is recommended to first watch the training video. Thus, the assembly of the most important kitchen furniture, represented by the set, can be done on your own. To do this, you must study the correct instructions in advance, watch a training video and use only high-quality materials and tools. This approach guarantees a durable and beautiful result.
Fixing the plinth strip
Installing the plinth
Door fastening
Sink installation