The built-in storage system can also be relocated from place to place. Of course, provided that the new niche matches the previous one in size, and there are no problems with installation.
How to properly disassemble a cabinet? We tell you how to quickly and accurately dismantle cabinet and built-in models with your own hands and without the help of a professional technician, without damaging anything.
An important point: start working only after making sure that all shelves, hangers and mezzanines are completely free of things.
How to disassemble a wardrobe
How to disassemble a wardrobe? You will need a screwdriver, wrench, pliers and a set of screwdrivers, as some parts are easier to remove by hand. One person can cope with this problem, but it wouldn’t hurt to have a second one for backup: for example, it’s more convenient to clean the same doors with two people.
First of all, remove the sliding panels: lift them, move the lower wheels out. Secure it so that the doors do not damage the body or fall on you, and then carefully remove the supports from the upper guide bar.
Lay the canvases on the floor: there is still work to be done with them. For example, unscrew the stoppers and closers in the lower guide. Then you need to remove both guide bars, lower and upper. Unscrew the bottom and side roller mechanisms - this is where a screwdriver comes in handy.
Usually the canvases have a special duralumin frame, which adds strength and prevents damage to chipboard, MDF or mirrors - this also needs to be dismantled.
Important: if you are disassembling the coupe in order to put it back together soon, you do not need to unscrew the door closers or remove the trims and profiles. The main thing is to pack all structural elements so that they are not damaged during transportation.
Now you will need a wrench: use it to unscrew all the confirmats (blunt-tipped European screws with a countersunk head) and carefully remove the shelves. If the design involves the presence of a chest of drawers or drawers, remove them too: you need to bend the guide stopper and unscrew the screws. Don't be afraid to deform the metal elements: they are quite strong. The boxes themselves do not need to be disassembled; they “survive” transportation normally.
It is necessary to remove screws and other fasteners from the crossbar supports.
Now that the filling has been disassembled, let's move on to the body:
Place the furniture on the floor; the side where the doors used to be should be at the bottom.
Remove the screws and washers from the back wall. Proceed with caution: this part is usually made from fiberboard, which is easy to damage. Remove the connecting strip.
Remove the confirmations from adjacent body panels and separate them.
Using pliers, remove the dowels (cylindrical wooden rods). Try not to break them: replacing the dowel is easy, but to do this you will have to go to the store.
Be sure to sort the fittings and all fasteners into boxes or bags, labeling them accordingly. If you don't do this, it will be difficult to put the furniture back together. Shelves, panels and doors also need to be packed for future transportation.
Walls
The walls near the cooking area are designed to be protected by a kitchen apron.
It is usually made from tiles (the most reliable, durable and hygienic option, but is difficult to install), wall panels made of MDF or plastic (easy to install and maintain), and tempered glass.
Mirror surfaces will help to visually increase the space.
The most expensive materials include stone and mosaic. The apron is installed next to the work table, sink, and also near the hob or stove.
The remaining walls of the kitchen are usually finished with wallpaper (preferably washable or paintable), paint or decorative plaster, and wall panels.
How to disassemble a built-in wardrobe
How to disassemble a built-in wardrobe? It’s easier here: you only need to remove the filling and doors, because the role of the sides, bottom and lid is performed by the walls of a niche or room. You need to start by dismantling the doors. Remove the sliding panels in the same order as in the paragraph above.
The hinged ones must be removed from the racks in the opening, having first unscrewed the awnings. Remove shelves and drawers according to the algorithm described in the previous paragraph. And again, don’t forget about packaging the accessories and all components: sort them into separate packages and label them.
Do not forget that the installation is always adjusted in size: to the curvature of the floor, ceiling and walls. Dealing with dismantling the closet isn't everything: you may have to reorder shelves adjacent to the walls, partitions and floor-to-ceiling sides that were inserted at random.
Preparatory work
Preparing a kitchen for renovation means cleaning it and removing old finishes, furniture and appliances. It all starts with removing appliances and furniture from the kitchen, then dismantling the ceramic tiles, removing the baseboards and flooring.
Whitewash from the ceiling is not so easy to remove, so you will have to spend a lot of effort on washing the surface. The same applies to painted walls: in this case, a special paint solvent helps the best. You need to work with it with extreme caution, wearing a respirator, protective clothing and goggles. You can remove old wallpaper using a spatula; first, you can wet it a little with cool water.
At this stage excess partitions are also demolished , if these actions do not contradict the norms, but in general, any redevelopment must be approved in advance. If the plan includes replacing the door, then it is better to remove it at this stage. After all the old finishing has been removed, it is best to wipe the surfaces with a detergent solution and then with plain water. This removes all remaining dust and accumulated grease.
The cleaned surfaces must be carefully inspected, their general condition, the presence of cracks, defects, and unevenness noted. At this stage, you can make adjustments to the estimates if it turns out that some additional work needs to be carried out.
We disassemble the swing wardrobe
For modern storage systems, the rules are essentially the same as for coupes. How to quickly disassemble a cabinet: start by dismantling the fronts, then remove the shelves. The fronts are easy to remove: on each hinge located on the side panel, just loosen 2 screws. Ready: the doors can be removed and packed away. Then proceed in the same way as in the case of sliding models.
You'll have to tinker with old-style cabinets. They were assembled a little differently: wooden dowels and even eccentric ties were used. To deal with shelves, handles and drawers you will need a set of screwdrivers, a screwdriver, a chisel and a rubber mallet.
First, remove the shelves that are not fixed in the cabinet, but simply rest on the holders. Then remove all the fastener plugs, corners and screws holding the other shelves and put them away. Using a screwdriver, unscrew the screws in the crossbar supports and remove them from the wardrobe. Now it’s the screwdriver’s turn: it is needed to remove the screws holding the body and mezzanines from the hinges. The removed doors can be laid on the floor and the handles unscrewed from them.
We remove the mezzanine
They can be attached:
metal arc and screw.
Plumbing for shower systemInstallation of ventilation systems
Electric heated floor
An eccentric coupler is easier to disassemble. Insert a suitable screwdriver into the cross slot of the eccentric and carefully turn it counterclockwise. Then pry the cylinder with a flat-head screwdriver and pull it out. Done: all that remains is to separate the panels.
If the fastening is made in the form of a metal arc with a screw, which is also hidden in a cylindrical recess, you will have to tinker. You may need an awl or thick wire that will not bend under pressure. Insert the tip of an awl or the end of a wire into the screw hole, unscrew the pin, and then remove the bracket and separate the body parts.
Does not work? You can gently tap one of the plates with a rubber hammer so that the dowels come out of their sockets. Be patient and do not try to separate the elements using brute force: if the dowel breaks off, you will have to remove it from its socket, and this is inconvenient.
Wooden dowels can be removed with pliers, screws with a screwdriver. It remains to deal with the bottom of the mezzanine. Pry it with a chisel and move it a little to the side, and then remove it. You need to do this together!
We continue to disassemble the body on the floor:
Use a chisel to pry up the back. In old cabinets, it is made of plywood and is attached to nails - they need to be removed using pliers.
Remove the plywood itself and the connecting strip.
Remove the remaining fasteners and remove the body panels.
An important nuance: if you have to dismantle a wall with glass doors, do this at the first stage, carefully releasing them from the hinge clamps.
Calculation of required building materials
In order not to encounter the problem of shortage or excessive surplus of building materials, you need to calculate the required quantity in advance as accurately as possible. After the design project is ready and finishing methods are selected, it is necessary to calculate how much and what materials will be needed for preparatory work, rough and finishing. If difficulties arise, then at this stage you can contact specialists.
The estimate includes the necessary facing materials, primer, putty, possibly new sockets, wires, etc. It doesn’t hurt to think in advance not only about the quantity needed, but also about the price of all materials . This will help you plan your budget correctly and can indicate the need to save.
How to pack furniture for moving
- Pipes for internal sewerage
How to choose a window sill?
Installation of PVC windows
How to disassemble a closet for moving? In order not to damage the case, internal filling, glass or mirror elements, it is important not only to carefully dismantle the product, but also to approach the packaging process correctly.
Cover all panels and shelves with corrugated paper or cardboard so that there are no chips or abrasions on the laminate or enamel.
It is best to lay glass and mirrors with foam. As a last resort, use bubble wrap.
Shelves, cabinet parts and doors can be stacked to fit. Be sure to wrap the ends with corrugated cardboard or foam rubber, and pack each stack in film. It can be fixed with tape.
Drawers and other elements from which you decide not to unscrew the fittings also need to be protected: it is better to wrap the corners, and if possible, line them with polystyrene foam.
Store packages with accessories and fasteners in one box.
Replacement steps:
Replacing kitchen countertops made of different materials follows the same principle.
- Remove the old countertop, do it very carefully so as not to damage the kitchen set;
- Remove old sealant;
- Prepare the tools: fasteners, glue-sealer (for stone countertops), glue sealant, screwdriver, drill, pencil, screws, tape measure;
- Check if your headset is securely fastened; if not, fasten it properly;
- Take the dimensions, taking into account the sink and hob - this is a very complex process, the main thing is not to make a mistake, otherwise it will be difficult or impossible to correct the mistake later. First, take smaller sizes and then adjust. Or order this service from the masters.
- Cut out the table top. You can do it yourself or order a service to avoid mistakes;
- Secure the finished countertop to the kitchen unit with screws, and close the space between the walls with a sealer (special glue for stone countertops) or sealant.
- Use metal trim between the cabinet and countertop to hide gaps.
Is it possible to remove the closet without disassembling it?
It’s better not to: it’s very easy to warp the body and doors, then you’ll have to adjust everything. But if there is no other choice, you will need at least two people and rigging belts: with their help you will keep the furniture as intact as possible.
To prevent doors and drawers from opening during transportation, secure them with masking tape or ropes.
The design of wardrobes for the bedroom excites many people who have begun decorating their apartment. This room is traditionally considered a place where you want to relax and unwind. Many designers are of the opinion that it should not be overloaded with an abundance of furniture. The ideal option for the bedroom are wardrobes. They are spacious and easy to use, while taking up little space. A wide variety allows you to choose the right model for any room and style.
- Covering the drain hole with your own hands
- How to lay flexible tiles on the roof?
How to properly lay a vapor barrier on the ceiling?
Redecorating
The stages of cosmetic repairs are similar to the last steps of a classic overhaul. In the same way, all work is carried out “from top to bottom”, that is, first of all, the ceiling is finished, then the walls are plastered and then the flooring is installed. Finally, the walls are decorated with wallpaper and furniture and decorative items are installed.
If, after removing the old finish, large surface defects are discovered, they are corrected with a cement-sand mixture. Further leveling is carried out with gypsum plaster.
After leveling the walls, before finishing, cover them with a special primer. It will play the role of adhesion to the material and eliminate the mycotic component, thereby preventing the development of mold.
Dismantling, dismantling and disposal of old kitchen
Nothing lasts forever in our world of material values, and the kitchen, which was a joy for many years, after ten years turned into a faded, worn-out pile of old-fashioned cabinets. The first thoughts that arise upon a quick inspection of such a clearly unaffordable element of the interior are to quickly get rid of, dismantle and recycle the old kitchen, and then order kitchen furniture in harmony with all the fashionable trends in the field of design and functionality. It’s good when you have the opportunity to attach an old kitchen somewhere - for example, take it to the dacha, sell it through free classifieds sites to tenants, simply drag a couple of cabinets into the garage and make a rack out of them for storing old stuff. But what to do if all conceivable and inconceivable options for moving fairly large-sized furniture have disappeared at once? Let us try to help you in this matter. If you are used to an old kitchen, if you are satisfied with the layout of the cabinets and the style of storing food and kitchen utensils that has developed over the years, and if the chipboard kitchen body (frame) has been preserved in fairly decent shape, we recommend that you use the service of replacing the kitchen facade and countertops. Having spent an amount of approximately four hundred USD. you will receive a completely updated set of furniture with a modern and practical facade and will save quite a lot of money, even compared to ordering a high-quality kitchen at a low price. As a rule, such replacement options are very reasonable if you have a kitchen made of film MDF (you can read about this problem in the article about the fragility of film MDF). In this case, the film on the facade peels off, and the kitchen body, often covered with durable PVC edges, is in almost pristine condition. If you have a kitchen that has served faithfully for a decade and a half and now cannot withstand any criticism due to its old-fashioned design, inconvenient layout (not enough storage space, modest depth or height of cabinets, few cupboards, etc.) and, most importantly, due to its deplorable appearance, you will have to dismantle and dispose of the old furniture. From our work experience (and we have been working in the Minsk furniture market since 1999!), this problem often falls on future owners of new kitchens out of the blue, i.e. takes them by surprise. Clients place an order for a new kitchen and continue to use the old kitchen until the very last moment, citing their reluctance to wash dishes in the bathroom and cook on a hob temporarily embedded in a piece of old chipboard. But the deadline for the kitchen to be ready is approaching, delivery dates are being negotiated, and then the owners face a pressing question - how to urgently dismantle and dispose of the old kitchen, which is no longer needed. The new kitchen will be delivered tomorrow, but you haven’t gotten rid of the old one yet? Follow our advice and you will do everything quickly, safely and legally! Tips for disassembling and disposing of the kitchen are given by us in accordance with the order of each type of work:
- Create enough space in the kitchen and in the hallway that leads to the stairwell. Cover the kitchen floor with cardboard or old wallpaper. Empty the old kitchen of its contents.
- Wear old clothes and be sure to wear construction gloves. Provide sufficient lighting in the room and open the window for ventilation.
- Shut off gas, electricity, and water supplies if utilities touch kitchen cabinets. Block access to the premises for small children and pets.
- Arm yourself with a Phillips screwdriver, drill or screwdriver and remove all the doors from the kitchen furniture. This can be done by unscrewing the central bolt securing the furniture hinge (if it does not have a latch) or by unscrewing the screws that secure the hinges to the cabinet walls.
- Remove kitchen drawers. Remove all shelves from kitchen cabinets.
- Remove the sink. If it is overhead, simply tear it out of the fastenings. It can also be fixed using metal corners and screws - unscrew them. If the sink is mortise-mounted, unscrew the metal clamps (“crocodiles”) that press the sink to the countertop.
- Remove the wall skirting and then remove the tabletop. It can be connected to the cabinet bodies using wooden dowels and glue, but most often using 30mm self-tapping screws. Remove the kitchen roof and the removable plinth, if any.
- Examine the bodies of the kitchen cabinets for the presence of connecting screws (they tighten the cabinets together). Often, good craftsmen hide connecting screws out of sight behind shelves. Remove the screws.
- Pull out the lower cabinets one at a time. Using a hammer and a cobbler's knife, remove the back wall and then, using an attachment for a Euro screed, disassemble the kitchen cabinets. Immediately sort the walls into similar sizes and stack them on the floor or lean them against the wall.
- Once you've finished with the lower cabinets, remove and disassemble the frames of the upper cabinets.
- Legislation prohibits dumping garbage and any waste near garbage containers in yards in Minsk. You can call a garbage collection service and, to save money, lower the disassembled kitchen yourself to the entrance. Or, for greater savings, you can remove the kitchen in stages, folding the walls a little at a time into garbage containers. Thus, sadly enough, many Minsk residents act, putting the dismantled kitchen first in the vestibule, then on the landing and slowly moving it to the trash. Don't forget about the rules of hygiene in common areas and fire safety! An old, dismantled kitchen fire probably doesn't matter, but the piles of piles are an obstacle to evacuation in case of an emergency. Don't break the law!
- After removing the dismantled kitchen from the apartment, remove the trash from the room and wash the floor. Now your home is ready to welcome new kitchen furniture!
Common repair mistakes
Nothing is done without mistakes. Repair is a vast field for making mistakes. Fortunately, the errors are always about the same, so most of them can be anticipated and avoided.
Main mistake
The main mistake is the lack of any action plan and a clear idea of the final look of the kitchen. Working on intuition or at random usually does not lead to anything good, but only creates additional problems and costs.
Incorrect calculation of sockets
Another mistake is incorrect calculation of the number of sockets and their location. Incorrectly placed outlets are a disaster. Who wants to run extension cords all over the place? And if there are fewer sockets than needed, then no tees will save you. Therefore, it is worth thinking about and calculating their number and location in advance.
Incorrect calculation of required materials
You need to calculate the amount of materials in advance and correctly. For wallpaper, tiles, wires and much more, it is customary to make a reserve in case of unforeseen situations. Well, a reserve of 10% bothers few people, but looking for the right material after everything has been purchased is much more difficult. It could be a different batch, a different shade and many other shortcomings.
Incorrect calculation of sockets
When installing plumbing and gas systems, some owners hide the valves or completely wall them up in the walls. This is a huge mistake. Valves must always be open and easily accessible. Who knows when and what kind of situation might arise?
Incorrectly selected materials
A terrible mistake is installing laminate flooring in the kitchen. Laminate is very afraid of moisture, and in the kitchen there is a lot of it.
Incorrectly selected materials are always a mistake. In addition to laminate, you can make a mistake in wallpaper, for example. Paper and fabric wallpaper cannot be used in the kitchen, because they absorb all the dirt, grease, etc., and it is impossible to clean them.
Late purchase of household appliances
One of the problems of our time is the purchase of household appliances after repair. This is fundamentally wrong. After all, repairs need to be carried out according to certain parameters, installation of sockets, layout - everything is taken into account. All furniture is customized to fit household appliances.
Thus, it turns out that repair is not a spontaneous decision, but a holistic and deliberate plan of action. In order not to get into trouble, not to get a lot of problems and costs due to a poorly thought-out idea or the wrong procedure, it is worth planning and calculating everything in advance. This is the only way to get the kitchen of your dreams in the shortest possible time and on your own.
How to remove a built-in kitchen
Those who have moved or renovated know firsthand that the biggest difficulties arise in the kitchen. It is not enough to replace sockets or hang wallpaper. The kitchen is a whole system of complex fixtures and devices that are connected to each other.
In addition, this particular room, together with the bathroom, can withstand significant fluctuations in humidity and temperature. In such a place there is a large concentration of things that should not only be harmoniously combined with each other, but also withstand high daily loads. For this reason, if you have to install or dismantle the kitchen, entrust it to specialists. Naturally, in this case, you will have a completely logical question: “How much does it cost to dismantle a kitchen?” It is about prices and the process itself that we will talk below.
Replacing the headset, of course, confronts the fact that the old sections will have to be disassembled. It is important to do this gradually and wisely. Professional disassembly by specialists includes:
- turning off cold and hot water supply;
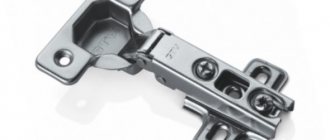
Mounting options
Before you begin to remove the headset, you must clearly understand what type of fastening was used. After all, each of them has its own nuances. These could be the following types of mechanisms:
Each mounting option has its own characteristics, and accordingly, cabinets will need to be removed from them using an individual method.
Standard fasteners for wall kitchen cabinets Source ecodacha-nn.ru Fastening options for wall kitchen cabinets Source furnitureezh.rf
Floor finishing
If the floor covering is linoleum or laminate, the installation of which does not require dirt and dust, and the material itself does not easily remove paint, first paint the floor. In the case of wallpapering, it is more practical to lay the floor first, and then proceed to finishing the ceiling and walls. There are several types of kitchen flooring:
- ceramic tile;
- laminate;
- linoleum;
- self-leveling floor
If the floor is wooden, then laminate is laid on it; previously, the floor is covered with sheets of plywood, secured with self-tapping screws
Combined floors in the kitchen
Ceramic tile
Ceramic tiles are a durable material with water-resistant properties, but require care when handling heavy objects. Not the most suitable option for finishing a kitchen with your own hands; laying tiles on the kitchen floor will require a special tool (tile cutter, grinder) and the skills of a qualified tiler.
Read also: Original design ideas for the kitchen
In the kitchen, due to the fact that the tile floor is quite cold, it is laid on a specialized electric heating “mat” in the form of a wire about 5 mm thick. on the grid ("Warm Floor" technology). This complicates the task of laying tiles and requires connecting the heater control unit with knocking out holes in the wall and a groove for connecting the electrical wire to install it.
Ceramic tiles are a convenient and practical flooring option for the kitchen
Laminate
Regular laminate is not a very suitable material for the kitchen due to its low water resistance, so moisture-resistant types with special surface treatment and locking joints are used for kitchen floors. Carrying out a kitchen renovation with your own hands by laying laminate flooring on a substrate is not difficult if you follow simple work technology.
Important! Moisture-resistant types of laminate can withstand exposure to water for about 6 hours without consequences, while water-resistant types are not afraid of its impact. Waterproof laminate is also made in the form of panels of various thicknesses or glued to the floor; its only drawback is its very high price.
It is advisable to choose a waterproof laminate, since there is quite a lot of humidity in the kitchen, and there is a high probability of frequent water getting on the floor
Linoleum
A budget option for the material for laying on the kitchen floor, modern types have a wide range of colors and patterns, commercial brands are highly durable and wear-resistant. The disadvantages of linoleum when installed in the kitchen include its small thickness, which leads to different floor levels if laminate is laid in the hallway.
If linoleum tears in one place, you will have to replace it in the entire room
Before laying linoleum, a flat floor is made so that there are no differences in height. You can repair the floor by laying linoleum on KS or PVA construction adhesive yourself; this is not a very complicated construction job.
Linoleum - a modern and inexpensive flooring for the kitchen
Self-leveling floor
This problem has a simple solution - the floor in the kitchen is filled with a leveling, self-leveling mixture to the required thickness (3 - 10 mm) - this allows you not only to raise the level, but also to level the floor
Read also: Options and rules for budget kitchen design
You can do the filling work yourself if you have a special toothed roller and a mixer for mixing the solution (self-levelling equipment is sold in bags in the form of a dry mixture). A construction mixer can be replaced with a household drill by purchasing an inexpensive whisk for mixing the solution, a roller with a metal comb with teeth (using this option is very risky, the liquid self-leveler may not spread well on the floor and it will be damaged). Look at the photo how fantastically beautiful the self-leveling floor looks in the kitchen interior.
preparation and step-by-step instructions in compliance with safety precautions
Modern manufacturers offer more and more advanced gas and electric models of hobs. As a result, there is a need to replace the failed panel with a new, more modernized one. To do this, it is necessary to dismantle the old surface. Having certain skills in the field of electrical engineering and gasification, the installation can be done with your own hands.
Removing a panel from a kitchen countertop
Disabling the necessary communications of the hob for dismantling
If there is no access to the gas tap, an application is submitted to a specialized gas service to suspend the fuel supply.
When using a cylinder gas supply system (propane, butane, isobutane), you need to turn the valve to the “Closed” position. Then unscrew the gas hose from the panel to avoid the appearance of static voltage, install an equalizing jumper between the panel and the gas supply hose.
Dismantling a Bosch brand electric induction surface requires more careful adherence to safety regulations. Disconnect the panel from the power supply by removing the plug from the socket. Then use the “Network” indicator to make sure that the signal lamp is not lit, this means that the equipment is completely de-energized.
Mechanical dismantling: rules and technology
A set of necessary tools for dismantling:
Special tool for dismantling
First of all, use a screwdriver to loosen the fastening of the surface with the table top of the kitchen module. If the wire is laid permanently (for electrical panels), the terminal box is disassembled and the supply wires are disconnected. The grounding conductor from the device body is disconnected last.
Then the mounting screws are completely unscrewed and removed from the tabletop. Removal of the hob is considered complete.
Dismantling the gas cooking structure is carried out in the same way. In order to stop the supply of natural gas to the surface, it is necessary to close all fittings and visually ensure that the handles of taps and valves are in the “closed” position. Next, loosen the clamp and install the standard plug on the hose.
How much does it cost to dismantle a kitchen? Average prices for services
Having analyzed the prices in the price lists of many companies providing similar services, we came to the conclusion that kitchen dismantling will cost about 3,000 rubles per piece. If the kitchen set is large and unusual, then your costs may increase slightly. Typically, the cost of dismantling includes consumables: dowels, corners, silicone glue, etc. The appraiser-consultant in most companies comes free of charge.
Experts offer dismantling:
- kitchen sets of different types;
- built-in kitchen furniture;
- household appliances, electrical equipment;
- various furniture designs and so on.
Tips for dismantling the kitchen:
- Only a person with extensive work experience can dismantle a kitchen. You can dismantle such an installation yourself, but only if you do not have to subsequently install it in a new place. Otherwise, for example, when moving apartments, it is advisable to resort to the services of specialists. This will allow you to save time and save things for later use.
- Kitchen installation is a much more responsible matter. If you decide to do it yourself, then be especially careful, because such seemingly simple things as installing a washing machine or installing a sink cannot be performed at the proper level without having the appropriate experience.
- To eliminate all problems, we advise you to contact a company that has earned an impeccable reputation in the market. As a rule, such organizations employ qualified employees who have invaluable experience in dismantling furniture, including the dismantling of kitchen units. This allows operations to be carried out in a short time and at a high level.
After analyzing all the situations of performing such work, you will be able to draw conclusions and decide on the most suitable option. If you still have any questions or need help, you can write to us through the feedback form on the Remontik website.
Address: Khimki, Moscow region, 8 March street, no.3
Similar tasks
Other tasks in the category "Repair and construction"
- RUB 2,500
Putty and paint a 10 sq m wall
Olga Krasnobogatyrskaya street, 9, Moscow
In a “granny’s” apartment in a five-story building. Remove old tiles. Treat with concrete contact. Put a new one. Cut borders from tiles. Grout. Hang kitchen cabinet doors. Put 0.5 sq.m. Decor.
Alexey K. Nagatinskaya embankment, 56k2, Moscow
Dismantling an Ikea wardrobe
Yulia N. New Boulevard, Dolgoprudny
Remove the old toilet, install a new one and install a toilet shower head.
Elvin Chertanovskaya street, 16k1, Moscow
Saw a chipboard 196 cm long, 2.5 cm thick, just cut straight with your saw on site, we don’t have a saw, work for 20 minutes
Dmitry Kostomarovsky Lane, 3с1А, Moscow
Hello, dear readers, I’ve decided to try to write a post about my work. It’s a pity that the rating is small and I could have attached the video, maybe in the future everything will change and there will be more detailed materials.
Let's start, and so I received this order, it seems like nothing unusual, everything with right angles, which makes the work easier :)
The first thing we do is cut it, it looks like this
Yes, everything is done by hand, because it’s easier for me in the future, since I can cut and trim myself :) By cutting, you can find out exactly how much material is needed for this set, and so on about the material:
Laminated chipboard – White (light silk) Lamarti
Edge 0.4 – White gloss
Closers - Boyard pro
Lifting mechanism - Bloom
Photo printing glass 6mm
Bottom fronts - MDF White gloss 18mm with integrated handles
Fronts up - MDF White gloss 16 mm
Frames also with MDF White gloss 16 mm
Shelves White gloss 32 mm
Table top – White diamond 38mm
Hidden fasteners 4 pcs
The main thing is to file and close, as it takes a lot of time
Exactly the opposite: installation of kitchen wall furniture
After purchasing a furniture set for the kitchen, you need to completely disassemble the entire set of parts. It must have standard canopies (especially if the furniture manufacturer is IKEA). The installation of the headset must be done reliably, and to achieve this, you need to work smartly. To do this, it is important to follow the instructions listed below.
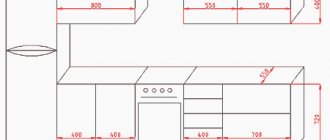
Deciding on the height
The first and most important thing in installation is knowing the exact height. Traditionally, it is not recommended to deviate from standards, however, there is such a need. It is necessary that the upper modules and the countertop be separated from each other at a distance corresponding to the generally accepted GOST, which is 45 cm. Modern kitchen furniture is hung above the countertop at a height of 60 cm. This is due to the fact that the installed household appliances acquire larger dimensions than before.
In addition, you should definitely take into account human height, especially those who will regularly use the headset. For example, if the height of the kitchen owner is 155-160 cm, then it is necessary to install a wall cabinet so that the height of the top shelf does not exceed 175 cm. A person must be able to reach its contents with an outstretched arm.
On a note! The height varies depending on the height of the person, but the topmost shelf should not be higher than 30 cm.
Preparing the walls for work
The first thing that needs to be done is to level the walls, otherwise there is a high risk that the design of the cabinet will begin to distort and the facade will look uneven, and the doors may even begin to sag. Therefore, first the walls are adjusted to the optimal level (if necessary, they are leveled using drywall). In this case, the angles must also strictly correspond to the 90 degree mark.
Alignment of walls for hanging furniture in the kitchen must be done Source krasnodar.mosplitka.ru
Choosing tools and accessories
Upon completion of the construction work, it remains to decide on the type of fittings with which the kitchen wall cabinet will be held. So, for this purpose it will be useful:
Also, the choice of type of fasteners also depends on the type of surface. For example:
When installing furniture on the chosen wall, you need to be sure that the surface is strong enough to withstand the long-term impact of the weight of the furniture on it.
Pendant options that can be used for fastening
There are two types of cabinet hangers: simple universal ones and complex ones that can be adjusted. It is important to know the details about each type in order to hang the headset correctly in the future.
Simple furniture hanging Source fastbox.su
Preparing the room for the installation of a kitchen unit
Ordering a kitchen set is only part of the work that needs to be done when starting a renovation. The first thing you need to think about is the layout, and then properly prepare the room to avoid operational problems.
Where to start renovating your kitchen
The first thing you need to do is draw a floor plan by hand or in a special program on the Internet. It should indicate not only the length and width of the room, but also the height of the ceilings, the size and location of door and window openings. The height of the window sill is also important. Don’t forget to mark on the plan the location of communications, the location of the gas pipe, if any, and heating radiators, and the location of the exhaust vent.
We recommend planning the size and content of your kitchen unit with specialists - this way you can take into account all the nuances.
If you decide to do this yourself, you need to check the following points:
- The length of the set and additionally the countertops so that they do not overlap the door casing or, in the worst case, do not block the doorway.
- Opening of all facades. It is especially important to check this for the outer drawers next to the window: the heating radiator often interferes with opening. You may have to move it or replace the cabinet with a false panel. Upper cabinets may have restrictions on opening due to lamps that hang too close to the unit.
- Access to gas pipe and tap. These are safety standards that cannot be ignored.
- Possibility of using a ventilation hole. You cannot completely cover it with cabinets, this disrupts air circulation. And not only for you, but also for your neighbors in the riser.
- Opening windows - This is especially true if you want to place the sink in front of a window. It is important to remember that you will need to change the window design or purchase a folding faucet if you want the windows to open further.
- The height and depth of the tabletop relative to the window. Most often, window openings are located below the level of the worktop - this complicates the installation of the set on the wall along the window. Some customers lay down part of the window to make the window sill and countertop at the same level. Such issues need to be resolved in advance at the stage of preparing the premises for the new kitchen.
How to prepare the walls, floor and ceiling for a new kitchen
When you have decided on the layout and taken into account all the necessary technical aspects, you can proceed to the rough preparation of the walls.
Dismantling the old coating
The very first stage is dismantling the existing coating and assessing the situation. Some walls may require major restoration. For example, in old houses the partition between the kitchen and the bathroom is very thin - it is simply impossible to hang heavy drawers on it. If this is your case, you will have to re-lay this wall from aerated concrete blocks with the installation of guides for wall cabinets. The total thickness of the partition should be at least 10 cm. If the house is old, then the floor covering will need to be replaced.
Leveling walls and floors
Proper preparation of the room for a new kitchen involves leveling the walls and floor. Why is it important? In addition to the aesthetic component, smooth walls minimize the presence of cracks and ensure proper opening of doors. If the walls are not aligned at 90 degrees, there is a possibility that there will be a gap between the kitchen wall and the vertical surface that is difficult to close. Also, a flat wall is needed for laying a backsplash made of ceramic tiles.
Leveling the floor in the kitchen is a vital necessity. Do you want the oil in the pan to always flow to one edge? A difference in the floor at the installation site of the kitchen unit of more than 1 cm can lead to the formation of gaps between the base and the cabinets. Therefore, pay special attention to the floor. What are the options:
sand-cement screed, strong and durable coating. Suitable if the height difference is more than 5 cm. Please note that the screed will need time to harden.
Self-leveling mixtures are ideal for floors where the height difference does not exceed 3 cm. This mixture can even be used independently, and it also hardens quite quickly. By the way, first check if there are any gaps between the floor slab and the heating pipes - they will need to be sealed first so that the mixture does not leak to the neighbors below.
gypsum fiber sheets (GVL) are laid on a layer of thermal insulation, so leveling consists of several stages. The sheets themselves are laid overlapping each other and secured with self-tapping screws.
plywood sheets are also used for leveling, but they will require logs if the height difference is significant.
Finishing walls and floors
Before installing the kitchen unit, it is necessary to lay the flooring and finish the walls. Any material can be used as a floor in the kitchen, but most often owners choose tiles - they are easier to care for.
Our advice if you want to save money: for the floor area directly under the kitchen unit, use a more budget-friendly material (first compare the thickness of the tiles). After all, no one behind the plinth will see the difference. When decorating the walls, also keep in mind that the wall is not visible behind the kitchen unit, so you don’t have to cover it with expensive plaster, paint or wallpaper. But there are different opinions about laying a kitchen apron with tiles: some say that for an ideal joint between the countertop and the apron, it needs to be laid out after installing the set. Others advocate making an apron before installing kitchen furniture, and then adjusting the height using cabinet legs, and hiding the gap with a baseboard.
Preparing the ceiling for installing a kitchen unit
Here the material and design of the ceiling are of primary importance. A plasterboard ceiling must be made before installing the headset, especially if it involves lowering, so that the upper cabinets fit exactly under the ceiling. With a stretch ceiling it is a little easier due to the technology of its installation - it can be done even after all the furniture has been placed.
Another important point is the placement of sockets, switches and lighting pins. All of them are done before installing the kitchen unit, since the wires are buried in the walls. Mark in advance where the outlets should be for all electrical appliances without exception, and also provide several outlets above the work surface. You will also need an electrical outlet for the hood and for the lighting of the drawers, if it is planned. Sockets can be located behind the back walls of adjacent cabinets (except for cabinets with drawers), as well as under furniture behind the plinth at a height of 100-150 mm from the floor level.
The ventilation shaft opening must be prepared for the connection of the air duct, in accordance with its size and configuration. The duct itself can be hidden in the upper cabinets or run above the cabinets. Remember that you cannot place electrical wires to connect the hood in the ventilation shaft.
When to take final measurements
After all the repair work is completed, the walls are leveled, the sockets are installed, you will need to call a specialist and take the final dimensions, taking into account all the finished surfaces and finished terminals. It is according to these dimensions that we will make your kitchen set.
Methods for removing the headset depending on the type of construction
Each modern design involves the use of different design options for kitchen units: pull-out, built-in, traditional wall-mounted. Each of them must be removed in the reverse installation sequence. If it was not you who did the hanging, then you need to be guided by the algorithms given below. Please note that we dealt with the demonstration of the mounted module above. Solving the question of how to remove a wall cabinet in the kitchen is done in slightly different ways. It all depends on the type of headset.
The furniture is first cleared; the fronts of all cabinets must be removed at once, and not one at a time Source Pinterest
Built-in
Such options usually have sliding doors, so the main problem arises at this point. Let's take a step-by-step look at how to make the process easier:
Please note that the built-in wardrobe is made strictly according to the dimensions of the niche in which it is installed and is mounted on casters. Therefore, it is often simply removed without prior dismantling.
Built-in cabinets in the kitchen are removed from their niches in disassembled form for convenience Source mfleko.ru
Retractable
This option can cause difficulties when removing it from the wall if you do not know the features of the working mechanism. This detail of all furniture is found quite often in modern kitchen interiors. To properly dismantle such a module, you must follow several steps:
The principle of dismantling remains the same for all models of sliding cabinets; only the sequence of actions can change. This is influenced by the points at which the furniture structure was fastened.
The retractable kitchen modules are removed all the way, after which the “tongues” that support the movement are pressed out. Source ssm124.ru
Upper cabinet with closer
The closer is an element that does not allow the structure to move further. This is done for the safety and integrity of the door leaves. To make it easier to solve the question of how to remove a kitchen cabinet with a closer, you need to start dismantling from the door leaves, but it may vary depending on where the closer is attached.
Communications layout
the water supply and sewerage system is
also equipped and remodeled, if necessary . They start with the electrical wiring, which requires three-wire cables in double insulation with a diameter of 2 mm. The walls are tapped in the necessary places so that the cable can be laid there, then the wire itself is fixed with masking tape and plaster. Cables are laid only at right angles. At this stage, you need to clearly know the kitchen lighting scheme and the location of sockets.
The water supply and sewerage system must be made of metal-plastic or polypropylene pipes: they are easy to install, durable, and are not afraid of temperature changes. After this, you can connect the gas hoses.