Hanging kitchen cabinetry is never a daunting task with an inexpensive household peg-hole drill and matching concrete drill bits. The task became more complicated when traditional Soviet methods of fastening using corners or furniture hinges were replaced by modern ones.
The illiterate use of a mounting rail with a hanger made of low-quality materials and a violation of installation technology led to so many falls of hanging cabinets that even a caste of professionals in hanging them has emerged. In any case, with a reasonable approach to the choice of materials, method of fastening and adherence to technology, hanging different types of furniture remains an easy task for any homeowner deciding how to hang cabinets in the kitchen.
Basic requirements for furniture
When determining how to properly hang cabinets in the kitchen, you must consider the following requirements:
- Cabinets should be located at a height that provides the most convenient access to dishes and kitchen utensils on the top shelf.
- Their location should not interfere with the ventilation system or spoil the aesthetic appearance of the kitchen with incorrect location geometry.
- The rigidity and reliability of the fastening must ensure long-term operation of the cabinets under high loads.
The main condition when installing hanging cabinets is to ensure accessibility to the top shelf. You can roughly set the height of the suspension in the following way: stand against the wall and raise your hands - at the point where your fingertips touch the wall, the top of the cabinet should be, in this case the shelves located below will be easily accessible.
Consider the height of hanging furniture based on your height, as well as the height of family members
There are also general recommendations for determining the height of the top shelf depending on height: if a person is 155 - 160 cm tall, it is 175 cm, if a person is 160 - 175 cm tall - the shelf height is 185 cm, if a person is 175 - 190 cm tall, the height is 175 cm installations 200 cm.
Depending on the furniture fittings, there are several ways to attach wall cabinets:
Useful drilling tools
A jack of all trades always needs certain tools to work in a private house, on a summer cottage, in an apartment, or when building his own house. Many of them are not even worth purchasing if they do not require constant use. For example, for drilling, there are many different attachments that will greatly increase the functions of your drill and significantly expand them.
Let's look at some devices for auxiliary potential.
To obtain precise holes of significant diameter in different workpieces, a device such as a drilling and milling attachment will help to carry out individual milling work.
Make a milling machine out of a drill.
The next device worth mentioning is very expensive, but has the highest versatility. You will sharpen all the tools that you have on the farm, be it knives, shovels, axes, hoes, various drills, effortlessly with the universal sharpening device.
When purchasing drill attachments, be sure to check their compatibility.
Holder with clamp. With its help, you can fix the drill anywhere, use it with various kinds of devices, use it as a mini-lathe, sharpening, milling or grinding and polishing machine.
The drill holder allows you to quickly secure the drill.
All kinds of attachments are also designed for drills. These can be stops that limit the depth of drilling, platforms with which you can drill at a certain angle or perpendicularly. There are nozzles that are adapters and extensions of different designs: offset, angled, flexible.
The angle drill adapter is designed for hand and electric drills.
Metal cutting attachments turn your drill into a one-of-a-kind tool. Some resemble sheet metal shears, while others have a different feature, such as roller shears. The nozzle, called the “Cricket,” seems to cut through the metal.
The main advantage is that they do not damage the polymer coating of the metal.
There are also other attachments designed for monotype work.
Furniture hinge
Another name for this fastening system is an “ear” type suspension, which is a metal plate with slots for hanging and fastening. Screwed with screws to the rear side or top and side walls of the cabinet in the corner, hung on the head of a screw screwed into the wall.
Peculiarities
- Hanging cabinets with hinges is more suitable for hanging individual modular cabinets and ensures they fit tightly to the wall.
- The mounting method requires precise markings during installation and does not allow changing the position of the hanging cabinet.
Some modifications of hinged lugs have rectangular horizontal slots of about 20 mm. in places of suspension - this allows you to move furniture in a horizontal plane over a short distance. In case of inaccurate installation of the mounting dowel with self-tapping screw in height, the required height of the suspension can be set by re-hanging the ears.
Required materials and tools
These pieces of furniture are of great importance. They save space in the kitchen and have sufficient capacity. They keep a lot of things there. Therefore, it is necessary to make high-quality and thorough fastenings to the wall. Before you start work, you need to prepare materials and tools:
- A base to secure objects.
- Hinges for the facade.
- Elements required for the construction of cabinets.
- Self-tapping screws, nails.
- Intersectional couplers.
- Tires.
- Hinges and screws to install them.
- Drill. If the wall is concrete, you need a drill with a hammer drill function.
- Tape measure, pencil, ruler.
- The level is preferably long.
- Screwdriver, screwdrivers.
- Drill attachments, screwdriver attachments.
- Hammer.
- Clamps, hacksaw.
- Open-end wrenches.
After you have purchased all the required materials, you need to prepare the walls for installation and make markings.
Rack with attachment
An example of a rail on which furniture is hung
A fairly common method of attaching wall cabinets lately, which includes two main components: a mounting rail in the form of a perforated metal strip with bent edges and a metal hinge in a plastic case with a hook for hanging from the rail.
The mounting rail (can be up to 3000 mm long) is attached to the wall using dowels with self-tapping screws at the required height; the hangers are fixed inside the hanging cabinet in the upper corners so that their hooks protrude beyond the dimensions of the rear wall. Structurally, the hinges provide adjustment of the hooks in height and forward and backward using built-in screws.
Peculiarities:
- Hanging upper cabinets using a rail can be done by one person without assistance in a shorter time.
- The design simplifies the work when hanging several closely spaced cabinets: they can be moved towards each other along the mounting rail and connected with bolts.
- Adjustment in the hinges allows you to change the height of the cabinets and the distance from the wall up to 20 mm.
The design features of the mounting rail provide the possibility of attaching it to hang furniture at many points, which lightens the load on the walls. This is a valuable quality when hanging furniture on plasterboard, gas silicate, or slag concrete; in this case, using a slats is the best option.
- The design of the slats does not allow the top of the cabinet to fit tightly against the wall, which is a positive factor when lowering the bottom of the cabinets onto the apron and a disadvantage if the cabinets are located above the finish of the work area.
- Wall-mounted kitchen cabinets can be easily removed and moved along the mounting rail.
The main disadvantage of this fastening system is the weakness of the suspensions, which often fail under heavy loads. The use of more expensive and reliable Scarpi attachments can solve this problem. Also, during installation, you should choose a thick and durable mounting rail, otherwise heavy furniture will bend it away from the wall.
Let's look at an example of how to hang a cabinet in the kitchen using a mounting rail.
Tools you will need:
- Impact drill or hammer drill.
- Several dowels with a diameter of 10 mm and a length of at least 6 mm.
- Two canopies and a mounting plate.
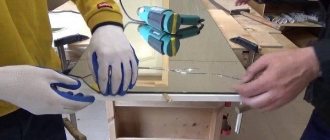
- Metal scissors or jigsaw.
- Concrete drill with a diameter of 10 mm.
- Drills 4 and 2 mm.
Fastening awnings
Let's prepare a cabinet for attaching awnings. To do this, if it is not removed, dismantle the back wall. It is usually made of fiberboard. We insert the canopy inside the cabinet and make sure that its upper part fits snugly against the cabinet body.
The hook, when released, should extend beyond the cabinet body by 4mm.
Use a 4 mm drill to drill a through hole for attaching the canopy.
We do not drill the second hole for fastening the canopy through it, but go through it with a 2 mm drill to screw in the screw.
In practice, two fastenings use screws, but for greater reliability it was decided to use a through screw and nut. The disadvantage of this method is that the screw head will be visible on the side of the cabinet. But even with ordinary screws the cabinet will not fall off.
When the hole is ready, fasten the parts with a screw and washers.
You should not clamp them too tightly so as not to break the canopy body.
We screw the screw into the second hole.
We do the same on the opposite side.
There are “left” and “right” canopies, and they need to be inserted accordingly.
The body is marked with the letters “L” and “R”.
Having secured the canopies to the side walls of the cabinet, we cover the back wall of the fiberboard with a panel, cutting out the places where the hooks exit. This can be done either with metal scissors or with a regular jigsaw.
We nail the panel to the body with thin nails.
Installing the mounting plate
The cabinet is prepared, we determine the height of the mounting plate. It should be assumed that the distance from the sink or countertop to the bottom of the cabinet in the kitchen should be 500 - 600 mm. If this value is less than 450 mm, the cabinet may interfere with work on the work surface of the kitchen countertop. Consider the height of the owner and the depth of the closet. When we have decided on this value, we add it to the distance from the bottom edge of the cabinet to the hooks. This will be the height of the mounting plate.
IKEA mount
Almost all models of IKEA wall cabinets have this type of fastening.
The fastening is a corner that is screwed to the side wall inside the cabinet; the second side with a large round hole for hanging is located in the slot in the back wall.
To hang furniture, a hole is drilled in the wall, a dowel is driven into it and a self-tapping screw is screwed in, its head is threaded through a round hole in the corner. Fastening to the wall is carried out through a self-tapping screw from the inside, onto which a washer in the form of a metal plate with pointed ribs is placed; it is pressed against the notches of the mounting angle near the hole when screwing.
Peculiarities:
- The fastening system allows you to adjust within small limits the position of the cabinet vertically and horizontally within the round hole in the corner.
- The fastening is quite reliable; during installation, the cabinet fits tightly to the wall.
- The design takes up little space; the metal corner is covered with an aesthetic plastic cover.
Don't forget to prepare the walls!
Before hanging cabinets, you need to prepare the walls by doing some work:
- It is good to level the base, since unevenness will negatively affect the entire installation;
Use plaster or plasterboard sheets.
These points will be the basis for the work ahead.
After hanging the cabinets, painting the walls will be very problematic.
Hanging corner
An old but effective way to attach any furniture to the wall
The system of fastening cabinets using a rigid corner with two holes for fastening to a cabinet and hanging has been known since old Soviet times.
Through holes are drilled along the edges of the frame, in the upper part of the cover, through them, using a bolt and nut, the corners are fixed flush with the back wall, they are hung on self-tapping screws screwed into the dowel. The mounting system is very reliable; it allows you to adjust only the height of the suspension.
Replacing facades is the most effective way to “refresh” a kitchen set
In the manufacture of kitchens, almost all furniture factories use laminated chipboard as the main material for the production of kitchen module bodies. You can find out why this particular material is in this article. The exception is luxury handmade kitchens, where all structural elements are made from natural wood.
The calling card of any kitchen is its façade. The cost of the headset depends more than 70% on the material from which the façade structural elements are made. In this case, the cabinets will be made from traditional laminated chipboard (in more expensive kitchens, the cabinets are simply covered with natural or artificial veneer so that they are identical in appearance and texture to the facades).
Replacing facades in an old kitchen has its advantages over other methods of updating furniture:
- There are no restrictions on stylistic execution. A classic kitchen can easily be transformed into high-tech furniture if the old chipboard doors are replaced with glossy MDF facades (you can read more about the main types of MDF in this article).
- There are no restrictions on the color palette, the ability to create an original creative set.
- There is no need to dismantle the cabinets themselves; the kitchen retains its functionality and practicality.
- You can replace facades at home yourself, without involving specialists. The main thing is to correctly take measurements from old doors and correctly mark the holes for hinges, handles and other fittings.
Step by step installation process
The considered method of attaching hanging cabinets is used for hook hangers with mounting rails.
- Before carrying out work, remove the front doors, if there are no installed fasteners, cut off fragments of the rear wall in the required places and install hook hinges. The hooks should protrude 3 - 5 mm. from the plane of the back wall of the cabinet.
- Lean the cabinet against the wall at the required height and mark its upper boundary, using a building level, transfer this mark, outlining a line along the perimeter of the entire wall where the cabinets are hung.
- Apply a fragment of the mounting rail to the hanger in the final suspension position and measure the distance from the top of the cabinet to the top of the rail.
- This difference is transferred to the wall by drawing a line for the upper border of the batten, parallel to the first line (usually it is 30 - 50 mm lower.)
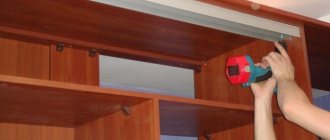
- Place the mounting rail on the line and drill through the mounting holes into the wall. It is most practical to first do this at one point and secure the rail with a dowel and a self-tapping screw; during further work it will not need to be constantly supported.
- Next, hammer in the dowels and tighten the screws, completely securing the rail.
The mounting holes in the mounting rail often have a diameter larger than the screw head. This allows you to drill holes through it for the dowel without removing it from the wall; when installing it on self-tapping screws, you will have to put washers on or use special types with wide heads.
- The frame is hung on the rail and set using adjusting elements in one line along the level at the required distance from the wall. If necessary, they are fastened to each other using self-tapping screws or intersection ties.
- The final stage of installation is hanging the doors and adjusting them.
There have always been problems with hanging kitchen cabinets. In particular, this concerned the horizontal level, which was difficult to maintain using conventional hinges. But more recently, a solution has emerged that can save us from all the existing problems with hanging cabinets - adjustable canopies.
A simple and at the same time effective method will facilitate the installation process.
Agree that the modern mount looks much nicer and neater
Features of removing a shelf from a cabinet
In kitchen cabinets, shelves are arranged in different ways. Therefore, the fastening features are first determined, from which they are subsequently based when dismantling:
- standard shelf holder. These can be small studs on which the panel is laid on top. In this case, it is enough to simply lift the empty shelf and remove it from the frame without much effort;
- furniture corners. In such cases, the shelf is securely held using self-tapping screws, so in order to pull it out, you need to unscrew them. It is most convenient to unscrew the screws that are located on the shelf, and not on the side of the frame;
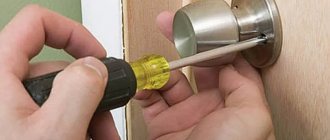
- eccentrics. To dismantle them you will need a screwdriver. It is necessary to slightly unscrew the fastener so that the shelf and sidewall disengage. This is done in all places where such fasteners are installed (usually there are only four);
- plastic holders. These are intended exclusively for glass shelves. First, you need to carefully unclench them and then remove the glass. These manipulations should be done carefully so as not to damage the shelf;
- dowels. The shelf can only be freed from such structures by completely disassembling the fasteners. If you try to remove shelves with such clamps from the frame, you can damage the integrity of the set.
Often, to dismantle a shelf from a kitchen unit, it is enough to simply lift the bar and remove it from the internal space. Source drive2.ru
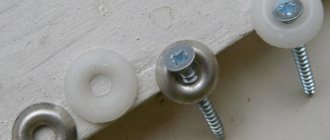
What does the canopy look like?
A hanger for kitchen cabinets is a small plastic (metal) box that has several holes:
- Two through ones for fixing the canopy with self-tapping screws to the side of the cabinet.
- Two adjusters with large bolts. Screwing in and out of these bolts allows you to lower and raise and press and move the cabinet away from the wall.
There is also a metal paw that clings to the mounting rail, fixed to the wall through a dowel and self-tapping screws.
In the photo you can see what the structure looks like as a whole and separately.
Universal (on both sides) plastic canopies and metal guide
Sectional view of the canopy: as you can see, one bolt attracts the paw, the second “fetters” its movements
Retractable
Modern kitchen sets often use retractable structures: shelves, bottle holders, etc. To dismantle them, proceed as follows:
- The contents are removed from the drawer.
- The drawer pulls out all the way.
- Use a screwdriver to press out the guide clamps. If Blum brand elements are used, then to remove them it is enough to press the latch manually, disconnecting the box from the frame.
- The box is removed from the guide bars.
- Then you can disassemble the retractable element itself.
In a “carousel” type design, when all the drawers roll out when the door is opened, dismantling is done as follows:
- The boxes are emptied of the cargo stored in them.
- The fasteners are unscrewed.
- The roller elements are removed from the guides.
The exact algorithm of actions will depend on the points at which the structure is attached: depending on the design, there are many options. However, the main principle is always the same.
Advantage of fastening
- Possibility to install cabinets without assistants. All work is carried out in two stages: installing a metal strip on the wall and hanging the module on it. You don't have to feel around for screws in the wall to get the loop onto the head.
- Possibility to adjust any position of the cabinet, an error of 15 mm is allowed on each side. In this case, you do not need to support or remove the module; the entire adjustment process is carried out overhead.
It all depends on the reliable fastening of the guide; the plastic adjustable canopy can withstand a load of up to 30 kg
- The hanging cabinet for the kitchen becomes more reliable. The fastening allows you to fix a single fastening strip on the wall, so that even if 2-3 screws become loose, the rest will hold the structure.
- A hanging kitchen cabinet can be installed directly on the wall on a kitchen apron. This is possible due to the retractable mounting bracket, which allows you to hang the module at a distance of 2-2.5 cm from the wall.
Note! Even an inexperienced specialist can do all the work with his own hands in a few hours.
The only disadvantage can be called the price, which is slightly, but higher than the usual metal plates. But, in fact, it is worth forgetting about saving when there are so many advantages.
Assembling the lower modules
It is logical to start installing a kitchen with your own hands by assembling cabinets installed on the floor. It is worth knowing that basic cabinets are classified according to construction types, each of which has its own assembly features:
- Assembling a cabinet with doors with your own hands is quite simple.
- Assembling a cabinet with drawers is also not difficult.
- When assembling a combined cabinet with your own hands, the first task is to install the guides correctly.
Installation work
In order to eradicate all doubts about the merits of installing wall cabinets on adjustable mounts, we suggest you study this section. It will include four stages, which are described sequentially.
Purchasing a tool
- Drill or hammer drill. It all depends on what kind of wall you have.
- Screwdriver or screwdriver. It is better to use a power tool that will speed up the work process.
- Hacksaw for metal.
- Building level.
- Roulette.
For your information! A screwdriver can easily be replaced with a drill with a Phillips head, but it is better to have a screwdriver with you so that you can use it to adjust the awnings. High speeds can break the adjusting bolt, and the canopy will be unusable.
Preparatory work
Before hanging the kitchen cabinet, the following work must be done:
- If you have just completed a renovation and are installing a kitchen, then the most important thing is to make sure the walls are strong. This is perhaps the most important thing. If you have plasterboard walls, then you should definitely secure a wooden beam under the front surface. Otherwise, use as many butterfly dowels as possible.
- There is no particular need for leveling; it is better to pay special attention to the corner of the kitchen (if the kitchen is corner). It should be laid out thoroughly so that the corner cabinet hangs without unnecessary gaps.
- Also prepare all the wiring in advance so that you don’t have to remove the module twice later.
Advice! For cabinets with a built-in kitchen hood or just a separate hood, run the outlet to the ceiling. This is more practical and safer, no extra wires above the work surface.
Installation of awnings
Hanging kitchen cabinets is installed quite easily, without any tricks or special features.
The process can be carried out in two ways:
- If the back wall is DVPO, then in the upper corners it is necessary to cut small holes into which the mounting tabs will go. Then, pressing the suspension to the top shelf of the cabinet, screw it with two self-tapping screws to the side.
Built-in
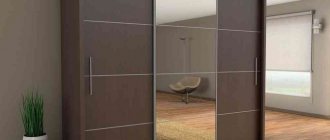
Such options usually have sliding doors, so the main problem arises at this point. Let's take a step-by-step look at how to make the process easier:
- After freeing the insides of the cabinet, they proceed to dismantling the doors. They are fixed by two guides (lower and upper). Therefore, each sash is first lifted individually so that it is pressed away from the lower part, and then carefully removed from the upper part.
- Then they begin to remove the shelves. If they are not screwed, it is enough to simply lift one edge to the top and, in a diagonal position, simply pull the crossbar out. If there are sides, then they are simply removed from the cabinet. The screwed parts will have to be unfastened using a screwdriver or a special hex key (usually this is included with the furniture modules for assembly).
- In case the structure is not very heavy, it can be removed from the niche without preliminary disassembly. If possible, you can wrap the edges of the frame with a soft cloth (possibly wool). This is done so that when removing the module, the case does not become deformed (chips, scratches and other damage). In case the part is quite heavy, then it is necessary to continue dismantling the parts.
- Next, the back strap is detached. It usually consists of plywood or a sheet of chipboard, fastened with small furniture nails or staples. Accordingly, to remove it, simply use a flat screwdriver or a chisel to pry the attachment points from the inside until the panel completely moves away from the frame. Next, they begin to disassemble the main parts (side, top and bottom components). There are two options for fastening the frame parts: using ties and corners. For both cases, you can get by with a screwdriver or a Phillips screwdriver. If fastening with a hex screw is provided, then the key must be appropriate.
- After complete disassembly, marks are made on each part of the module. This is done so that in the event of further assembly the location of the part is not confused. It is recommended to collect all accessories in a separate package, this will protect against loss of elements.
Please note that the built-in wardrobe is made strictly according to the dimensions of the niche in which it is installed and is mounted on casters. Therefore, it is often simply removed without prior dismantling.
preparation and step-by-step instructions in compliance with safety precautions
Modern manufacturers offer more and more advanced gas and electric models of hobs. As a result, there is a need to replace the failed panel with a new, more modernized one. To do this, it is necessary to dismantle the old surface. Having certain skills in the field of electrical engineering and gasification, the installation can be done with your own hands.
Removing a panel from a kitchen countertop
Disabling the necessary communications of the hob for dismantling
In order to dismantle the gas panel equipment, it is necessary to carry out a number of manipulations with the gas supply shut-off valves. If gas is supplied from underground or external gas distribution networks, the ball valve at the entrance to the living space is closed.
If there is no access to the gas tap, an application is submitted to a specialized gas service to suspend the fuel supply.
When using a cylinder gas supply system (propane, butane, isobutane), you need to turn the valve to the “Closed” position. Then unscrew the gas hose from the panel to avoid the appearance of static voltage, install an equalizing jumper between the panel and the gas supply hose.
Dismantling a Bosch brand electric induction surface requires more careful adherence to safety regulations. Disconnect the panel from the power supply by removing the plug from the socket. Then use the “Network” indicator to make sure that the signal lamp is not lit, this means that the equipment is completely de-energized.
Mechanical dismantling: rules and technology
A set of necessary tools for dismantling:
- screwdriver “+”;
- pliers;
- side cutters;
- wrench 8*10;
- gas key.
Special tool for dismantling
First of all, use a screwdriver to loosen the fastening of the surface with the table top of the kitchen module. If the wire is laid permanently (for electrical panels), the terminal box is disassembled and the supply wires are disconnected. The grounding conductor from the device body is disconnected last.
Then the mounting screws are completely unscrewed and removed from the tabletop. Removal of the hob is considered complete.
Dismantling the gas cooking structure is carried out in the same way. In order to stop the supply of natural gas to the surface, it is necessary to close all fittings and visually ensure that the handles of taps and valves are in the “closed” position. Next, loosen the clamp and install the standard plug on the hose.
disassemble the built-in kitchen and reassemble it in a new place, adjusting it to size in Khimki for 10,000 rubles
I am moving from one apartment to another; I need to dismantle the kitchen along with the appliances and assemble it in a new kitchen in another apartment, cutting and filing where necessary to the appropriate dimensions. Connect equipment. The task is 2-stage and divided by time: 1) disassemble 2) assemble after transportation
When: , 23:59
Address: Khimki, Moscow region, 8 March street, no.3
See also:
Reviews Rating: 5 — 1 1 review
- Andrey F. 400
More than 400 completed tasksReviews: 384 5 — Performer Feedback on the task “disassemble the built-in kitchen and reassemble it in a new place, adjusting it to size”
EVERYTHING IS FINE
Politeness
Punctuality
Adequacy
Want to find the best repairman?
Latest added tasks
- Price is negotiable Construction supervisor
We need a supervisor for the site Engineers Education is required Construction OfficialRail A. Leningradsky Prospekt, 60A, Moscow
- RUB 2,500 Fill the screed with a slope
Pour screed from ceresit cn 173 with a slope towards the drains in two rooms of 5 m2 eachDmitry village Manushkino
- 20,000 rubles Make stainless steel hangers for the store. With…
Weld a lightweight stainless steel structure. To a clothing store. I’ll send you the project in a personal message on SappAlexander B. Chertanovskaya metro station, Moscow
- Price is negotiable
Ventilation installationIt is necessary to extend a pipe to the installed ventilation, a line to the charcoal grill. Ready to discuss work options
Rustam R. Oktyabrskaya street, 26с1, Moscow
- 1,000 rub.
Table repairI bought a new computer desk, but it turned out to be defective. The bolt holes in the table top do not line up with the holes in the legs. They need to be drilled out
Anton K. Khoroshevskoe highway, 34, Moscow, Russia