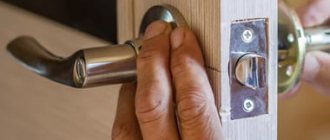
In this article we will deal with the topic of how to disassemble a door handle. Let us first consider the classification of this door accessory, outline the technical and design features of each model, and then proceed directly to the process of disassembling and repairing it.
How to remove a door handle Source www.eat-to-live.ru
Features of various designs
First, let's talk about the designs of door handles and their features.
The first category we will look at is stationary models. These are the most common solutions for interior doors. Such fittings are now practically not used. Perhaps on doors installed back in the days of the Soviet Union, which have not been modernized since then. And it is usually not used in residential premises. Outwardly it looks like a bracket.
There are two varieties of this model. The difference between them is that they can be one-way or end-to-end.
If we talk about the latter, then long screws are used to fix 2 handles, which are placed on different sides of the door leaf - one opposite the other.
This type of handle can be removed very easily - just unscrew the bolts that hold this structure in place.
Such fittings can literally be called cheap, since they have a minimal price. And it’s pointless to repair it, because it can’t be understood.
The next option is a push design. This design decision will be a little more complicated. The handle is a lever-type product: the working elements, thanks to the axis, are connected to the lock mechanism. Some options of this type are additionally equipped with a latch that locks the locking part.
Such a handle can be dismantled using a screwdriver with a narrow blade. By the way, such a handle can have a lock with a metal core.
Another design worth mentioning is the swivel model. It has a lot of differences from the above-mentioned options, which lie in the shape and design features. The general principle of operation is the same as that of other models.
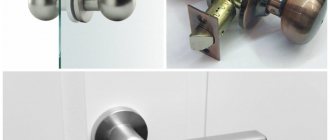
The next option for the accessories under consideration for an interior door is a handle with a rosette.
Such handles have a round shape and, depending on the design, can be disassembled using different algorithms. They also differ in the method of securing the decorative element. The spherical shape is very convenient to use. Such models are also called knobs.
In general, as you can see, there are a large number of door handles for interior doors. Each type has its own advantages and disadvantages, at the same time, the algorithm for disassembling them will be approximately the same.
Expert advice
Almost all experts, when removing and disassembling interior door locks, note several points that need to be paid special attention to.
- You can remove the spring manually or pry it off with a screwdriver, covering the mechanism with a rag or hand.
- It is important to wipe all parts of the mechanism with a dry, clean rag to remove old grease and assess the degree of wear, as well as the possibility of further use or the need for replacement.
- Before assembly, it is very important to lubricate all parts of the lock mechanism, including the spring, with special lubricant. This procedure contributes to longer, trouble-free operation of the product.
- Lubricant must be selected from a range of graphite options. Graphite-based substances are less susceptible to temperature changes, dust accumulation, etc.
In this article we examined the features of removing and disassembling interior door locks. However, before disassembling such products yourself, it is very important to read the relevant information in various sources and get advice from a professional technician.
Sources:
- https://furni-info.ru/kak-snyat-dvernuyu-ruchku.html
- https://m-strana.ru/articles/kak-razobrat-dvernuyu-ruchku/
- https://ODveryah.ru/furnitura/kak-razobrat-dvernuyu-ruchku
- https://o-dveryah.ru/zamki/kak-snyat-dvernuyu-ruchku-mezhkomnatnoy/
- https://okcomfort.com/dveri/zamena-mezhkomnatnoj-ruchki.html
- https://DomNaMne.ru/zabory/zamki/kak-pravilno-razobrat-zamok-mezhkomnatnoj-dveri
- https://stroy-podskazka.ru/dveri/zamki/mezhkomnatnye/kak-snyat-i-razobrat/
- 1
Required Tools
To disassemble the door handle, you will need to have a certain tool on hand. Regardless of its type, there may be some hidden elements and parts in it that cannot always be pulled out using conventional tools.
For this reason, you should have the following list of tools on hand:
- hammer;
- screwdriver;
- drill and set of drills with a crown;
- pencil;
- awl;
- square
Reasons for disassembling fittings
The technology for assembling/disassembling door hardware is not a complicated procedure. Therefore, installation/dismantling work can be done independently.
The main reasons for the need to dismantle door handles:
- The fittings have become loose; the fastening bolts need to be tightened;
- The handle is cracked or broken due to significant physical activity;
- The locking mechanism has failed;
- New, more modern models of fittings have appeared on the market;
- The owners decided to renovate and update the interior of the premises;
- Due to low quality, the fittings quickly lost their attractiveness: the paint peeled off, large scratches or chips appeared on the surface.
How to disassemble and remove?
Removing a door handle is quite simple if you have the above-mentioned tools, as well as a little theoretical knowledge of the structure of this mechanism.
To do this, you must follow these steps.
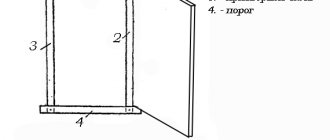
- Support and secure the door well so that it is in a stationary position.
- Now you need to pry up the decorative flange and pull it out a little. Underneath there are fasteners that need to be unscrewed.
- On the mentioned flange of the pressure part there is a special pin, which is locking and spring-loaded. It should be pressed in using a screwdriver. In rotary versions it is usually located in the housing. To get there, you need to insert a key or an awl. If you cannot feel it, then you should rotate the flange until it comes into contact with the pin.
- Now you should press the pin and at the same moment pull out the handle structure.
- Now unscrew the fastening bolts.
- We separate the inside of the element from the outside, take out the handle and the decorative flange.
If there is a need to remove the latch for replacement or repair, then you should unscrew the screws that secure it to the side of the door block, then remove the bar, and then the mechanism itself.
When installing fittings to a different position, it is better not to disassemble it for spare parts. It is easily attached to the door structure, but in the reverse order.
Now we’ll tell you directly about the disassembly of each category of handles.
Let's start with the stationary one, which does not have a push set, and is also not equipped with a mortise lock. In order to unscrew such a handle, you will need a Phillips or flat-head screwdriver. Alternatively, you can use a screwdriver. Dismantling must begin by loosening the screws that secure the mechanism.
If there are decorative elements, they must first be removed. As you unscrew the bolts, you should hold the counter parts on the back side of the blade. If this is not done, the structure may simply fall out of the canvas and become deformed.
It should be noted that the fastening can be one- or two-sided; accordingly, the structure can be disassembled in different ways, which means that this must be taken care of in advance.
When all the bolts are unscrewed, you need to carefully remove the handle from the door leaf using a flat-tip screwdriver. In place of the old handle, another mechanism is installed or the same design, but with new spare parts.
If we are talking about disassembling a round handle with a socket, then it is necessary to clarify that the word “socket” is usually understood as a mechanism that allows you to lock the lock using a small key on one side, which is not used on the other side. There is a special lamb on the second side.
In this situation, disassembling the mechanism will be carried out according to the following algorithm:
- first loosen the screws that hold the linings that perform a decorative function on both sides;
- the screws connecting the mechanism on both sides are unscrewed;
- the handle structure is pulled out and the remaining part is removed;
- The locking mechanism is pulled out.
If the handle requires repair or any part of it needs to be replaced, then you should completely disassemble the individual elements and determine the cause of the malfunction. It is necessary to especially carefully monitor the safety of all small structural elements, otherwise if they are lost, it will simply not be possible to put the mechanism back together.
Now let's talk about disassembling the round knob handle. To remove this element from the door leaf, the following steps are usually performed.
- The fastening bolts on one side of the door are unscrewed.
- The mechanism is dismantled through special holes.
- The additional counter-type strip is disassembled. To dismantle this element, simply pull it in your direction.
The non-removable round handle is fixed using the simplest screws for fastening. This mechanism is made with the expectation that later no repair work will be carried out, but a new spare part will simply be purchased, which will take the place of the old handle.
Push options. Usually they are used instead of rotary solutions. This is due to the fact that they are durable and very easy to use and repair.
Disassembly is performed as follows:
- first, the screws holding the decorative cloth of the overhead type, which performs the function of a clamp, are unscrewed;
- after this careful removal of the overhead sheets located on both sides;
- the fastening bolts are unscrewed and the round-shaped structural elements located on both sides of the door leaf are pulled out;
- All that remains is to open the strike plate and the lock itself, and then pull them out of the fitting grooves.
see also
Comments 17
why film? You can easily put it in one (open it 90 degrees and put 2 wedges under the door, screw the bottom and use the wedges to adjust the level)
Collapsible + there is door adjustment (remove the hinge cover behind them there will be bolts securing the hinges to the frame) you need a set of sprockets and hexagons
Sprockets are not used in these hinges and they are not dismountable, you just need to completely unscrew the ear from the sash.
Together with the door, I stuck one of these in my house. Nothing complicated. I fitted the profile with long self-tapping screws before screwing in the chamfer. Then foam and everything gud gud soup gud)))
2 assistants, entirely or on frame dowels or anchor plates. 25 minutes of work, and adjustment under the decorative overlays. It’s easier to expose the whole thing right away, the main thing is not to lose it, you can put spacers in before foaming and remove them after drying. And under the threshold, preferably without pads, it is better to place it evenly on concrete.
It’s better to make a monster of a liquid solution right away - it will turn out denser than to add it later, I already know