I've been on this site for almost 3 years. And all these 3 years I have been tormented by the memories of my first not very successful review about... light bulbs!) With this review I will try to correct the situation and tell you about one interesting application of those same light bulbs for which even the link was burned out... but they are not) Link in the review I give for similar light bulbs and, judging by the reviews, they are even quite good.
A batch of light bulbs was ordered - 2 lots (10 pcs each). Each cost 3.3 dollars. 7 W bulbs with E27 socket.
On the seller's page they looked like this.
In real life it's like that
More about light bulbs
We ordered 7 W bulbs, but in fact they turned out to be 4 W or even less. But this is no longer news for readers of this site. I think that at the above link, you will find much more useful information about a similar light bulb, its characteristics and brightness... I’m afraid that I don’t have enough skill to compete with our “giants of thought”))) Therefore, I will tell and show everything from a woman’s point of view vision)
Initially, the idea was to use these light bulbs throughout the house, but their rather dim light soon began to “confuse” me and I began to suspect that these were not 7 W, but much smaller... Then these light bulbs moved to my husband’s garage, and some were left at home for “every fireman” (and 4 of them still light up in the bathroom). During all this time, not a single light bulb burned out. Yes, there’s nothing that melts: the power is low, and the LEDs don’t overheat too much (as far as I understand) Bulb in disassembly
Unfortunately, I don’t have anything to measure the power with... I’ll just show how it shines compared to a 25 W incandescent lamp. The light was chosen warm white (warm white). I apologize for the bubbles on the wallpaper. I’m shocked))
From the photo you can see that the LED lighting radius is much smaller, the light is “one-sided”. Even 3 light bulbs were not enough to properly illuminate the room. It was a bit of a shame for the money spent. I still had to go to the city stores and buy “normal” ones. Although, there were also questions here (some light bulbs quickly burned out and they even had to be changed several times under warranty)... Which is still not the case with the Chinese ones))))
The Chinese light bulbs were lying around, gathering dust... But one day I “came with an idea”!
My husband is always afraid of these words. Because he knows that the next few days will not allow him to live in peace)))
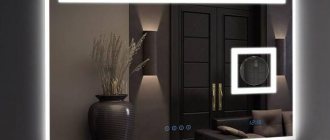
It was decided to make a mirror with lighting
.
Why a dressing room? That's what they call him online. And it’s probably very convenient for make-up artists to use just this to better illuminate the “client’s” face. I liked it for its design. “In loft style” - it seems that this is another way to describe it) Also, my goal
was: - to make a “mobile” mirror that can be transported anywhere; -make a kind of “lamp” (by the way, at the moment it is most used this way) -diversify and decorate the interior -see everything on your face even in the evening)
#Which size light bulbs should I use with which base?
The main sizes used for make-up mirrors are E14 (small) or E27 (large).
Often in the photo you see not just light bulbs, but glowing white matte balls - these are most often flasks, inside of which the light bulbs are screwed. But you can use a transparent flask. Outwardly, they look like a regular incandescent lamp, but inside there are LEDs.
Selecting spotlights for placement on a suspended ceiling
Not all lamps are suitable for a suspended stretch ceiling. The film fabric is very thin and light. Installation of spots involves installation on the base ceiling and the formation of holes in the canvas for lighting fixtures.
It is necessary to take into account another feature of the tension film: the material does not tolerate high temperatures. This eliminates the use of devices with too high power, as well as incandescent or metal halide lamps: the latter become very hot, which leads to deformation of the film.
Accordingly, the most important selection parameter is the type of light source and power:
- If an incandescent lamp is used, its power should not exceed 40 W. It is possible to install a lamp with a power of up to 60 W on a fabric sheet, since polyester is more resistant to temperature;
- The halogen lamp heats up even more. The maximum for PVC film is a product with a power of 20 W;
- LED devices do not heat up regardless of power, since this model includes special heat-dissipating devices.
Which lamps are best for a suspended ceiling in a living room or bedroom is determined by the height of the room and the design of the ceiling.
Lamps are classified according to installation method:
overlays are the best option for stretch films. The device includes a mounting pad, which is installed on the base surface, and a housing. The hole under the PVC film lamps should be smaller in diameter than the body of the product;
Working in the light or relaxing requires different levels of lighting. This issue is also solved with the help of spotlights.
In this case, when choosing, you need to pay attention to the design features:
Stationary lamps. Most built-in models are of this type;
- rotary-retractable - an interesting option, which, however, requires manual adjustment, since the body can only be pulled out with your hands;
- spots - equipped with a rotating mechanism and manually adjusted. Spots come in a variety of varieties, but most often they consist of several lamps installed on a common fastener.
Spotlight placement diagrams
Let's consider specific schemes that are widely used in practice.
These schemes No. 1, 2 with a minimum number of points and a chandelier in the center are suitable for relatively small rooms.
For example, if you do not have a corner kitchen set, which is built along a single wall, then choose scheme No. 2.
Scheme No. 4 evens out the illumination. It can also be used for the kitchen, but only with corner cabinets.
With its help, it is convenient to highlight any separate areas in the rooms - the dining area in the kitchen or the relaxation area in the hall.
In the bedroom, children's room and living room, patterns No. 5, 6, 10 with semicircles, circles, arcs, and ovals are often used.
1 of 3
Do not think that without a chandelier the number of options is sharply reduced. There is also a place for fantasy here.
The main thing to do in this case is to divide the ceiling into lighting groups, and thereby create different degrees of lighting in the same room.
Here are some options. Each individual group on them is different in color.
For example, let's take a work office. Here are some of the most stringent standards for light levels. However, this does not mean that the ceiling needs to be evenly and abundantly covered with spots.
Select two zones:
rest zone
In the first, where there is usually a sofa or armchair, you don’t need a lot of light. Make it softer and not so bright.
But where the table is, saturate the ceiling as much as possible with spot spots, so that you can work even without a table lamp.
Frame
The hassle of arranging light for applying cosmetics is more speculative, and the physical ones come down to purchasing components. But you need to make the frame for the backlit mirror yourself, otherwise why all this fuss? Its design is traditionally copied from theatrical makeup mirrors; The lamp sockets are recessed into the frame up to the rim. But there are no physical, technical, physiological or other objective reasons for this. There is only one, and rather historical one - tours.
Traditional design
In the old days, but already familiar with electric lighting, the only mass media that existed were periodicals and embryonic cinema. The main distributors of living culture were artists. We toured everywhere where a good gathering was expected. All kinds of breakdowns are inevitable when constantly moving, and in some places in the outback of those days it was no easier to buy a light bulb socket to replace a broken one than it is now to buy a Pentium Core series processor in a rural grocery store.
According to the same tradition, the frames of dressing room mirrors were made too massive and durable for household use - the entire expensive, fragile product had to withstand frequent transportation, incl. horse-drawn transport on broken roads. The actual mirrors for theater dressing rooms were made small, like the ones we have today at home “for one’s own use.” Nowadays, you can make an illuminated mirror for home make-up of the “old-fashioned” type yourself, within 1000 rubles, see for example. story below:
We are looking for ways to improve
However, as the size of the mirror increases, the complexity and labor intensity of the design increases disproportionately to the operating conditions of the product. Mainly due to the use of thick boards or beams for the frame.
Frame details of a traditionally designed illuminated dressing room mirror
The lamp socket is recessed into the frame partially or completely, up to the rim (item 2 in the figure). In both cases, the hole (item 1) or a through hole for it must be drilled with a feather or core drill. Taking into account the subsequent decorative finishing, you need to choose grooves for steel fasteners, and grooves for wiring. This requires either an expensive special tool (a hand-held wood router) or tedious work with a hammer and chisel. After that, the gaps visible on the rough product must be puttied, pos. 3. If you work on the balcony or in the living room, so many shavings are formed that the future happy owner will not be happy with the gift.
Installation rules
Location of light sources
Despite the fact that side lighting is less bright than top lighting, experts consider the best option to be placing lighting fixtures on the sides of the mirror surface
The fact is that the light falling from above focuses attention on the imperfections in the appearance of the person looking in the mirror, and sometimes even visually aggravates them. If you place the lamp at the bottom, the reflection will create deep shadows. If you hang a sconce on one side of the accessory, the person wearing it will see one side of the face less clearly than the other.
If you hang a sconce on one side of the accessory, the person wearing it will see one side of the face less clearly than the other.
The best option is symmetrical lighting located on both sides. In this case, it is better to maintain a height from the floor of about 1.5-2 meters. So the light flux will come from both above and from the sides at the same time. The result is good, uniform illumination that is pleasing to the eye. Experts also recommend maintaining a distance of at least 60-70 cm between devices. The same indicator is considered optimal regarding water sources.
Installation process
A lamp with a regular light bulb is mounted like this:
- electricity is turned off;
- markings are made on the wall;
- using a drill or hammer drill, drill holes in the surface;
- the cable is connected to the terminals;
- metal “ears” are pressed to the center;
- the fastening is given the correct position and fixed;
- screw in the light bulb.
If a halogen lamp is used, power wires and terminals are also involved. The housing is mounted with springs. The lamp is inserted into the socket and secured with a yoke. The latter should be included in the kit
It is important to remember that such lamps can only be handled with gloves.
If the device is overhead, the strip is mounted first. For this purpose, hardware is used. After this, the cable is connected to the terminals (by color)
Then the wiring is carefully removed into the hole. The device body is applied and fixed. If the lamp is heavy, it is additionally reinforced with stiffeners
If the lamp is heavy, it is additionally reinforced with stiffeners.
As for the LED strip, first it is connected to the network adapter
It is important not to forget about polarity here. Then the wires are installed in the sockets and secured with screws. The surface must be prepared
It is cleaned and degreased in advance. If the tape is not long enough, it is inserted in small pieces, soldering them together
The surface must be prepared. It is cleaned and degreased in advance. If the tape is not long enough, it is inserted in small pieces, soldering them together.
Security measures
When laying wiring in the bathroom, it is important to follow some rules
- The distribution box must be moved outside the premises. As a last resort, moisture-proof terminal blocks are used. At the same time, the twists are insulated with high quality.
- Grounding of electrical appliances in such conditions is mandatory. This even applies to LED strips.
- An RCD must be installed. This device protects the system by cutting off the electricity when there is a risk of a short circuit.
- The general electrical power circuit is divided into several parts. In this case, each mini-system must be protected by a circuit breaker.
- It is recommended to use a low current power supply system. 12 V is quite enough.
Ready-made lighting is not always good
For a long time, fluorescent lamps were considered the best option, and there weren’t really any alternatives. But over the past couple of years, LED lamps have become so firmly established in our everyday life that it will not be a problem to choose the right one for each functional area in the apartment.
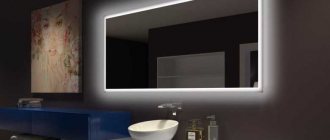
This includes mirrors for hallways and bathrooms with ready-made LED lighting, often located around the entire perimeter. But be prepared to be disappointed. Most often, manufacturers equip them with the cheapest light bulbs. Please note: even in the description of such “prefabricated” models, the technical characteristics of the light bulbs are rarely indicated, as if this is an insignificant detail not worth mentioning. But rather, there is nothing to brag about.
As a result, the lighting seems to work, but it’s more decorative than functional. Another unfavorable option is when light bulbs with incorrect characteristics are installed (read about the correct ones below).
Of course, they can be replaced: if the design requires changes, plus it is not difficult for you to solve this technical problem. But it is often more economical and efficient to buy a mirror and separate lamps for it. And then place them in the right places.
So, the main thing you need to know about light bulbs.
Illuminated mirror: operating tips
Before purchasing, make sure your eyes can tolerate the sight of light bulb filaments. If you feel discomfort or tearing, it means that the lighting is too powerful and aggressive. If you have to change light bulbs, then choose identical ones, otherwise the look will be catastrophic. The pendant above the mirror is usually installed from 198 to 203 cm from the floor. This height is suitable for family members of any height to use it effectively. One thing to keep in mind is comfort, diffuse lighting that provides a suitable display.
The mirror is an integral element of the design of the bathroom, bedroom and hallway. You use it every day, so you should take care of good lighting.
Appearance of light = Kelvin
When choosing a lamp, you need to consider not only its brightness, but also the color temperature of the light, which is measured in Kelvin and ranges from warm to cool.
Information about this characteristic can usually be found on the packaging. The higher the Kelvin value, the colder the light.
Soft white/warm white
The value in Kelvin is about 2,700. This light is more suitable for a living room or bedroom, where a cozy environment is of great importance.
The value in Kelvin is early 4,100. This light will best fit into the interior of a kitchen, bathroom, or toilet.
Daylight
The value in Kelvin can vary between 5,000-6,000.
This light is more suitable for the dining room, kitchen, basement, library, study, where the maximum level of lighting is required.
Types of housing
The design of the product itself and its two main types are not yet a full classification. They may differ in size, shape, lighting, design, and installation method.
Dimensions
By size they can be divided into:
- Small ones . Compact options, around the perimeter of which there are 6-7 light bulbs. They are installed on bedside tables in corridors and bathrooms. One of the most popular sizes is 60x60 cm.
- Average _ Their width is usually at least 80 cm, height 100-120 cm. It is the middle ones that are most often used as makeup ones.
- Large ones . The size can be even 100×180 cm. Even larger options are made to order. These are full-fledged growth structures.
Form
Variety of shapes.
The shape of the product is another important parameter. There are usually three main types:
- Square.
- Rectangular.
- Round.
Round shaped product
If we consider them from the point of view of convenience, then rectangular ones would be better ; they provide a good overview. But style is also important; if a round mirror fits better into the room, then you can buy or make one.
Lamp placement method
Several types of lamps are used for make-up mirrors:
- Incandescent lamps. Suitable for decor in old rooms. But in operation they have significant disadvantages: they burn out quickly, heat up, and it is difficult to regulate the light.
- Fluorescent lamps. Suitable only in cases where the backlight is used rarely and for a short time. Makeup artists practically do not use such lamps, because their eyes will definitely get tired after a whole day.
- LED. They are expensive, but they are durable and provide bright, eye-pleasing light.
LED lamps are the best option
According to the arrangement method, there are options when the light bulbs are mounted in a mirror, installed on the wall around it, or mounted in a wooden frame. When making it yourself, it is better to take a closer look at the last option.
Installation method
It all depends on the size and design features; the following types are distinguished according to the installation method:
- Tabletop . Typically, these are compact options that are either attached to a table or are portable and simply placed on a table supported on the wall.
- Wall mounted . They are fixed to the wall using screws, adhesive tape and other elements.
- Floor-standing . They are either simply placed on the floor with emphasis on the wall, or have a base. Another option for a floor-mounted dressing room mirror is a design on wheels, used in theaters and other professional fields.
Design on wheels with the ability to move.
Design
In addition to its main function, a homemade mirror should become a decorative element. It is important that it is combined with the overall style of the room and other items.
Main styles:
- Classic . It is best to make a frame for this style from wood. Additionally, carving or gilding is used for decoration.
- Minimalism . Here, on the contrary, there should be a minimum of decorative elements; you can do without a frame at all, mounting the light bulbs directly into the glass.
- Loft . Massive floor structures of strict geometric shapes are best suited for the loft style. The materials used are rough wood or metal.
- High tech . Minimal frame and unusual shapes. You can even use spiral bulbs.
- Provence . The frame in strict geometric shapes is made of wood and painted in light shades.
For Provence, light colors are required.
What is needed for making
Before starting work, you need to prepare all the tools and materials so that you don’t have to run to the store later.
Materials you will need:
- Mirror;
- boards or wooden beams;
- sockets and light bulbs;
- electrical cable, plug;
- metal corners;
- fasteners;
- dye.
Tools needed:
- Wood cutting tool;
- drill with pen attachment;
- measuring instruments;
- wire cutters;
- screwdriver;
- sandpaper with a block.
It is also worth taking care of safety precautions, working in shoes with rubber soles, safety glasses and gloves.
Step-by-step instruction
Almost anyone can make a dressing room mirror with their own hands. It is important to study the step-by-step instructions in detail and adhere to them when performing work.
Tool selection
When choosing tools for making a makeup mirror, you need to focus on accessibility and ease of use. It’s good if you can use a circular saw to cut wood, but you can do it with a regular saw.
What you will definitely need is a drill with an attachment for large through holes. Making them without this tool so that they are neat is difficult.
The “Feather” drill is one of the most important tools in these works.
Board selection
As for the material, there is practically no difference; any wood will do. You can use pine boards. The dimensions will depend mainly on the dimensions of the mirror, but there is an important indicator - thickness, it is recommended to be at least 20 mm.
Another important parameter is evenness. There are a lot of boards with curves in construction stores, so you will have to spend time choosing an even material.
Preparation of the drawing
To avoid stupid mistakes, you need to make a drawing of a homemade dressing room mirror in advance. The diagram must include: height, width, thickness, both of the entire structure and its individual elements. Additionally, it is necessary to indicate the location of the light bulbs and the step length between them.
Drawing of a rectangular mirror.
Frame making
The frame manufacturing process consists of several stages:
- Cutting material. According to previously prepared drawings, transverse and longitudinal boards for the frame are cut. This can be done with a hand saw, but using a circular saw will give you a more even cut.
- To fix the frame elements, you can use mounting adhesive.
- Additionally, the structure is reinforced with a construction stapler.
Drilling holes for lighting
According to the previously drawn up diagram, you need to make holes for the light bulbs in the frame. The accuracy of the measurements is important, because the design must be symmetrical.
Instructions:
- It is necessary to draw the center of future holes on the frame.
- You need to choose a pen that will make a hole with the same diameter as the cartridge.
- After attaching the pen to the drill, all the holes are made.
- After this, they are sanded with sandpaper.
- Additionally, it is necessary to process the edges and front side of the frame.
Painting
For small frames, painting can be done with just a can of spray paint. Before applying it, the surface of the material must be thoroughly cleaned.
Wiring
If possible, it is better to entrust all electrical work to a specialist. If not, then you can do everything yourself, even without experience, but strictly following the recommendations.
Instructions:
- Inside the cartridges there is an element with two clamps for wires.
- You need to unscrew the small bolt, insert the wire into this compartment and screw the bolt back.
- The cartridges are connected to the cable using a serial connection. For cleaning, use a stationery knife, which carefully makes an incision between the wires, and then they are stripped.
- The exposed wires must be bent so that they can be inserted into the socket.
- In this way, all cartridges are connected to each other.
Video tutorial: Making a makeup mirror for a makeup artist.
How to fix a mirror
There are several ways to secure:
- Using double-sided tape.
- Attaching corners.
- Use of special fasteners.