how to make a table with lighting
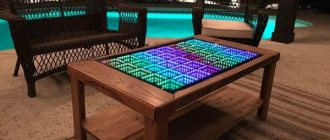
-Have you seen a light table with an infinity effect , but not in the photograph? It's really cool, like a fairy tale. In fact, making a backlit table with your own hands is quite simple. There are different options, here you will learn ways that will help you make your own glowing table with your own hands with different effects. LED tables are great for creating interesting decor in your home. They will immediately create a festive atmosphere anywhere - a great thing for a party. Check out this selection of ten tables; there isn't a single example you couldn't make yourself. These are mainly backlit coffee tables , but there are also practical options for backlit desktops , on which you can draw, sketch, solder and do many other useful things. Check out all these wonderful projects and today, with the help of the instructions and step-by-step photos presented here, you can start making your own light table .
Corner furniture for PC
This variety is designed to optimally fill the space in the corner of the room. Many existing models will create an ideal area for working with office equipment. Below we will look at the most interesting, in our opinion, projects of corner computer desks with drawings and dimensions.
What is it like?
The corner of the room will be a good place to place furniture for office equipment. Such accessories have a larger surface area. In terms of functionality, this product is much superior to its competitor with a straight tabletop. If you are looking for the most rational and optimal option for a miniature room, then making a corner piece of furniture yourself is a good solution. Just follow the instructions and you will be the owner of universal furniture that will satisfy all your needs.
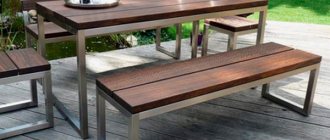
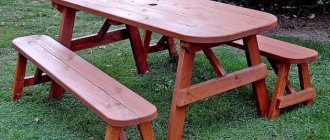
Photo selection of tables made from pallets
Below are photographs of the most popular DIY models.
Varieties
Looking ahead, we note that the luminous elements of the tabletop look very beautiful, but this solution cannot be called practical. The fact is that the glow needs to be viewed in the dark, and when you stay in a dark room for a long time, bright elements cause eye fatigue. Thus, an epoxy resin table with lighting will find its use in creating a special atmosphere in the room. You can demonstrate a masterpiece to amazed guests or find relaxation by watching the play of light, but in all these cases, time is limited. Thus, the scope of application of the backlight has been determined.
In fact, guided by the basic principle of the new movement, designers have developed many projects that are simply impossible to imagine. However, every potential owner of such a wonderful table must imagine all the variety of options, so we will try to fill the reader’s imagination as much as possible so that he himself becomes the designer of his future order.
All epoxy tables in which illuminated elements are found can be divided into two groups. The criterion for separation is determined by the nature of light.
- The first group includes products in which the resin contains a special powder - phosphor. As is known, luminescence produces a glow when excitation energy is converted. There are several types of luminescence. In particular, a substance can release light energy after irradiation with ultraviolet rays, as a result of a chemical reaction, as a result of the passage of an electric current or bombardment with electrons. Photoluminescence has found practical application in the field of construction, that is, the phosphor in question, under the influence of natural lighting, subsequently becomes a light source.
- The second group is represented by products with electric lighting; these can be incandescent lamps or LED sources. One of the features of epoxy resin is its dielectric properties. All elements of the electrical circuit can be filled with the composition, and they will be reliably insulated. LED elements have low power, so the power source is often embedded in resin along with the backlight. Such options are considered “disposable”. Indeed, it is not possible to replace the power supply or LED. More reliable models contain a current converter and are connected to a 220 V network.
Step-by-step instructions for assembling a glowing table
- We connect the boards with cotter pins and glue them together. We tighten the shield with clamps until the glue completely hardens.
- We process the side edges of the tabletop with a plane and grind them.
- We cut the ends of the table with a jigsaw to one level. Then we polish them.
- Cypress wood has resin chambers in its structure. We clean them with a semicircular chisel without disturbing the natural shape.
- We blow out the cavities with a vacuum cleaner and dry them with a hairdryer.
- Preparing the epoxy filler. Mix the resin and hardener in disposable plastic cups. We also add a phosphor there (we use 10 g of powder per 100 g of resin).
- To avoid resin leakage, cover the table with tape around the perimeter and place pieces of plywood or plastic underneath.
- Fill all cavities and cracks in the tabletop with a fluorescent mixture. Leave the wood material alone for a day. During this time, the solution will completely harden.
- We process the entire surface with a grinder until a perfectly smooth plane is obtained.
- We cover the tabletop with 3 layers of furniture varnish.
- We form a support frame from a board 50 mm wide or more.
- We attach the tabletop to the frame and install the legs. As a result, we get an original luminous table made from wood with our own hands.
Sketches of computer desks with the most popular sizes - photo gallery
Below you will see drawings of the most popular models of tables for personal computers. The diagrams visually show how to create an ergonomic and practical product from a minimum number of parts that will decorate any room.
Several options
Let us remind you once again that the total number of design solutions with lighting is in the hundreds, so it is impossible to describe all the variety. Considering that a number of models are created using fundamentally similar technologies, we will present the most popular examples of countertop design.
Useful to know > How to make an epoxy resin ball, simple step-by-step instructions
Multi-colored lighting is great for creating a romantic atmosphere. Point sources are used, dispersed over the tabletop area in a chaotic manner.
You can order lamps in the online store. Many models can change color. Modes are switched from the remote control.
A striking example of the use of phosphor is a tabletop with cavities that are filled with epoxy resin. These cavities can be natural (wormholes) or cut into the slab with a special cutter.
Typically, a relatively small amount of resin is needed to make such tables, which significantly reduces production costs.
The use of white LEDs will allow you to create pictures that imitate the starry sky.
It would be preferable to use a darker background for the tabletop, but do not forget that most of the time the product is used without lighting.
To make tables, not only longitudinal, but also transverse sections of a tree trunk can be used. The transparency of epoxy resin allows you to preserve the natural pattern. If you add color and phosphor to the composition, you can get decorative illuminated tables.
The river table has gained wide popularity. There are a lot of variations in its execution. The resin, tinted blue, imitates a body of water. The role of the banks is played by a wooden slab. Using decor, you can create a picture of a river or standing pond. When a phosphor is added to the resin, “water” begins to glow in the dark.
A table with fiery lava depicted on its surface requires special consideration. The secret is that an LED strip in epoxy resin is mounted in the cavities of the slab. At its core, this composition is one of the varieties of “river”, only red filler is used instead of blue.
Hot lava is poured onto a slab base or can be formed with a continuous layer of epoxy.
If you use many small components as filling, you can save on the amount of resin, but at the same time it will visually seem that there is quite a lot of it. This effect will be enhanced by the presence of a phosphor in the composition.
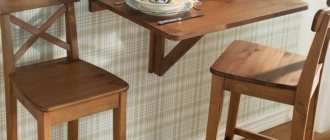
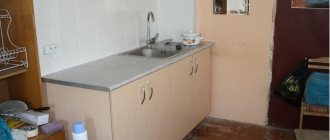
DIY folding table for a small kitchen
An original idea for a folding table for a small kitchen, consisting of two separate halves. Agree, it’s very convenient, if your husband comes in for lunch or your child comes home from school, they set it on one table, and on the second you do your household chores. In the evening, when the whole family is gathered, you can move the halves together for dinner together. The tables are connected by hinges, so all manipulations are very simple.
Step-by-step photos show how to bring this idea to life. The tables are very simple, without any bells and whistles; according to the drawing presented below, anyone with minimal carpentry skills can assemble it.
Photo source idealsad.com/skladnoy-stol-svoimi-rukami/
Original folding table for the kitchen
A small space requires thinking outside the box. Here's an idea for you - an original folding table for the kitchen, which certainly will not take up extra space, or rather, when assembled, it generally takes up no more space than a picture on the wall.
The structure folds, a bracket is attached to the wall, the table tilts up and is secured with a regular window latch. The following shows a diagram and how to make such a table with your own hands.
Photo source: www. home-dzine.co.za
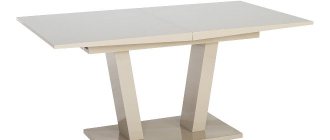
Small folding table for the kitchen
Another good solution for a small kitchen, a table with a folding top, very convenient. It takes up the same space as an ordinary small bedside table, easily turns into a dining table for two or three people, and is very functional for its size. The design is simple, so making it yourself will not be difficult.
Here is a diagram, as you can see, you will also need a minimum of materials. The assembly order is shown below, the main parts are the tabletop, bedside table and drawer
Pay attention to the original solution of a double-sided bedside table
Photo source stroyday.ru/stroitelstvo-doma/interernoe-oformlenie-doma/stol-svoimi-rukami
Preparation of tools and materials
For work you may need:
- drill or screwdriver with a set of bits and drills;
- jigsaw or hand saw;
- electric milling machine, folding cutter or zenzubel - types of planes for cutting quarters under the top glass;
- a plane if the boards are not planed or sandpaper with a holder;
- screwdrivers;
- miter box and file, square;
- ruler, pencil;
- brushes, paint trays.
A garland is used as lighting.
Additionally prepare:
- bars with a section of 40x60 mm;
- boards 24x60 mm;
- boards for decorative frames;
- self-tapping screws 4x50 mm;
- Chipboard or laminated chipboard according to the size of the table;
- silicone glue or double-sided foam tape;
- mirror film;
- wood glue;
- mirror and glass according to the size of the table;
- wood stain, paint or varnish.
The missing tools can be rented from construction stores or you can find such a service in advertisements of private companies.
Application of the composition
The resulting composition should be carefully poured into the slits and hollows made with a chisel. It's important to note that the epoxy will soak into the wood, so you'll need to add at least a second coat.
The whole process took us about an hour. After which we waited about 12 more hours, allowing the epoxy to harden properly.
Further work consisted of trimming the edges of the tabletop to get rid of unevenness and resin deposits, as well as sanding. In order to achieve a dotted effect, we had to use a sander to remove a fairly large layer of the surface where the epoxy had gotten outside the grooves.
The final stage is processing the edges and coating the surface with two layers of varnish.