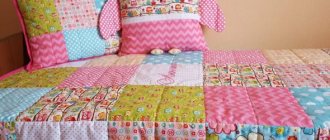
The bonbon technique, with which poufs are joined into a single blanket, is vaguely reminiscent of patchwork. The only difference is that the elements are bright small bubble-like elements or small pads. The highlight of this technology is that everyone chooses on their own how to sew a bonbon blanket - make it colored, plain, matte or shiny, large, small, rectangular, square, and so on. There are no restrictions or strict schemes. It all depends on the imagination of the master. It is available for sewing by both experienced and novice dressmakers.
If the fabrics are chosen correctly and the tailoring itself is done carefully, it will be difficult to take your eyes off the finished bonbon product. This material reveals the general principles of the technology, some features and manufacturing options.
How to sew a bonbon blanket?
Blanket dimensions
Despite the fact that there are no strict requirements for the design of bubbles and pillows, it is generally accepted that the minimum and maximum dimensions of the parts will be squares of 8 by 8 cm and 40 by 40, respectively.
If you do not follow this recommendation, the bonbon blanket will look less attractive.
Blanket elements must be the optimal size
What is it and what is it eaten with?
Initially, such a blanket was intended solely for decorative use. The patchwork technique in one form or another exists among almost all nations. "Bonbon" is a variation of this technique. At one time there was a catastrophic shortage of fabric, and every free scrap was used in the work. Therefore, the blankets turned out to be very colorful and varied in texture.
Bonbon is a type of patchwork technique.
Today this model has several names: “Bonbon”, “Biscuit”, “Marshmallow”, “pouf blanket” and the like. Since modern craftswomen have no shortage of materials, the blankets turn out to be very impressive and presentable. Even if the accessory is made from multi-colored fabrics, the palette is carefully selected. The technology for creating a Bonbon blanket is considered a type of decorative and applied art, and the result looks more textured and unusual compared to regular patchwork.
This blanket is made using the technique of stuffed patches.
This unusual blanket has two sides: the back side, which is more even (probably, it would be more accurate to say, flat), and the front side, consisting of square fragments of the same size. The edge of the blanket is decorated in different ways: it can be just a wide edging, or in addition to the edging, a lace braid or frill with small pompoms can be used.
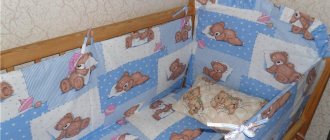
In addition to the blanket, you can also sew bumpers on the crib.
Additional functions
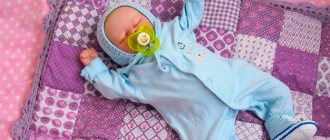
The design of the bonbon blanket allows it to be used not only for interior decoration and heating. If there is a child in the house, he can crawl around and spend time actively.
The printed patterns and bright elements of a bonbon blanket are a good alternative to an expensive developmental rug.
The child will love the educational elements of the bonbon blanket.
Also, a light bonbon blanket can serve as a temporary curtain. Its light weight makes it possible to place it as a bedspread on a window or the side of a bed. Sunlight and wind do not penetrate through the fabric and filling, so the bonbon blanket will be good protection from adverse external conditions.
The use of bombon blankets and the differences between the “adult” and “children” varieties
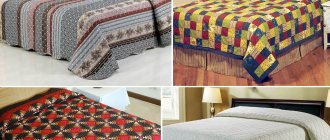
This blanket has a wide range of uses. They can be used for shelter while sleeping. It will also become an interesting and unusual addition to the design of the room and give the interior a unique style. It can be used in different situations:
- as a rug for a child. Children are restless and often fall, and such a blanket can soften the blow and protect against injury;
- as a cover for a sofa. For this purpose, blankets of any size can be used;
- as a replacement for a bedspread. Bonbon will give the interior a unique and well-groomed look;
- instead of a blanket. This blanket is very warm, you can cover yourself with it on cold winter evenings while sitting in a chair.
You might be interested in this. Rules for sewing and creating a pattern for unicorns. A blanket will be a good addition to the interior.
The main difference between a child’s blanket and an adult’s is the size. But the differences also lie in style. For example, when making a children's version, you can use a lot of bright colors and buy fabric with drawings of their favorite cartoon characters. An adult blanket should be made in such a way that it does not clash with the style of the room.
Important! A blanket in neutral colors can be called universal; it will look harmonious in any interior.
What you need to prepare for sewing
Let's look further at what elements are needed for sewing.
Table 1. List of materials and tools
| Name | Description |
| Base fabric | The components of the blanket will be sewn onto a piece of fabric, so you can even take an old sheet - it still won’t be visible. Any composition is suitable for the base, including simple chintz. In general, there is a recommendation to take a woven fabric of natural origin for that part of the blanket that will always touch the body - satin fabric, linen, or a piece of poplin meet these requirements. |
| Plain, different shades - at the discretion of the master. The front part can be a combination of synthetics and natural fibers. Also, on the outside there can be exclusively synthetic or, on the contrary, natural fabrics. |
| It is ideal to use padding polyester or holofiber. These materials are lightweight and do not wrinkle during the first wash. Batting warms well but has a number of disadvantages - heavy weight, the ability to retain moisture and accumulate it inside the blanket. In addition, after washing, cotton wool and its derivatives form into clumps, as a result of which the product may lose its appearance. Before you determine the type of filler, you need to think in advance what the mass of the blanket will ultimately be. |
| The colors are selected in accordance with the shades of the front side of the blanket (for a variegated model - 2 or 3, for a plain blanket one color is enough). |
| Needles | Needed to secure fabric elements. |
| Will be needed for cutting and other operations. |
| Pencil or washable marker, ruler | Needed for marking and defining the boundaries of parts. |
A plain blanket can be attractive too
To make a blanket from bubbles or pillows, you will definitely need a sewing machine.
Machine seams make the product more attractive
Bombon blankets: how to care for them?
The small bombon can be machine washed on a delicate cycle at a temperature of no more than 30 degrees. After washing, straighten it, wash out each “bubble” and dry it horizontally. Iron only with a steamer. It is better to take large items to the dry cleaner. Bonbon blanket is a practical and decorative product. It will be a good gift and an indispensable attribute at home. Children's delight, the zest of the interior, the creation of comfort, a warm atmosphere - it's all about him. These are the most beautiful blankets that definitely deserve your attention.
Author: Yulia Tamanskaya especially for the website Matrasium.ru
Sewing materials
What will become the main fabric when cutting and sewing a bonbon blanket depends on the purpose and manufacturing technology. If a product made using the bonbon technique plays exclusively the role of decoration, a smooth fabric with a characteristic shine and attractive texture would be a good choice. satin , polished poplin , and crepe-satin to create a blanket . cambric and staple , stretch are suitable materials for decorative blankets using the bonbon technique .
Matte and shiny fabrics are equally good in the bonbon technique
When using a blanket for its intended purpose, the ideal option is to sew it from matte natural fabric that is pleasant to the touch, or shiny, but not slippery.
For children, fabrics that are too smooth should not be used and it is advisable to avoid synthetic options when sewing children's products.
Colorful models - for the most daring lovers of experiments
When choosing a material, they also take into account whether the sewing machine can handle the sewing. To get poufs, the craftsman needs to sew in folds and use multi-layering. If the machine is the simplest, it may not be able to pull several dense layers.
Traditional sewing machine is suitable for loose fabrics
One of the options, which is a fairly universal and popular solution when using decor using the bonbon technique:
- for the top of the blanket - thin satin fabric, medium-density calico, cambric cut, shirt-type fabric, thin linen (to make the product you need to take a mixed fabric that includes at least thirty percent synthetics). An alternative could also be poplin fiber or other high-quality cotton fabric;
- for the back side of the bonbon blanket, the same options are used as for the top, but it is possible to thicken the product and make it softer using flannel, flannelette, cotton velor or cotton velor;
- if there is a layer between the front side and the lining, any material based on cotton will do.
The quality of the material is especially important for children's models
Calculating the amount of fabric and choosing a cutting option
To determine the amount of fabric needed, you first need to choose a base. Its size depends on how the bonbon will be used. If for its intended purpose, then it is better to choose a sheet. It can be used as a template for other fabric. You can also use a duvet cover for this purpose.
This is how you can mark the base fabric
In the case of a children's bonbon, you will also need a template. Only a master of his craft can select the required amount of fabric by eye.
The pattern depends on the size of the fabric. First you need to take measurements, then calculate how to mark the fabric. Usually squares are used, but in some cases the size of the base does not allow them to be sewn harmoniously. Then you can use rectangles. They can also be alternated with squares.
You might be interested in this: The procedure for sewing sundresses without patterns with your own hands
For example, one row may be made of squares with a side of 15 cm, and the next row of rectangles up to 30 cm long. In general, it all depends on the situation. For example, if the squares do not fit quite a bit, you can trim off the excess part of the base.
Attention! The use of rectangular shapes is not so popular in this style. Squares are considered the classic option.
What to fill the blanket with
Among the most popular fillers when sewing products using the bonbon technique is a marshmallow blanket with high-quality filler
It is good to fill a bonbon blanket with such material as Eslon - it has a number of other names: comforter, down. This filler has similar properties to the above-mentioned padding polyester and holofiber.
Marshmallow blanket with quality filling
In texture, Eslon consists of balls that are distinguished by their elasticity and elasticity. They are delicate, have a twisted hollow spiral structure, which does not deform during use and always quickly restores its original appearance. The silicone coating of the balls allows the filler parts to move freely relative to each other and helps maintain the appearance of the blanket.
The amount of filler regulates the splendor of the product
These qualities of Eslon are useful, as they deprive the craftsman of the need to stitch the filler before using it in the product. Also, Eslon does not belong to the group of flammable nonwoven materials; it creates an excellent microclimate in the product, preventing the accumulation of harmful substances in it and the appearance of microorganisms that can negatively affect human health.
Eslon is good to use in bed
Also, the filler of this group does not cause allergies, odors do not accumulate in it. From the point of view of insulation, Eslon also shows itself positively - the material retains heat excellently. Great news for those who care about the health and appearance of things - ticks and moths do not linger in a bonbon blanket with the latest generation of filling.
When storing blankets, they do not accumulate odors
In addition, blankets with Eslon are easy to wash in warm water. Such things will dry quickly in room conditions. Blankets made from ottomans and pillows should be dried in a horizontal plane and protected from direct sunlight.
The blanket should not be exposed to the sun
How to sew bumpers for a baby crib using the bonbon technique
Any child, even if he has not yet learned to walk, needs protection on the bed. The sides will help protect the child not only from collisions, but also from drafts. For older children who can walk, they are simply irreplaceable. Sides made using the bonbon technique will be an excellent solution, as they have all the necessary qualities. They are very soft and do not take up much space. You can find ready-made products in stores, but it’s easier to sew them yourself.
Crib bumpers
They are easy to make. First you need to take measurements of the crib, then decide on the shape and length of the rectangular parts. A standard bed consists of sides of 60 × 30 cm. This is divided into squares with a side of 15 cm. The sewing technique is the same as for a blanket, but there are several features to consider. Firstly, you will need less padding, otherwise the bumpers will take up a lot of free space in the bed. Secondly, it is advisable to choose shades of fabric that have a calming effect, since the sides will be constantly in front of the child’s eyes. You can choose fabric with a pattern of stars, moon or clouds.
You might be interested in everything about women's sewing measurements: a detailed plate
Idea for decorating a side
It is also not recommended to additionally decorate the sides with small decor, which can be easily torn off.
Design options
Bonbon is a technique that implies the presence of many options for color and texture combinations in one product. You can combine ottomans or pillows in contrasting shades, or, on the contrary, you can create calm combinations. Delicate floral designs and pastoral motifs are good for a bedroom, girl's room or living room with a classic interior. Chocolate and beige make a dynamic and at the same time traditional combination that creates warmth and comfort. Wine shades add chic to the atmosphere.
If you want to create something completely unusual, metallic textures, foil-like fabric, shiny satin and crepe-satin combined with matte details will come to the rescue.
Decorative and functional model option
If the blanket is not intended for use by small children, it can be decorated with a bright edging with rhinestones or sequins.
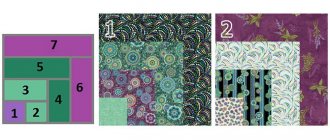
As for the arrangement of parts by color, it all depends on the choice of the master. He prepares a scheme of color combinations in advance, thinks through how and in what quantity to place squares in a horizontal row, and makes the overall appearance of the product attractive.
Mint or lemon in combination with gray, pink in combination with gold - the color scheme of bonbon blankets can attract attention, relax the eye, and create accents. Considering the volumetric design of the product, it is not only a convenient and functional item, but also takes up enough space in the space, so it is worth considering its appearance in advance.
The texture of the fabric can also serve as decoration
If we talk about the difference between children's and adult models, then lush-looking pillows are more appropriate for the play environment of a children's room. As for the choice of colors, all kinds of bright ottomans, juicy and eye-catching, are suitable for children. You can also opt for calmer pastel options. If the fabric has large prints with famous fairy tale and cartoon characters, you can use a pattern measuring 10 by 10 centimeters or more for the ottomans. Other large patterns that combine with each other are also suitable.
For adults, the decisive factor is the overall style of the room and color in combination with the color schemes of the product.
The size of the squares may vary
The final stage
Girls, we are entering the last stage. For clarity, I will show what the holofiber in balls that we use looks like. It should be fluffed before use, because in production it is heavily compacted into bags.
Then we insert it into our bonbons. To prevent them from being overfilled, use an average of 10-12 grams of holofiber per bonbon . Once we've filled the bonbon, we're reminded of the serifs and folds, since we want the same look on all sides of the quilt.
After you have collected all the strips into a full-fledged blanket, you need to lay it out on a flat surface and start measuring the size that you will get for the back surface. We will get 65 by 120 cm or 5 by 9 squares in a blanket.
In the meantime, we sew the back side onto our bonbons. Place the front side of the back to the front side of the bonbons and sew. Turn the blanket inside out. This is the kind of blanket we got from the back side, but not yet turned inside out.
Bonbon to bonbon, line to line - everything turned out very symmetrically. Now you need to turn it out, for this we left a hole in the blanket. We turn it out through it. I'll show you two ways to close a hole in a blanket.
Basic sewing techniques
To make a bonbon blanket, there are two main sewing techniques. In both cases, you can sew a blanket either on a sewing machine or by hand (if you don’t have one).
- The first method is to make a product from strips of squares, which are stitched one by one onto the base, and then stitched on three sides, forming pockets into which the filling is placed. At the final stage, the resulting ottomans are stitched on the fourth side.
- The second method is to connect small pre-prepared ottomans, which are then sewn onto the base according to a pre-approved pattern.
General sewing patterns for ribbon type
Cutting and fabric consumption
In order to choose the amount of fabric required for sewing a product, you first need to decide how fluffy it will be. Sewing technology is also taken into account when cutting. Let's look at an example.
If you plan to sew a baby blanket measuring 80 by 110 cm for a crib or stroller, the fabric consumption will be as follows:
Table 2. Required materials
| Name | Consumption |
| Plain fabric for ottomans or multi-colored fabric | Depends on the size of the squares and sewing technology, but there are a number of recommendations. If the structural basis is ribbons, then to the size of the square of the base fabric (where the outer ribbon part is attached) you need to add two or three centimeters on all sides and an additional 1 centimeter for the overlap (to cut out the front squares, cut out the base from thick cardboard and lay it on the fabric ). If we are talking about sewing a blanket from ready-made pillows, then the fabric consumption is also determined by their number and the side of the square. |
| Lining material | If a hem is used when sewing, then for the lining side you need a piece measuring 100 by 130-120 centimeters; when using edging, you need a piece of the same size as the final product - 80 by 110 centimeters. |
| Intermediate layer on which the pads are sewn | 80 by 110 cm fabric. |
| Kant | For the edging, you need to purchase a wide bias tape with a total length of 4 meters: (80 cm + 110 cm) * 2 = 4 m (here the length is indicated with a margin), or use a strip of fabric with a width of at least 5 centimeters, the length of such a strip - similar. |
| Holofiber for filling | 700 grams. |
Bright prints of blankets for children's rooms
If you use a frill element instead of a piping, you will need to recalculate the amount of fabric consumed when sewing. The length of the strip in this case will be 2-3 times longer than when using edging. It is also worth considering the desired splendor of the decor of the product.
Making a blanket from ribbons
Let's look at how a bonbon blanket is made in the first way - by assembling the product from ribbons. Let's also do this using the example of a blanket that can be placed in a child's bed. It serves as both decoration and insulation during the cold season. An additional function of a bonbon blanket for a child is educational. You can crawl on it, it is interesting to hide in it, but at the same time it is not heavy if it is made of fabric stuffed with modern insulation.
Finished blanket
Stage 1. Selecting materials for sewing a bonbon blanket
The size of the final product is 80 by 110 cm. This size is well suited for children's furniture.
At the first step, you will need to prepare pieces of fabric of different colors, as well as internal filler, which will create volume for the finished product.
You will need:
- 3 cotton colors for bombons;
- base for a blanket for the back side measuring 100 by 120 centimeters (if you need a blanket without edging, then for sewing take another piece of fabric for the back of the base with similar sides - the parts are sewn together, in the photo - the finished product processed in the second way);
- filler in quantity 700 grams.
High-quality filler is an important factor.
You also need threads, stationery for marking, pins, scissors, and a sewing machine.
You need to lay out the available cuts in front of you and choose the best combinations. For a child model, these can be discreet, gentle combinations, unlike the more contrasting ones for adults. Bright colors can be a good choice for children whose activity needs to be stimulated by bright accents in the interior.
It is better to take dense calico as a basis.
For the base you need to choose dense natural and high-quality fabric
For the inside of the bonbon blanket, which will touch the body, you should use natural fabrics.
Front side materials can be of any color
Decorative materials (ribbons, lace elements, stickers, stripes, etc.) can also be useful from raw materials. At the same time, when sewing a baby blanket, you should always remember the safety of the parts. You should avoid elements that can easily come off or injure a child (rhinestones, sequins, etc.).
The product can be decorated in different ways
For sewing, you should take scissors, an iron, pins to secure the fabric, sewing thread, materials for making notes (pencil, chalk, soap). For cutting, you will need paper on which the canvas plan will be drawn.
Stage two. Sketch development
At the next step, the master must transfer the plan of the future bonbon blanket onto paper. It would be nice if the diagram reflected the design of the pattern. In this case, you get 80 squares measuring 11 cm (the blanket consists of 8 squares in width and 10 in length).
The paper will help you visualize the pattern of the blanket
The base fabric can have any color, since sewn pillows filled with padding polyester or holofiber will be placed on top of it. This option comes in three cotton colors.
If you want to make a product of a different size according to this pattern, you need to think about it in advance. It is calculated based on the wishes for the size of the pads. In the children's version, the component parts can have, in particular, dimensions of 6 by 6 cm. Dividing the final length and width of the product by similar indicators of the component pads, we obtain the total number of parts. Or, on the contrary, we add up the overall picture from the sizes of the parts.
At the same stage, the fabric for the base is drawn out for the patch of ottoman parts. It is lined into squares with a side of 11 cm, leaving one centimeter for allowances.
Markings are made directly on the fabric
We must remember that in addition to the squares themselves and the distance between them, the pattern must contain 6 centimeters for allowances (another option is allowances of up to 5 centimeters, but not less than three), folds, and piping to decorate the finished product.
Stage three. Preparing the external components of the bonbon blanket
Squares of fabric, cut from sections, are sewn to each other “with a train” so that a ribbon is formed (the stitching is machine-made). Next, the seams between the parts are ironed to the right side. The next ribbon is assembled from squares, stitched, but the seams are ironed to the left, etc. This alternation allows you to achieve a beautiful connection of the ribbons with each other.
The parts are sewn together with ribbons
Next, the resulting ribbons are pinned to the base using “invisible” tapes, forming folds. It is very important to be careful at this step. The appearance of the finished bonbon blanket for a child depends on this.
Sewing is done in a strictly established order
First sew the top of the squares for ottomans along a horizontal line, and then the side seams - in full accordance with what is drawn on the base.
Important. The bottom of the squares is cleaved with the base at the place where the seam allowance strip ends, not the square.
Forming folds
Folds can be made in different ways. You can do them inward or in different directions.
The sides are sewn strictly along the seam between the tape parts.
The product must be stitched strictly along the seam
After the so-called “pockets” have been created, they are stuffed with filler (the ottomans should be of medium density) and then the lower part of the tape is attached to the base fabric.
Rows form one after another
The next row is drawn up in the same way until the entire working space of the base is filled. To sew on the next strip, you first need to gather it into folds and then sew it to the first with right sides. You should carefully carry out this operation, getting into the seam lines.
The base consists of rows
At the final stage, you will need to fold the front sides and lining material. They are stitched together along the contour of the ottomans. In order to be able to turn the blanket inside out, leave a 25 cm incision. After this is done, the product is sewn to the end using a hidden seam.
To ensure that sewing requires a minimum number of operations, you can attach the next strip, covering the previous cut site where the soft filler is placed. To sew a blanket in this way, at each stage they make sure that it does not “float”, strengthening the rows with pins or needles.
After all the tapes are in place and the product is ready, the final processing consists of sewing piping on the sides, or stitching the base and bottom layer. Finally, all that remains is to steam the back side, and it is ready for use. You can also decorate the product with satin ribbons.
Recommendation. If you sew an additional layer of padding polyester from the inside out, under such a blanket it will become even more comfortable and warmer.
Blanket made from ready-made “bubbles”
A bonbon blanket can be made up of pillows sewn together.
The set of tools and materials is the same. With the difference that the number of squares should be doubled. A bright fabric is used on the front side, and any other fabric on the back side (it won’t be visible anyway).
Step 1. Forming strips of pads
First, three edges are sewn on each component strip, then filler is placed in the pad and closed with a fourth seam. The same should be done with all pillows, the number of which is determined by the size of the final product.
Pillows are sewn separately
When the blanks are completed, they are connected into strips. It is important that they are smooth and do not create distortions. When stitching, corner should meet corner. It is advisable to first make a basting, and then go through the main seam.
Step 2. Obtaining a fabric from strips
Once there are enough stripes for the blanket, the lines are collected into a large canvas. The base is additionally stitched. The alternation of colors and the number of parts in length and width are thought out in advance.
Assembly
Step 3. The pillows are “planted” on the base , which can be additionally insulated with several layers of padding polyester. Any natural dense fabric can be used as a base. Also, the perimeter of the base fabric can be decorated with frills, borders, etc.
Forming the Foundation
Step 4. Both parts are connected . The result is a comfortable blanket that can also be very warm.
Finished product
How to sew a baby blanket using the bonbon technique
First you need to prepare all the materials and carry out calculations. For a baby blanket, it is advisable to choose bright colors of fabrics with large patterns. First you need to decide on the size. Below are instructions on how to sew a bonbon blanket for a child:
The children's version can be bright
- Mark the base. For a baby blanket, a length of 170 cm and a width of 136 cm will be sufficient. This base can be divided into squares with a side of 17 cm; they will need 10 in length and 8 in width.
- You need to decide on a blanket pattern. For example, you can take two colors and arrange them in a checkerboard pattern. Diagonal lines of three colors also look beautiful.
- Now you need to take the fabric for the forms, sew one strip from 8 squares, and then attach it to the base with pins, following the markings. The fabric should not fit tightly to the base; you need to make small pockets out of it that will be filled with filler.
- Next, you need to sew each square to the base on the top and sides, without touching the bottom.
- Now you can fill each square with filler and sew it to the base from below.
- Following the pattern, sew the remaining strips to the base. The finished product can be additionally decorated with decor, for example, piping.
Fabric printing technique
Recommendations for making a bonbon blanket
Professionals advise following some recommendations when sewing a blanket using this technique:
- to all seams you need to add from 0.05 to 1 cm or more depending on the type of fabric;
- it is imperative to monitor their quality - even seams are the key to success;
- When sewing, the direction of the ottomans should be taken into account;
- Before cutting, all parts are washed and ironed;
- the appearance of the blanket depends on the folds - one fold forms the product from dome parts, two folds at the edge will give the product’s components the appearance of a cube;
Kids of all ages love bonbon blankets - if the base is increased to 5 centimeters (in addition to taking allowances into account), shrinkage of the product will not harm the appearance;
- You shouldn’t skimp on the filling – the better quality it is, the more airy the sewn blanket will look;
- the pattern of the blanket can be drawn in advance in a special program for a PC, or you can create a sequence of colors and the arrangement of squares in rows on a sheet of paper - for clarity, you can use colored markers, pencils or felt-tip pens to see what the pattern will be in color;
- For children, it is ideal to make a blanket exclusively from light cotton fabrics - they do not cause allergies and it is pleasant to spend time on them, play, and relax.
Useful ideas
First stage
We begin to cut the fabric from which we will have a blanket. We fold the fabric in half in width, align it, since it is very important that our squares turn out even. We apply a pattern, which is 21 by 21 cm, and mark it with a pencil or chalk.
Let's start cutting the strips. We lay out our strips and place them on top of each other so that we have the fabric on the right side. We apply our large square again and begin to mark with a pencil.
We continue to cut, be sure to cut off the unnecessary edge. Now a very important point: after you have cut and laid out squares exactly on top of each other, you need to mark serifs on them. Make serifs on your pattern, exactly in the middle. WITH
make it a small triangle , so your pattern will serve you longer. The serifs are extremely important, since in the future we will use them to see where the fold needs to be made.
Tips for caring for the product
Despite the delicacy of the design, the bonbon blanket does not require maintenance. The filler, which is located in separate cells, is not prone to deformation or change in location in the product. These blankets are machine washed at 30 degrees. If the bonbon blanket has significant dimensions (more than 2 x 1.3 m), it is better to dry clean this product.
When using cotton wool to fill a blanket, clean it only dry
How much does it cost and where to buy
The price range is quite large. A small blanket for children can be found for RUB 1,000, while a double blanket for adults can approach RUB 20,000. Buy from an online store or a regular one that sells bedding, the choice is yours. An individual design can be made by a craftsman to order. If you want, it’s easy to make a bonbon blanket yourself; you just need a little persistence.
How difficult is it to do: what's wrong with the instructions?
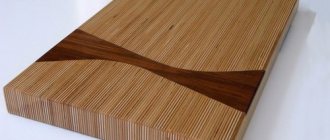
How to make a plywood table with your own hands, step-by-step guide
No matter how many descriptions there are on the Internet, they are often so confusing that if you follow such instructions, it is difficult to achieve a good result. Sometimes it seems that the production resembles the stitching of linen with the addition of padding. In fact, making a Bonbon blanket is much simpler. This does not require tedious drawing of the base, alignment of edges, or grueling adjustment. If you follow the instructions of professional craftswomen, everything is quite clear and uncomplicated.
The bottom line is this: initially the bombons themselves are prepared, which consist of two squares of different sizes (the larger ones are combined with smaller ones made of gauze, laying folds in the centers of each face: that is why the squares look round).
Then they are ground down on all sides, connected in rows, and then into a single piece, not forgetting to sew a braid with pom-poms along the edge. Afterwards, they are stitched together with a base insulated with padding polyester in the form of a curly stitch. Then they make small cuts from the inside out, fill the bombons with stuffing, “close” the holes with hand stitches, turn the blanket inside out, and close the turning allowance with a blind stitch.
You can watch a master class on sewing a Bonbon blanket with your own hands in the following video.
Beautiful interiors with a bomb blanket
Features of combining beds with carriage frames with interior styles
Since a textured “biscuit” style blanket is unique in itself and immediately attracts attention, it is preferable to make some connection to existing interior items
The style can be expressed through the print of bombons, their shades, special elements (for example, bears, suns indicate a children's theme and the young age of the user). Styles for older children are made with a less bright print, but the emphasis is on color: for example, it can be repeated in the tone of curtains, wallpaper, table lamp shade, flower pot, painting design.
You should not be overzealous with one color, flooding the entire area of the room with it: an excess of color negatively affects the design idea, creating a depressing atmosphere.
To make the blanket look beautiful in the interior, we must not forget about the size of the squares. Small ones are universal and fit perfectly into the overall picture; large ones create the illusion of decorative pillows laid in rows.
This blanket looks beautiful in a variety of styles. The most typical design option is country (if the model consists of bright colors). To fit a product into classic or modern style, you will need to make it monochromatic without additional decor.
The Arabic version is also possible: gold trim, a slight repetition of the color combination of the room, a maximum of two colors - and the blanket from “A Thousand and One Nights” is ready!
If you want to show luxury, you should choose expensive textiles with companions (one unloading monochromatic, connecting the other two with a pattern). Every little detail matters: the print should be premium, lace, but not colorful.