We have already told you how to make a cheap and simple frame greenhouse using PVC pipes. But greenhouses and sheds are not all that can be made from PVC and aluminum pipes of different diameters. Furniture, decorative items for the home, organizers, shelving, even weapons are beautiful bows of different shapes. People's imagination is constantly being embodied in new PVC forms, and we have made a selection of the most interesting DIY projects for you.
Let's start with homemade furniture made from aluminum and PVC pipes connected with fittings. There is both children's furniture and options for adults, cute designs that will fit into any interior, and shelving with many shelves.
Tools and materials required for work
Depending on the type of furniture that you plan to make, the set of materials and tools may vary. But basically the following tools will be required for the job:
Read also: Aliexpress Mall in Russian
- perforator;
- screwdriver;
- hacksaw;
- scissors or knife.
Materials required for work:
- pipe cutting;
- glue;
- connecting elements of different shapes;
- stubs.
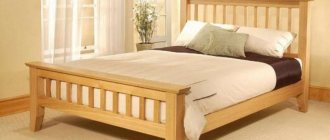
To make furniture look more beautiful, paint is useful. Beds, tables, shelves can be painted in the color you like. For beds in the children's room, choose delicate pink, blue, bright orange, yellow shades.
PVC materials
Soldering iron for welding plastic pipes
Variety of types of plastic pipes
Types of plastic pipe connections
Stages of the plastic pipe welding process
Connecting elements
Polypropylene or PVC is widely used in areas such as baths, kitchens, and toilets. But besides plumbing tasks, they can serve as an excellent basis for creating original pieces of furniture.
Quite often you can see something like this:
- shelves;
- awnings;
- folding chair;
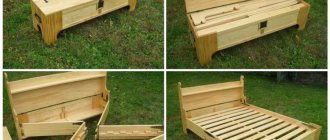
- bunk bed;
- stool;
- swing;
- rocking chair;
- racks;
- hangers;
- whatnot;
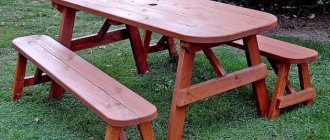
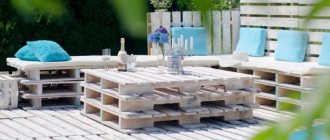
- garden furniture;
- arches, etc.
Looking into your garage or storage room, you will probably find a lot of scraps from old plastic pipes that turned out to be unnecessary after renovation. And for some reason you were in no hurry to throw them away.
I think you just knew that sooner or later you would read this material, and there would be an irresistible desire to make something out of them. But what exactly is still an open question. I would like to start not with what to do, but how to do it.
Let's sum it up
Don’t rush to throw away pipe scraps, because it’s easy to make high-quality modern furniture from these materials. If you have any questions about assembly work or want to learn more interesting things, watch the video in this article.
Did you like the article? Subscribe to our Yandex.Zen channel
November 29, 2022
Furniture,Pipes
If you want to express gratitude, add a clarification or objection, or ask the author something, add a comment or say thank you!
Assembly steps
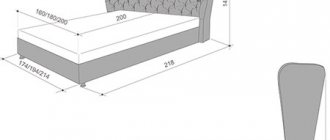
First, we determine the dimensions of our future rack. Here are some recommendations:
- for storage rooms, the height of the shelf should be at the ceiling, the depth should be at arm’s length (to make it convenient to reach the item);
- if the rack can be approached from both sides, then its depth can be increased;
- for storing tools: height – 2 m, depth – 50 cm, number of shelves – 4, distance between them – 45 cm;
- for storing canned food, the step between the shelves can be reduced (up to 30 cm), and their number can be increased.
Typically the dimensions of the shelf are:
- 180x50 cm – with 4 shelves;
- 200x60 cm – with 3 shelves;
- 180x50 cm - with a high bottom shelf, the rest - in increments of 35 cm.
Of course, these dimensions are not absolute; they can be changed when making them yourself.
When this stage is completed, prepare the drawing. As a last resort, a diagram. But be sure to indicate the dimensions that need to be maintained during assembly.
Important! Always practice safety precautions, especially when working with sharp objects and power tools. Do not neglect the protective cover on the angle grinder. To protect against plastic and metal dust, use a respirator and goggles.
When this documentation is ready, production can begin.
- Cut the profile into equal sections. If this does not work, bring it to the desired length by grinding the end of the workpiece.
- Clean off burrs and chamfer.
- If the pipes will be connected with fittings, the protective varnish must be removed from the ends of the workpieces. To do this, use sandpaper again. In addition, a rough surface adheres better than a perfectly smooth surface.
- Start assembly with the vertical posts. Then connect them with cross beams. Fasten the parts together in the desired sequence. The method of fastening depends on the material of the workpieces and the type of connections.
- Be sure to use a level - the product must be level. The more often the checks, the fewer errors.
- Using this method, assemble the entire frame.
- Install shelves. If the fastening is through, then the frame is assembled to the height of the lower shelf, which is then placed on the pipes. After this, grow the frame to the desired height.
- If the bookcase is high, secure the top crossbar to the wall with anchors.
- Once the shelving is assembled, paint it. Preferably in several layers.
The structure is ready. Both plastic and metal shelves are assembled using this system. A homemade rack does not have to be rectangular; it can also be made angular. The general assembly technology does not change.
And finally, an important tip. Load both factory and homemade shelves correctly. Place heavy things on the lower shelves, light ones on the upper ones. Periodically inspect the fastening points, because this is where destruction begins.
Rack
Making a rack from wood or metal is expensive, time-consuming, and requires practical knowledge. It’s easy to make such a necessary item for storing various household items, canned foods, and tools.
By connecting several pieces of pipe in the required order, you can get a practical and inexpensive rack.
Comparative table of materials used.
| Indicators | Tree | Metal | Polypropylene pipes |
| With constant contact with humidity | Gets wet. It is necessary to separately cover it with a protective layer of impregnation. | Corrosion occurs, rust appears | Tolerates any level of moisture |
| Price | Accessible | Expensive | Accessible |
| Required Skills | Have basic carpentry skills | Perform welding work | Simple process even for beginners |
At the first stage of production, you need to draw up a diagram with dimensions. The dimensions of this product depend on the ceiling height of the place where the rack will be installed. Having prepared the necessary elements according to the drawing, they should be connected.
It can be either quite modest in size or a real giant.
Shelves will be needed. They can be made from plywood or chipboard. Attached using self-tapping screws. It is better to carry out the work at the place where the product will be located.
If the rack is located in the living room, then the pipes can be painted, and glass or plywood can be used as countertops.
Selection of construction and design
Glamorous pink laptop stand made of plastic pipes
Furniture manufacturing begins with the choice of design and its design implementation. You need to start from the function that the furniture will perform. Then select the design parameters:
- collapsible or solid;
- dimensions of the entire product;
- number of elements and their sizes;
- method of connecting parts of a structure.
Convenient bar counter for a summer residence made of plastic pipes
When thinking about design, you can be inspired by looking at furniture magazines and catalogs, and websites about furniture on the Internet. It will not necessarily be furniture made of polypropylene pipes. Original ideas may arise when viewing furniture options made of rattan, wood, and metal.
Storage stand made of plastic pipes for the boiler room
This stage of work ends with drawing up sketches, determining the necessary materials, and drawing up cost estimates. In this case, it is necessary to take into account how you can use those materials that are already available, as well as availability if materials need to be purchased.
Large and beautiful table with legs made of PVC pipes
What materials are needed
Necessary materials for creating furniture from PVC pipes
After the design is selected, it is necessary to draw up a list of materials and tools needed to create the craft. For this you may need:
- plastic pipes;
- fasteners: glue, screws, self-tapping screws;
- fitting.
Stages of the plastic pipe welding process
Plastic pipes are easy to cut. This leaves a sharp edge with burrs that must be cleaned off. Just cut the thread. When heated, polymer pipes bend well, retaining their new shape after cooling. Sometimes it is easier to bend the frame rather than assemble it using pieces of pipes and fittings.
Plastic pipes of various shapes and fittings for them
Plastic pipes come in several types. They all differ in price and ability to withstand different loads and temperature conditions. Knowing the properties of each type of pipe, you can make the best choice and save money.
They are divided according to purpose:
- plumbing
- sewer.
Variety of types of plastic pipes
From the point of view of making furniture and useful household appliances, sewer pipes, unlike water pipes, benefit from a lower price. They are manufactured in large diameters.
Based on the type of polymer from which the pipes are made, they are divided into:
- polyvinyl chloride (PVC);
PVC pipes of different diameters and colors
- polyethylene (PE);
Large diameter polyethylene pipes, straight and corrugated
- polypropylene (PP).
Polypropylene pipes and fittings for them
They differ slightly in properties. Polyethylene behaves worse at elevated temperatures and under the influence of sunlight; it is elastic. Polypropylene pipes are more durable and rigid. A positive quality of PVC pipes is their increased resistance to chemical attack and reduced flammability. They tolerate ultraviolet exposure very well. The difference in the performance characteristics of polymers in most cases will not be critical for the manufacture of furniture. But differences in price are a factor that should be taken into account. The most expensive are polypropylene. PVC pipes have the optimal price-quality ratio for creating furniture structures.
In addition, pipes can be reinforced or unreinforced. Polymer pipes are most often reinforced with fiberglass or aluminum. The reinforcing layer is soldered between two layers of polymer. This is done to increase strength, rigidity, and reduce linear expansion when heated. Polypropylene reinforced pipes are used for hot water supply. The letters RC are added to the designation of a reinforced pipe. They can also be distinguished by their appearance. In addition, some manufacturers apply a colored stripe along the pipe, informing about the scope of application of the product. Pipes with a blue stripe are used for cold water supply, with a red stripe for hot water or coolant pipelines. The presence of both stripes indicates the versatility of the pipe. It should be borne in mind that reinforced pipes, although stronger, are much more expensive. Make a decision on the advisability of additional expenses for the master.
Trolley with mounting made of plastic pipes
Crafts for the playground
Original crafts made from PVC pipes can also be made for a yard playground: a small playpen for a baby, a collapsible educational mat, a light swing for children under 5-6 years old, a plastic sled of an original design, a collapsible goal for playing hockey or football, a small playhouse, an open shower stall for summer use, a theater screen for impromptu home theater performances, and much more.
A playpen made from plastic pipes can be assembled in a couple of hours if you have a special soldering iron. You will only have to purchase the required number of corners and crosses for the segments to connect the partitions to each other. The design is simple in that it does not require a floor.
Plastic swings must be assembled from polypropylene pipes with a diameter of 32-55 mm, or from large-diameter metal-plastic pipes. To make the structure rigid, metal rods of suitable diameter are inserted into the supporting pipes - they will not make the portable structure too heavy, but will make it as safe as possible for children. For a chair of such a swing, you can cut out a sheet of OSB and bolt it to the frame. To make a stationary swing with your own hands, it is enough to drive iron rods into the ground, onto which the main skeleton of the structure will be mounted.
The sleds made from PVC pipes look very original, and the seat for them will be the same OSB or chipboard sheet. Due to the short length of the connected sections, such sleds will be very durable. You can bend polypropylene sections on the front of the sled using boiling water - you need to lower a piece of pipe into boiling water, keep it in it for 20-30 minutes, and then, until it cools down, put the pipe on an iron rod and quickly bend it as needed . Leave for several hours until it cools, and the bent element of the sled is ready.
A playhouse made from plastic water pipes can be complicated to the point of a castle - make a drawing, and your kids will have a transforming house from which they can assemble anything - from a swing to a crib. The roof and walls of the house are made of thick fabric or opaque polyethylene. And to make the children feel like they are in a real house, provide lighting there and make furniture - two or three chairs, a table, a cabinet. Children will find it interesting!
Making a shower is very simple - assemble a quadrangular frame on the corners, and you don’t even need to mount a sprayer - just drill many small holes on the long sides of the upper pipes, through which water will create many jets. And the pipes of the made frame will serve as a water supply route - connect water from your home or an outdoor storage tank with a pump to create pressure. And if you make this building higher, then you yourself can refresh yourself in it.
DIY coffee table made from pipes
Loft furniture will always be popular because it is not just a fashion trend, but a special character of the interior. Metal and wood are hallmarks of industrial style. Threaded steel pipes form an ideal pipe that is very easy to assemble with your own hands. Calculate the number of parts needed and their length, then use the connectors to assemble the frame. Spray paint the frame and attach the plywood table top. You can leave the homemade pipe table as is or apply a clear varnish. Plywood is a better choice for the top because it is less expensive than planks.
To assemble the frame, connect two 20 x 200mm pipes using T-fittings for the legs.- Then make brackets from 250mm pipes and screw them to the T-fittings for the legs.
- Connect the legs with a crossbar made of 900 mm pipe. Attach the end caps to the bases of the legs.
- Apply a coat of primer to the frame, then apply 2-3 coats of spray paint. Tip: When spraying, wear a protective mask and work in a well-ventilated area.
- To attach the coffee table top, use a circular saw to cut a sheet of plywood to measure 1000 x 750mm.
- Lay the top face down, center the frame, and attach with screws through the exposed elbows.
- Sand the surface with sandpaper and apply a coat of clear varnish.
Little things for the interior
- From scraps of products you can construct an organizer for an office or workshop. The reliability of the craft is determined by the connection options: self-tapping screws to the surface of a table or wall, or gluing structural parts together. The first option will be stationary, the second – mobile (portable). It is better to take white or gray pipelines;
Plastic pieces of small diameter will make a beautiful and original stand for a tablet or netbook;
What else can be made from pipes? For example, shelves for books in modern or high-tech style, photo frames or mirrors;
Large-diameter scraps will make a shoe rack with compartments, and smaller-diameter pieces will make a flower stand. In order to make flower pots with your own hands, you will need products of a very large diameter - from 100 mm and above. Such country crafts made from polypropylene pipes can be placed both indoors and outdoors; Usually these are sewer elements;
A floor vase of any length, decorated with any patterns, can even serve as a gift to a friend. To make a vase, take pipes for water supply or sewerage systems of medium diameter, and you can make such a vase as a set - insert the trimmings one by one, using each subsequent segment of a smaller diameter;
An indoor or outdoor spotlight with a minimum of decoration will fit perfectly into a techno-style interior;
A hanger, a holder for things, a chair or table, a rack, a shelf, a bookcase, a shower, a sprinkler - there are so many ideas for a country house that you can’t remember them all, it would be a fantasy;
A garden house can be equipped with a homemade storm drain from pipes cut in half lengthwise and connected with glue or bolts into one long drainage gutter.
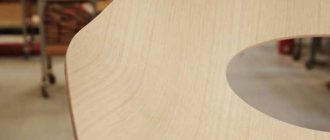
How to bend a pipe
Products made from this material look unusual. They will look even more interesting if they consist of curved parts. For example, a table with curved legs. In addition, various decorative elements are made from pipes, which come in different shapes. In such cases, bending the pipe is simply necessary.
For this you will need:
- funnel;
- sand;
- scotch;
- plate;
- metal containers;
- gloves;
- saw (hacksaw);
- knife (scissors);
- sandpaper;
- a device for bending pipes (there are different types, mostly improvised materials are used).
The process looks like this:
- cut a piece of the required length;
- cover one end with tape;
- using a funnel, pour in as much sand as will fit;
- heat a measured amount of sand in a metal container;
- put on protective gloves for safety, carefully pour sand into the pipe through a funnel;
- Seal the other end with tape, then the sand will not spill out during the bending process;
- leave it for a while, it will warm up from the inside;
- when it warms up, start bending;
- give the pipe the desired shape;
- at the end of the work, tear off the tape and pour out the sand;
- When the pipe cools down, it will be in the required shape.
How to make a table from pipes
Who would have thought that furniture made of galvanized pipes could take pride of place in the interior of your home. Do you want to learn how to make a table from pipes with your own hands ?
Here's how it's done.
Attach two hex nipples to the 300mm pipe. This is the top bar. To make the legs, attach two 150mm pipes to either side of the T. Attach a round cap to one end. Repeat to make the second leg. Then attach the legs to the crossbar. Make sure the open ends of the T line up in the same direction, at a 90° angle to the crossbar.
Materials and tools
You can make furniture using metal elements, but it’s easier to make items from plastic ones yourself. Before starting work, you should decide in what conditions the furniture will be used. Because polyvinyl chloride is cheaper than polypropylene, but less durable and cannot withstand high temperatures.
Therefore, pipes made of polyvinyl chloride cannot be used in saunas, and furniture made of polypropylene elements can be placed in the dressing room without risk. After all, the material can withstand temperatures up to +60°C.
There are always leftovers after renovations, and these materials can be put to good use. Fragments of plastic systems - several tubes, fittings - are perfect for making furniture.
To carry out the work you need to stock up on the necessary tools and materials. The main thing you need to make furniture is a hammer drill and a good hacksaw, preferably for metal. It is universal and suitable for cutting both metal and plastic. In addition, you need a screwdriver and a sharp knife.
The materials on hand should be the water pipes themselves, they will need to be cut to the required sizes, connections, plugs, glue, paint for subsequent decorative finishing.
When working with metal water pipes, the main tool will be a grinder, which is used to cut parts to the required parameters. Plastic elements require connecting elements, fittings, and plugs.
What will you need to make furniture?
Assembling PVC furniture with your own hands is not at all difficult - you will need a minimum set of tools, basic skills in working with them and a little creativity. The result will definitely be comfortable chairs, armchairs, shelves and even tables - the range of possible products is limited only by your imagination.
The assembly process will take no more than an hour for each item - and this includes design. By the way, in order to quickly figure out how to shape this or that piece of furniture, on our website you can see a variety of photographs of plastic products. For example, the photo above shows a very convenient and stylish rack for books and magazines, and when complemented with flat shelves, other items can be placed on it.
The minimum set of necessary tools is as follows:
- roulette;
- marker;
- hacksaw for metal.
Other items that can be found at any summer resident may also be useful - a file for smoothing cuts of plastic pipes, a drill, a soldering iron. But, for example, a level is not needed - all the parts, as when assembling ordinary water pipes, will be connected with special fittings - it will not be possible to deviate from the desired angle no matter how much you want. Because of this feature of PVC products, separate fasteners - screws or glue - are not needed.
Important: despite the fact that working with products made from polypropylene pipes is very safe, you should use protective equipment - goggles and gloves.
Process of working stages
- First we need to take the boards of the required sizes. Length as desired, width preferably about 20 cm. They will definitely need to be thoroughly soaked with an antiseptic.
- We install a rectangle of boards on the previously leveled ground, securing it at the corners with reinforcement, which we drive into the ground. It must be the correct shape. We can check this using the diagonal of the inner rectangle.
- Next, we need to attach pieces of reinforcement to the sides (those that are longer) so that we have 50-70 cm left on the surface of the earth. It is on them that the arcs will be attached.
- We divide the width of the base approximately in half, while marking the middle of the board with a marker. We must retreat from it 40 cm in each direction, while we also hammer in a board from the outside.
Related article: Is sleeping on the floor beneficial or harmful?
Section No. 4: sheathing
The steel “skeleton” is certainly very strong and stable, but it cannot be called particularly beautiful. It lacks coziness, and I used particle board to give it to the finished structure. For the purpose of decoration, this material will cope quite well, since the load-bearing functions have been removed from it.
Range of laminated particle boards with finished edges
My actions:
Scope of work on decorating a metal bed
- I screwed elongated thin laminated chipboard panels to the sides of the frame with M6 furniture bolts 7 cm long . At the same time, their finished edges were raised above the structure by several centimeters, due to which small walls were formed;
- A wider panel was similarly attached to the front part of the frame in such a way that its lower edge dropped almost to the floor;
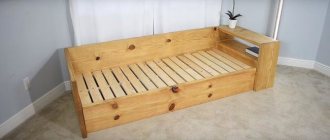
- At the back, where the pillows would presumably lie, I installed a wide canvas, which also forms the headboard of the bed;
I recommend pre-upholstering the back panel with foam rubber and covering it with fabric. This will make it much more convenient for you to lean on it during operation.
- placed an orthopedic mattress in the resulting box , on which all the work on assembling the bed from a profile pipe was completed.
Frame covered with laminated chipboard panels, with an orthopedic mattress placed inside
Of course, you can choose other materials for cladding, or even leave the steel uncovered and simply decorate it using other methods. Everything is in your hands, and the manifestation of originality in this case is only welcome.
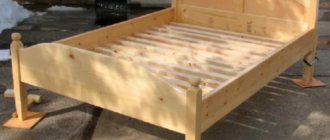
A profile pipe can make an aesthetically pleasing bed even without particle board covering