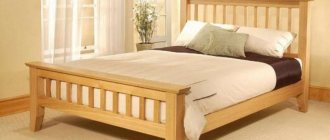
firewood holder photo
What could be better than spending a winter evening by the fireplace? The flame will warm you with natural warmth, and the cozy crackling of logs will add comfort and create a unique atmosphere. The only problem is that at some point you will have to go outside to get firewood. And most likely, they will need to be dried first, so it is much more convenient to have a supply of firewood on hand so that it will last at least for the evening.
There is a solution - make a firewood rack for the fireplace with your own hands , it’s not that difficult. Of course, there are two options: buy or make it yourself. You can look at the prices for accessories for fireplaces in the catalogs of online stores, after which you will most likely choose the second option. Now think about what exactly you need - a stationary firewood stand or a portable one, and, of course, how it will fit with the overall design of the room. Here are homemade firewood holders for fireplaces and stoves . There are interesting ideas for racks made from water pipes and simple wooden structures, and no complex projects, everyone can do them all with their own hands.
Style solutions
When purchasing a fireplace, a firewood rack is often included in the set.
This is a very nice bonus, and quite a profitable option, because such components for the fireplace are made in the same style and design. Very often such firewood racks are portable, which is also a big plus. In addition, a fireplace or stove and firewood rack, made in the same style, will look great in the interior; they will add a special zest to it. A vertical mini firewood rack will look very stylish and tasteful. It will become not only a stand for storing firewood, but also an excellent addition to your cozy home. It will look ideal next to the fireplace or stove.
When choosing forged firewood racks, you can choose not only intricate and openwork options, but also those made in the style of minimalism. The main thing is that all firewood racks made of metal will be a very good solution for your country house. Not only based on aesthetic needs, but also on safety grounds.
An unusual solution could be to choose different abstract firewood racks for your home. For example, a wooden firewood rack in the shape of a Christmas tree will look very interesting. Most manufacturers of fireplaces, stoves and accessories offer a huge range of different firewood holders. For every picky taste. You can definitely choose what you need. And if you want to make your own individual design, you can easily try to make a firewood rack with your own hands.
Very often fireplaces already have “built-in firewood holders”. Places for storing firewood. With this option, additional firewood is most often not needed. If you are planning to build a fireplace yourself, then it is quite possible to make a place to store firewood in its lower part.
Fabric structures
Fabric carrier for firewood
Baskets can be made of fabric. A bag is the easiest option for those who are at least a little familiar with patterns and sewing. For its manufacture, any dense fabric is selected. It can be drape, wool or other material. Such a basket plays more of a carrying role, since holding a fabric structure near a fire is dangerous.
Despite the ready-made designs offered, it is better to do it yourself, giving the product exclusivity and using it as an additional accessory in the interior. To do this you will need a small piece of fabric in the shape of a rectangle. Depending on the density of the material, it can be used in one or more layers.
Kinds
The firewood storage stand can be stationary or portable. A special firewood shed is built outside, in which the entire supply for the winter is stored, and a smaller portion is brought into the room. To fire stoves, not only firewood is used, but also special long-burning artificial briquettes or pellets.
When laying out a fireplace with a classic shape or in a country style, you can lay out a special niche in which you can then store fuel. A fireplace bench with a recess or shelf is also an excellent solution for storing fuel. The size of the portable firewood rack is selected so that it is comfortable and easy to carry. Stationary storage structures are heavier and can hold more firewood.
Firewood boxes can be made of brick, stone, metal, solid wood, plywood, cord, glass, and combinations thereof. They can be decorated with various decorative elements and decorations. Stores sell ready-made fireplace kits, which include firewood holders and other necessary accessories. This set can be easily made with your own hands. Among the additional parts for fireplaces there are also ceramic firewood, but it is strictly forbidden to burn with them - they perform a purely decorative function.
A forged firewood box with a metal bottom is very popular: it can be combined with fireplaces of any style, can have different shapes and designs, has significant weight and looks attractive in the interior with or without firewood. To reduce the weight of the structure, sometimes they make a holder without a solid bottom, but only with a grate. Its disadvantage is that dust and sawdust will fall directly onto the floor.
A firewood carrier woven from thick non-flammable cord or knitted looks original and homely. You can also sew it from thick fabric, for example, thick drape with a suitable texture. Baskets and boxes woven from wicker, rattan or artificial materials are also popular. Numerous manufacturers offer branded luxury holders made from non-standard expensive materials, for example, tempered glass and chrome-plated steel in a high-tech style.
Wooden fuel boxes made of oak or plywood, coated with varnish or paint, are perfect for country houses and rustic-style interiors. Any box or bucket, if desired and with minimal skills, can be turned into a vintage or modern log holder, decorating it to your liking. You can also buy or assemble racks or shelves from boards or light beams with your own hands, place them in a corner or attach them to the wall.
Firewood for a bath: what is the difference?
It would seem that it will also stand on the street - how does this design differ from an ordinary firewood box? Let's figure it out.
Unlike traditional storage, the sauna structure is always smaller and is built next to the entrance to the steam room.
Building some kind of massive barn is completely pointless. You simply build a local shed and put in it the amount of firewood needed for 2-3 fires. A wall canopy is the simplest and most affordable way of arrangement. The approximate number of logs is at the level of human height, but the length can be different and directly depends on the length of the bathhouse itself.
To mark the corners, thick bars or metal rods are driven into the ground. The sides are filled with slats and boards. You can also secure the chain link. Sometimes even two corners are enough - the rest will be replaced by a wall.
Once the walls are ready, you can begin building the floors. In this case, it is also better to make the roof pitched to ensure uniform drainage of water after rain. We lay construction pallets on the bottom or assemble lathing. Our firewood will be placed on it!
Firewood at the bathhouse
Proper storage of firewood is the key to your safety, a good indicator of housekeeping and decoration of your home or site. Firewood racks look especially great in homes. They create comfort, are able to emphasize the individuality of the interior, and ensure order and cleanliness.
23e96d03d0c83cea9ea54ce7d296d8f8.jpe
Main types
A firewood stand located near the stove or fireplace is called a firewood rack. It performs two functions at once: it is a device for direct storage of firewood and a decorative piece of furniture. Usually there are a couple of stacks of firewood by the fireplace or next to it, allowing you to calmly light a fire and lightly heat the room; this is quite enough. A dry log burns well, but wood brought from the street is not always ready for this.
Conventionally, all devices for storing timber can be divided into the following types:
- Street options. To store firewood outdoors, small structures in the form of sheds are most often built. These sheds protect the forest from precipitation, and at the same time give it the opportunity to ventilate and dry out, since there are cracks in the walls of the structures. In addition, the wood is not placed on the ground or floor, but on a prepared base that prevents moisture from getting on the firewood. In some cases, the woodpile is made in the form of a canopy, which is fixed to poles. The canopy protects the firewood from precipitation, and the absence of walls allows the firewood to dry from the wind.
- Room solutions: stationary and portable. It is not possible to fully store firewood in the house due to limited space. You can organize a small storage area under the stairs, but it is better not to take up precious space with wood. Most often, next to the stove or fireplace there is an improvised woodshed for a small amount of firewood with which you can light a fire and heat the room. This firewood box can be part of the stove itself, there can be a fireplace with a firewood box on the side or with a stand inside, a small storage can be made in the form of a shelf for firewood on the wall. The firewood holder for the fireplace can be placed separately and look like a full-fledged decorative accessory. In stores you can find options made of wood, metal and plastic; beautiful forging is often used. The simplest may be a portable option, for example, an ordinary wicker basket, with which you can easily go to the barn to replenish your supply of firewood.
Set of forged accessories for the stove
You can make a woodshed for firewood yourself, or you can buy a ready-made version in a specialized store, matching it to the interior of the entire room. Typically, such devices are made of either wood or metal, although plastic structures are also found.
The dry and warm microclimate of the house allows the firewood to be always ready for use. However, when bringing another stack of firewood from the street, you should often dry it a little so as not to start a fire with damp logs. Stationary solutions are great for this, when the firewood for the fireplace is located in close proximity to it.
For example, you can make a niche right in the wall next to the stove into which you can load wood for storage and drying. If the size of the stove or fireplace is large, you can consider the option of having a niche right in it. Typically, such a niche is located at the bottom of the fireplace or stove, conceived even before laying, in the process of developing the appearance of the entire structure.
Wood storage space at the base of the fireplace
Varieties and characteristics
Woodsheds can be of different designs:
- open, made of wood in the form of a canopy;
- frame made of bars;
- from old barrels;
- from pallets;
- made of timber, metal, boards, plywood or PVC sheets.
In urgent cases, owners of personal plots cast a concrete platform or lay reinforced concrete slabs. This work is not cheap, but such wood burners are reliable and of good quality. The most common option is adding gravel; this is quite enough if you place a woodpile of firewood on sheets of roofing material. The site is also most often fenced with a border made of reinforced concrete blocks or timber impregnated with primer or antiseptic. The beginning of work begins with the development of a plan diagram of the future facility and calculation of the materials that will be required.
A wood shed usually has three walls and a roof. You can make a woodshed-shed in the form of a gazebo. The design has a claim to originality; it can be decorated by attaching decorative details. The roof is made at an angle of at least 20 degrees so that moisture flows freely onto the ground. This design will reliably protect the firewood. Good ventilation ensures that moisture in the form of condensation does not accumulate on the wood. Such a facility can be built next to the main house or erected behind the bathhouse.
The advantage of such small woodsheds is also that there is no need to cast a strip foundation; it is enough to install two pillars in the corners of the site. The material for such supports can be:
- corners "6";
- wooden logs;
- profile pipes 150 mm;
- timber
The walls can be made of boards 20 mm thick. Between the vertical fastenings from the inside, diagonal and transverse fastenings should be made. During the cold season, snow will accumulate on the roof, therefore, the load on the roof and vertical supports will increase. It will be necessary to strengthen them with spacers and fastenings. Also, a rigid frame from corners should be made under the roof. This element will also provide additional rigidity, connecting all elements into a single support unit. You can make such a structure in a couple of days, but the woodshed can last for decades. You only need to periodically carry out small preventive maintenance.
Among modern materials for building a woodshed, polycarbonate is popular. Its sheets are durable, do not corrode, do not deform due to changes in temperature and humidity, reliably protecting the material from precipitation. Sheathing the walls with polycarbonate is not a bad idea. The weight of such a structure will be minimal, the walls will be strong and the fuel will not rot due to changes in temperature and humidity. For better ventilation, gaps of 2-4 cm in size are often left between the sheets. Some homeowners decorate such woodsheds with forged fragments. The most important thing in creating such structures is to create a structure with high-quality natural ventilation.
Professional builders recommend building a woodshed on the north side of the house. The reasons for this are:
- no direct sunlight;
- the northern side is traditionally cold and the woodshed can be an additional “heat” zone.”
An important point when creating a roof is that it should protrude by 25 centimeters, no less, so that moisture, when drained, does not fall on the firewood. The roof is made using the following materials:
- slate;
- roofing felt;
- metallic profile;
- polycarbonate
Woodsheds are also built on a pile foundation, which is not inferior in strength to a strip foundation. Its advantages:
- making a pile foundation is much easier;
- no shrinkage time required;
- its cost is four times lower.
You can buy any piles in a store or make it yourself. Alloy tubes (piles are usually made from them) are easily screwed into the ground, their service life exceeds 50 years. Between the piles it is necessary to make a “cushion” of gravel, lay the gaps with timber or concrete blocks of 20x20 cm, make transverse fastenings, then sheathe the walls with sheets of polycarbonate or flat slate.
Before constructing a facility, the groundwater level should be studied. If the site is located in a lowland, then groundwater may approach the surface. In this case, you should make a “pillow” of gravel 20-25 cm high. The tools that will be needed in this case:
- Boer;
- Bulgarian;
- pliers;
- hammer;
- small sledgehammer;
- drill;
- screwdriver
Many people make various additional structures on the roof of the woodshed:
- terrace;
- flowerbed;
- a small greenhouse.
When creating a woodshed, it is important to correctly arrange the logs, which at the same time can become a decorative element. Forged cast iron products go well with wood
Methods for stacking firewood
The generally accepted methods of storing firewood are from above and from below. The main principle of stacking firewood is to ensure that the structure does not fall apart or spill out due to unstable stacking of firewood.
There are three common ways to stack a woodpile:
- “Stack” (boards and firewood are stacked in rows parallel to each other);
- “Crate” (every subsequent upper layer of firewood is folded perpendicular to the lower layer);
- “Circular method” (laying firewood in a circle and filling the center with the same circular method, vertically or horizontally, since the middle will act as a support for the entire structure).
How to make a woodshed
It is not difficult to build such a structure; in many ways it resembles a free-standing firewood shed.
You will need the following materials:
- boards;
- plywood 20 mm – sheets 2.45x0.68 m and 1.2x2.5 m;
- roofing felt;
- tiles;
- screws.
You need to act step by step:
- Assemble the floor frame. This is a rectangular frame and several cross members.
- Secure the vertical support posts. The height on different sides should be different so that the roof is sloped. Attach the posts below the frame. To make legs.
- Cover the walls, attaching the planks horizontally.
- Prepare the boardwalk. Depending on the length, the material can be laid lengthwise or crosswise. Use galvanized screws to secure.
- Equip the frame for the roof.
- Prepare the rafters, maintaining an angle of at least 15°.
- Lay a plywood sheet on the rafters, securing it lengthwise with screws at intervals of 15 cm.
- Lay down roofing felt.
- Secure the shingles. The beginning of styling is the lower left edge. The tiles should protrude approximately 5 cm from each edge.
The final stage is processing and painting wooden surfaces.
If you need a closed structure, then you need to form a fourth wall. You can install a door or leave a wide opening. Its width should be such that a person with an armful of logs can easily get out.
Why are firewood logs needed?
Many people believe that firewood holders installed next to the fireplace perform a purely decorative function, and therefore consider them an optional element. However, they were originally intended for a completely different purpose - the final drying of firewood before loading it into the combustion chamber.
Decorative and functional portable firewood rack.
No matter what conditions the firewood is stored outdoors, before using it, it must be at room temperature for at least a day. At this time, excess moisture evaporates from the logs, due to which the heat transfer from their combustion increases significantly.
Thus, each subsequent batch of firewood is usually brought into the room and placed in the woodshed immediately after placing already dried logs in the oven (fireplace).
Fireplace with niches for drying wood.
Therefore, manufacturers of metal stoves and fireplaces provide special niches for drying firewood in many of their models.
But in order for the wood to quickly reach the optimal state of residual moisture indoors, it is also necessary to create the correct storage conditions for it outdoors.
A woodpile set up near the house.
Therefore, chopped firewood is placed in a woodpile. It will be best if the firewood is in a ventilated shed. But if this is not possible, a firewood shed is set up for the woodpile, which should also be ventilated. Its side walls must be left open. Well, if such a structure is installed along the wall of a house or outbuilding, then a distance of at least 50 mm must be provided between the surface of the wall and the firewood. Of course, an outdoor firewood shed must have a roof so that water and snow minimally fall on the surface of the wood.
9a0f655db2eba04f63e511bcca063312.jpe
d9028a1c9173edb8274745078f901792.jpe 3285569c7f91e104b775bc7c9dadc4cd.jpe 9beed075075601a6da7daaf17b564157.jpe
If the firewood box is installed in that part of the yard where no ground covering has been created, that is, on open soil, then it is recommended to raise the bottom layer of firewood by 100÷150 mm so that ground moisture does not penetrate into the wood. To do this, a shelf is installed in the lower part of the building or a layer of moisture-resistant material is laid out.
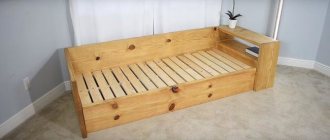
Outdoor firewood rack for a summer residence
Storing firewood in winter will not be a problem if you properly build a firewood rack for your dacha. One of the conditions is that the wood does not come into contact with the ground, then it will be in good condition. To make a firewood shed with your own hands, shown in the diagram, it is not necessary to buy new boards; in order to save money, you can use old pallets. To protect the firewood from rain and snow, cover the rack with a tarp, the air will ventilate the firewood and keep it in good condition.
You will need boards:
A - 7 pieces, 60 cm each
B - 6 pieces, 245 cm each
C - 5 pieces per meter
D - 6 pieces of 60 cm for side walls
E - 3 x 245 cm for the rear wall
- The first step is to make the floor. As shown in the drawing, nail the boards at even intervals and secure with galvanized screws. It is advisable to make the holes in advance so as not to split the boards.
- Install the uprights, you just need to screw the upright boards to the frame. Check them with a level so that everything is level, then it will be difficult to correct.
- The side walls do not need to be covered with plywood, although it is prettier this way. There should be good air circulation, and for strength it is enough to nail several longitudinal support boards.
- Cut the grilles to the correct size using a miter saw and pre-drill at both ends before installing the galvanized screws.
- When installing the side walls, use a tape measure; it is difficult to make an even structure by eye.
- Sand the edges with sandpaper.
- Finally, install the back strips.
Although the firewood rack for the dacha performs a purely functional role, it doesn’t hurt to take care of the appearance. Take the time to sand it, paint it, or, in short, give it an aesthetic appearance. Also, cover your firewood with a tarp before it rains.
Photo source myoutdoorplans.com/shed/diy-wood-shed-plans/
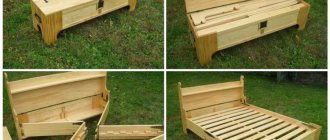
How to make a firewood rack without tools
Everything ingenious is simple. You can use this stand for many years, and nothing will happen to it. A very durable, stable, easily disassembled structure that can be assembled very quickly. The rack holds heavy, wet firewood without any problems.
What is necessary:
- 2 or 3 concrete blocks
- 2 thick bars
No special instructions are needed, the idea of the stand is clear, it can be seen in the photographs. Just a few tips from the author.
- place 2 concrete blocks on a flat surface, or 3 if you need support in the center;
- insert the racks of bars into the holes in the blocks, after adding some pebbles there to prevent dirt from accumulating;
- if the load on the racks is large, move them closer to each other;
- Place the logs along the outer edges of the blocks.
The last photo shows a double firewood rack with another block added. In principle, you can apply a lot more, judging by the comments, this is a very durable design. Another tip from the author about storage. Cut a 3 meter long piece of tarpaulin to cover the logs, take a couple of bricks and tie a string from one end to the other to hold the tarpaulin in the wind. The more firewood there is in the woodshed, the stronger it is. The stand is high enough off the ground so that the leaves are blown away by the wind and do not accumulate under the firewood. And what’s most convenient is that the stand is very easy to move to a new location.
Photo source www.instructables.com/id/No-tools-firewood-rack/
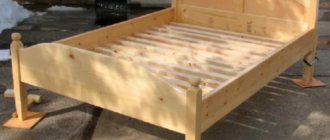
Here is another version of a similar open rack for firewood. Everything here is also very simple.
First you need to assemble the lower frame
Please note that both ends of the horizontal components must be cut at a 75° angle. Then drill through holes through the side boards and secure them to the beam with screws. Assemble the side posts by also cutting the bottom edges at a 75° angle. Then drill through holes and secure them on the sides with screws. Add glue to the seams and remove any residue from the surface with a damp cloth.. The last step, assembling the firewood rack
Leave a gap of 10 cm from the ground to the bottom frame. Drill through holes through the bottom frame and tighten the screws. Check with a level to ensure the bottom frame is horizontal. Place the rack legs on concrete slabs to protect them from moisture
The last stage, assembling the firewood rack. Leave a gap of 10 cm from the ground to the bottom frame. Drill through holes through the bottom frame and tighten the screws. Check with a level to ensure the bottom frame is horizontal. Place the rack legs on concrete slabs to protect them from moisture.
Photo source myoutdoorplans.com/shed/wood-rack-plans/
How to build a firewood shed?
When the canopy design has been chosen, the location for its construction has been determined and all materials have been found, you can begin to work. Regardless of whether the firewood shed is built at the dacha or near the house, whether it is wooden or metal, the sequence of actions will remain the same in any case. Therefore, we will give a number of recommendations without reference to one project or specific conditions.
To begin with, a homemade firewood box made of wood or other material is applied to paper in the form of a sketch with dimensions. Then, using this sketch, the structure is marked on site and it is determined where the frame supports should be placed.
The structure must stand firmly on the ground, and the flooring must be able to withstand the load of a stack of firewood. This means that we need to take care of constructing a small foundation. It is better to make it in the form of pillars using the following methods:
- wooden beams are dug into the ground to a depth of 1 m. The underground part of the beam is pre-coated with resin or bitumen, then it will stand quietly for up to 20 years.
- It is recommended that steel pipes be concreted in the ground. To do this, a hole 60-70 cm deep is dug, a pipe is inserted into it and jammed with stone fragments. Then the hole is filled with liquid concrete.
- concrete pillars can be made without formwork. The hole is made with a hand drill, the soil is selected, and before pouring concrete, a plastic film is laid inside. It will serve as a waterproofing barrier between concrete and soil.
The simplest firewood shed on wooden poles is erected immediately, but a concrete foundation takes time to completely harden. Construction begins with the installation of a deck with intermediate joists, followed by the assembly of the wall and roof frame. The last stage is covering the walls, laying the roofing and hanging the doors, if any.
73c95c3c53be43bed9522b173df70453.jpe 79e9330f630323ef426d7753b3c2fb6e.jpe
f2da1d140dd2490b9ffb64e14848e85a.jpe
Installation of a free-standing woodshed
The design of the product is similar. The difference is in two points - the canopy can be beveled in any direction, a foundation is required.
Please note that the diagram is similar to the previous one and can be used for a firewood shed adjacent to the house. Elements of longitudinal and transverse strapping have been added here
If desired, you can make the wall cladding continuous or sparse, including the front wall, and additionally hang the door.
The foundation in this scheme is shallow blocks or a shallow strip foundation.
The scheme with a gable canopy is also close to the previous one.
In this option, there is no sheathing as such - its role is played by crosspieces made of timber on the side walls of the woodshed. Instead of individual rafters, simple triangular trusses are used, and the role of the longitudinal strapping is performed by rafter beams at the top and timber flooring at the bottom
If trusses are used for a gable roof, they are assembled separately using a template and only then attached to the frame. Another difference between a design with a gable roof is that the ridge needs to be protected from leakage. For this purpose, additional elements are used, which can be purchased complete with roofing material.
Attaching the frame to the foundation
If the firewood shed is installed separately on a foundation made of concrete, brick or blocks, it is necessary to properly attach the wooden or metal frame to the foundation.
There are several options:
- mortgage with a U-shaped holder, used for monolithic bases. The mortgage is installed at the pouring stage, the frame is fastened after the base has reached its design strength;
- anchor bolts (dowels) on top of the waterproofing. To increase the service life of the support (crown) beam or board, lumber is impregnated with an antiseptic;
- studs to the foundation over the waterproofing.
The last two methods are applicable for both monolithic and block foundations. The first method is suitable for block bases to a limited extent, only when using a fastening profile with a supporting plane.
When using a foundation, there are two options for the installation sequence:
- first secure the racks to the foundation, then assemble the frame;
- fasten on the base of the post of the already assembled frame.
The first option is convenient for small point supports with already concreted embeds, since otherwise it is difficult to guarantee the correct placement of the posts. The second method is universal.
Types of woodsheds
To figure out how to make a firewood log, you need to get acquainted with its different types:
- Canopy. These outdoor firewood boxes are chosen for summer cottages; assembling them is not difficult. The process consists of preparing a floor raised above the ground, organizing at least 4 supports and a roof. To store large volumes, several sections are made, separating them with supports or partitions.
- Extension. It is stable and simple, with a building as the back wall. The important elements are a lower frame with an upper ceiling; it is not necessary to make walls. Such extensions are not recommended for wooden buildings, as they increase the fire hazard.
- Free-standing firewood rack for a summer house or home. It is stable and used for large volumes of fuel. There are different manufacturing methods.
- Mobile firewood for a dacha (at home). It is designed for small volumes of fuel and can be moved.
Simple country firewood
For a summer cottage on the street, you can build a simple structure with your own hands; it will cost little.
It is important to calculate the dimensions; you can use ready-made drawings or make them yourself
You need to prepare:
- on the lower frame a pair of one and a half meter boards and 4 0.34 m each;
- on the side posts 4 bars of 1.5 m each and a pair of 0.34 m each;
- for the rear crossbars 2 strips of 1.45 m each;
- drill with drills;
- hacksaw;
- level;
- pencil with tape measure.
If properly prepared, the process will take several hours. The algorithm is as follows:
- Cut out the parts to the required sizes.
- Make a frame. Assemble a rectangular frame from two long and two short boards. Use the remaining short strips as crossbars to keep the frame secure.
- Attach long pole bars perpendicular to the frame. Install them in the inner corners of the base. From below, the bars should protrude beyond the frame, forming legs.
- Using short bars, fasten the side racks at the top in pairs.
- Secure the rear crossbars. Without them, the structure will be unstable.
- For reliability, you can make a top floor or replace it with 1-2 boards.
Making a metal country firewood
For the woodshed, you can take a profile pipe. It will turn out strong. For a metal woodshed you will need:
- aluminum profile 2.5 m;
- a pair of L-shaped metal corners of the same size;
- self-tapping screws;
- hacksaw or grinder;
- angle grinder;
- roulette.
To get everything smooth, you need to use a level. The work will take several hours, the algorithm is as follows:
- Saw the metal profile in the middle.
- Cut one corner into 0.6 m sections.
- From the second corner, prepare 4 sections of 0.3 m each, the same number of brackets of 0.15 m each and legs of 5 cm each.
- Assemble the side posts. The vertical supports will be sections of 0.6 m each; connect them at the bottom and top with sections of 0.3 m each.
- At the bottom of the rack, connect parts of a metal profile - they will serve as the long sides of the frame.
- Attach the support legs.
- Fasten the profile to the side posts with brackets, placing them at an angle of 45°.
A metal building for the street will suffer from precipitation, so it needs to be painted. It is better to use matte black paint.
The metal firewood rack must be installed evenly. A platform is being prepared for this. You need to remove the sod and add gravel. It is better to install bricks under the legs.
To make the metal woodshed more stable, you need to strengthen the supporting frame with a crossbar. It is also placed on legs.
What are there
A sheet of metal will protect the walls from woodworms (wooden ones, of course)
. If you do not pay attention to the size, there are two types of sheds for firewood - attached to the wall of a building or standing separately. It is clear that it is easier and faster to install, but this is not always possible. Or rather, not with all buildings: it is dangerous to attach to wooden walls
And not only from a fire safety point of view. With the firewood comes a whole army of wood-boring beetles, which will happily take on your home. Therefore, it is better not to attach woodsheds to wooden buildings, even with wood treated with bioprotection, but if you really want to, then nail an iron sheet to the wall. As in the photo. It should be larger than the size of the woodcutter. Then all the bugs (most of them, for sure) will remain in the firewood.
Free-standing firewood sheds can be completely open - several pillars, a couple of lintels and a roof. The main thing is that the roof is large enough: it is advisable to make larger overhangs. And the rest will be completed by air and sun. They say that they dry no worse than in more closed structures. In regions with heavy snowfall, to prevent snow from getting inside for the winter, sheets of plywood are attached (attached) below. They are removed in the spring.
How are walls made?
More often, woodsheds are built with lattice or slotted walls. It is better if the boards are stuffed at some angle - like blinds. Then, even with oblique winds, little precipitation gets inside. But even if the boards are filled at some intervals, everything dries well.
Boards/slats are placed on the frame mostly horizontally, sometimes vertically; they also make lattices from thin planks or place them diagonally. In any case, there should be a lot of cracks for ventilation.
Vertically stuffed planks are rare. This is a woodshed with a pitched roof
Does the drying speed depend on the method of installing the planks? No comparisons have been made, so it’s difficult to say for sure. But one owner claims that if you lay the boards diagonally (he has 10 cm with a 2 cm gap), with each wall in a different direction, it dries faster and faster: in a month.
About the size of the slots: they are made from 2 cm to 10 cm. But it also depends on the width of the board. If you leave the gaps very wide, snow will sweep in a lot. If there is little snow or you are not concerned about the amount of snow, you can fill the boards less often. It's also more economical.
Beautiful woodshed for the dacha
Not all woodsheds have doors (those with doors are also called “woodsheds”), as in the version in the photo. Often there is not even a front wall: this allows for more active ventilation. The front wall and doors are needed if stealing occurs in your area, but in general you can do without them.
Log location
Now a little about the structure of the woodshed. If it is small and everything fits in one row, then there are no special problems - everything is accessible. But if large volumes are loaded, it is better to divide the area into sectors into which batches of firewood will be loaded. Thus, previously imported and already dried out ones will not be covered by fresh ones.
It is better to divide the area into sections, so that you can go inside
If the woodshed is square, arrange the sections so that you can reach inside to remove the driest logs. To do this, a passage is left in the middle. In terms of depth, it should not be up to the wall, but it is advisable that only one, or maximum two, rows of logs separate you from the wall (and in general it depends on the volume) - this way they will all be accessible. It’s easier with rectangular ones: they are simply separated by non-sectors by a partition. For example, as in the photo.
This is a large shed for firewood - each section fits one car - about 4 cubic meters. The back wall is not solid; if you look closely, there are holes there.
And a little about height. You don’t need a large woodcutter for a (seasonal) dacha. All you need is one or two cubes for heating in the fall/spring, and even then only for the weekend. But if you have to heat a house, and even a bathhouse, you will have to build something solid. Then, regardless of the layout - long or square, the height is about 2 meters. With average height, you can load it almost to the ceiling. but there should be a ventilation gap at the top.
Difficult choice
The quality of the logs determines how comfortable the temperature will be in the house. You cannot heat the room with freshly cut firewood, because the stove will smoke and the room will not get hotter, but residents can easily inhale carbon monoxide.
Therefore, the wood must be brought to a special condition: completely dry and place the woodpile so that the air inside it constantly circulates.
Most often, stacked firewood is stored under a wide canopy outside. The logs reach the desired condition in about a year.
You can build such a firewood box yourself: install it close to the walls of the house or place it on the site.
The main thing to remember when designing is that the logs must be reliably sheltered from the weather:
- firewood must be stored on some kind of flooring at a height of approximately 10 - 15 centimeters from the ground: this way the heating oil will not be saturated with moisture from the soil;
- the walls of the woodshed must be installed so that the wind can pass freely between the logs;
- the canopy should be positioned with a slight slope - so that snow and rain flow freely from the roof without falling on the wood;
- the support of the woodshed must be strong - for this purpose, special beams are screwed into the ground during construction.
You can make such a firewood shed to suit your taste - from any material: beams covered with clapboard, from a Euro pallet and even from corrugated sheets.
Do not forget that on particularly stormy days the woodpile must be carefully covered with film.
However, you should always keep a small supply of fuel in the house itself. That is why the logs are placed in the woodshed.
In addition to the fact that such a “storage” will allow you to heat the room without running outside in the cold for a new portion of logs, a firewood rack for the stove can also become a stylish element of the interior. Moreover, you can make such a stove accessory yourself.
But first things first. So, firewood holders for fireplaces and stoves located indoors are indoor, portable and stationary.
Requirements they must meet:
- such a “storage” located indoors simply must be stylish or, in extreme cases, at least not stand out from the general mood of the interior;
- The firewood box must be spacious: it is assumed that the supply of wood should be enough for a day;
- the firewood holder must have a strong structure to withstand the weight of the logs;
- the basket or firewood rack for logs must be made of fire-resistant materials, or located at a safe distance from fire if we are talking about a wicker product.
When choosing a stand for firewood, special attention should be paid to the location of such “storage”. Video:
Video:
So, for example, if there is not too much free space in the room, then a stationary type of firewood rack would be the best solution.
This design is installed in the fireplace niche during laying, or a suitable space can initially be provided inside.
However, you can make such a piece of furniture yourself, the main thing is to decide on the type of firewood.
Creating a Foundation
First you need to decide on what the foundation will be created on. Foundation columns are created using concrete, ordinary bricks, and stones. The base is installed on these columns, after which it is aligned to a certain level. The depth of the foundation is usually 30-60 centimeters.
Do-it-yourself woodcutter
Sometimes logs are placed under the base, which have a height of 10-15 centimeters from the place where the soil is laid. Such a system prevents the occurrence of dampness in the room. Wooden boards are placed on top of the joists, which are placed in the correct row.
Metal woodpiles
In order for the structure to maintain its quality for many years and not become covered with fungi, its base is impregnated with special compounds. Joists and wooden boards are also coated with special chemical compounds that have fire-fighting properties.
Do-it-yourself firewood rack: stand designs
Today the market can offer a large selection of stylish firewood holders. They can be made from a variety of materials that will help transform the overall interior. In addition, they will be able to provide not only reliable storage, but also convenient operation.
However, in any case, it is always more pleasant to create something with your own hands. Of course, without certain skills and without any tools, you will not be able to make this product. If you want to create a firewood box with your own hands, then it is better to try to start with the simplest method of making it from plywood.
You should start by creating a stand.
To do this you will need the following materials and tools:
- Plywood;
- Marker;
- Drill;
- Jigsaw;
- Several wooden slats;
These are the materials that are most necessary. After all materials have been collected, construction can begin.
You can make a log holder for a fireplace with your own hands
They are as follows:
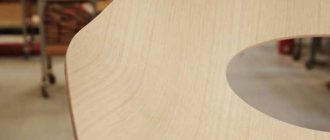
- A small ellipse of approximately 90 by 40 cm is drawn on a sheet of plywood;
- A shape is cut out along the contour with a jigsaw;
- Step back 5 centimeters from the edge and drill holes with a drill, the approximate diameter of which is 3 cm.
- The plywood is placed in water for 1 hour to make it elastic;
- After this, it is given a bent shape.
- Wooden handles need to be inserted into the holes made;
- These handles are attached externally with a dowel;
- In order for the firewood box to not wobble like a cradle, it needs to be stabilized; several slats, which are attached to the base with self-tapping screws, will help with this.
As for the fifth point, it must be done very carefully, otherwise the material can be easily damaged. If you feel that the material is cracking or does not give in, lower it into the water again.
Option three. Woodpile from old barrels
The firewood rack, which is made from an unnecessary old empty barrel, can be used both outside and inside a building.
To create it you need:
- Use a grinder to prepare a circle 15 to 20 centimeters wide.
- Take a sheet of metal and make a vertical partition - it needs to be fixed by welding.
- On the left side of the round structure, you can arrange an additional shelf on which it will be convenient to store firewood or tools.
- Fix the base of the firewood rack to the floor using two metal or wooden slats.
How to make a firewood shed at your dacha with your own hands
Keep firewood dry. Here you can learn how to make a firewood shed at your dacha with your own hands from old pallets, boards and corrugated sheets for the roof. Pallets are used for the base of the structure so that the firewood does not become damp from the ground, remains dry and does not spoil. Treat the wood before you start building. The author suggests doing this the natural way, using steel wool soaked in apple cider vinegar. A chemical reaction dissolves the steel wool, leaving a rich brown solution that perfectly saturates the wood as it dries.
Note that steel wool must be soaked in solution for several weeks to reach condition, so do this in advance. Use a sponge to apply the mixture to the wood
Start construction with measurements and markings. The fences need to be cut into three pieces to form the back and two side walls of the firewood box. To form two side walls, saw the top of the fence panel in half. The roof line on the side walls will be angled to allow water to drain properly. Measure 20cm down from the top corners of the fence panel and make a mark on each side. Then measure 1.20m inwards to mark the center point and from this point line up a straight edge to connect the two points. Repeat the same on the other side. Then cut the fence along the marked lines
You should have one rectangle measuring 2.50 x 1.80 m and two wall pieces. The design must “breathe”, this is important for storing firewood outdoors. Clearance between the soil and the deck helps air circulate and keeps the wood dry
Pallets are ideal for this design, especially since getting them is not a problem. Place pallets near where your firewood will sit because it will be heavy when you're done. For additional reinforcement, you can join two pallets together so they sit flush and move as one. If you need to adjust the wall panels to fit the size of the pallet, cut the tall two pieces so that each side panel is the same depth as the pallet. Three vertical fencing panels will also be separated from the back wall according to the width of the connected pallets. Frame the rear wall so that the fencing slabs are reinforced with a horizontal cross brace at one end. Cap the loose ends flush with board, which will provide additional support for the back wall and roof. A simple structure with center braces will be strong enough to support the weight of a corrugated roof. Make vertical supports for the roof line by measuring from the top of the pallet to the top of the beam and secure with nails. Vertical supports will strengthen the structure and prevent the roof from sagging under its own weight and snow. The board previously installed on the top of the back wall serves as a third beam member to support some of the roof's weight. Although in principle the wall itself provides sufficient support. The cellulose fiber panels that the author used are sold in sheets measuring 1.20 x 2 m. Two sheets are enough to cover the width of the firewood box. The ridges should be positioned so that rainwater can flow down easily. Buy special roof fasteners with polycarbonate washers for installing corrugated roofing. Drive screws into every second or third ridge space along each of the three ceiling joists.
Photo source www.diynetwork.com/how-to/make-and-decorate/crafts/how-to-build-an-outdoor-firewood-shed
Peculiarities
Decorative firewood - can be indoors or outdoors. Be an additional functional and decorative element in the interior or be an element of landscape design.
firewood holder - installed indoors or in open and closed gazebos with a fireplace. They are made portable or stationary, organically fitting into the overall interior. They are made from wood, metal, thick fabric and other materials.
a1c868732e5ab1d446821f3b2562ae40.jpe dec248cf1340b1a21d0e3ad6f1ba4d91.jpe
26671895f34d6d618fc8b608f9cdf1f4.jpe a229af02e2fa0ebfed46f387206d0da1.jpe
You cannot throw logs randomly into a woodpile. They should be folded correctly for better preservation.
Circular method
If you don’t have a stationary woodshed, then you can stack the logs in the form of a barrel tower. It is necessary to drive a stake. It will serve as the basis of the structure being built.
Tie a fishing line or rope and draw a circle of a given diameter, depending on the amount of raw material. To prevent them from becoming damp and rotting, place tree bark or thick plastic film on the ground as a base.
Place the firewood on it in a circle carefully and tightly so that the structure is stable and does not sag. By laying firewood about 0.5 m high, you can fill the middle by stacking them in any order, but quite tightly. Continue laying in this way until the barrel tower is about 1.5 m high.
"Stack"
Stacking of logs is often used. This type of installation requires support. The wall of a house, bathhouse or other building is suitable as a support; firewood grate for a summer residence. When laying, strictly control the slope towards the support. If you are laying two rows, then place thinner logs on the support and thicker ones on the outside. Due to the difference in size, there will be a slope towards the support.
If your structure stands separately from the wall, then use a wooden beam as a support. The height should be small, otherwise, under the pressure of the firewood, the support beams may break and the structure will fall apart.
With stakes
If it is not possible to lay it otherwise, you can use stakes as a support. The stakes must be those that will not bend from the logs. Drive them into the ground from several sides, forming a frame.
When stacking firewood, line each row with branches. They will play a reinforcing role. Place the logs in a checkerboard pattern. The top must be covered with any covering material that does not allow water to pass through.
Foundation installation
The pouring rules are the same as those used when assembling a stationary heater. To begin with, you need to highlight the outline of the base and make a 100 millimeter indent from the fireplace itself. If the installation takes place in a room with parquet, the base for the stove is cut out.
Work algorithm:
- make a recess from 0.5 m to 0.7 meters;
- fill the bottom of the boiler 10 cm with sand, compacting it and spilling it with water;
- cover the sand with crushed stone and compact it thoroughly;
- from crushed stone, at a height of 5-7 cm, install a mesh of reinforcement;
- install formwork along the base (align the upper cut of the boards at the same level, which will ensure leveling of the foundation);
- mix sand, crushed stone and cement mortar (3:1:4), then pour a homogeneous mass into the base;
- compact the concrete, then level it using a rule, passing through parts of the formwork.
After pouring the foundation, you should wait a week for complete setting. Do not forget to separate the concrete from the installation with waterproofing, such as roofing felt.