Furniture made from plastic bottles is increasingly being installed in garden houses and dachas. Many people are happy to place non-standard models in city apartments: in children’s rooms, on loggias and even in living rooms made in the style of extravagant modernism. The demand for such furniture is determined by low cost and ease of manufacture; for example, you can build a chair from plastic bottles with your own hands in one evening. The functionality of the product will not differ from that purchased in the store. And if its appearance seems too unsightly, you can always cover the chair with a beautiful cover or reupholster it.
Design selection
You should start making furniture from bottles by determining a suitable design. The chair can be built similar to a classic model with armrests and a back, in the form of a rocking chair, or you can choose an original shape for it. The first option is the most popular, since such furniture is the easiest to make. Depending on the desired size, you may need from 90 to 250 empty bottles for the job.
At the initial stage, it is useful to draw up a small project, sketch out a schematic drawing; it should take into account the amount of free space that can be used for furniture, as well as the types of structures that will be convenient to place here.
Enterprising craftsmen have come up with several ways to make chairs from plastic bottles. You can build a product from vertically installed elements - if executed correctly, such a model looks quite respectable. You can also combine plastic containers with wood or wire, cover them with foam rubber and cover them with fabric. Combined options are well suited for interiors decorated in high-tech style. Upholstered types of furniture will appeal to lovers of comfort and coziness.
Decor for country interior
In addition to garden decor, a plastic bottle is good for creating an extravagant interior design for a country house. Bright panels for walls and furniture, partitions and screens, even curtains - you can easily make all this yourself from PVC containers. Such home decorations look quite distinctive and original, at least you will not see anything similar from anyone else. By putting your soul into decorating a country house, you will enjoy both the creative process and the results of your imagination combined with skill.
By cutting the bottoms of transparent plastic bottles and connecting them with thin wire, you will get air screens to divide the space of a country house
The rainbow curtain for the front door is made from ordinary bottle caps and looks very original
Plastic bottle caps will help you paint the interior of your country house in all shades of the rainbow.
Materials and tools
Making a regular chair is a long and labor-intensive process, and in addition, it is financially expensive. You need to cut out parts from wood or plywood and assemble them, which requires at least a jigsaw, wood glue, nails, a hammer, self-tapping screws, and screws. To make a simple chair from plastic containers yourself, you will need to stock up on a minimum amount of necessary materials, most of which are literally at hand:
- directly bottles of the same color, design and size (from 90 to 200 pieces, depending on the desired dimensions of the finished product);
- strong tape, cling film or stretch film;
- knife and scissors;
- fabric for creating covers;
- foam rubber for softness;
- sheets of cardboard and wire for the frame (if necessary).
All the above materials and tools are intended for making a simple chair. Depending on the design of the intended product, various additional elements may be required. For example, to make the body of a rocking chair you will need parts cut from chipboard or fiberboard.
Foam rubber
Cardboard
Bottles
Outdoor breakfast table
A cute and comfortable table made of plastic material can be built quickly and easily. The only materials you need are a tray and four plastic containers.
Important! If the bottles are long and thin, then the product can be used as a coffee table.
The manufacturing process is quite simple:
- Glue the bottles to the surface of the tray with their bottoms. These will be the legs of your table, and the tray itself will become the tabletop.
- To make the product look more attractive, the bottles can be wrapped with strong and thin twine, jute twine or coated with acrylic paints.
- The tabletop can also be decorated. To do this, you can decorate it using the decoupage technique or, for example, lay small flat pebbles on the surface.
Manufacturing stages
Having decided on the desired type of furniture, you can proceed to its manufacture. It is necessary to calculate the required number of bottles in advance and prepare them. Some fans of recycling things collect basic material gradually. After waiting until a certain amount of empty containers is collected, they combine the bottles into a block. The resulting modules are stored in a suitable place - a garage, closet, basement. After a sufficient number of plastic bottles have been collected, they proceed to the formation of the furniture itself.
Drawing creation and preparatory work
When preparing a drawing, it is desirable to estimate as accurately as possible the space that the piece of furniture being manufactured will occupy. This way you will be able to correctly determine the height of the chair and its width, the depth of the seat, and the dimensions of the armrests. Then compare the obtained dimensions with the dimensions of the materials available. In this case, it is necessary to take into account the thickness of the auxiliary elements - tape, film, covers. After creating a frame from plastic, the structure is supplemented with soft foam rubber, the seat is given rigidity through the use of plywood or chipboard, the furniture is decorated with fabric, although this does not significantly affect the occupied space.
To make a chair, you will need to create several sketches that, to scale, depict the desired piece of furniture from different angles. The drawing can be done schematically. Having previously indicated the length, width, height of all elements and plotting these parameters on the drawings, you can calculate how much material will be needed to bring the idea to life. When making a chair, you need to periodically (after creating each individual element) check the drawing.
When preparing for work, all plastic must be washed, cleared of stickers and dried naturally.
Making blocks from bottles
Once all the necessary materials for making the chair have been collected, the preparatory work has been completed, you can proceed to the first stage. To make the blocks from which the frame is then made, you will need several bottles and tape. The whole procedure looks like this step by step:
- Two thirds of all plastic bottles should be cut in half. The part with the neck is directed with the lid down and inserted into the other half with the bottom. Then a whole bottle is installed into the resulting structure, onto the top of which the lower part of another cut container must be placed. The neck of the second bottle goes to waste. The result is a rather hard plastic element, reminiscent of a loaf.
- Having made a sufficient (according to calculations) number of such blanks, they should be connected into a single module using tape. For better stability, all bottles should be placed with their necks down.
- It is necessary to wrap the structure with adhesive film as tightly as possible. This way it will be possible to obtain an element that does not deform during subsequent use.
At the end of the work, you should have several finished blocks: a base, two armrests, a backrest. At this stage, it is necessary to measure all parts of the future chair and check the parameters reflected in the drawing. If some parts turn out to be smaller or larger in size, the block structure is unwound, adjustments are made, and everything is reassembled.
Cut off the neck of the bottle Connect the whole bottle and the cut part, secure with tape
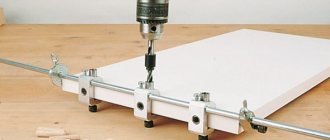
Connect the prepared elements with tape. For the base you need 4 blocks of 6 elements each.
Assembly
You need to start assembling a chair from bottles by installing blocks in the form of a rectangle or square on the floor. Referring to the diagram, you need to fasten them with wire. This will create the foundation for the future product. The same blocks should be laid on top of it, but they should be placed across. If it is necessary to assemble in several rows, you can stack the elements in a checkerboard pattern. Next, you need to raise the rows to the height at which the seat is supposed to be built.
In order to make the structure stronger, it is recommended to install “risers” one or two bottles high in the corners of the base. They are formed from rounded blocks 10–12 elements thick. To fasten all modules, tape or cling film is used. The same round blocks are used to decorate the armrests. The back is created last - it can be made round or square, as desired.
Glue blocks with two elements to the base
Starting from level 4-5, add only backrest and armrest blocks
Ready product
Upholstery and soft seat
To upholster a chair made from plastic bottles, you will need foam rubber, which, if necessary, can be folded in several layers. You can make an additional cushion on the seat, similar to those chairs that are sold in stores. The same can be done for the back of the product.
The chair is covered with a suitable fabric over the foam pads. If you don’t have time to create a full-fledged cover, you can simply throw a blanket over the product. If possible and desired, furniture can be decorated with flock, nubuck, chintz, artificial leather, jacquard. If the product is intended for a cottage or garage, you should not use expensive materials - the cover can be sewn, for example, from old blankets. But at this stage, every craftsman who assembles a chair from plastic bottles with his own hands is free to let his imagination fly.
Make a cover and put foam in it
Assembly technology
You can even assemble a complete model alone. First, you should prepare the bottles, wash them, remove excess labels, stickers and other interfering elements. Then, you need to assemble one strong block from three bottles and secure it with tape.
- Cut off the neck of the bottle.
- We insert it into the lower part, with the plug facing down.
- Insert another, whole bottle into the resulting vase.
- Cover its neck with the cut-off lower part from the third bottle.
Overall, you get a fairly strong block, which in addition needs to be secured with tape. To make it more convenient to fold the selected model, you need to fasten four bars together. This must be done carefully, so that the bottles do not move, or rather do not move at all, in the assembled pack.
Then you can use your imagination. All the instructions offered on the Internet are different, so you can come up with your own version of a comfortable and homemade sofa
The main thing is to pay attention to proper gluing, so that after some time the parts do not begin to move apart, ruining the appearance of the furniture
https://thebestvideo.ru/fun/poleznosti/iz-plastikovyh-butylok/https://kak-sdelat-vse.com/dom-i-remont/127-kak-sdelat-divan-iz-plastikovyh-butylok. htmlhttps://houseadvice.ru/mebel-iz-plastikovyh-butylok-svoimi-rukami/https://infomebli.ru/gostinaya/divan/iz-plastikovyh-butylok-samomu.html
What else can be made from bottles
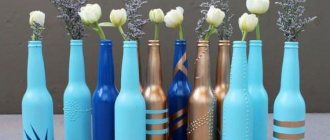
You can construct a lot of useful and interesting things from plastic containers. They are great not only for making various furniture. New master classes and technologies for creating crafts, interior elements (vases, curtains, stands, boxes) and products for the garden and country house are constantly appearing: bird feeders, gutters, flower beds, garden figurines, lampshades, watering devices, washbasins.
In households, plastic bottles are also used to create greenhouses and country greenhouses. Small summer buildings can be built by first collecting the required amount of material. Experienced craftsmen can even make a boat that will be no worse than an inflatable rubber or wooden one.
Furniture made from plastic containers is cheap, convenient and lightweight; it can be moved from one place to another without any problems. She is not afraid of heat, cold, or rain. That is why more and more new product options are appearing: shelves, cabinets, cabinets, poufs, chairs, stools, tables, sofas, beds.
Flowerbed
Boat
Greenhouse
Original stool
You can make a comfortable stool from bottles that will appeal to both adults and children. The creation process is also understandable for novice craftsmen. To work, you need identical 2-liter plastic bottles (5-7 of them will be needed), tape or film, plywood or thick cardboard, and universal glue. If you want to make the stool more stable, you need to first pour water into the containers or pour sand into them. The creation of an original product is carried out according to a step-by-step algorithm:
- The prepared elements are placed on the floor with their necks up so that the end result is a round block.
- The entire bundle is fixed with tape or film.
- A round or square seat is cut out of plywood or a piece of thick cardboard according to the width of the resulting stool leg and attached to the bottles using glue.
If the seat turns out to be hard, it can be covered with foam rubber. The finished structure is decorated with fabric, self-adhesive wallpaper, and plain white paper. When using the latter option, it is worth allowing the child to paint the stool with funny faces or some other figures.
Connect plastic bottles with tape
Cut two circles from plywood
Secure to bottles with self-tapping screws
Wrap the structure with padding polyester
Add soft padding for the seat Cut out pieces for the cover
Stitch
Fix on a stool
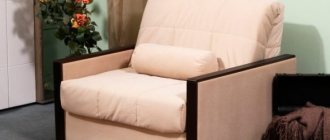
Comfortable chair with backrest
To make a chair out of plastic bottles, you need to proceed in much the same way as when making a chair. From three containers - a whole one and two cut ones - you need to assemble 16 blanks. Then connect them into blocks, first fastening 2 bottles together, then 4. So until all 16 elements form a single module.
Then the back is formed. It would be better to make it two bottles thick, the length is at the discretion of the master. Each row is held together with tape; the latter can be arranged in one container for beauty. The plastic backrest is attached to the seat.
You shouldn’t skimp on adhesive tape: the more of it, the more reliable the design.
Table made of plastic bottles
If you want to furnish your entire dacha with plastic furniture, the next product after an armchair, stool and chair can be a table. It will require 1.5 liter bottles, identical in shape and color. For the countertop, you need to prepare a piece of plywood or use a ready-made version left over from old furniture. From the prepared plastic elements you need to assemble a block of the required thickness, give it the shape of a circle, rectangle or square.
Next, you need to turn the cover over and mark the points where it will be attached to the screws. It is better to arrange them in a circle - the tabletop will be located, as it were, on a plastic palisade. Fasteners should be selected in length so that their sharp ends do not peek out from under the table cover. Or screw them in from the front side, and then cover the caps with putty. Paint the work surface or decorate it with wallpaper.
The bottles are glued together in pairs at the bottoms. The upper part of the pair will be without a lid, the lower one will be closed. Then each of the legs is screwed into a lid fixed to the tabletop. To strengthen the structure, you can tie the necks of the upper and lower elements with wire. The plastic table is ready.
Prepare a wooden tabletop, glue corks, screw in bottles
Preparation for construction in general
First of all, we need to understand what size greenhouse we need. Considering the complexity of collecting components, there is no need to make it too large.
Let our structure be on a wooden base, in the form of the most primitive small house. We assume the dimensions of the base are 2x3 meters, the height of the greenhouse walls is 2 meters, the height of the ridge is 1 meter.
We draw the drawing by hand, set the dimensions and estimate how much timber, slats, screws and corners we need to purchase.
Drawing of a greenhouse, sketched in haste
For the frame we will need a thin pine beam 40x40x6000 mm.
Edged pine block 40x40x6000 mm - the basis of the structure
To connect it into the structure there are metal corners.
Corners are needed to strengthen joints
To connect bottles into pipes, use thin wooden slats 20x20x3000 mm.
Pine slats 20x20x3000 mm
To fix the parallelism of the walls, use three rolls of thick fishing line.
Fishing line is needed to fix the walls
To cover the roof - a piece of hose film.
Tubular film is needed not in a roll, but in footage
When we calculate the required amount of materials, we will be pleasantly surprised at how cheap our project is. It’s funny, but the most expensive thing is not even the timber, but the strip needed to be threaded into the bottle “pipes” to create stiffening ribs. in fact, you can do without slats, or thread a wire or wire into the “pipes”. And the bottles will not cost anything at all - except for the labor of collecting enough of them.
Bottle preparation
- You need to collect about four hundred two-liter bottles. White plastic (water bottles) transmits ultraviolet light better. And to decorate the structure, you can choose a number of bottles of a different color: blue (sparkling water), green (drink bottles) and brown (beer bottles). In fact, bottles come in all the colors of the rainbow. But only these four are produced en masse (in order to collect the required quantity).
With some effort, you can create beautiful ornamented greenhouse walls from them.
- Bottles must be removed from stickers in advance. It is better to use bottles with regular paper stickers that can simply be soaked.
Required Tools
- Bayonet shovel
- Shovel
- Power saw (hacksaw).
- Hydraulic level.
- Carpenter's corner.
- Drill (with a set of drills).
- Hammer.
- Awl.
- Shoe knife.
- Roulette.
- Screwdriver.
- Installation stapler.
Calculation of required materials - table
| Position | Name | Specification | Quantity | Unit price | Price | Notes |
| 1 | Edged pine beam | 40x40x6000 mm | 6 items | 95 RUR/piece | 570 rubles | |
| 2 | Equal-sided galvanized mounting bracket | 40x40x60x2.0mm | 25 pieces | 35 rub/piece | 875 rubles | |
| 3 | Planed pine slats | 20x20x3000 mm | 50 pieces | 35 rub/piece | 1750 rubles | |
| 4 | PET bottles (plastic) | capacity 2 liters | 400 pieces | |||
| 5 | Fishing line calibrated 1.00 mm | 1.00 mm x50 m | 3 skeins | 90 rubles | 270 rubles | |
| 6 | Polyethylene film 80 microns | width 3m / sleeve 1.5m | 4 meters | 20 rub/m | 80 rubles | |
| 7 | Antiseptic impregnation (and optional paint) | As needed, but small quantities | ||||
| 8 | Adhesive tape transparent wide technical | 75 mm x 50 m | 3 skeins | 49 RUR/skein | 147 rubles | |
| 9 | Self-tapping screws | About 2 kg | As needed | |||
| Total | 4412 rubles (excluding the cost of screws, impregnation and paint) |
DIY soft chair
To make the craft presentable, you can cover it with foam rubber or synthetic padding. The easiest way to make an upholstered chair is in two stages: first make a seat that looks like an ottoman, and then design the backrest.
- For the seat, take the required number of bottles, which are installed on a cardboard template. Another similar template is used to cover the part from above. The entire structure is fixed with tape.
- Then a part is cut out of foam rubber or padding polyester that will soften the upper part of the seat. It is identical to the cardboard template covering the bottle structure.
- The seat element is wrapped on the sides with rectangular softener parts. This design can be fixed with a needle and thread.
- The second stage is to assemble the back and armrests from bottles. You can use “loaves” for them (how to make them was described above).
- The top of the chair can be covered with fabric. Tapestry, coat fabric, velor, suede, and leatherette are suitable for this purpose.
An interesting option is to cover the chair with wicker from old jeans. To do this, the trousers need to be cut into strips 3-5 cm wide. They are ground into longer ones that are suitable in size (compare by pattern). The edges of the strips are hemmed by machine.
Following the rules of checkerboard weaving, they make an original material for covering upholstered furniture.
Instructions for implementation
Let's take a closer look at how to make common furniture options from plastic bottles.
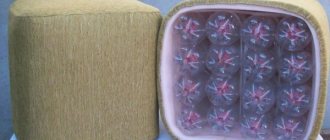
Lightweight and comfortable pouf made from bottles, covered with fabric
Ottoman
- We take the bottle and make an incision in its wide part;
- insert another part into it with the neck;
- repeat steps 1 and 2 until the desired height of the product is obtained;
- wrap the resulting structure tightly with tape;
- we make a sufficient number of such blanks of the same height and fasten them together with adhesive tape;
- result: round design;
- we cover it with foam rubber to ensure softness;
- we upholster the product and get a full-fledged ottoman.
The product can be decorated in different ways, the main thing is to choose the right pouf style.
We make a beautiful ottoman from bottles according to instructions with photos
Shelf
This version of the product is suitable for manufacturing by beginners. The shelf is suitable for a room, country house and location on the site. It does not take up much space and is suitable for storing small items. To make the product, you need to complete the following steps:
- select the size and shape of the structure;
- cut off the material at the neck;
- cover the resulting parts with acrylic paint (you can take several colors);
- We fasten the parts with tape to each other;
- We fix them to the wall with self-tapping screws.
You can add an additional element - plywood, to which the parts are secured, this will add reliability to the structure.
Convenient and spacious shelf for toys made from large plastic bottles
Sofa
A sofa made from plastic bottles will look original in the garden. To do this, you need to follow the steps provided:
- purchase two-liter elements in quantities of 500 pieces;
- you need to buy wide tape;
- make a reliable foundation;
- The top is removed from each bottle, and the neck down should be inserted into the lower part;
- Another bottle is installed in this design, which is covered with a cut-off bottom;
- We use tape to connect two elements; the product must be wrapped securely;
- the resulting modules serve to form the structure itself;
- first the seat is assembled, then the supporting part, and lastly the armrests;
- We fix all the elements with tape.
You will need quite a lot of adhesive tape - this should be taken into account when preparing the tools. The sofa can be decorated as desired.
Beautiful sofa made from bottles with your own hands
Stylish and comfortable sofa frame made from bottles
The process of making a chair from plastic bottles with step-by-step photo instructions
Stool
Even a beginner can make such a piece of furniture. To do this you will need to complete several steps:
- preparation of 10 two-liter parts filled with sand or water for structural reliability;
- rewind them tightly with wide tape;
- production of individual sections (used as legs) and their fixation;
- installation of a seat embedded from a plywood sheet, it is nailed or screwed to the bottle caps.
It is necessary to use a large amount of adhesive tape to increase the reliability of the stool.
Simple stool made from plastic bottles
Original do-it-yourself stool made from bottles
Sofa
An interesting solution for any garden plot or cottage would be a sofa made from plastic bottles. To do this, follow the following steps:
- two-liter bottles are purchased, and their number cannot be less than 500, since a smaller number will not be enough to obtain the optimal size of the sofa;
- standard adhesive tape is used as fastening, but it must be wide enough;
- bottles are not very strong elements, therefore, under the influence of significant load they are easily crushed, so it is imperative to make a strong and rigid base for the furniture;
- The top part of each bottle is cut off, after which it is inserted neck down into the lower element;
- the next bottle is inserted into the resulting base, covered with the previously cut bottom;
- then bottles of 2 elements are connected in the same way, after which they are securely and firmly wrapped with tape;
- a direct structure is formed from the modules made, and approximately 17 modules are usually needed for sitting;
- These elements are used to assemble the seat, then the back, and then the armrests;
- All the resulting parts of the future sofa are connected to each other with tape.
During the process you will need a large amount of tape, so it is recommended to purchase a lot of this material in advance.
Cutting bottles
Assembling the back and armrests
Connecting all the elements
Stool
A small stool is considered the easiest to create. It can have various unusual shapes, so it is often intended for children. The process of its creation is divided into stages:
- approximately 10 two-liter bottles are prepared;
- they are tightly rewound using tape;
- separate sections are made from 3 or 4 bottles, which are tied to the main structure in different ways and from different sides;
- it is important to use a large amount of adhesive tape in order to obtain a reliable and deformation-resistant structure;
- to increase stability, bottles can be filled with water or sand;
- the seat is cut out of plywood, screwed or nailed to bottle caps.
After creating the structure, it is decorated in different ways.
We take two-liter bottles
We wrap bottles with tape and make a seat
The benefits of creating a product with your own hands
Special country furniture made from plastic bottles
Light and comfortable plastic chairs and table for a summer cottage
Summer cottages are a place to bring ideas to life. Creating something with your own hands is interesting, and things turn out unique. Making furniture from plastic bottles is not as difficult as it seems. But the process itself has a number of advantages that are worth noting:
- The embodiment of a unique idea;
- Spending free time doing interesting activities;
- Creation of a useful item;
- Saving money.
Unusual room with a bed made of plastic bottles
Beautiful do-it-yourself sofas for a summer cottage made from plastic bottles
Purchasing interior items involves additional financial costs, but not every person wants to spend a lot on a summer cottage. Therefore, creating furniture from plastic elements is an excellent option for saving the family budget. In addition, it will be resistant to humidity and external weather influences.
An excellent budget furniture option - a plastic sofa and a coffee table