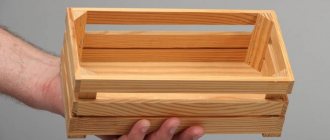
A wooden box is a simple but very functional item. Depending on the shape and depth, such products can be used to receive correspondence, grow seedlings at home, or store children's toys or tools.
The design is quite simple, so wooden flower boxes can be made with your own hands. If you use your imagination and apply a little skill, even such an elementary thing can be turned into a real work of art.
Necessary tools and equipment
Before you begin your wood box project, you need to gather all your tools and equipment in one place.
We will need a machine for processing wood; a jointer and a circular saw must be present. Otherwise, we buy the strips we need in the store - size and thickness. You can’t do without a pencil, tape measure, construction angle and hammer.
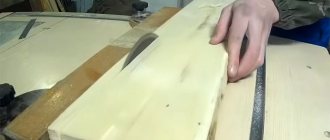
We will use the machine for unprocessed wooden blanks, which we will make from boards 2.5 x 25 x 150 cm.
What materials are used to build structures?
Most often, boxes are made of wood and other materials. For instruments, it is better to choose solid pine or maple. Alder or aspen is suitable for products. These tree species are distinguished by their durability and strength. They do not emit resinous secretions and do not dry out over time.
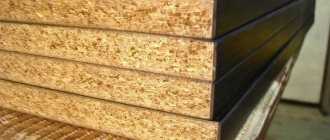
Plywood is suitable for making decorative products. You can place all sorts of little things here. To fix the parts, a special adhesive composition is used.
Tool used
Depending on the selected material from which the box will be made, the appropriate tool is selected. This should include:
- jigsaw and jointer;
- grinder and welding machine;
- hand tool.
Naturally, when making any design you cannot do without a measuring tape and a pencil.
We looked at how to make a box yourself from various materials. This design is distinguished by its simplicity and does not require special knowledge or experience from a person.
To make it, it will be enough to show attention and have the necessary skills in handling hand tools.
Homemade boxes are distinguished by their durability and ease of use. Their production does not require significant financial investments, which adds to their popularity.
Main features
Boards are the best option for making fences. You can buy them or use lumber already available on the farm. Before you make beds from boards, you need to decide which border option to choose for this.
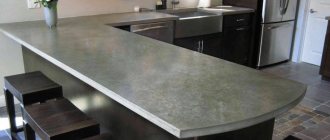
The WPC board fits quite tightly to the ground during installation, leaving no visible gaps.
Moreover, the box made of wood boards perfectly retains moisture, thanks to which the plants germinate faster.
Courtyard interior
Garden fencing boards have the following features and advantages:
- acceptable price;
- ease of container assembly;
- ease of maintenance in the greenhouse;
- aesthetically attractive appearance;
- durability with proper care.
The photo shows a border made of boards.
Boxes made of boards
Master class on creating a box with your own hands
We offer step-by-step instructions on how to make a box at home. To do this you will need the following tools and materials:
- tape measure;
- a simple pencil;
- board 25 mm thick;
- wooden edges 15 mm thick;
- thin plywood;
- metal corners;
- nails and screws;
- hacksaw;
- screwdriver;
- metal hinges for opening the lid structure;
- hammer.
First of all, you need to familiarize yourself with the diagrams and drawings of how to make a box. This will allow you to correctly compare the dimensions of the finished product. You should not make too large structures, as they will take up a lot of free space.
When all the components are ready, you can proceed to making a storage system for vegetables and fruits. The process includes several stages:
On the surface of the boards we mark the size of the side parts of the product. Next we move on to the bottom of the box. We mark the size on the wooden edges. After this, using a hacksaw, we begin to cut out the blanks.
We fix the boards together using small nails. We attach the bottom parts using the same method.
The cover of the product consists of a plywood sheet. It is installed on special hinges that allow you to control the closing process.
The photo of the DIY box shows the entire work process.
Folding box
An original and practical case that folds and unfolds as needed. This is a convenient option for needlewomen who find it difficult to organize a workplace during the creative process.
The photo shows bright folding storage cases measuring 15x15x20 cm.
What you will need:
- Cotton fabric size 50x45 cm.
- Adhesive interlining 50x45 cm.
- Chalk or water-soluble marker.
- Sewing machine, scissors or roller cutter.
Step-by-step instruction:
- Iron the fabric onto the adhesive interlining and carefully cut it:
- Draw 4 lines at a distance of 15 cm from each side and stitch them:
- We cut horizontal lines from two edges, as shown in the photo:
- We retreat 1.5 cm from the edges and mark the holes on four sides of the rectangle with a marker or chalk:
- We draw lines for the valve:
- And we cut them:
- The next step is to cut out the valves:
- We process the edges in any way:
- We assemble the box by threading the flaps through the side slits:
- After creating your first folding organizer with your own hands, the following products will be much easier to make:
Stages of work
How to make a wooden box with a lid? There is no point in buying or ordering it. And it's not interesting. You can do everything yourself. There is nothing complicated here, just follow the instructions. You have to do the following:
First you need to cut the bars to the length you need them. This will be the basis for the future box.
To create a three-dimensional frame, you need to combine these bars with each other. You will need nails to connect.
Next, calculate how many drawer slats you will need. They need to sew up the bottom and sides.
Professionals in their field advise to sew the bottom first, and then connect the sides. This way you can never go wrong with the size. When working, be sure to use a construction angle.
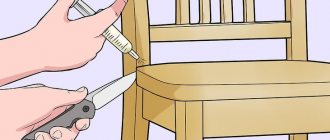
Also, if you plan to often use the box for storing vegetables, it is best to cover the caps with putty. This way they won't stick around and disturb you.
After all these steps, all you have to do is screw the handles to the drawer. Ready!
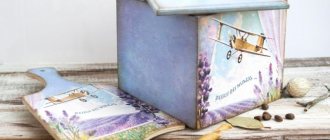
Gift containers
Oddly enough, even the most ordinary item can be beautifully packaged in a beautiful gift box, which can cause a storm of positive emotions in the birthday boy. We can offer to make a wooden box for gifts.
Gift boxes can even be made from wood. It's interesting, unique and presentable. Wood is a durable material. It will be able to serve the hero of the occasion for a very long time, because it will not be thrown into the trash and will become an excellent interior decoration. A very interesting idea is to collect money in such boxes.
Planter boxes
Do you have your own dacha? It's hard to imagine your garden without beautiful flowers. How to make wooden flowerpot boxes? This is a very beautiful, unique design. Making a flowerpot from scrap items is very easy and, moreover, very exciting.
We offer a fun version of a flower pot made from old shoes. So, you will give your shoes a new life and decorate your garden. In order to make a unique flowerpot, you will need old shoes and free time.
Follow the instructions:
- Fill the bottom of the shoe with soil and plant the seeds of your favorite plants in it;
- Next, you need to water the flower with warm water and place it near the house;
- To prevent too much water from remaining inside the boot, you can make several holes in the sole;
- To make the flowerpot more interesting, you can paint it in your favorite color.
You can use not only old shoes as a basis. You can also use old sneakers, rubber boots, galoshes and other old shoes.
How to sew decor for a sweater box
Unconventional ideas, for example, a storage box made from a sweater, will help you decorate the space in your home. To do this you will need an old knitwear item, a cardboard box, scissors, a glue gun and ribbons for handles. Wicker elements can also be used as handles.
The master class includes the following stages:
- From the middle of the sweater, cut a suitable piece of fabric that should cover the box with a margin. The material lies around the perimeter.
- The canvas is glued to the cardboard base using glue.
- Tuck the edges of the knitted fabric inside the box and secure them firmly.
- Attach pre-prepared handles to the sides.
The result is a stylish item that will fit perfectly into any interior.
Regular wooden box
In fact, this is an ordinary rectangular design that is suitable for growing flowers in the country or storing various household items at home.
The advantages of making boxes from wood are due to the fact that it is an environmentally friendly and affordable material, convenient for processing with hand tools.
To assemble such a product you will need:
- boards that will go to the bottom and walls;
- fastening elements: screws, nails, metal corners;
- tools: screwdriver, hammer, wood saw;
- roulette;
- a simple pencil and paper to prepare a drawing.
First, a drawing is made. A sketch of the finished product is drawn on paper and the main dimensions are determined. The schematic image allows you to accurately calculate the material needed to make the box.
Any boards left over after construction or renovation are suitable as raw materials. The main thing is that the material is of high quality: there should be no signs of rotting or wormholes, otherwise the service life of the box will be short.
The boards are cut according to the specified dimensions. There should be 5 elements in total: side and front walls, bottom. The boards are nailed together; corners can be placed at the joints to provide additional rigidity to the structure. If the box is intended to be used for growing flowers indoors, it makes sense to lay a layer of waterproofing made of plastic film on the bottom.
Knitted boxes and baskets
With a little effort, you can create stunning crocheted storage boxes. Such products are suitable for the interior of any room. The original solution is boxes for the dressing room. Such items will not only decorate the interior, but also make it more functional and practical. They are used to place all kinds of things. You can make stylish decor with your own hands.
Detailed lessons on how to weave a basket yourself, as in the photo, follow the link!
Compact and spacious baskets will help create coziness in the kitchen. To make them you will need a hook and ribbon knitted yarn. Such products can be used for storing nuts, eggs or baked goods.
Additional storage containers will also come in handy in the bathroom. With their help, you can correctly place all the items. Original baskets can be fixed in one of the corners of the room.
The elegant decor is also suitable for decorating the living room. You can store blankets, books, firewood or TV bullets in it. A similar basket is especially appropriate in the hallway. Changes, bank cards, wallet or keys will fit inside.
This knitted item looks perfect as a flower pot. Bright decorative elements will create original accents in the room.
Crocheted boxes are best made using a crochet hook. There are a large number of schemes with which you can create an original product.
Baskets made from Ribbon or Spaghetti yarn, braid, rope or knitted yarn are popular. To create decor, you can choose synthetic or cotton yarn. This material is a continuous narrow strip. Products made from yarn are knitted in a short time and hold their shape remarkably well. The original box is ideal for the garden. The basket can be made with or without handles. You can also create a knitted item from old T-shirts, cut into ribbons. The knitted strips should be pulled in different directions so that the edges are rounded. A 10 mm hook is used for this work. Knitting a basket begins with an amigurami ring. For this you will need a special circuit. Then knitting is done in a circle.
Flower box for balcony
The general principle of making a flower box from wood with your own hands remains unchanged, but the specifics of use force you to take into account a number of nuances.
Depth is of particular importance. Experienced gardeners do not recommend making walls more than 20 centimeters high. Flowers need to be watered regularly, and wet soil significantly increases the weight of the structure.
Balcony boxes need to be placed on a solid base to prevent them from falling down. For these purposes, metal frames welded from reinforcement bars are usually used. The advantage of this method of fastening is that the outdoor box can be easily removed and brought into the house for the winter.
Note! If painting is planned, it is better to give preference to natural and neutral tones. Bright colors not only fade quickly in the sun, but also hide the natural beauty of plants.
To save on decoration costs, it is recommended to plant flowers in two rows. In the foreground there will be climbing plants that will disguise the wooden container. The flowers of the main composition are planted in the background.
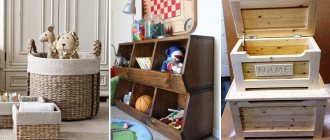
Decor options
There are many ways to transform storage boxes: you can decorate cardboard containers for shoes or equipment with your own hands, turning them into stylish interior elements. For decoration, fabric, lace, decoupage or scrapbooking techniques are used.
The photo shows a compact box with pockets, decorated with fabric and lace.
Using wrapping paper or leftover wallpaper, you can transform the box beyond recognition and store various items inside: books, toys, craft materials. You can cover a cardboard storage box with regular rope and create an excellent eco-style accessory.
Making boxes with your own hands depends not only on the availability of suitable materials, but also on your imagination. The process of creating stylish things “out of nothing” is always fascinating, and the result brings comfort and order to the environment.
Assembling a wooden box
The entire assembly process is very simple, no tricks or hidden mysteries. We take the most ordinary nails 5 by 0.15 cm. Why thin nails? So that the structure is tightly fastened and the boards do not crack.
First, we nail the top and bottom strips from the end, then we place the remaining wooden blanks. We screw 24 cm long planks to the wooden base from below, use 35 mm self-tapping screws.
Drawings and dimensions of wooden boxes are presented below.
Plywood structures
Here the material is selected depending on the intended use of the finished product. If the box is intended for correspondence, you can get by with thin plywood. For seedlings or flowers, multilayer sheets impregnated with a waterproof compound are more suitable.
The design is made according to the following scheme:
- make a drawing of the box with dimensions;
- the drawing is transferred to a sheet of plywood;
- parts are cut out according to the markings;
- individual elements are fastened together with self-tapping screws or nails, and the joints are treated with sealant.
Considering that plywood is easy to process, you can make more complex, non-standard country boxes. For example, the joints of the walls should be designed according to the tongue-and-groove principle. If you are making a deep box for storing children's toys, you can attach wheels from an old computer chair to the bottom. Drawers with a sliding top panel look interesting. Here a cover is cut out of a sheet of thin plywood and a groove is cut in the upper part of the walls.
For seedlings
The size and shape of wooden planting boxes will depend on how you grow your flowers. Bulky items take up a lot of space and spoil the overall interior of the apartment. Therefore, if you plan to grow cucumbers and tomatoes on a windowsill, it is better to limit yourself to small wooden plywood boxes.
A garden plot offers more opportunities for the DIYer. So, a large and functional box for seedlings can be made from an old pallet. In fact, a pallet initially represents a finished product. The gardener can only make the bottom and walls from pieces of multi-layer plywood. To do this you will need decorative nails and a hammer. After this, the internal space is filled with earth, the seeds are sown between the top rows of boards.
What to consider when choosing an idea for creating a useful craft
Often, a mailbox is placed outside the yard and is necessary for timely receipt of mail; decorative structures can be used to decorate the courtyard or complement the landscape design composition, and it is important to take into account the following factors:
- correspondence between the style of the box design and the design of the local area;
- a set of performance characteristics of the materials used for its manufacture;
- ease of access to the interior of the mailbox and ease of installation.
Decorative mailboxes can be used as universal storage systems, providing an increased level of moisture insulation; stylish and beautiful designs help to emphasize the overall style of the site’s design and become its bright accent.
Making a plant box
Step 1. First of all, you need to decide on the dimensions of the box being constructed. It is important to choose the place where it will stand. Based on this, you should sketch out a drawing of the box indicating the dimensional parameters and calculate how much material is required.
First you need to decide on the sizes
Step 2. Next, you need to go to the store and purchase everything you need. First of all, you need to buy the required amount of boards.
Buy boards in the required quantity
Step 3. Now you need to apply the appropriate markings to the board - mark the sides and ends of the box on it. It is better to take measurements with a tape measure, but to get even marks it is better to use a square.
Marking
Step 4. Next you need to assemble the box frame and drill holes in its sides. It is better to make several holes on each side.
Assembling the drawer box
Step 5. The boards on the sides of the box need to be connected together using self-tapping screws. You can also use nails, but connections with self-tapping screws are much stronger and of better quality.
Self-tapping screws are used for connection
Step 6. Next, you need to determine the size of the bottom of the box and cut the bottom itself from the board. It needs to be secured by drilling wooden holes and screwing screws along the bottom border of the box around the entire perimeter.
Attaching the drawer bottom
Step 7: It is important to be sure to drill a few drainage holes in the bottom of the plant box. They will ensure the drainage of excess water that will enter the soil during irrigation or rain.
Drainage holes are drilled
Step 8. It is important to sand all surfaces of the drawer so that they are smooth, pleasant to the touch and safe.
Sanding the drawer
Step 9. Finally, the box can be painted, but it is better to coat it with varnish. This will make the box beautiful and additionally protect it from moisture.
Finished product painting
Original ideas and available materials
In addition to traditional wood materials, metal and plastic, all sorts of containers can be used under the mailbox, having previously used all kinds of decor and finishing materials to decorate them.
Such products are distinguished by a recognizable design, but fit perfectly into the overall and conceptual composition of the landscape composition, matching practical and aesthetic functions, which is important for owners of beautiful and attractive homes.
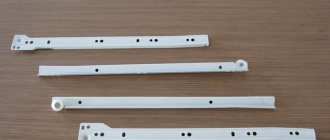
Drawer
How to make a drawer? Buy:
- wood processing machine;
- roulette;
- construction corner;
- unedged board 2.5*25*130 cm.
You will also need a hammer and nails. And also 4 wheels from a children's toy stroller and attachments to them.
Procedure:
- We convert unedged lumber into edged lumber.
- We cut the board into several pieces - four of 20 cm and 1 of 24 cm.
- We process blanks.
- We cut the remaining boards to a width of 4.5 cm along the grain of the wood.
- We collect the box.
- We attach wheels to the bottom.
Slat box
Step 1. First of all, you need to cut the blanks to create a box. You will need bars of the selected length, slats 1 cm thick. The bars need to be cut to length so that their profile is triangular.
Blanks are cut
The process of creating blanks
The block has a triangular cross-section
Step 2. Next you need to take the bars, lay them on top of each other (2 bars on each side) and start making walls. You need to apply wood glue to the flat surface of the block and arrange the slats so that they rest on the flat side surface of the bars. The slats are placed at a certain distance from each other to create gaps.
Applying glue
The slats are parallel
Advice! If you plan to make several boxes of the same size, then it is convenient to use a wooden template to create the walls.
Step 3. Then the slats additionally need to be secured to the corner bars using nails or self-tapping screws. In this way, two side walls of the box are made.
Additional rail fastening
Finished side wall
Step 4. Next, the prepared walls need to be placed in a special template (or simply held correctly) and, using the same principle as in steps 2 and 3, attach the next slats to the sides of the free sides of the bars. Thus, it will be possible to create two other side walls.
The next slats are attached
All side walls are ready
Step 5. Then the bottom is made. You need to lay two slats (with a length equal to the length of the box) parallel to each other, and fix other slats on them, but without gaps, so that the bottom is solid.
Making the bottom of the box
The bottom turns out to be solid
Step 6. All that remains is to secure the bottom to the underside of the box, and it is ready. If necessary, all structural parts can be sanded before assembling the box. It is better to varnish or paint the product after assembly.
The bottom of the box is attached
This is what the finished box looks like
From newspaper tubes
This interesting basket will look great in a nursery, bathroom or living room. If you have a lot of newspapers in your house, you can use them to create a useful and beautiful box with your own hands.
The photo shows a storage basket made of newspaper tubes, painted blue and decorated with fabric.
What you will need:
- Newspapers.
- Knitting needle (you can take a skewer).
- PVA glue.
- Scotch.
- Cardboard box.
- Acrylic paints and varnish, brushes.
- Textile.
- Scissors, ruler.
Step-by-step instruction:
- Cut the newspaper into equal strips measuring approximately 28x10 cm:
- We apply the knitting needle to the edge of the strip at an angle of about 45-60 degrees. We wrap the paper on a knitting needle and secure it with glue:
- We take out the knitting needle. You need to perform the same steps many times to get a sufficient number of tubes:
- We strengthen the bottom of the box with tape and paint it any color:
- We make markings for the main tubes, marking equal segments on the box:
- Glue the tubes according to the markings:
- We fix the additional cardboard bottom with glue:
- We paint the resulting workpiece. Let's start weaving. To create the first row, we braid the outermost tube-stand about the next one. We extend the horizontal tubes by inserting one into the other. We fix the vertical tubes with clothespins.
- If necessary, glue the ends. We braid the whole box:
- We glue the inner walls, securing the ends of the racks to them.
- We paint the basket in two layers, allowing the product to dry. Varnish:
- We sew a removable cover from fabric. The basket is ready!
A detailed master class on creating a storage box from straws with your own hands is in this video: