This article will not talk about countertops in the kitchen, but how to make this element with your own hands. Please note that this article is a kind of instruction on how to make a countertop correctly.
But before you start making such an important attribute in any kitchen, you should decide on the material from which the countertop will subsequently be made.
The most common materials for manufacturing
The most common materials today used to make the working surface of a kitchen set are:
- fake diamond
- wood or chipboard
- porcelain stoneware
- concrete
Each of the materials described above has its own advantages and disadvantages. Before choosing the most suitable option for certain conditions, it is useful to know their main characteristics.
By following the step-by-step steps of making your own countertops, you can largely avoid mistakes.
Making a classic table with 4 legs
This table option is suitable for both large and small kitchens. It is necessary to first complete the drawing, decide on the dimensions, and only then begin manufacturing. Thanks to the right finishing, the product can be decorated in any style.
Standard table with 4 legs
Materials and tools
It is necessary to prepare the following materials:
- legs - 4 pieces (not too thin). If necessary, they can be made from beams;
- tabletop plate 3-4 centimeters thick;
- boards for the frame 2×10 centimeters thick;
- screws;
- glue.
The following tools will be required:
- sandpaper;
- screwdriver;
- level;
- Bulgarian;
- measuring tape;
- square;
- plane;
- sander
Sander
Instructions for making a classic table
Step one: making the countertop. First, you should align the boards in width, and then in length. The tabletop must be carefully processed several times with a plane to make it uniform. In this case, you will need to pay special attention to the processing of the edges, which will allow the boards to fit together without any problems. Next, you need to mark the edges of the boards and make holes using a drill. After that, the boards are joined with wood glue. When the glue dries, you can remove any remaining residue with sandpaper and thoroughly sand the countertop again.
Making a countertop
Step two: make the base of the table. To do this, you will need to connect the legs with short crossbars. A couple of holes for screws are drilled in each such cross member. In this case, you should drill carefully so as not to pierce the legs through. The crossbars are secured at a distance of 15 millimeters from the edge of the leg.
Connecting short crossbars
Step three: secure the frame with long crossbars.
Connecting long crossbars
Step four: we make holes in the long crossbars, and when the glue sets, you can begin installing the tabletop.
Tabletop installation
Step five: we attach additional bars for greater reliability of the structure.
Installation of additional bars
Step six: after completing the construction work, finishing must be done. You can choose any color of the product; in the classic version it is walnut or oak. For such purposes, stain is usually used, and then the surface is varnished.
Table processing
Video - Making tables and stools from solid wood
Artificial stone for countertops
When deciding on the choice of material from which you can make a beautiful countertop, you should pay attention to artificial stone. A surface made from a similar material quite convincingly imitates real rock.
The main components for the manufacture of such imitation stone are polymer resins and high-quality cement. Special fillers are additional additives that give it sufficient strength.
An undoubted advantage is the ability to obtain a product of various configurations, which is an exact copy of the stone surface.
Making a kitchen work surface from artificial stone begins with the manufacture of formwork. It is advisable to use laminated plywood as a formwork material; it is most suitable for these purposes.
Eurobook sofa - 130 photo recommendations on how to make and assemble a comfortable and compact sofa- Assembling furniture with your own hands - 105 photos and a detailed video of how various furniture elements are assembled
- Do-it-yourself bookshelves - ideas for building shelves and shelves quickly and easily from scrap materials (155 photos and videos)
It is worth considering that the higher the accuracy of the mold manufacturing, the less time will be spent on additional processing.
Design features of kitchen tables
A product such as a kitchen table is made in several versions. They all differ in design features:
- Classic table with four legs. This is the simplest design of all the possible options, so it is suitable for beginners.
- Table with folding top. As in the first case, this table is distinguished by its simplicity of design. It is a table top with a folding base.
- Transformable table (folding). To make such a structure, you will need special tools and a mechanism due to which the table will fold out. Such products are most often assembled from laminated chipboard.
- Extendable table. The peculiarity of the design is that there is an additional element in the middle, thanks to which you can increase the table area at any time.
Extendable table option
If necessary, any of the above structures can be made at home. In this matter, the most important thing is to prepare all the tools for installation and follow the technology.
Tabletop made of laminated chipboard and wood
When wondering what kind of countertop you can make yourself, you can opt for wood, the most common material for making countertops. It compares favorably with other options due to the monetary component.
Disadvantages include poor resistance to mechanical damage.
Despite this, the use of high-quality hard wood will make it possible to make a high-quality product that will last for many years.
From chipboard
Chipboard is the most inexpensive and easiest to process material. For those who like to frequently change their interior design, there is no better option. They try to cut the tabletop from a whole sheet of chipboard - this improves its strength characteristics. The slabs are sold laminated with imitation of different textures: wood, marble, granite and others. But it is more practical to stick a sheet of HPL plastic onto the base, which protects well from moisture, household chemicals and damage.
The most vulnerable point of chipboards is the ends, through which water can penetrate. Therefore, it is important to treat the cut areas with sealant and cover with edge tape or aluminum strip.
Step-by-step instructions for making a wooden tabletop
You can start working after selecting the required size bars from hard wood (beech, oak). The material for the future working surface must be dried to wood moisture to avoid warping in the future.
The next steps are:
- White table: 115 photos and videos describing the selection and construction of cool and easy-to-use tables
- Corner sofas - 130 photos and videos on how to choose and where to place modern original corner sofas
- Do-it-yourself computer desk: 150 photos of making corner tables and features of the choice of materials
- Calibration of prepared bars.
- Gluing the bars into a single panel.
- Giving the resulting shield the required configuration.
- Cleaning and polishing.
- Treatment with protective compounds.
It is worth considering that wooden products must be covered with protective coatings.
Today, hardware stores offer a huge range of protective compounds for wooden surfaces. They do not allow moisture to get inside the fibers and give the surface additional hardness.
From boards
Warm, beautiful, alive - no matter how many new materials appear, nothing compares to natural wood. It is most convenient to make a tabletop from furniture board, but such a solution cannot be called budgetary. Therefore, tongue and groove floor boards are more often chosen, which provide a simple and durable connection.
Considering the features of the kitchen countertop, it is recommended for it:
- larch,
- oak,
- ash,
- spruce.
Home craftsmen also love pine for its ease of processing and reasonable cost. However, its wood is soft and needs additional strengthening impregnations.
Installation features
It is important to choose a smooth, high-quality and well-dried board that will not warp in the future. A tree with a rich texture looks impressive, the main thing is that there are no falling knots.
Installation is carried out on a base made of a sheet of plywood, which simplifies the process and makes the structure stronger. The finished countertop must be sanded and coated with several layers of varnish or water-repellent oil.
Advantages and disadvantages
The advantages of tabletops made of boards are obvious. However, for it to last a long time, it will require regular care and careful treatment. Hot metal utensils should not be placed on wood, and spilled liquid should be removed quickly. To avoid rotting and damage by insects, the protective coating of the boards is regularly restored.
Porcelain stoneware countertop for the kitchen
A product made from this material is quite resistant to mechanical damage. The work surface made from it has an attractive appearance and a long service life.
On the Internet you can find many photos of handmade countertops. You can make such a tabletop yourself with a minimum of effort. The disadvantages of porcelain stoneware products include low resistance to impact.
Why is the tabletop swollen?
Countertops are made, for the most part, from wood-based material. Which, when unprotected, strongly absorbs moisture. Thus, the cut areas of the table top that are not protected by laminated film must be treated with sealants. Which will resist the penetration of water into the chipboard.
A countertop that is not installed correctly and not properly processed will swell at the joints today or tomorrow. Also, there are cases when all installation is done correctly. But the countertop is covered with low-quality laminate. Which goes away over time.
Therefore, there is no need to skimp on the countertops in the kitchen. This is not a place where you can save money. You should choose a high-quality countertop with a high-quality finish. Because subsequent repairs will cost a pretty penny and take a lot of time, effort and ruin the nervous system)
Concrete countertop for kitchen
This option is quite simple to make yourself. The characteristics of a concrete countertop are similar to artificial stone.
But it has a fairly big advantage - environmentally friendly materials such as cement, sand, and water are used in its production.
From ceramic tiles
Regular tiles are recommended for Provence, retro or Scandi style, and large-format varieties are recommended for minimalism. It is advisable to choose a tile size that is a multiple of the width of the countertop in order to cut less material.
Installation features
The tiles are laid on a base made of plywood, OSB or moisture-resistant plasterboard. To protect against water, apply 2–3 layers of coating waterproofing. It is not advisable to fix the tiles with cement-sand mortar; it is better to use special glue.
It is also important not to skimp on joints - expensive epoxy grout will last much longer, maintaining its cleanliness and original shade.
The ends are finished with a tiled border or covered with an aluminum profile.
Advantages and disadvantages
Tile countertops are one of the most popular homemade solutions. Its advantages:
- moisture resistance;
- the ability to put hot food without additional protection;
- hygiene;
- environmental cleanliness;
- aesthetics and varied design.
The disadvantages include fragility - with a strong impact, the tile can crack. However, it is easy to replace it in one piece without removing the entire coating.
You can tile the countertop and work apron with the same tiles - this technique visually expands the space and is especially good for a small kitchen.
Step-by-step instructions for making a concrete surface for a table
Using this method, you can realize the best ideas for handmade countertops. It allows you to get a different color range by adding a dye of one shade or another to a liquid solution.
The future shape of the finished product depends on the shape of the formwork. Therefore, before you begin assembly, you should carefully inspect the plywood for the presence of deep potholes and potholes.
Choosing the shape and size of the table
When drawing up a drawing, the fundamental criteria are the shape and size of the future structure. The exact dimensions of the table will depend on the size of the kitchen and the number of residents. At the same time, it is important to ensure the correct placement of adults at the table, so usually the average height of the structure is 80-85 centimeters.
Before choosing one shape or another, it is recommended to measure the area of the kitchen
Important point! When determining the size of the tabletop, it should be taken into account that on average each person relies on about 60-65 centimeters.
The most optimal width of a kitchen table is no more than 1 meter. In the presence of a large-sized structure, difficulties arise when serving. At the same time, a table that is too small does not always allow all family members to sit at it.
Table 1. Various tabletop shapes
| Form | Description |
| Square or rectangular | This table can be installed close to the wall, thereby freeing up additional space. Quite often, such models are made with rounded corners. Depending on the dimensions of the structure, from 4 to 12 people can be seated at the table at the same time. In addition, if you move it to the middle of the kitchen, you will be able to get additional seating areas. |
| Round or oval | Such a table requires a spacious kitchen, because it is most often placed in the center of the room. There is no point in installing it close to the wall - this will only allow you to lose the usable area of the room. Tables of this type fit harmoniously into the interior of a classic kitchen; on average, they are designed to accommodate 4-10 people. Such models are often chosen by families with small children because of their safety. |
| Semicircular | An unusual type of round table that can be mounted against a wall. The main advantage of the design is the ability to place it in a small room. This table has up to 4 seats. |
| Original | If desired, you can design a table of any shape according to your own wishes. Designers bring various ideas to life, resulting in designs in the shape of a trapezoid, rhombus or polygons. |
Features of assembling formwork for countertops
Having previously marked the sheet of plywood, you can begin cutting the material. Sufficient accuracy when cutting can be achieved using a jigsaw.
It is advisable to use wooden blocks as side edges, fastening them together with self-tapping screws. After assembling the formwork, it is necessary to seal the joints. Silicone sealant is used as a sealant.
It should be noted that the higher the accuracy of marking and cut quality, the lower the sealant consumption will be.
To increase the strength properties of the finished product, reinforcement is used using metal rods with a diameter of 8 mm, or a ready-made reinforcing mesh with a cell of 5 cm.
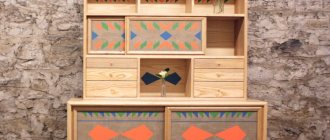
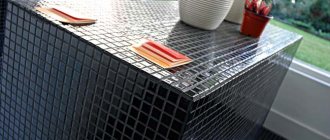
From mosaic
The mosaic countertop is a bright accent that gives the kitchen a Mediterranean flavor. Small tiles are indispensable for complex curved surfaces and multi-level joints, for example, in the window sill area. Countertops are finished with ceramic or frosted glass mosaic (smalt) - this is the most common and practical option.
Also, for bohemian-style interiors, you can use compositions of broken tiles with different textures and patterns. You will have to spend more time laying “mismatched” pieces of ceramics than ready-made mosaic panels. But as a reward we will get a truly exclusive and budget-friendly countertop. In addition, we will be able to utilize the battle in the best possible way.
Laying features
The preparation of surfaces for mosaics is the same as for other types of tiles. The material is supplied on a special support, in the form of sheets of different sizes. Mosaics on paper are laid in tiles on glue, and then the base is removed, revealing the front side. The panel on a silicone or polymer substrate is attached directly to it, without turning it over or removing it.
Only light glue is chosen, especially for translucent smalt. It is better to use epoxy-based grout.
Advantages and disadvantages
Ceramic mosaic has the same advantages as tiles or porcelain stoneware, but it provides more decorative possibilities. Smalt is stronger than ceramic analogues and looks impressive, as if transmitting light from within. The main disadvantage of mosaic is the high cost and large number of seams that require maintenance.
Pouring formwork with concrete solution
Concrete mortar is prepared by mixing sand, cement and crushed stone. To reduce the porosity of a concrete product, it is advisable to use a plasticizer.
Pouring pre-prepared formwork takes place in several stages:
- filling the formwork with concrete solution by 50-40 percent
- laying the reinforcing structure
- complete filling of the entire formwork volume
The final drying time for a concrete countertop is about a week. The finished, dry surface is sanded until a perfectly smooth plane is obtained.
Due to the fact that concrete has high hygroscopic properties, it would not be superfluous to cover it with moisture-proof compounds.
Details
Varieties
Such designs can be very different. They can be roughly divided into linear and corner countertops for the kitchen, which are not difficult to make with your own hands. It’s easier to make linear ones, since in this case you don’t have to take into account angular curvature, which often makes the workflow more complicated. This is extremely important for structures made of tiles, which will reveal any flaw in the walls by the mismatch of seams between the tiles. So, if everything is clear with linear structures, then corner countertops can have a laconic or complex shape. For example, the table may have smooth corners, which will ensure safety when moving around the kitchen in conditions of lack of space. Moreover, corner models according to the drawings can be made from 3 conventional figures - 2 rectangles and a square in the corner with a beveled corner. Depending on the type, it can be monolithic or prefabricated. Joining in products made of MDF and wood, chipboard can be seamless. It is believed that sawing became the most technologically advanced option, and therefore monolithic structures have become a rarity.
How to make a concrete countertop with your own hands
To give a homemade concrete countertop a beautiful appearance with a marbled texture, in addition to the necessary accessories, you need to consider the presence of a grinding machine. For the work, it is worth preparing plywood (chipboard), aluminum profiles, boards, crushed stone, sand and wire for reinforcement. Even during creation, you need sealant, drying oil, assembly adhesive and paint and varnish for concrete. First, make formwork from boards 4 cm thick. You need to cut the chipboard sheets to size, install the sides, and secure them with self-tapping screws. The places where plywood and beams are fixed are filled with silicone, which will prevent concrete from getting into the cracks. The formwork should be treated from the inside with drying oil so that the solution does not stick to the boards.
As reinforcement, you need to use wire with a thickness of no more than 0.8 cm. A lattice is made from it, slightly smaller than the formwork, and placed in a container into which glue is poured. The grating needs to be glued to the plywood, and after complete drying, you can pour in a concrete solution. To prepare, mix crushed stone, cement and sand in a ratio of 2:1:2. To improve quality, it is worth adding a plasticizer to the solution. The dye is added at the rate of 1 to 50, leaving a little for the finished tabletop. The excess is removed with a spatula, and then the countertop is covered with polyethylene for approximately 1 week. After drying, the surface should be sanded smooth and placed on an old kitchen table. Before this, the old tabletop needs to be removed and the body reinforced with timber supports. You can put the stove in a permanent place.
Manufacturing from chipboard
To make such a tabletop, prepare chipboard boards (this will be the working surface). When working, use 1st grade material with a minimum number of visual defects. To make the chipboard tabletop more durable, it should be made monolithic. Before you start marking the slab, prepare drawings with exact dimensions, holes for tiles and sinks. After this, transfer the dimensions onto chipboard sheets, cut the material with an electric jigsaw with knives of the required size. If it is not there, then use a sharp hacksaw. For smooth sawing and cutting without chips/burrs, stick masking tape along the sawing line. When working, you should use blades with fine teeth. The composite needs to be shaped by grinding the corners and ends, and then checking the surface for smoothness and evenness. If you notice unevenness, then sand everything “to the level”. You can use sandpaper for this.
Afterwards, you can begin to impregnate the composite, and then decorate the surface and produce finishing coatings. The tabletop is treated with protective coatings, and after drying, it is varnished several times. In this case, all new layers are applied only after the previous one has completely dried. Before processing, it is imperative to apply a primer layer to the composite. Only after all this can you paint the slab. A chipboard countertop for the kitchen is made by hand and treated with stain. This substance is suitable for processing particle boards, and this composition usually dries out after 10-12 hours. Varnishing is done with water-based paints, and the ends can be treated with melanin edge or veneer.
Tile covering
The tile countertop is laid on 2 plywood layers, and they must also be glued together. To improve the quality of the product, the slabs should be treated with waterproofing material. The convenience of the technology is the fact that the design can be made larger than the original one. At the initial working stage, measurements are taken and the material is selected so as to reduce the number of cuts. If you plan to update old countertops, then you can use a pedestal kitchen set. In other cases, painted chipboard should be used. It is worth cutting it with a circular saw (taking into account the required dimensions). After cutting the edge of the substrate, it is worth treating the coating with a moisture-resistant impregnation. You can apply oil putty, but first apply masking tape. Afterwards, the ends are sanded and treated with an oil-based paint and varnish composition. Assembly is carried out using metal corners, screws and dowels. Before you start tiling the countertop, you should coat it with a moisture-resistant impregnation using a paint brush with natural bristles. After that, drying oil is applied, and when the structure dries, you can begin finishing the surface with ceramic material.
It is best to use epoxy/acrylic based glue, as cement glue will not adhere well to the surface of the wood. Laying is done in a thin layer, distributing the mass of glue with notched spatulas. Work begins from the front side and leads to the rear edge (wall). New rows are laid end to end, and when working, special clamps or crosses are used. The ends should be decorated with mosaics or wooden slats. At the final stage of finishing the countertop, you need to grout the seams with a grout mixture. Afterwards, wait for the grout to dry and use a regular dishwashing sponge to get rid of the excess, polishing the finished surface.
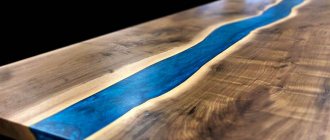
Epoxy resin table top
This type of material is initially liquid and is quite successfully used for making epoxy countertops with your own hands.
The undoubted advantage of this material is the original appearance of the finished product. With the right approach to choosing decorative elements, you can get a unique appearance of the surface.
What material is better to use?
Before you start making a kitchen table, you need to choose the right material. The choice is influenced by the following nuances: cost, durability, processing capability (availability of certain tools), room design.
It is also worth taking into account that when making a structure, craftsmen can use several materials at once, combining them with each other.
Table 2. Materials for making the table
| Material | Characteristic |
| In most cases, wood is used in the manufacture of furniture, and in particular kitchen tables. The popularity is justified by the environmental friendliness, decorative appearance of the material and the lack of processing difficulties. It should be borne in mind that wood is not the most durable material, because it is quickly damaged during use - over time, various dents, cracks, and chips may appear on the surface of the table. In addition, untreated wood quickly absorbs grease, which leaves unsightly marks. Deformation of such a structure can occur due to excessive humidity in the room. In addition, as the wood dries out, it begins to shrink, which does not always have the best effect on the structure. Experts recommend choosing only durable wood for the manufacture of countertops and other elements of the product - birch, oak, ash and beech. |
| Such materials are usually chosen when there is a desire or need to save money. Most often, MDF and chipboard are used for such purposes, because they have a fairly affordable cost. The disadvantage of such plates is considered to be not the best strength. So, they can become deformed and sag even with a slight impact. Over time, the corners of such a table break off, so to ensure greater structural strength, a protective layer of wood or stone is placed in the upper part. Some experts prefer to cover the slabs with PVC film (you can purchase it at any hardware store). The main advantage is that there is a huge variety of such films of all shades. In this case, you can purchase ready-made laminated MDF or chipboards. Such countertops have ready-made rounded corners, but their main feature is the ability to withstand high temperatures and mechanical stress. |
| Plywood | To make a tabletop, you should use only durable plywood with a thickness of at least 1.2-1.5 centimeters. The method of using such material is practically no different from the previous version, so it is necessary to provide a method of protective coating. |
| Plastic | When making furniture, various plates, pipes, and PVC bars are often used. Polycarbonate is the most widespread because this material is very similar in appearance to glass. Usually it is recommended to make only the tabletop from plastic, but some craftsmen use it for other parts. Of course, this artificial material does not have the same decorative qualities as wood, but plastic can be used to make quite unusual products that will fit perfectly into the interior of a modern kitchen. |
| Glass countertops have become very popular in recent years. For work, you should choose only durable glass, the thickness of which is at least 0.5 centimeters. The main advantage of the material is ease of care, but the disadvantage is excessive fragility. |
| Metal | In some cases, metal is used to make the table frame, which increases the strength of the structure. For this purpose, you can purchase rectangular pipes, corners, and profiles. |
Photos of do-it-yourself countertops
Tell your friends