- Posted by larisochkaivanovna
- Date: November 30, 2018
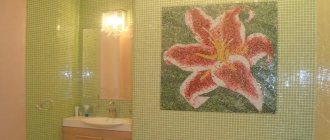
A kitchen apron is a surface above the work area that protects the walls from contamination during cooking. Accordingly, it must be resistant to wear, temperature and moisture, easy to wash and at the same time look attractive. Let's consider whether such a common finishing material as laminate is suitable for this purpose.
- 2 Types of laminate, composition, material selection criteria
- 3 Recommendations for installing an apron yourself
3.1 Surface preparation
- 3.2 Installation on lathing
3.2.1 Video: laying laminate on sheathing
- 3.3.1 Video: how to install a laminate apron with glue
- 5.1 Video: ideas for laminate aprons
Advantages and disadvantages of a laminated apron
Laminate wall coverings have the following advantages:
- easy to clean. To get rid of simple stains, just wipe it with soapy water; in case of more complex stains, you can use any chemicals, the laminate will not lose its quality and visual appeal;
- resistant to moisture (applies only to moisture-resistant laminate);
- easy to install - it is easier and faster to install than traditional tiles, and there will be virtually no dirt in the process;
- has a long service life in the absence of mechanical stress;
- has a low price;
- has a rich assortment of colors and textures;
- imitates the look and structure of natural wood, stone or tile, can be matte or glossy, structured;
- consists of environmentally friendly material.
You can decorate an entire wall with laminate
Flaws:
- ordinary non-waterproof laminate warps from moisture;
- unstable to high temperatures (cannot be installed next to a gas stove - the distance to it must be at least 10 cm).
User reviews
Sergienko Anton Pavlovich, 59 years old, Kemerovo: “I would like to compare laminate flooring with lining, which is made of larch. Polished fresh wood is much more beautiful, and if it is installed correctly, then when heated from the heat of the stove, the aroma of resin is formed. One of the disadvantages is that larch quickly turns black from water. I suffered for a long time and looked for a laminate with a specific pattern and color. I made an apron from lamellas near the sink, and from larch near the slab. Everything has been fine for four years now, there is a characteristic aroma, and the apron looks like new. In terms of money, everything cost the same as for Turkish tiles.”
Larik Nikolai Andreevich, 33 years old, Volgograd: “My advice to you is that as soon as the apron is laid, you should immediately cover it with a monolith or glass. No varnish compositions or polishes can save you from moisture. Because of the drawers, steam will not escape, and the water will hang in drops on the wall. There is neither the energy nor the time to constantly wipe and dry. It’s not for nothing that the apron was invented earlier; it’s a great phenomenon. It will be a little more expensive, but it will last for 30 years, and no less.”
Types of laminate, composition, material selection criteria
Laminate coatings are divided into several types depending on the composition and installation method:
- MDF. Inexpensive panels that can be installed on all types of sheathing. The disadvantage is that it is not resistant to moisture.
MDF - the most budget covering
- Chipboard. More durable than MDF, they are attached without lathing using plastic dowels, but also absorb moisture. Unlike MDF, they have non-laminated ends, so during installation you will need a special profile for the edge.
Photo printing can be applied to chipboard
- Laminated hardboard. It has good density and does not allow moisture to pass through. Installed on frequent sheathing.
- Laminate flooring. Durable, can also be used as a wall covering. It can be attached to the sheathing or directly to the wall, but the surface must be perfectly flat.
All types of laminate consist of the following layers:
- a base layer of wood fibers, which provides strength, on which the remaining layers are applied;
- cellulose impregnated with a water-repellent composition;
- decorative layer imitating various textures;
- protective coating made of acrylic resin with special additives.
All types of laminate consist of several layers
For a kitchen apron, it is recommended to select panels of strength class 31 or 32. They are also the most moisture resistant. The environmental safety class must be E1. Other labels may contain toxic substances - formaldehyde.
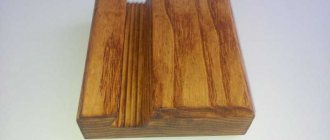
For the apron, a waterproof laminate of wear resistance class 31 or 32 is optimal
DIY installation
Almost everyone can make a kitchen apron from laminate with their own hands. It is very important to follow the sequence of actions and perform everything carefully and carefully.
All installation steps are divided into several stages:
- Preparatory work . The surface of the walls must be covered with putty. It eliminates all irregularities and defects. The wall should be leveled and prepared for subsequent installation.
- Installation of sheathing. Self-assembly of the structure is not difficult. It is advisable to take small blocks of 4x4 cm and attach them to the wall at a distance of 50 cm from each other. The sheathing can be assembled either over the entire wall or over part of it.
- Installation of laminate to the sheathing. The laminate sheet is secured with screws, plastic dowels or screws to a lath covered with concrete screed or linoleum. In certain cases, special glue is used. When joining elements to each other, all connections are covered with sealant, which increases the degree of protection from external influences. Always start attaching the plates from the bottom.
- Final works . It is best to cover the edges of a laminate kitchen apron with decorative corners made of polymer materials.
Care Tips
After installation, the laminate is cleaned of debris and dirt. It is enough to rinse it with plain water. Detergents are used to remove grease and dirt during operation.
If scratches appear, you can use a wax pencil that matches the color of the coating - apply it to the damaged area and polish with a dry cloth. Damage from water can be restored by wax itself - if applied to the entire surface, it will create a protective film.
Deep scratches are repaired with a special putty for laminate flooring, which is sold in powder form in hardware stores. To get rid of damage:
- Dilute the powder according to the instructions.
- Clean the surface from dirt.
- Apply the product using a spatula, being careful not to go beyond the scratch. If this happens, the excess must be removed as quickly as possible before the putty dries.
- After drying (half an hour to an hour), the surface is polished with a dry cloth.
Required Tools
tool for laying laminate flooring on an apron
To carry out the work, you will need tools that are available to almost any home owner:
- roulette,
- level,
- ruler,
- putty knife,
- screws and nails,
- glue,
- hammer,
- screwdriver,
- electric drill,
- jigsaw
Kitchen design with a laminate splashback
When choosing laminate flooring for your kitchen interior, you need to take into account its main colors:
- traditional - birch, cherry, oak, wenge, walnut, both dark and light;
- neutral and pastel - ash, light birch, light alder, light oak;
- cold - milky, cream, shades of gray, white oak.
The color and texture of the kitchen apron should be in harmony with the overall interior design, and it looks better when the wall covering matches the tone of the doors, trim or window frames. Decorating it in the same color as the floor is not a very aesthetic solution.
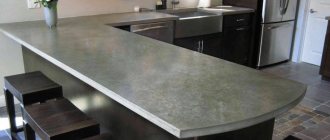
Often a laminated panel is combined with a countertop made of the same material.
The apron is often made in the same tone as the countertop
Decorating the area above the work surface with laminate can be appropriate in almost all interior styles. In this case, it is only important to choose the right type of coating:
- Panels with the texture of antique artistic parquet will best fit into classic interiors, as well as Empire, Victorian, Baroque, and sometimes Art Deco or retro styles.
- Imitation of natural wood, depending on the shade and texture, is suitable for any design from classic to high-tech.
- The texture of aged boards is used in kitchens decorated in country, Provence and shabby chic styles.
In the Provence style, laminate with the texture of natural boards is used
- Laminate in cool shades will look impressive in Gothic interiors (it is better to choose panels in dark colors), as well as in high-tech style. In some cases, such an apron would be appropriate in a Provencal kitchen.
Laminate in dark shades looks impressive
- Panels with bright patterns and 3D designs are suitable for kitchens in modern, minimalist, and high-tech styles.
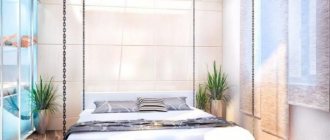
In sunny rooms decorated in light colors, a laminated apron with a matte finish in neutral natural colors would look good. For dark and cramped kitchens, it is better to use light glossy surfaces.
An apron with a wood texture emphasizes the light facades of furniture
If a panel with a pattern is installed, the size of the pattern must correspond to the dimensions of the room. An apron with a large ornament in a small kitchen will look bulky and attract unnecessary attention.
An apron with a large pattern is better suited for spacious kitchens
My friends have a laminate apron. After a short time of use, in some places it began to sag and spring back. And such a coating, in my opinion, does not look very presentable. Of course, this option is very good as a temporary measure when a major renovation is just being planned, or for tenants of apartments in the “granny chic” style, if they want to cover up the old tiles, but the owner does not agree to expensive repairs. But for a thorough renovation in my own apartment, I personally prefer ceramic tiles.
Before you start
Installation of the material can be carried out in several ways: on the lathing or using the adhesive method. Regardless of the method chosen, the preparation measures for the material and surface are the same.
Installation tools
- Jigsaw or hand saw.
- Hammer.
- Building level.
- Pencil and ruler.
- Wooden block.
- Electric drill.
- Wooden slats for sheathing. If the glue method is used, then liquid nails.
- Nails, screws.
What to look for when choosing
It is important to understand that not every type of laminate is suitable for operating conditions.
If you want to choose a suitable floor covering, you should pay attention to the markings on the packaging
It is very important to choose a laminate suitable for the kitchen
First of all, determine the wear resistance class. The conditions in the kitchen are far from ideal - constant humidity, temperature changes. Therefore, it is necessary to choose the most wear-resistant type of laminate. The optimal indicator is considered to be level 32 or 33.
If you do not expose the coating to mechanical damage and open fire, and promptly wipe up spilled water, the floor can last you up to 15 years. However, laminate with a wear resistance rating of 34 can last you even longer, but it also costs more - most often there is no point in overpaying for it.
Choose a coating with increased moisture resistance
The moisture resistance factor is also equally important. Special treatment can significantly increase the resistance of the laminate to water and steam. Look for a material that has an image of water droplets or a tap on the packaging - this is best suited for use in the kitchen.
Moisture resistance does not mean that the coating should be filled with water
Pay attention to the type of locking connection. There are two types of laminate - with Click and Lock fasteners
The first is a collapsible groove system, the second is something like a snap lock. For the kitchen it is better to choose Click type laminate. Firstly, it is more durable and reliable, and secondly, it is easier to install - you can handle it even without experience in laying floors.
The groove system allows for maximum tight coupling
Lock-type coatings look cheaper, but such locks are not very reliable - if the laminate is not laid too tightly, the slabs will begin to move. And the installation process itself is much more complicated. In addition, unlike Click-type laminate, it requires a perfectly flat surface - you cannot do without a thorough rough finishing.
Lok fasteners provide a perfectly smooth surface
Don’t forget about the manufacturer’s reputation: don’t chase dubious savings. A suspiciously cheap laminate from a No-name manufacturer is unlikely to serve you for long - most likely, they are trying to sell you a fake that is not of very high quality, and sometimes even dangerous to your health.
Buy laminate only from trusted manufacturers
It is very important to take into account such a factor as the thickness of the product. It is logical that the thicker the laminate, the more durable and stronger it is.
True, the price also increases in proportion to the thickness of the laminated board. For the kitchen, we recommend choosing a laminate that is no narrower than nine millimeters. You can do more, but then get ready for serious expenses.
The thicker the coating, the more reliable it is
Laminate boards with a beveled edge look very nice. The floor is voluminous and textured. However, this option is not very suitable for the kitchen - moisture and dirt accumulate in the recesses, which does not have a very good effect on the service life of the material. Therefore, give preference to the optical chamfer: the panels at the edges of this laminate are slightly darker than the middle. This makes the outline of the board stand out while maintaining the smooth texture of the floor.
Chamfer is a very interesting design technique
A very important factor that is often forgotten is the environmental friendliness of laminate flooring. In any case, the material will contain the emission of formaldehyde, an element toxic to humans, which is released into the air when heated. Read the label carefully: the maximum permissible emission class is E1. It’s better to spend time and find a laminate with class E0 - the safest from an environmental point of view.
Be sure to check the composition of the laminate
Modern types of laminate are often produced with an additional sound-absorbing layer - for example, Sound Protect. An extra 1-2 millimeters hides the noise level, making your stay in the kitchen more comfortable. True, such coverage is quite expensive. Therefore, weigh your financial capabilities - it will probably be more rational to install a separate soundproofing substrate.
The substrate often copes no worse than a special layer
Texture also plays a role. We recommend choosing a rough laminate surface - it does not slip, which means the risk of injury is much less than when using a smooth glossy laminate.
Preparation
Depending on the material chosen, the installation of the apron may look fundamentally different, but let’s still look at some basic principles that are always appropriate.
- First you need to understand that the apron can be installed on a bare wall without any finishing, which is important in the case of plaster or tiles, or it can also be mounted on top of the old finishing, if it is glass or laminate. Regardless of how the installation is carried out, it is advisable to prepare the wall under the future location of the apron by degreasing it and carefully removing the fungus: this will help the tiles and plaster adhere better; in the case of hanging panels, it will simply protect against the spread of bacteria and mold.
- If certain signs of destruction are clearly visible on the surface of the wall, it is better to immediately repair all cracks and potholes, since even when attaching hanging panels, they can lead to peeling over time.
- A separate point is the correct calculation of the amount of consumables. Before carrying out installation work, it is necessary not only to correctly calculate the length and width of the future apron, but also to clearly mark on the wall the location of its future installation. In such a unique plan, it is necessary to include places for fastening, if we are talking about screwing on panels.
- The length of the apron is almost always determined by the corners, door and window openings, but how high it should be is solely a decision of the planner. As a rule, the apron is limited from below by the sink, stove and countertop, and from above by wall cabinets and a hood. Accordingly, it is necessary to estimate the levels of the upper and lower furniture and calculate the dimensions of the apron so that it completely covers the space between them.
It is more convenient to choose a finish after the exact dimensions of the apron become known. Cutting the same tile, especially if you do the installation yourself, will be much easier if the length and width of the apron are multiples of the parameters of each individual tile.
How to choose?
Before you start decorating a kitchen backsplash with laminate, you should choose the right type, since the service life of the finish will depend on this.
Since today the construction market is represented by a chic assortment of laminated boards, when purchasing it you need to pay attention to some indicators
Wear resistance class. For kitchen splashbacks, it is recommended to purchase panels of class 31 or 32. They are resistant to various influences and last a long time.
Environmental friendliness. The facing material in the kitchen must be safe for human health and not emit harmful substances when exposed to high temperatures. To do this, the working area must be sheathed with boards of at least E1 class. It does not contain formaldehyde and does not depend on environmental conditions.
Moisture resistant. Laminated panels, which have an additional protective layer, are ideal for kitchen splashbacks. They are more expensive than usual, but last longer and do not lose their attractive appearance.
Thanks to modern technologies, laminated surfaces are produced in various modifications, which may differ in properties and design.
This is important to consider when purchasing material for covering the apron.
MDF panels. They attract many craftsmen with their low price and simple installation, which can be carried out on any type of sheathing. But this material is hygroscopic and only superficially resembles a laminate, since its surface is covered with varnished paper. Laminated panels are not suitable for kitchen splashbacks.
Chipboard. They are one of the types of laminate with increased density. Such panels are durable and can be installed without lathing.
The downside of the products is their hygroscopicity, so they will not last long as decoration.
Laminated hardboard. This is a dense pressed material that is ideal for kitchen aprons.
Thanks to its high quality, it will serve as reliable protection for your work wall.
Laminate flooring. Despite the fact that this type is intended for decorating floors, it can also be chosen for finishing aprons.
In addition, it is worth noting that the boards are available in different thicknesses, ranging from 6 to 12 mm. Products with a thickness of 6-7 mm are classified as thin, over 12 mm - as thick.
Panels with a thickness of 8 mm are well suited for cladding the work area.
The laminate also differs in the width of the panels, which can range from 90 to 160 mm. The width depends on the appearance and size of the models.
An important criterion in choosing a laminate is its color. Most often it is made in traditional shades imitating oak, walnut, birch and cherry. There are also boards in pastel and neutral shades, reminiscent of the texture of ash.
If the design provides for cooler colors, then for the kitchen apron you can buy panels in gray, cream and milky tones. Stylists recommend choosing the colors of the laminated surface so that they match the shades on the door panels, window frames and trim.
Grouting joints
The choice of grout should be done in the same way as with glue. We take the most popular and affordable option. Fortunately, the stores are full of them. The mixture is a mixture of varied composition and shade. You will also need a regular sponge, for example, for washing a car.
We choose a rubber spatula as our main assistant. It does not scratch or otherwise mechanically damage the top layer of ceramics, which is varnished and its appearance and functions depend on this. A small spatula will fit perfectly when grouting internal corners.
It is better to get rid of the remaining grout within 15 minutes, otherwise it will harden and the process will be considerably delayed. After this, all ceramic tiles should be carefully and thoroughly washed more than once until the stains completely disappear.
Installing an MDF apron yourself: step-by-step instructions
In stores you can find many suitable materials for making an apron. If you have a choice between installing an apron in the kitchen from fiberboard or MDF, as practice shows, it is better to use the second option
Particular attention is paid to MDF, since the material meets all the necessary requirements. It also has special advantages: ease of selection to suit the desired interior and ease of installation work.
Before you learn how to install an MDF apron in the kitchen with your own hands, you need to study the advantages and disadvantages of the material to make sure of its quality.
Advantages:
- Low price when compared with other building materials - building tiles or mosaics.
- Installation is easy, even a non-professional can handle the work, since fixation requires a minimum of tools.
- MDF attaches to any surface, regardless of what material was placed on the wall before it.
- Light weight structure.
- There is no need to use complicated tools to secure MDF.
- The material can be further decorated with drawings or various patterns using photo printing. Pasting patterns is not difficult.
- If replacement is necessary, the panel is as easy to remove as it is to install.
- Low-current networks or ventilation can be installed under the finishing material.
Flaws:
- Chemically active substances can ruin the appearance of the apron.
- Over time, the panel will begin to move away from the wall.
- The material is flammable, so you need to handle matches and incendiary devices carefully.
Preparation
First of all, make sure that the necessary tools and supplies are on hand:
- Wall building level. It is used to install an apron without tilting.
- Saw. If you can’t find the right size MDF in the store, you’ll have to cut off the excess parts yourself. You can also purchase an electric jigsaw or circular saw. Then the speed of material preparation will increase. Such equipment is also convenient because the cut edges will be more accurate, without jagged edges.
- If the walls are uneven, plaster will be needed to make them suitable for installation.
- Drill and mixing attachment for stirring plaster. These tools significantly reduce preparation time. If necessary, use any long stick for stirring.
- Tape measure for precise measurements.
- Pencil or marker for marking.
- Self-tapping screws or liquid nails on which MDF is attached.
Before starting the main work, prepare the material for installation. At first glance, it may seem that installing MDF is an easy process. This is not far from the truth, but some nuances need to be taken into account.
First of all, you have to calculate the dimensions of the future structure:
- Calculate the distance from the apron to the floor. To make things easier, simply measure the height of the countertop. Usually it is a standard size - 85 cm, but it is advisable to verify it in practice.
- The next step is to find out the height of the apron. This is the distance from the wall cabinet to the countertop itself. Size varies from 55 to 65 cm.
- Third step - do not forget to take into account that a hood is installed above the stove. The distance from the tabletop to it is also standard - 75 cm.
- The last preparatory stage is marking out places for several outlets. Before installing MDF on the wall, pre-cut holes for them.
Preparing the work area
Just because a kitchen has recently undergone a major renovation does not mean it is ready to install a backsplash.
Preliminary preparation required:
- Remove old finishing material from the surface. This applies to various screws or nails, any defects on the wall.
- If there are gouges or chips, carefully fill them with putty.
- Next, use an antiseptic composition to treat the wall.
It is difficult to work without a mounting strip, since it acts as a support on which the MDF is installed. This is also a kind of starting point for installation work. When the apron is installed in its proper place, the bar is removed.
Varieties
Let's look at the types of laminate and their differences, because the scope of its application directly depends on this.
• Furniture. This is a chipboard covered with a laminating film. Due to its high resistance to moisture and stress, it is used for interior decoration and is suitable for use in the kitchen. However, it is not suitable for decorating bathrooms. In conditions of high humidity it warps.
• Floor-standing. The most common material for floor finishing. This is a fibreboard consisting of three layers: stabilizing, load-bearing and decorative. This type of laminate is divided into types of locks and thickness. Thickness ranges from 6 to 12 mm in increments of about 1 mm. This indicator affects wear resistance, sound insulation and assembly. The higher the thickness of the coating, the easier it is to install.
• Adhesive, vinyl. This innovative flexible material is made in the form of tiles that resemble traditional laminated board panels. The main advantage of flexible laminate is the high elasticity provided by the polyvinyl chloride it contains. Externally, plastic laminate is as similar as possible to wood laminate, but it has 2 technological layers, not 3, due to which its thickness is noticeably thinner, and the installation process is as simple as possible. This material is not at all afraid of moisture and is ideal for use in bathrooms and toilets.
Varieties according to fastening methods:
• Butt (aka furniture). Its edges are absolutely smooth and have no locks. It is attached with glue by adjusting the ends of the panels to each other. First, the reverse side of the panel is coated with a zigzag (it is unnecessary to completely cover the entire surface with glue). Then the panel is laid, glue is applied to its ends, the next panel is adjusted to it, and so on. If excess glue protrudes on the surface, it must be carefully removed with a cloth. Suitable for installation on flat walls that do not require lathing.
• Tongue and pile. Its panels have a straight tongue and groove lock. During installation, the ends do not need to be treated with glue, due to which the joints are dry and clean. Installation is carried out on the sheathing using small nails that are driven into the tongue groove. When mounting on a wall, it is mounted on glue. Ideal for decorating walls and ceilings.
• Clicky. This is an advanced tongue and groove laminate. The only difference is in the profile of the lock. The ridge in section has a complex shape, the groove has a similar, suitable profile. When snapped into place, such a lock forms a strong connection. When laying, the panels are tilted relative to each other with the adjacent side at an angle of 20 degrees and the lock is inserted into the groove, then lowered to the horizontal and the lock easily snaps into place. When mounted on walls, this laminate is attached to the sheathing with glue. It is characterized by high strength and resistance to deformation.
Regardless of what type of laminate you choose for wall finishing, it is important to ensure that the surface is perfectly flat. To do this, you must first level the wall.
Otherwise, the most beautiful and expensive laminate will lie unevenly, warp, the joints in it will diverge, and the appearance will be hopelessly ruined.
Ceiling decoration
Many designers are trying to transform the gray and dull style of the room into something lighter and more modern in nature.
One of the tricks that helps them do this is to place laminate flooring on the kitchen ceiling. Every day this method is gaining more and more popularity, but you need to understand that the process itself is quite lengthy and complex in principle. Ultimately, you can get not only a spectacular interior, but also additional sound insulation of the ceiling.
Installation of the planks is carried out on a pre-prepared sheathing using self-tapping screws. The cost of decorating a ceiling with laminate can sometimes be identical to finishing with plasterboard. For work, it is quite possible to choose thin planks with the lowest strength class, since there will be no loads or external influences on it.
Stylists and decorators use this technique to achieve solutions to all kinds of design problems and ideas. Often the decor at the bottom of the wall is extended and “led” onto the ceiling, which allows you to visually highlight a separate area in the kitchen. Typically, such finishing is used for high rooms, since installing planks will, at a minimum, take about 100 mm of space and make it smaller.
Peculiarities
A laminate apron is an original idea for decorating a kitchen. According to many builders, this material is considered the best for finishing rooms with high humidity, since it consists of several layers:
- a base made of wood fiber, it gives strength to the board;
- paper impregnated with a special composition;
- textures with imitation tiles, stone and wood;
- acrylic protection, extending the life of the panel.
Thanks to its special structure, the laminate is characterized by a high level of moisture resistance. The board is easy to care for; to clean it, simply wipe it with a damp cloth.
The advantages of the material include easy installation, which is quicker than tiles. In addition, the board is available in a huge range of textures and colors, which simplifies its selection to suit the design style. Manufacturers produce boards of various classes, so anyone can purchase one, regardless of their financial situation.
As for the disadvantages of finishing the apron with laminate, there is only one - the panels are afraid of high temperatures.
Personal impressions
Usually, when choosing a material, reviews and personal impressions have a greater influence on the decision than manufacturers' assurances.
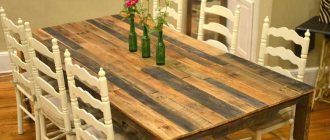
The author of the article used a regular seamless floor laminate of class 32 in an area of much greater risk than the walls and even the apron - as a covering for the work area countertop and dining table. The laminate was glued on and edged with an aluminum threshold.
Impressions after a year are as follows:
- The material is extremely durable. Numerous contacts with dishes, cutting vegetables on the table surface and other loads did not leave any marks on it at all.
- The joints between the boards stand out slightly; however, the boards remain lying without the slightest gap. Food residues and dirt do not accumulate in the seams.
- The appearance of the table is beyond praise.
- Near the stove and sink, where hot and wet dishes were constantly placed on the boards, the joint between the boards swollen barely noticeably. If you had to redo the countertop, it would probably be a good idea to assemble click locks with sealant.
The opinion that laminated wall panels in the kitchen should be used away from the stove and cooking area was also hard-earned: in one of the previous apartments, the panels were installed within the range of splashes and quickly lost their original appearance.
Something like this.
The laminate boards are secured at the edges with self-tapping screws, which will be hidden by the edging.
Panel laying methods
Not everyone has the money to hire a team of professionals who can handle laminate wall finishing in the kitchen. Installation is often done with one’s own hands, mentally preparing for a long and tedious procedure. In vain: beginners can finish finishing a floor-to-ceiling wall 2.8 meters high and three and a half meters wide in a day. Before covering the wall with panels, choose a suitable method for laying the panels.
Horizontal
This method is difficult for beginners in matters related to apartment renovation. After laying a board 1 m long, secure the plinth. It hides the joint and prevents the laminate from folding like an accordion. The folding problem is solved by alternating rows of short boards with long ones.
Vertical
Beginners prefer the vertical method. It is suitable for laying wall panels that have a square shape, pattern or imitate parquet made from different types of wood. It is correct to place the panels with the end shifted, i.e. randomly. By covering a wall with laminate in this way, you can achieve a visual increase in the height of the ceiling in the kitchen. Lathing and liquid nails are used to secure the laminate.
There is no need to pre-level the wall when attaching the laminate to the sheathing. This method is good for “Khrushchev” buildings, where the sound and heat insulation of the premises suffers. If the kitchen is small, then this method will not work, because it will make it even smaller. The laminate is fastened together with locks, and for fastening to the sheathing, glue or a hidden type of fastening element, clamps, are used. The structure holds better if, on one side, it is attached to the sheathing with screws/nails, and on the other, it is mounted on brackets placed in the groove of the lamella.
Liquid nails are often used when working with laminate flooring. This method is easy to implement, since you do not need to assemble the sheathing to attach the panels. So that they fit tightly to each other and the joints are not visible, prepare the wall by first leveling and drying. Having assembled part of the wall on the floor, glue it to the prepared surface.
Moisture-resistant or water-resistant coating?
High-quality modern laminated panels are practically not afraid of water - special water-repellent wax-based compounds are applied to them as a protective layer. However, not all manufacturers process the joints between panels, and therefore these parts of the coating remain susceptible to moisture.
For the kitchen you can choose:
- Moisture-resistant coating - does not react to high humidity in the room, but the base may deform if water gets into the joints. Able to withstand drops, splashes and even small puddles, but the exposure time to the liquid should be no more than 20 minutes. In this case, sealing of the seams is required during installation.
- Waterproof laminate is more expensive, but can withstand moisture for 6 hours. Here the joints are processed at the factory, so no additional measures are required to protect them. Laminate with a plastic base is considered the most reliable, but it is also the most expensive.