One of the main pieces of furniture in any home is the table. Family, relatives, and guests gather behind him on holidays and celebrations. Therefore, this attribute must be especially original and attract the eye. There are few truly interesting options in stores, so you often have to be content with what manufacturers offer.
But there is a way out of this situation - to make the table yourself. Firstly, this will save money, because... the prices for ready-made tables are not small, secondly, you can come up with an original shape or decor, thereby surprising your family and friends; thirdly, to be a carpenter, a designer and experience great pleasure at the end of the work.
There are various ideas on how to make a kitchen table with your own hands, you just need to show your imagination and decide on the shape, type and size.
Brief overview of the article
Types of tables
There are many types of tables, it depends on the size of the room in which it is located, on the composition of the family, and simply on the wishes of the owners.
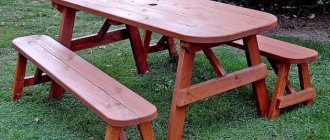
Most homes have a classic rectangular table in the kitchen. If the kitchen is small and there are two owners, then the table can be square. This is one of the easiest solutions for creating a table yourself.
A transforming table is an ideal solution for a studio apartment or a small living room, because it is both a coffee table and a dining table at the same time. Due to its compactness, when folded, it will not clutter up the space, and when unfolded, a large number of people can fit behind it.
The design of the table is quite complex, so it is advisable to have good experience in furniture production in order to begin its implementation.
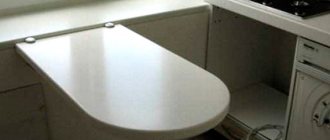
A pull-out table is a good solution for a small kitchen. It is usually built into furniture.
A bar counter can fit perfectly into a small kitchen or a large one, dividing it into several zones.
Also in a small kitchen you can implement a retractable or folding table, which will not be difficult to manufacture.
Chalkboard paint
The advantage of this wonderful coloring composition is that it creates a surface on which you can draw with crayons. Such table decoration can save your wallpaper and other furniture when the little artist in the child awakens.
Another secret - before covering the table with slate paint, apply a thin layer (2-3 mm) of magnetic primer. Sticky magnets will bring even more joy to your child.
Photo: tur.thehomelifemag.com
Photo: an-vn.ru
Table shapes
The most popular shape of a kitchen table is rectangular. It can accommodate many people and will also fit well into any kitchen. However, along with the square one, it is the most traumatic due to the angles.
Note!
- Do-it-yourself wardrobe: a review of ways and methods on how to build a stylish and original wardrobe (video and 145 photos)
- Do-it-yourself furniture restoration - removing chips and scratches, restoring surfaces. Instructions with photos and video tips
- DIY ottoman: how to make it at home. The best ideas, master classes. Photo + video review of beautiful ottomans
The round table creates a unique comfort and special atmosphere. But not every kitchen can “accept” this type of table from a practical point of view. Compared to a rectangular one, it requires more space for the same number of people. To do it yourself is not an easy option, you will have to tinker, however, it will be worth it.
An oval table is also a very elegant and sophisticated option. It is not difficult to manufacture and is quite practical.
The combination of a rectangular and oval table is a rectangular table with rounded edges: both comfortable and stylish.
Multi-colored tape
You can make a fun table if you decorate it with decorative tape of different colors. The striped “thing” will instantly turn into an accent spot against the background of any interior.
The tape can be applied to any surface. The metal countertop needs to be thoroughly cleaned. If there are small areas of rust, try to get rid of them with vinegar or a special product - moisten the surface and then treat it with a scraper. It is also advisable to degrease the canvas with an alcohol solution. The wooden tabletop needs to be sanded thoroughly.
You can completely cover the surface of the table with ribbons of multi-colored tape. But if you avoid excessive diversity, then initially paint the table white, black or any other color, and then make a design with a ribbon of one contrasting color.
Photo: berkem.ru Photo: trendodom.com
Kitchen table materials
There are many ideas on what you can make a kitchen table with your own hands: deciduous trees, coniferous trees, and also metal. It will be much easier for a beginner to work with pine, because... it is unpretentious in processing.
Solid wood, on the contrary, requires more attention and careful finishing. Such furniture is negatively affected by moisture, temperature fluctuations, it fades under the rays of the sun, and can also absorb odors. But, despite this, a table made of solid wood is strong, durable, and looks aristocratic and stylish.
The most common material for creating a table is chipboard, produced by pressing wood chips. It is characterized by low cost, but also low environmental friendliness.
Note!
- How to make a backlit mirror with your own hands: necessary materials, tools. Tips for choosing lamps and LED strips
- A simple and beautiful DIY bathroom shelf made of MDF, glass, plasterboard: straight and corner options. Photo instructions, tips, video master class
- How to make a computer desk with your own hands from wood or chipboard. Photo/video master class + description of models
A similar material, but more environmentally friendly and expensive, is MDF. It is created by grinding sawdust into crumbs and mixing with a special resin. The downside of MDF is the high risk of fire. You can also use furniture board - a material made from glued timber of various tree species.
Metal is quite rare in use. Its cost is quite high, and the icy surface requires the use of a tablecloth.
Wood selection
There are many different building materials that you can use when making your own dining table for the kitchen. But natural wood is considered the best.
The main thing is to choose the right material, size, shape of the tabletop and supports, which will extend the service life and ensure the product’s resistance to rotting and various types of mechanical damage.
Natural wood varies in density and can be soft, hard or very dense.
A countertop made of soft material is easier to process, but any scratches or traces of mechanical damage remain on it. The same cannot be said about the hardest and most dense rocks.
Soft varieties are used in the manufacture of kitchen tables:
- poplars;
- pine and spruce;
- cedar;
- fir;
- alders;
- chestnut;
- juniper.
Solids include:
- nut;
- birch;
- oak;
- maple;
- plum;
- elm;
- ash.
The following are considered very dense:
- acacia;
- Erman birch;
- boxwood;
- yew.
The best material for making a kitchen table yourself is oak - a high-strength, durable material that is not subject to deformation and moisture. It is easy to process and varnish.
Siberian larch and horse chestnut are no less popular. It is better to make the tabletop from pine, walnut or wenge, and the stand from acacia, birch or boxwood.
The table top can also be made from chipboard, plywood and fiberboard. The edges of such materials are laminated with vinyl film. Note that they are less durable and strong, they contain chemical components that are not harmless to human health, but are easy to process and affordable.
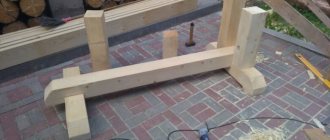
Definition of support
Before you start learning how to properly make a kitchen table with your own hands, you need to decide on the support. Of course, if the choice fell on a classic rectangular table, then the best support would be four legs in all corners for stability and reliability. However, you can opt for two massive legs if the table is not very large.
For small tables you can build one massive leg. Most often, such tables are used as coffee tables or garden tables. Less often - in small kitchens.
Assembly
The finished cover is installed on the supports. A hole is made in each and metal bolts are placed in it. It is important that the holes on all parts of the legs match completely - only in this case can they be firmly connected.
To give the structure the necessary strength, a jumper is inserted between the supports, which will not allow them to diverge to the sides. For its manufacture, you can use the material of the tabletop. It is fastened with self-tapping screws at the ends of the vertical support.
After the brackets are installed, the tabletop is additionally secured with bars. The holders can be visually hidden by making them from plywood sheets or OSB.
To make the lid of the dining table look massive, the frame is lined with a frame. The rail is attached with self-tapping screws along the entire perimeter. Shallow holes for plugs are made in it every 20–30 cm.
To refine the tabletop, a solid wood strip 2–3 cm thick is used. It is attached to the chopsticks using PVA glue.
The finished lid is turned over, and legs are attached to the back side, which are secured with bolts. After assembly, you must carefully check all fastening points - there should be no gaps or distortions.
The main advantage of this design is that, if necessary, it can be quickly, simply dismantled and assembled. This is especially true when restoring a kitchen table.
After disassembly, the old coating can be removed from each element, cleaned with fine-grained sandpaper, painted and varnished again.
Working space and tools
When deciding to start producing a table, you need to allocate a separate room, taking into account that there will be a lot of dust and debris, as well as harmful fumes, so the room should be well ventilated. It is best to use a workshop, garage or barn for this purpose. It is also advisable to use a respiratory mask.
To implement the idea you will need the following tools:
- drill;
- a circular saw;
- milling cutter;
- grinding machine.
In addition to the basic ones, you will also need measuring instruments, antiseptics and finishing solutions.
Made of metal
You can make a metal table for the kitchen with your own hands even from scrap materials. As a basis, you can take a table with a foot drive for sewing machines. If necessary, the height is reduced to 65 cm. The tabletop can be made either from sheet metal (you just need to make a frame for strength) or from wood (plywood or MDF is suitable). It is necessary to apply a high-quality coating to the metal to eliminate the possibility of rust and corrosion.
Tabletops of metal structures can be:
- Retractable - the tabletop increases, as a result you can fit 4 people.
- Sliding - in them the drawstring belt has a tab. If you use it, the capacity increases by 5-6 people.
- Wall-mounted - a special design allows you to increase the area of the tabletop.
Production instructions
When the type, shape, and size of the table are determined, you will need detailed instructions on how to make a kitchen table.
- Draw a drawing.
- Provide the necessary tools.
- Purchase the necessary material. For example, if the tabletop is 80 cm in size, then you will need four dry boards 120 cm long.
- Sand the surface of the table top. Treat the joints of the boards so that they are in proper contact with each other.
- Drill holes at the ends at a distance of approximately 10 cm for connection and sand.
Decoupage
The simplest but most magnificent idea is the decoupage technique. To do this, you need to purchase napkins with patterns that will match the interior design. Multi-layer napkins need to be separated so that the material is as thin as possible.
The surface of the table, if it is wooden, must be thoroughly cleaned, sanded and made absolutely smooth. If the table is metal, it should be washed and degreased. Next, cover the surface with acrylic paint.
The design is applied quite simply: grease the tabletop with PVA glue, apply a napkin and smooth it, expelling any air bubbles that have formed. After finishing work, the table should dry well, then apply a protective layer of varnish, which will prolong its service life for a long time.
Photo: hsdeck.ru Photo: sovkusom.ru
Product coating
Paint or varnish is used for coating. You can also apply stain, thereby giving the product the desired color. The wood is not just painted, but rather impregnated with liquid.
Before you start staining, to make sure you choose the color, you should try it on a trial product, because each type of wood has a different structure and shade, and the color may not come out as planned.
stain
A wooden table can be successfully decorated using stain. Using this tinting liquid, you can give the wood a new rich shade. It is noteworthy that after processing the wood texture is perfectly preserved. In addition, the tabletop will be protected from moisture and ultraviolet radiation.
The stain should be applied parallel to the grain. At the final stage, the surface must be covered with several layers of varnish.
Photo: leasary.com Photo: vortaro.ru
Tabletop Decor Ideas
There are many ideas for creating interesting tabletop decor that eliminates the need for tablecloths and napkins.
If you have artistic skills, you can use painting. Stencils are also used, which is quite simple, quick and does not require experience.
Many people choose self-adhesive film. You can choose any pattern, as well as wood imitation.
An interesting decor is obtained by painting the table through tulle - a lace pattern.
For the ice effect, you can use epoxy resin, which hardens when applied and creates the appearance of transparent plastic. You can add various decorative elements to the solution - shells, dried flowers, stones.
Photos of a kitchen table with your own hands will help you decide on the shape of the table, look and design.
Covering with leather or dermantine
You can breathe a second life into an old coffee table, making it stunningly original, using regular leather or dermantine. Choose a material with large embossing, for example, crocodile leather or bright gold, which will certainly attract the eye.
Use a piece of dermantine to completely cover the top surface of the table top. The material should be pressed tightly and smoothed, getting rid of air bubbles. The final touch will be upholstering the sides of the table with nails with a wide head, which will be similar in color to leatherette.
Photo: pinterest.com
Photo: stellag46.ru
Photos of DIY kitchen tables
From the windowsill
If you are planning to make a table from a window sill in the kitchen, you need to evaluate its advantages:
- Saving room space.
- The tabletop is easy to install, you just need to follow the instructions.
- Aesthetic pleasure - such tables look attractive and unusual.
- Energy savings - there is enough light, since the entire working surface is located near the window.
- Wide selection of design solutions.
- Low cost of the finished structure.
A window sill table also has a drawback - if you like to change your interior frequently, then you should not use such table designs.
Master class – 6 steps on the path to a new life
In this tutorial on how to easily restore a dining table with your own hands, we will update, repair and repaint an old veneer table with a moderate number of defects.
So, to update your kitchen table you will need:
- a sander or sandpaper of coarse, medium and fine grain, as well as glasses, a respirator and gloves;
- alkyd enamel paint of the desired color (or other desired coating, such as stain), as well as a flat, non-fading paint or art brush;
- wood primer and a small roller/brush for priming;
- wax paste or varnish.
Step 1. Inspect and repair parts
We carefully inspect all fasteners in the structure and defects of the tabletop - how much the veneer has delaminated or the wood has been damaged.
If the table is a little loose, you just need to tighten all the screws. If it requires a more serious restoration, then you need to completely disassemble the table, re-fasten all the parts, or clean and sand all the grooves and joints so that the new glue adheres better, fix the glued parts with clamps or self-tapping screws, and then remove them after 15 hours. when the glue is completely dry.
- Sometimes the base needs to be replaced, not only because its parts are very worn out, but also because the legs can completely transform your old table. For example, if previously the legs were simple, now you can replace them with beautiful carved balusters.
- When disassembling furniture, do not forget to mark the installation location of each of the parts, this way you will not get confused and will complete the task faster.
Step 2. Remove the old coating
Now put on safety glasses and prepare 2 types of sandpaper: coarse-grained for initial processing and fine-grained for smoothness. Get ready for long and labor-intensive work - removing old paint or varnish is not an easy task.
Step 3. Repair cracks and chips
After sanding, thoroughly clean the table from dust, inspect the tabletop and look for defects. Keep in mind that even the smallest damage will be visible after painting. All chips and cracks must be locally repaired with wood putty or polyester putty, and then the entire surface must be sanded again when the “patches” have dried.
Note: covering the table with stain:
- if the countertop is not severely damaged, then you can not hide the natural beauty of the wood and cover it with stain, and then varnish, shellac or wax. The photo below shows an example of a restored table with a stained top in the color “Bleached Oak”.
Step 4: Prime and sand again
We continue to work. Now we need to not only clean the table, but also degrease it. And after the table has dried, we proceed with the primer. This step is mandatory, since without it the paintwork will lie unevenly and quickly become damaged. You can use an alkyd or shellac wood primer. In this master class, we used the universal alkyd primer Zinsser Cover Stain (pictured below), which dries in just 1 hour, protects the wood well and prepares it for painting. It costs about 500-600 rubles, but is not sold everywhere. The table can be primed in 1-2 layers using a small sponge roller, and each layer must dry completely.
Once the primer has dried (1 day), sand the countertop again with a medium-grit sandpaper or sponge to smooth the primed surface and prepare it for painting. And don't forget to put your respirator back on!
Step 5. Now let's start painting.
It is very important to choose the right paint and its color. Avoid cheap paints, because this is a dining table, which means the tabletop should be able to withstand frequent washing, wiping, impacts, etc. In this case, a premium water-based alkyd enamel paint with a satin finish is used, but you can choose a more environmentally friendly acrylic-based enamel. Also, be careful to choose a high-quality brush so that it does not fade in the process. Not a paint brush, but a large flat art brush is perfect.
Read also: Amplifier with microphone input
The paint should be applied in 2 thin layers, with the finishing layer best left to dry for 3-4 days.
- If you have chosen a dark color of paint, then it is better to apply it in 3 thin layers;
- To create scuffs in the shabby chic style, the paint can be sanded in some places, for example, on the ends of the table;
- Also, to create an antique effect, the table can be patinated.
Step 6. Apply a protective coating
As we already said, you can protect the surface of the table with a varnish, for example, a matte water-based polyurethane (the photo on the left is an excellent varnish from Varathane). It should be applied evenly in 2-3 thin layers, lightly sanding each layer before applying the next layer of varnish. Of course, all layers must be completely dry (4 hours) before sanding.
The second option is protection with wax, which will make the countertop matte and can be rubbed to shine. To do this, rub the wax gently into the wood with a cotton cloth, then allow the first layer to dry for at least 1 hour. After this, polish the surface in a circular motion, and repeat the procedure 2 more times within one day. Well, now be patient and leave the table for 1 week so that the surface acquires the necessary performance properties.
Well, that's all - the restoration is complete, and the old table has found a new life in fashionable white.
And here is another interesting video from the program “Cheap and Cheap” on the topic of restoring a tabletop at home using improvised means.