how to make a manicure table
The success of a manicurist largely depends on the functionality of the workplace. Of course, you can buy a manicure table or rent one. However, its acquisition is not always acceptable, especially for novice craftsmen. Firstly, the price of such furniture can be very “biting”. Secondly, it is difficult to choose a size suitable for an apartment or small salon. But the convenience and comfort of manicure procedures is highly valued by both masters and clients. The ideal solution would be to make a manicure table with your own hands , this is a guarantee that personal requirements will be met. Fortunately, you can find a lot of useful information on the Internet. This article can become a kind of guide to similar sites. Here there is a detailed description, examples of how to make a manicure table , what needs to be taken into account and what equipment to purchase. First, look, for example, at what types of manicure tables there are.
What is a manicure table, what is its difference from a regular table?
A manicure table is the main furniture that a master uses when working with a client.
The specificity of tables for professional manicure is that the master’s workplace should be:
- convenient;
- neat;
- comfortable for both the master and the client.
Design requirements:
- for the surface, choose wear-resistant materials;
- work on ergonomics - the key to convenience;
- sufficient amount of free space;
- area for placing consumable tools.
Step-by-step manufacturing instructions
It will be easiest to assemble the tabletop if all the parts have already been cut out; the parts only need to be connected to each other. If the project is carried out independently from start to finish, then you will have to work hard: first cut out all the parts and fasteners, and then assemble them into a single structure.
It is best to make the body of the manicure table from chipboard, the tabletop and facades from chipboard.
How to make a manicure table with your own hands:
- The chipboard sheet should be laid out on a flat surface and cut into components. We must try to carry out this procedure with a minimum of waste.
- All ends are covered with veneer. After connecting the main part and the decorative strip with glue, you need to walk over the surface with a hot iron. In this way, better adhesion of materials can be achieved.
- In the places marked according to the drawing, you need to drill holes where the fasteners will go.
- After completing the preparatory work, all elements must be connected to each other. If you do not plan to disassemble the tabletop in the near future, you can pour glue into the mounting grooves; this will make the structure stronger, and situations where the shelves will fall (often found among beginners) will be automatically eliminated.
Manicure tables made by yourself are practically not inferior to similar products that are produced in furniture factories.
If you plan to install a built-in hood, even at the cutting stage you need to drill a corresponding recess for it. There is no need to cover it with veneer - the device will cover the wooden section itself. You can make a hood for a manicure table with your own hands, but its cost is not much less than a ready-made one. That is why it is easier to buy a built-in model ready-made.
Additional equipment, in particular an exhaust vacuum cleaner, plays an important role in the process.
Important! For fastening points, at least 20 mm must be removed from the edge of the walls.
The equipment can be purchased ready-made or made independently using an electric motor with blades, as well as a power supply.
Pros and cons of making a manicure table with your own hands
How good or bad is it if your desktop is made at home? To understand this, let's look at the advantages and disadvantages of the process.
Pros of self-assembly:
- you can make furniture according to your taste and needs;
- By assembling the table yourself, you control the entire procedure step by step and are responsible for its quality;
- you can choose materials, decor, fittings according to your preferences;
- you will receive moral satisfaction from the process.
Now about the disadvantages:
- if you made a mistake in calculations or cutting parts, you will pay for the mistake financially;
- There is a risk of injury when working with tools. In this case, the price of a mistake is your health;
- if materials are placed incorrectly, they can be damaged during transportation;
- you will need free space for assembly, a certain tool - and these are additional costs. In addition, please spare yourself some time.
Preparation of tools and materials
Depending on the chosen manufacturing option, you will need the following tools:
- drill or screwdriver with a set of bits and drills, jigsaw;
- milling cutter for processing edges (for cutting laminated chipboard yourself);
- tape measure, long ruler, corner;
- iron (for self-adhesive edges);
- scraper or stationery knife;
- screwdrivers;
- pencil or erasable marker;
- rags.
Set of materials:
- laminated chipboard;
- 2 mm edge for table top and for visible parts (optional);
- 0.4 mm edge for the remaining parts of the table and cabinet;
- adjustable legs;
- drawer handles;
- confirmations (Euroscrews), self-tapping screws, ties and other fasteners;
- dowels;
- shelf holders and drawer mechanisms;
- PVA wood glue.
Depending on the design, other parts may be needed.
How to make a manicure table with your own hands at home
Professional equipment for nail services is expensive. If you make furniture yourself, you can save a lot of money. In addition, a factory manicure table may not be suitable in size and design.
How to solve the problem yourself, what to look for when choosing a design - let’s look at it in more detail.
Criteria for choosing a product design when manufactured from wood, plywood and other materials
To ensure that the final result of your work meets your expectations, consider three main criteria when choosing a model:
- convenience;
- functional;
- design.
How to choose a ready-made lamp
First of all, you will need to take into account the following criteria:
- power of the selected device;
- dimensions of the drying chamber (some do not fit both hands);
- type of lamps used;
- body material (plastic/metal);
- availability of options.
Comparative characteristics of lamps of different types - table
| Lamp type | pros | Minuses |
| UV lamps |
|
|
| LED lamps |
|
|
| CCFL lamps |
| High price |
| Hybrid lamps |
| High price |
Lamps for manicure - photo gallery
UV lamp is the most budget-friendly purchase option
The UV lamp dries almost all types of gel, but fails quite quickly
The LED lamp runs on LEDs, is quite economical and durable
The design of lamps for manicurists is varied; you can choose a model that matches the color scheme of the work area
Hybrid lamps for manicures are chosen by professionals
For a professional, the best option is CCFL+LE, which are both convenient and versatile to use.
Equipment
Equipment is an integral part of a manicure salon. Let's start with the most important thing - sterilization. A serious issue requires a serious approach. For complete cleaning of all kinds of bacteria, viruses, infections, instruments need to go through several stages: pre-sterilization treatment, sterilization, storage.
Ultrasonic baths with a disinfectant solution are suitable for surface cleaning. A glassperlene (ball) sterilizer will help remove some types of viruses and microbes, but will not ensure complete safety. Sterilization should be carried out in a dry-heat oven: each instrument is placed in a separate disposable Kraft bag and exposed to high temperature (up to 220° C). After careful processing, the instruments are stored in a UV sterilizer; this is the only way to ensure complete safety during work. It is worth noting that the place for sterilization should ideally be in full view of the client, so that there are no controversial issues and there is complete trust.
The manicure machine also occupies an important place in the master’s work. Today there is a large selection of such equipment on the market; the main thing is to decide on the power, number of revolutions and the necessary cutters. And, of course, don’t forget about the dimensions; the device should not take up half the table.
Strong, Device 793/102L, 64W, without pedal
Machine for manicure and pedicure complete with bag. Rotation speed – 35,000 rpm.
(322)
RUB 11,850
RUB 11,850 Buy
A lamp for polymerization of materials is a must-have purchase for a manicurist’s office, because today there are gel polishes and various gels that do not dry in air. Based on the characteristics of the coated lamp used, choose the type of lamp: LED or hybrid. Power is also important: high power will shorten the polymerization time.
Ice Nova, Lamp UV/LED Sun Ice 01, 48W/24W
Lamp for polymerization of materials with ultraviolet and LED technology.
(44)
RUB 3,500
RUB 3,500 Buy
Since we strive for the ideal, basic equipment is not enough for us. Additionally, you can and even need to purchase:
- a desktop vacuum cleaner that will collect all harmful dust when processing nails;
- fan - it will provide a comfortable temperature in the hot season (especially if there are no windows);
- a quartz lamp that will help completely destroy pathogenic viruses, bacteria and microbes in the room.
Simple version of the product
For beginning crafters, we suggest starting with a simple stand made in the style of a woodpile. The product does not require large expenditures on materials, and it will look simply wonderful.
All you need for the craft is paper towel rolls, glue and paint (preferably durable acrylic, but gouache will also work).
To learn how to make a flower stand, follow the instructions:
We make preparations. We take five bushings for each of the four sides (20 in total) and paint them brown. To achieve an interesting wood effect, add veining and paint in other fine details with a fine brush.
Interior, comfort
Now the office has everything for safe, productive work. But a nice bonus will be a beautiful interior: warm colors, paintings on the walls, perhaps even flowers.
Long procedures for the client will be brightened up by comfortable furniture, light background music or an interesting program on TV (computer).
And, of course, it is always comfortable to be in a clean room, so an ideal office requires constant wet cleaning.
Built-in hood
If you are going to install a special hood over the product, which absorbs all the dust and creates a safe working atmosphere, you should make a separate hole for it in the countertop.
The hood itself is purchased at a specialized store . It has compact dimensions and stylish design. You can install the hood within 10 minutes:
- Using an electric jigsaw, we make a hole in the tabletop according to the dimensions of the device.
- Insert the hood into the hole.
- We fasten it with self-tapping screws.
Important : to prevent chips and cracks from forming in the countertop when drilling a hole, it is recommended to use a file with fine teeth.
Metal product
Forged coasters look stunning as decoration for indoor spaces and for landscape design.
It is difficult to answer the question of how to make a metal flower stand. Not every handicraft worker has the skills to forge this material.
If you want to place an exclusive metal stand in a room, most likely you will have to contact a framer.
As an alternative, you can use some old pieces to make a stand and fasten them together.
It can turn out pretty well, the main thing is to be smart!
What types exist
All manicure tables can be divided into four main types:
- stationary;
- folding;
- transformer;
- express counter.
We offer you a selection of photos that will help you get an idea of each type of table.
Stationary table for manicure
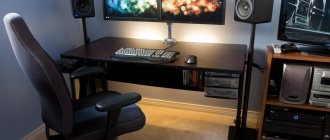
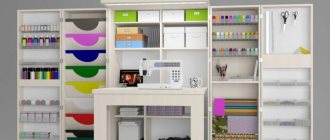
The simplest option for an economy class manicure table. It has a curved table top without corners and a cabinet with a drawer and shelves. This table option is suitable for home use or for a small salon with a small flow of clients and only performing classic manicures.
A classic version of a stationary manicure table with two cabinets and an extension with a large number of shelves. This add-on is convenient because it allows you to organize a large number of nail polishes into groups.
This table is equipped with two cabinets with open shelves and drawers, which are convenient for placing a router and a drying lamp. The unusual curved shape of the tabletop on short chrome-plated stands provides additional space for placing tools, varnishes and samples.
The table with two cabinets and a raised tabletop has an additional small rack for varnishes and a soft rest for hands
Please note that this table is quite mobile and can be easily moved to a more comfortable place, as it is equipped with wheels
The premium stationary automated table is equipped with a built-in hood, router and lighting, and also has a soft palm rest. The glass coating of the tabletop is not exposed to chemical compounds, so any contamination from it is very easy to remove.
Another option for an equipped manicure table with an interesting feature. The cabinet on wheels can be moved around the axis of a stationary stand, which makes the table very mobile and convenient. Additionally, it has a built-in powerful hood and work area lighting. A varnish rack will allow you to place the main types and colors.
The simple table with one cabinet and two-shelf extension has an angled top that allows for easy storage of additional equipment.
In salons, double tables for manicure are often used, which save space and allow you to serve two visitors at once. The stationary table, as in the photo, is more likely intended for performing a classic manicure, since it has few additional drawers and is equipped only with lighting.
The ergonomically designed double manicure table is equipped with additional shelves, hand rests and two cabinets.
This double table has only a two-sided nail polish stand and a built-in light, which allows you to simultaneously perform classic manicures with regular polishes. The working surface of the table is quite narrow and will allow you to place additional equipment.
Folding table for manicure
- This folding manicure table is ideal for home use and is quite easy to make yourself. It is enough to attach to a ready-made cabinet a small tabletop with a folding stand, which can be ordered at a furniture or hardware store.
- This is a ready-made version of a folding manicure table, equipped with a removable drawer with a stand for polishes and a soft roller for hands. Built-in wheels allow you to easily move the table when folded to the place you need. This manicure table is suitable for home use in a small apartment.
Transformable table for manicure
A transforming table is useful for those who receive clients at home or travel to them. This table is very simple, but has a built-in hood.
When folded, it is easy to transport with a special case with a handle, which is included in the kit.
The photo shows a stationary view of the transformable table, in which you can slide the bedside table under the table to save space or pull it out to accommodate additional equipment. The cabinet in this case is a movable part of the table.
Express manicure table
Tables for express manicure occupy a small area and allow you to simultaneously serve from three to six visitors. Such counters are equipped with special high chairs, which are very convenient for clients, and additional equipment for the master is located partly on the table and partly on the internal open shelves.