Every needlewoman dreams of a comfortable workplace. Often a hobby develops into something more and becomes not only a way to realize one’s creative abilities, but also becomes the work of one’s whole life. At the same time, over time, handicrafts begin to require more and more space to accommodate all the accessories, materials and other “purchases”. Often, do-it-yourself cabinets for handicrafts with folding tables and various transformer mechanisms also serve as a convenient workplace in which everything is at hand. Let's look at how you can design and make a handmade cabinet-table for sewing yourself using photos and drawings as an example.
Design Features
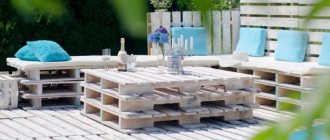
It’s easy to create a full-fledged workplace in a small area. Of course, on an ordinary desk it will not be possible to comfortably arrange fabrics, the necessary tools and a sewing machine. For these purposes, it is better to choose a special transforming table. When assembled, it is a medium-sized bedside table, which, if necessary, folds out into a convenient table for cutting and sewing. Such designs for the home have many advantages: compactness, versatility, ergonomics, plenty of places to store sewing equipment (boxes, shelves, hooks).
When choosing furniture for cutting, pay attention to the area of the tabletop. A cutting table up to 3 m long and 1.8–2.0 m wide is suitable for needlewomen who sew large items (bed linen, tablecloths, long clothes)
If the craftswoman plans to create compact things (bags, patchwork, clothes for children), a table with a width of 0.6–0.75 m and a length of up to 1.5 m or a “Book” model is suitable.
Crafts cabinets
Relatives of needlewomen know: threads, scraps of fabric and even needles are found here and there. And the needlewomen themselves are familiar with situations when there are so many consumables that it’s even difficult to find a place for them - especially in small-sized apartments. There is nothing more valuable than something made with your own hands, but jars with ribbons, scraps of fabric, bags with buttons, located in random places, make the interior look sloppy and greatly spoil it. If your activity has reached such a scale that there is a shortage of space for supplies, it’s time to think about a craft cabinet.
Present
If you do not do needlework yourself, but simply have such a craftswoman in your family or among friends, then a special cabinet will be an excellent holiday gift. You can either buy such a cabinet or build it yourself. In the latter case, your craftswoman will be doubly happy.
Modification
Possible modifications of cabinets for handicrafts are quite diverse. They depend on the type of activity of the needlewoman, her preferences, as well as her imagination. Such furniture should provide comfort during work and be convenient for storing consumables. It should fit into the interior and not clutter up the space.
The more functional the closet, the better. The so-called transforming cabinet can be made with a folding table. This option is especially relevant for small rooms, because they usually have very little space.
During work, the folding table functions as a full-fledged workplace. If you are a seamstress, you can install a sewing machine or overlocker on it. When you're done, you can quickly and easily return everything to its place.
In this option, the machine and overlocker can “hide” in a separate compartment. However, it is better to provide an option so that, for example, the machine moves out with the table, because it is quite heavy. Or the compartment should be at the same height as the table and next to it to make it easier to rearrange.
If the scale of your activity is such that you need a permanent place to work, and the area of the room allows it, you can place the table along the wall and choose a wall cabinet.
This option can be made in the form of the letters “G” or “P” - or located on one side of the wall.
When installing a wall cabinet, it is important to consider the height. Since needlework involves the presence of small parts (needles, pins, buttons), it is very important that they do not tip over. Therefore, the cabinet should not hang too high, nor too low. Otherwise, it will greatly interfere with your work.
If your activity does not involve such global installations as a sewing machine or an overlocker, but a small table is still needed, it can be installed inside the cabinet - from one wall to the other, or shorter, if you need a very small table. Then shelves for materials can be located on the sides of the table.
At your request, the table can be on wheels, and if necessary, can be rolled out of the cabinet. If your activity involves high precision, the wheels should have stoppers so that the table does not accidentally move at the most critical moment.
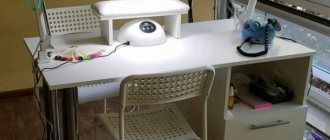
DIY sewing machine table
Here's how to make a DIY sewing machine table from Ingo's dining table. It's much easier than you think! Just look carefully at the step-by-step photos and, if necessary, read the instructions on the website linked below the gallery to get a good idea of what you're going to do. It is sometimes easier to look at photographs in later stages to understand the initial steps. If you purchased an Ingo table, make sure it is fully assembled. You will need to remove the tabletop later, but you need the table fully assembled.
Materials: Ikea INGO or another table with a crossbar under the tabletop. It will be needed to attach the support beams that will hold the machine. You will also need two boards. One as a shelf on which the typewriter will stand under the table; it should be at least 5 cm longer and wider than the typewriter. The second should be twice the width of the table.
Place the sewing machine on a table and a suitable place for easy sewing. Draw the outline of the car on the table. Carefully cut a hole along the lines. Go slowly, especially around the corners, to get nicely rounded corners (if you have a straight corner sewing machine, you'll want to cut it into a perfect rectangle). Now insert the clipper to make sure it fits snugly into the hole. If the shaft is a little narrow, sand the edges with sandpaper. Once you've made the hole the right size, sand all the edges, first with medium-grit sandpaper and then with fine-grit sandpaper until the surface is smooth and flat. Then turn the table over and measure the distance between the front and rear tires. Saw into two pieces the same length as the distance between the slats and make sure they fit snugly between them. Screw the inserts to the bottom of the table using a Krag Jig. Mark holes for the bolts that will hold the sewing machine shelf. Be careful not to mark too close to the front edge, you should leave at least 8cm at the front and back. Then unscrew the tabletop and move it to the side for now. Drill 4 holes in the inserts. Insert the bolts so they are flush with the top but not protruding outward from the tabletop. Remove the bolts and set aside for now. Turn the table over and check how the shelf will stand. Now you can collect
First, insert the bolts into the holes you made earlier. Holding the bolts in place so they don't slip out, carefully flip the table back onto the tabletop and secure the pieces. Finally, attach the shelf on which the machine will stand. After that, place the machine on the shelf and simply tighten or loosen the nuts until the machine is at height, flush with the surface of the countertop. Pull the cords through the hole and place the machine back on the shelf. Connect the cords, turn on the machine, and check how it works.
Looks much better than plastic sewing tables. It costs less, and you have reason to be proud that you made this sewing table with your own hands.
Photo source frommartawithlove.com/2012/10/diy-ikea-sewing-table-tutorial
Here are three more options for converting a regular table into a sewing table.
Using the dining table for sewing is of course a solution, but you must admit, there are a lot of inconveniences. A specialized table is not cheap; it is much easier to convert an existing table into a sewing table. The task is not so difficult, make a recess in the tabletop to install a sewing machine, plus think about drawers, shelves for placing sewing equipment, fix the wires, adjust the parameters for comfortable work. You can see an example of such modernization in the photo.
Photo source www.makeithandmade.com/2013/11/easy-diy-ikea-sewing-table-hack.html
Another example photo, if you need step-by-step instructions, under the photo is a link to the site, where the process is described in great detail.
Photo source www.freemotionquiltingadventures.com/2013/10/how-to-make-sewing-machine-table-great.html
And the third example is how to make a modernized sewing table for comfortable work.
Photo source www.freemotionquiltingadventures.com/2015/02/diy-sewing-table-updated-improved.html
Cabinets for needlework (28 photos): folding transforming cabinet for sewing
SUM: 0
Buy this table in the Gold series
Specify the color of the product (Basic program) To view, move the cursor over the color field
Transformable wardrobe Comfort CRAFTBOX
For compact use and storage of sewing equipment and accessories.
(pictured is the BDAC package)
The order fulfillment period is up to 45 days from the date of receipt of money.
Dimensions:
– FAST TRANSFORMATION
– THREE SEWING MACHINE POSITIONS
– POSSIBILITY OF USING INSERTS
*INSERT for comfortable sewing L
(ATTENTION! Not included in the kit, must be purchased separately).
*INSERT for L cut
(made of MDF and included in the table set).
– THE SET INCLUDES: 3 spool stands (56 pcs), 5 sectional containers
– CHILD LOCK
– LED LIGHTING
– SOFT WHEELS
– POSSIBILITY OF SELECTING THE LOCATION OF MODULES
– Interior in White. In the selected decor, only side posts and fronts are made.
Standard arrangement: A,D,B (see section Dimensions),
Where
Module A – completely with shelves.
Module B – with holders and shelves.
Attention!! Module “C” must be added to the cart additionally.
Modifications with 1 module “C” ACDB, ADBC, ACDA, ADAC, BCDB, BDBC
Modifications with 2 modules “C” ACDBC, ACDAC, BCDBC
When ordering, please indicate the desired location (in the comments).
Certificates:
Step-by-step photo report
Let's take the following model as an example:
to his size
Prepare the necessary tools: tape measure, drill, drill bits, circular saw, Kreg Jig set, measuring angle, bolts and screws of various lengths. These things should always be at hand.
Work begins with assembling the racks and sidewalls:
Using a square, make sure that all corners of the assembled structure are straight. Mark the places where the sides will be fixed:
Fastening of sides with racks:
If necessary, the boards must be fastened from the inside at an angle. To drill pilot holes, use the essential Kreg Jig. This is a convenient and easy to use tool.
Attach the sides of the future bed to the posts:
The crib frame is almost ready:
Now attach the sides of the second tier:
Then prepare the places where the logs under the mattress will be attached:
First fill the unevenness and knots of the frame, then sand it. Next you need to make a ladder to the second tier.
Apply a first coat of water-based varnish. In this case, Lakra “Oak” was chosen. One of its advantages is that it has almost no smell
This is important since there are small children in the house. However, it also has a very unpleasant drawback - it is almost impossible to sand it, and even after drying, a sticky layer remains:
The second floor is almost ready. Next you can attach the logs.
Staircase view:
The staircase in this form is not entirely convenient - it “cuts” the legs, so it will need to be slightly modernized. But more on that later.
The top floor is already ready:
It is clear that the sides need to be increased. There is no need to add anything from the wall side. The bed will be close to the wall, which means there is nowhere to fall. On other sides this will definitely need to be done.
Next, lay the logs of the lower tier:
Now about the stairs. To avoid the awkwardness and pain of going down it, lightly sand the edges of the rungs with a hand planer or sander. This procedure will give them a neat appearance:
The result of the work:
As a result, you will get a reliable and stable structure. Now we can say with confidence that making such a bed yourself, given the abundance of materials and necessary tools that fill the shelves of hardware stores, is not at all difficult.
Step-by-step instruction
Before you start, you need to make sure you have the following tools:
- screwdriver;
- hammer;
- pliers;
- jigsaw;
- Screwdriver Set;
- sandpaper;
- polyurethane varnish for wood;
- brush or roller;
- edge tape (for chipboard, MDF);
- building level;
- construction pencil.
Investments in natural materials are always worthwhile.
Step 1. At the first stage, you need to select a drawing of a cabinet for a sewing machine and cut out all the parts on paper indicating the dimensions. With the finished drawing, you should go to the building materials store. To make a folding table with drawers, one sheet of chipboard, MDF or plywood will be enough.
The reliability of furniture assembly is determined by high-quality fittings.
Step 2. Then you need to mark the parts on the board with a construction pencil, taking into account the edges, and cut them out using a jigsaw; mark and make holes for fastenings. If natural wood is used, the surface of the parts must be sanded. Cover chipboard and MDF with edge tape. In order not to cut out the parts yourself, you can order cutting and edging according to the drawing and immediately proceed to the assembly stage.
The latter can be made in a certain style and perform a decorative function.
Step 3. Start assembling the body of the cabinet: connect the tabletop, sides and support strips using self-tapping screws. Attach the back wall using a hammer and nails, making sure that the edges of the wall do not protrude from the sides. Using self-tapping screws, attach the legs to the cabinet and check the result with a building level. If there are deviations from the horizon, correct them. When installing the tabletop, make sure that the fastening is carried out exactly according to the marks corresponding to the drawing.
At the first stage, you need to select a drawing of a cabinet for a sewing machine and cut out all the parts on paper indicating the dimensions.
Step 4. Varnish the finished product and components. You should take special care when cleaning the countertop, as it will become your main work surface. If the varnish coating will be done in several layers, it is necessary to allow time between applications. The varnish will dry completely after 36 hours.
To make a folding table with drawers, one sheet of chipboard, MDF or plywood will be enough.
Step 5. Assemble the drawers. After varnishing, attach the ball guides. Check that the boxes fit smoothly into the fastenings by placing a building level on the bottom of the box.
If natural wood is used, the surface of the parts must be sanded. Cover chipboard and MDF with edge tape.
Step 6. Lastly, attach the doors and handles, and insert the assembled drawers.
A table for a sewing machine is an indispensable assistant in the process of implementing creative ideas, but in furniture stores you cannot always find an option that suits you. Armed with instructions, tools and a good attitude, you can independently assemble a table that meets all the requirements of a master sewing craft.
Cabinet with sections for storage.
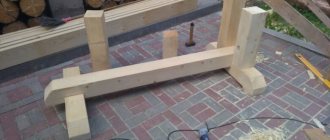
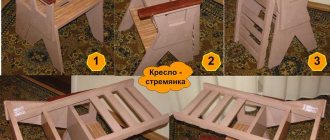
Building a classic version of a step stool
In order to make a transformable stepladder chair with your own hands exactly according to the drawings, you will need a minimum set of power tools:
- Jigsaw with a set of saws for wood;
- Manual electric router with 25 mm and 30 mm end mills;
- Drilling machine or drill with a device for precise vertical drilling;
- Polishing machine with wood attachment;
- Screwdriver;
- Set of carpentry clamps.
Since this design, in addition to the functions of a staircase, will also be used as a piece of furniture, it is best to choose a design with elements of carving and decor.
For the most part, a step stool will be used as a piece of furniture, so it makes sense to make it as beautiful and attractive as possible. In this case, decorative elements are practically not used; windows are made on the sidewalls in order to make the structure lighter and give it a more elegant look.
Structurally, each part of the step-chair consists of two sidewalls, between which four transverse steps are glued. One of the steps serves as a seat, the rest are used only for climbing stairs.
Initially, you will need to transfer the contours of the side posts of the stepladder chair to the boards. This can be done in two ways. In the first case, the contours are transferred by drawing lines using carbon paper. The second method allows you to do the work much faster - you can simply print out the outlines of the parts of the future step-chair and stick the paper on a wooden blank.
At the first stage, you need to make longitudinal grooves or cuts on each side of the large and small parts of the step stool, as in the photo. The grooves must be made for two reasons: firstly, they will be necessary for further processing of the workpieces. Secondly, the step boards will be inserted into the grooves. If you fasten the steps only with self-tapping screws, the rigidity of the step-chair will be very small, and the entire structure will quickly fall apart under the weight of a person.
Next, you need to make several through holes with a drill and cutter, preferably at the corner points of the internal contours. This must be done in order to be able to cut out selections along the openwork thread with a jigsaw.
Following the inner contours, we cut out the outer lines of the sidewalls in the same way. After all four sidewalls have been cut out, two for the larger part of the stepladder chair and two blanks for the smaller one, you will need to calibrate the dimensions, as in the video
https://youtube.com/watch?v=oQq1OMXHA1Q
To do this, two side blanks are folded in pairs and cut on a router. This allows you to make both elements of the step-chair absolutely identical in shape and size. At the same time, we remove chamfers and burrs, and treat the surface with a grinding and polishing attachment.
The steps for a stepladder chair are best made from oak boards, 15-20 mm thick. For the large swivel part of the chair, you will need to make three steps, all three of different sizes. For the smaller stationary part, you will need to cut two steps, also of different sizes. The step blanks, cut to size, are carefully glued to the sidewalls. To do this, you need to coat the gluing areas with wood glue or epoxy glue and insert the blanks into the grooves. To maintain the geometry of the step-chair, gluing is best done with fixation in carpentry clamps.
After the glue has dried, the steps of the step stool must be reinforced with carpentry screws. At this stage we have two small structures, one looks like a short chair, the second looks like a stool. To make a full-fledged folding stepladder out of them, you need to connect the two parts with a furniture or piano hinge.
Attention! To ensure that during use the vertical load on the step-chair does not deform or tear off the hinge fastening, special stop pins are used in the design.
The last element of the chair is the back. It must be made and a stepladder installed on the chair without fail. Otherwise, the front supports of the ladder will be unstable and will quickly fail.
The step-chair is almost ready for use; you need to finish the exterior with stain or varnish.
The result is a nice design that can not be hidden, but rather installed in the kitchen or hallway, where there is always work for such devices.
Varieties
A properly equipped work area will allow you to comfortably engage in your favorite hobby, and will also ensure high productivity for experienced seamstresses
But it is important to understand that non-dismountable furniture is much more durable. However, other modifications can be very convenient
In any case, the choice will depend on the amount of work. All existing product options can be divided into professional, semi-professional and amateur.
First of all, it is worth noting special tables for sewing and cutting. Sewing studios, factories, and workshops are equipped with classic models. The table for drawing patterns and cutting has substantial dimensions and is a stationary product not intended for regular assembly/disassembly. But such furniture allows you to adjust the height of the working surface using the legs and securely fasten equipment (sewing machines, overlockers, carpet lockers). A professional table for cutting and creating patterns will be appreciated by experienced seamstresses. Their only drawback is that there must be enough free space in the room. Only in this case will it be convenient to work on it.
Types of folding tables for the balcony, stages of self-production
As for semi-professional models, a multifunctional table consisting of several modules is popular in this segment. To make the furniture take up less space, additional elements are placed in the main cabinet (pull-out shelves, roll-out tabletops). The advantage of the model is that there are many sections, shelves, and drawers that ensure comfortable work at the table. Some products are equipped with an additional cutting table.
A transforming table can simultaneously serve as a workplace and a corner for doing handicrafts. When assembled, the compact table allows you to fully work at the computer. To create a space for hobbies, simply pull out the tabletop or attach an additional panel to the door leaf.
The corner design takes up more space, but provides a constant comfortable place for doing needlework. The model also has other advantages: it uses a “dead” corner zone in the room, and there is no need to waste time preparing the workplace. Thanks to the swivel chair, it will be easy to “switch” from one work process to another.
There is also budget furniture for handicrafts. This includes a book-type sewing table - a popular folding design. To cut the material, you can lift both side doors of the table. To sew small items, just lift one table door and install a sewing machine on it. A special advantage of the furniture is that fabric, equipment and accessories can be stored on shelves arranged inside the structure.
For periodic activities, a neat table for needlework is suitable. In this case, everything is simple - a regular cabinet/chest is supplemented with drawers, shelves and sections. To make it convenient to use a sewing machine, some cabinets are equipped with a folding tabletop.
Professional
Semi-professional
Table-book
Transformer
Angular
Handicraft table
Cabinets for needlework: tips for choosing
Those who do handicrafts know how difficult it is to find a place in the house where you can accommodate everything you need for your work. The way out of this situation may be to purchase a cabinet for handicrafts. Let’s try to figure out what it is and how to choose the appropriate attribute.
Peculiarities
Due to the fact that “hand made” has become very widespread recently, and many people are engaged in various types of handicrafts, cabinets for storing everything they need have begun to become popular. The main feature of this organizer is the compact placement of everything you need for your favorite activity. A huge number of drawers, shelves, hooks are an integral part of such a piece of furniture.
The cabinet is usually equipped with a folding table, which can be disassembled if necessary. There is no need to look for additional horizontal surfaces in the apartment where you can place your work.
Often such a table has illumination of the work area, and does not require the additional installation of a table lamp.
Models
There are several models of craft cabinets on the market.
Suspension
The cabinet has small dimensions and is hung on the wall. The door usually folds down, forming a convenient desk for work, similar to a secretary. Inside there are trays and drawers where you can put all the necessary materials for needlework. The convenience of this model lies in the fact that such a cabinet can be placed in any room of your home.
The facade can be matched to the main furniture of the room , and it will not stand out from the general style of the room. When closed, craft materials will not be visible, and the room will be in absolute order.
Floor
This furniture attribute requires a large area for its installation. Outwardly, it looks like a regular wardrobe, but when you open it, you get a whole organizer where you can place a huge amount of material, laying it out for convenience on various shelves and trays. It can be either small in size, for example, the size of a desk, or occupy the entire height of the room.
Very often, such cabinets are made to order by needlewomen so that they can have the functionality that is needed specifically for your activity. After all, the needs for filling such furniture, for example, for machine sewing and knitting, differ significantly. Typically, shelves in such cabinets are placed not only on the wall, but also on the doors. An interesting model is the matryoshka wardrobe. Its doors have wheels, and in addition to the fact that they fold out, the facades have another turn.
Also in such a cabinet there is a table on which you can permanently place a sewing machine; it will simply slide into the structure when the work is finished.
Built-in
A craft closet can also be an entire pantry. For such an attribute, you need to allocate several square meters of space and make a built-in structure. Externally, such a cabinet is very similar to a dressing room and can be corner, L-shaped or straight. Its shape depends on the layout of your room. The table here can be either folding or stationary. And the content depends only on your wishes.
How to choose
The choice of craft cabinet model depends on several factors. First of all, you need to decide on the size of this furniture attribute.
If “hand made” is an activity for the soul, and you do it only for yourself or give gifts to your loved ones, then you need a handicraft cabinet of small dimensions. Hanging models are an excellent option here. In them you can place everything you need for the creative process, and at the same time they will not take up much space.
In addition, if you decide to stop this activity, such a transformer can easily be converted into a desk, next to which you will always need shelves and drawers. It is important to choose a product made of natural wood. Such a cabinet will have a long service life, and its appearance will be quite presentable.
If you produce works for sale, then you need a larger cabinet. Either a floor option or a closet-room is suitable here. The size of the handicraft cabinet depends on the volume of products produced and the type of handicraft. Perhaps the most work space required is for sewing. This is due to the fact that the manufacture of products requires various large items, for example, a sewing machine, overlocker, ironing board, mirror.
Whatever size cabinet you choose, remember that the workplace in it must be illuminated. It would be good if the lighting was built into the design of this piece of furniture. You won’t have to allocate additional space to place a table lamp, and nothing will get in the way on the table.
Also, when purchasing, you should pay attention to what this piece of furniture is made of. Of course, it is preferable to choose a product made from natural wood. Such a cabinet will have a long service life, and its appearance will be quite presentable. But natural wood will be quite expensive . Nowadays, most models of such cabinets are made from analogues of solid wood, laminated chipboard and MDF are used. The appearance, of course, of such a cabinet will be simpler, but the cost is several times less.
If your closet has folding parts, then you should pay attention to the fittings so that they are strong and reliable. Otherwise, the cabinet will quickly fail and will not perform its intended functions.
But the main thing when purchasing such an attribute is that you should like the cabinet and it should be convenient to use it.
You can watch an overview of one of these products in the following video.
DIY wardrobe-bed-transformer
Such furniture can last more than fifty years. Since the appearance of such models, their design has changed a lot - they can be folded vertically and horizontally, be two-tiered, with a huge number of additional functions.
Let's study in detail how to make a transforming wardrobe bed with your own hands. The drawings we will use have four main components:
- Lifting mechanism.
- Magnetic clasp to prevent the bed from falling out.
- Frame.
- Closet.
Preparing the necessary tools
Prepare the following tools for making transformable furniture with your own hands:
- Centimeter tape measure.
- Construction level, square.
- Screwdriver.
- Electric drill.
- Electric jigsaw.
- Grinding machine.
- Hex keys.
- Screwdriver Set.
The process of assembling a transforming bed
Assemble such transformable furniture according to these instructions:
- Frame assembly. The frame will consist of four boards of the same height, serving as sides for the bed. Try to make a rectangle with even corners. Connect the frames with wooden pins coated with glue. Once the glue has dried, secure the base with self-tapping screws and furniture corners. You can additionally nail a 100 by 50 mm cross-section around the perimeter to make a kind of limiter for the mattress.
- Assembling the bed base. Make it from a single sheet of plywood or knock it down from planks.
- Assembling the frame for the cabinet. Fasten the frame parts in the same way as fastening the bed frame parts.
- Legs for bed. Make them from wooden beams and furniture hinges to make them built-in.
- Installation of furniture mechanisms. Install the piston or spring mechanism according to the manufacturer's instructions.
As a result of performing all the above manipulations, you will receive a durable, beautiful, multifunctional design - a transforming wardrobe-bed with your own hands.
When the material matters
The choice of material should be treated with special care: the practical and aesthetic properties of the finished product depend on this. The comparative table shows the key characteristics of various materials.
| Name | Environmental properties | Moisture resistance | Durability |
| Chipboard | Releases formaldehyde as it contains petroleum products | low | In such materials, screws and nails tend to become loose, and fastenings gradually lose strength |
| Laminated chipboard | Does not emit harmful substances due to coating | ||
| MDF | Environmentally friendly | increased | |
| Plywood | Completely natural material | High when coated with polyurethane varnish | They retain the strength of fastenings, do not rot when coated with protective compounds, and have a long service life |
| Solid wood |
Whether the table will be a strict workplace or a real art object is up to you to decide.
Thus, financial investment in furniture made from natural wood and plywood is suitable for a person who focuses on safety, environmental friendliness and durability of furniture. Investments in natural material are always justified: such a sewing table will delight its owner with the beauty of its natural texture and smell, durability and will last for generations. If the expense item does not involve high costs, then from the budget options you can choose laminated chipboard or MDF; they are more advanced and safer materials.
The modern market is overflowing with furniture made from chipboard, but not everyone is eager to use furniture made from sawdust.
The reliability of furniture assembly is determined by high-quality fittings. For a simple folding table with drawers, a shelf for a sewing machine and additional compartments you will need: butterfly hinges, self-tapping screws, ball guides, fasteners for the base, legs with height adjustment, handles if there are doors or for the convenience of folding out the tabletop. The latter can be made in a certain style and perform a decorative function.
In addition, natural materials are characterized by durability, strength of fastenings and the possibility of restoration.
Armed with instructions, tools and a good attitude, you can independently assemble a table that meets all the requirements of a master sewing craft.
How to choose the right one
Before going to the store, you should carefully measure the room where the furniture will be installed - the width of the walls of the room, the parameters of the platform intended to accommodate the built-in bed, draw a plan for installing the closet where the bed will be installed.
An interesting interior design option with a folding bed.
It is important to find out everything about the manufacturer, how long it has been on the market, and study reviews. Such a purchase is a serious event, so you need to treat it with full responsibility.
You need to ask the seller to show the product unfolded.
Of no small importance when choosing is the correspondence of the materials from which the folding bed and the cabinet are made. They must be harmonious in design
To create a cozy interior, there should be no dissonance either in color or texture. If the items are successfully matched to each other, you can relax comfortably without being distracted by inconsistencies.
The transformable bed will fit harmoniously into any interior, the main thing is to pay attention to details. Particular attention should be paid to the process of raising and lowering the built-in bed
This is what you can't save on! Durability and safety of purchase depend on this. Make sure that parts of the device do not stick out. This should not be unfolded or assembled. Otherwise, this defect may cause injury
Particular attention should be paid to the process of raising and lowering the built-in bed. This is what you can't save on! Durability and safety of purchase depend on this
Make sure that parts of the device do not stick out. This should not be unfolded or assembled. Otherwise, this defect may cause injury.
An example of stylish and thoughtful interior design with a built-in bed.
The material from which the folding bed is made also affects its durability and strength. For example, chipboard sometimes contains voids that cannot be seen from the outside, which causes frequent breakdowns. OSB or MDF are the most acceptable. Their price is higher, but it’s worth it - you don’t have to repair an expensive product.
A transforming bed allows you to significantly save space thanks to innovative stylistic solutions.
Prices also depend on the raw materials from which the folding bed is made, the brand of the manufacturer, and the country.
home_and_garden
Home and Garden
Stylish and comfortable home
Furniture for handicrafts
In the spring, there was a post in the community about organizing the storage of handicrafts (there were ideas that complemented it in the comments).
I accidentally came across a video online about a transforming wardrobe:
Like this in the tree:
Other cabinet model:
Table. At first glance it looks simple:
Also available in black:
And you don’t need to invent anything. Everything has already been done.
Definition with the model and design of the wardrobe bed
The most important advantage of making a transforming bed yourself is the ability to choose any of the proposed designs, and even create your own.
Consider the appearance of the room when making a wardrobe bed.
First of all, you need to build on the existing style in the room. It is unlikely that you will be able to combine a modern design wardrobe-bed if other furniture is made, for example, in a classic style. The main thing is to maintain the harmony of the living space and prevent the mixing of radically different styles.
A sketch of the bed can be drawn on a piece of paper.
It is better if, already at the planning stage, a rough sketch of the future bed is drawn up. And the best option is to find any one you like on the Internet and adapt it as much as possible to your needs. In this case, you can also save a decent amount of personal time, which can be spent creating designs and drawings yourself.
Try to clearly draw a plan for the future bed-wardrobe.
Furniture production MK-ArionA
Transformable wardrobe for sewing and creativity
This model is designed for sewing, needlework and creativity.
The cabinet can be adapted for any hobby:
- change the dimensions, number of sections and their contents
- choose case color
- choose the color and shape of the fronts, bringing the cabinet as close as possible to the style of your interior
- supplement, remake, taking into account your specifics
Inside you will perfectly place everything you need: equipment, tools, workpieces, materials, fittings, accessories,
and the presence of wheels makes it easy to move the cabinet around the room.
Create your own creative space!!
Description of the cabinet
- Overall dimensions when closed: WxHxD mm: 830x1800x726
- Overall dimensions when open: WxHxD mm: 2390x1800x350
- Body and façade material: laminated chipboard
- Body color: Craft oak white
- Front color: Gray kraft oak
Cabinet components
- Five section cabinet
- Folding table 790x600 mm with two folding supports
- Shelves made of plexiglass and chipboard
- Pull-out shelves on ball guides made of plexiglass and chipboard
- Sloping plexiglass shelves for scrapbooking paper
- Limiters on plexiglass shelves
- Barbells with hooks
- Door locks
- Rubber wheels with stopper
- Pens
Additional equipment
- Backlight
- Equipment sockets
- Additional table top
- Cork, sheet metal for magnets, or graphite surface on the back of small sections
Making a transforming bed: quickly and easily
We often give up a spacious bed in favor of a sofa, despite the fact that this is fraught with serious consequences - spinal diseases and lack of sleep. A transforming bed built into the closet is an excellent solution, because it is simply assembled and returned to its original position at your request. Plus, this bed doesn’t need to be made! It’s not so easy to find this miracle of design in stores, so we suggest you make it yourself.
Transformable bed
How to make a transforming bed with your own hands? We publish step-by-step instructions.
- The support of the cabinet is a regular mattress with an orthopedic base.
- We remove the strips of plywood, curved by the arc of the lamellas.
- We mount the base of the future bed on medium-sized wooden blocks that can easily support any weight.
- We make marks on the sidewall areas intended for landing.
- We fasten the base of the future bed with the side panels.
- Fix the front panel. With this, the main element of the cabinet is ready.
- We fix the base of the cabinet to the wall of the house (the location of the future piece of furniture).
- Using gas springs and a lifting mechanism, we proceed to install the frame.
- We attach the bed frame to the base of the closet.
- As the so-called front of the bed, we install cabinet doors into which it is necessary to install handles that serve as an auxiliary element for bringing the bed into a horizontal position.
Only 10 steps separate you from creating a transforming bed with your own hands. By using your imagination, you can safely start decorating it, thus turning your homemade product into a real work of art.
We give several recommendations for improving the miracle bed:
- linen cabinets, shelves for bedding, mirrors make the furniture multifunctional and easy to use;
- light bulbs and lamps allow the fittings to shine and give the furniture aesthetic appeal;
- the use of wood of various shades, cutting out patterns and the original texture of the handles creates unlimited decoration possibilities.
Remember, creating comfort and coziness in a home is always the work of its owners. We wish you creative thoughts, a wealth of imagination, and playful imagination!
Transformable furniture (video)