Modern aprons can give a kitchen set a beautiful look and adequately highlight the area of the kitchen in which it is located. On the one hand, this element plays a purely decorative role, but on the other hand, it reliably protects the wall of the room from water, fat, steam and splashes of ingredients used in cooking in the area where the stove and sink are located. Aprons are made from a variety of materials, but the most popular, of course, remain ceramic tiles, which are not only pleasing to the eye, but are also characterized by high reliability, durability and resistance to external influences. But at what height from the floor should such protection be installed, what should be the most suitable size of this element, and what nuances should be taken into account during repair work, we will consider further.
Kitchen apron – reliable and effective protection from external influences
It is in the kitchen that all household members gather to enjoy the taste of aromatic tea on winter, cold and long evenings.
Here the hostess creates her culinary masterpieces, which she willingly treats to her family and friends. Therefore, it is very important that it is not only functional, but also always remains well-groomed and beautiful. The work surface is periodically exposed to various substances that are used in cooking in one way or another and can splash onto the wall. Therefore, the question of selecting the material from which the apron will be made remains so important. A simple and universal answer is not easy to find. But you can always choose the facing material that will be most practical. Ceramic tiles have been used for this purpose for several years now. Moreover, modern industry offers us a wide range of types of ceramic tiles, with many shades, various prints and even shapes. Important!
Ceramic tiles are a successful combination of a variety of shapes, textures, colors with a large margin of density and strength.
First, you need to decide not only on the color and shape of the tiles, but also correctly calculate the parameters of the apron themselves.
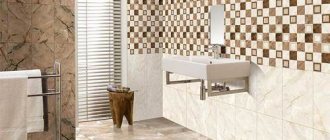
Ceramic tiles apri from the Neapolitan collection of the Kerama Marazzi factory
Ready! Here is a short explanatory text. The result will be visible below.
If you have any questions, leave your message to the manager and We will definitely contact you.
Didn't find the product you're looking for?
Would you like us to call you back and give you a personal discount?
Everything is safe! Your data will never be passed on to third parties, nor will it be used to send unsolicited messages.
Leave your phone number and we will call you back!
Everything is safe! Your data will never be passed on to third parties, nor will it be used to send unsolicited messages.
Thank you! Your message has been sent. We will answer it shortly.
We give discounts up to 7%
The more tiles you buy, the higher the discount.
5% from 50,000 R
7% from 100,000 R
Discount for new residents 7%
Discount on the entire range!
We are giving a 7% discount on ceramic tiles and porcelain tiles to everyone who has recently bought an apartment.
Source
The size of the apron is an important point in its installation.
The size of the apron refers to the gap between the upper kitchen cabinets and the countertop, to which you should add another 2-3 cm for overlap.
But the question remains open: what is ultimately the optimal height of the apron from the floor? First of all, it depends directly on the height of the lower cabinets of the kitchen unit, that is, the working surface. That is why a single standard measurement cannot exist a priori. Everyone chooses the height based on their preferences, for example:
1. The height of the work table is selected according to the height of the cook. 2. The height of the work table must correspond to the height of the installed gas stove. 3. A washing machine and dishwasher must fit under the work surface. 4. Buy tables of standard height.
The most preferable approach to solving this issue is to select the height of the work table in accordance with the height of the housewife, which will allow you to cook in a natural position, without the need to bend over or hold your hands awkwardly.
The second criterion is the location of the outlets. They should be located above the work surface.
Important!
The height of the lower section of the apron must be measured along the entire length of the working surface. If the floor is uneven, then the lower limit may fluctuate.
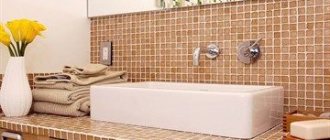
Mosaic Bits by Marazzi
Calculation steps without a calculator
- Measure the length of each wall and the height of the ceiling. If the bathroom screen will be covered, we also calculate its dimensions.
- Calculate the total area of the cladding, excluding the door, window, bathtub (if it is already installed).
- Find out the dimensions of the tiles that will be laid and calculate the area of 1 piece.
- Divide the total area of the cladding by the area of one tile.
- Take into account decor and borders separately, and subtract them from the main area. Remember that the decor cannot be cut, so it can only be placed in spots or can only be used to replace entire tiles without trimming. The curb is usually not used, since it makes almost no sense, and it greatly increases the cost of repairs. Its main purpose is to avoid narrow cuts near the ceiling, but with the advent of tension and hanging structures, this has lost its meaning.
- For complex designs where several colors of cladding are used, it is better to calculate the number of tiles for the bathroom according to the sketch. It can be drawn either by hand or in special programs (for example, in the 3D editor SketchUp).
- To the result obtained, add a margin of 10% for joining and trimming, in case of defects. It’s better to take a little more, especially since almost every normal store will issue refunds within several months without any problems if you have a receipt and unopened packaging.
Seam width
The width of the seams can be from 1 to 10 mm depending on the type, geometry and size of the tile, but most often it is 2 mm.
The dimensions of the seams can be ignored if the layout is done correctly. I will show this using the example of a wall 150 cm long and tiles 40 cm long.
- We measure the length of the wall (150 cm).
- We calculate how many cm can be covered with whole tiles without trimming (40 cm * 3 = 120 cm).
- We subtract one whole tile (120–40 = 80 cm), and subtract this size from the length of the wall (150–80 = 70 cm). We divide into 2 parts, since there will be 2 identical trims along the edges (70 / 2 = 35 cm).
- We start laying from the center. We lay 2 whole tiles (80 cm) and 2 trims (35 cm each) along the edges. Total - exactly 150 cm, the cuts turned out to be uniform and the length of more than half the tile. In fact, they will be a little smaller due to the seams, but this does not matter, although they will be 1 cm.
- Keep in mind that only whole tiles should fit onto a hidden plumbing hatch, so this layout method is not always suitable for walls with hidden hatches.
Apron width size
Of no small importance is the calculation of the width of the apron in the kitchen, that is, the distance between its upper and lower boundaries.
Attention!
The lower part of the apron should be covered by the tabletop by at least 1 cm.
The width of the apron, similar to its height, depends entirely on the layout of the furniture in the room. If the furniture is aligned along one line, the apron is also positioned in one strip. The optimal width of an apron is considered to be 65-70 cm. With this format, it will be convenient for the housewife to take what she needs from the upper shelves, while the upper cabinets will not interfere with the work on the countertop. kitchen apron based on the Karaoke collection from the Kerama Marazzi factory
Online calculator for calculating the cost of kitchen renovation
An obligatory step in deciding whether to renovate a kitchen is to understand what budget should be allocated for it. To do this, it is not at all necessary to contact a specific company, wait for the surveyor to arrive and the results of his calculation. If you are planning to radically - or not so radically - change the look of your kitchen, you can find out right now how much it will cost you. Just use our online calculator to calculate the cost of a kitchen renovation.
It is specially optimized to determine the cost of renovating a kitchen space: the points take into account the most common requests of our clients.
Area under the hood
Special attention should be paid to the part of the apron that is located under the hood.
According to the rules, the minimum distance of the part of the apron that is located under the hood should be 70-75 cm from the hob. But you should take into account the type of hood itself, as well as whether there is anything else above it. In addition, it is necessary to take into account the width of the hob and its accompanying elements. When calculating the size of the kitchen apron in terms of width in the area of the hood, you should remember the need to place ceramic tiles 5-7 cm inward on each side of the hood. This is necessary so that when installing upper kitchen cabinets you do not encounter unforeseen troubles.
Attention!
The size of the width of the apron in the kitchen at the location of the hood always depends on the width of the hood itself, plus 5 cm on each side.
If the width of the selected hood is 50 cm, then the width of the apron in this area is 60 cm.
Now that you have figured out how to correctly determine the width and height of the apron, you can easily calculate the required amount of ceramic tiles, taking into account their size. To summarize, we can say that if the choice of facing material and design is completely dependent on the taste and general style of the room, then the dimensions of the apron always depend on the following nuances: 1. Formats of floor cabinets 2. How high the hob is located 3. Location and organization of wall cabinets 4 Type of hood. The choice of color always depends on the preferences of the housewife in the kitchen. You can choose tiles to match the countertop, or you can play great in contrast.
Tools for laying ceramic tiles in the kitchen
List of necessary tools for laying tiles:
- a drill with a nozzle for mixing tile adhesive, two containers of 7-10 liters (for glue and water);
- two spatulas (regular and notched) for applying glue to the surface;
- rubber spatula for grouting joints;
- a short level (40 cm) for checking the horizontal and vertical positions of individual tiles;
- long level (150 cm) to check the evenness of the rows and the entire tiled surface;
- tile cutter (machine or manual);
- a sharpening stone and nippers for smoothing chipped edges;
- ruler, pencil, electrical wire for aligning seams.
Using Trims
Trims are also used at the joints - decorative corners made of PVC. For external corners, L-shaped trims are used, for internal corners, corners in the shape of a pressed arc are used. They are attached to the tiles with glue, silicone or acrylic sealant, and liquid nails. One part of the trim is mounted directly under the tile, the second remains on the surface. This element not only adds elegance to the apron, but also protects the joints from the penetration of dirt and moisture.
How to use an online calculator?
You are just a few steps away from finding out how much your new kitchen will cost:
- Indicate the dimensions and area of the room - it is advisable to measure the width and length of the kitchen yourself: there are often significant differences
- Decide on the type of ceiling - in the end, the most affordable option remains a single-level stretch ceiling. Its installation may take 1-2 days, while leveling the space for painting can take a week.
- From the proposed drop-down lists, select the planned wall or floor covering - if there is no suitable material in the list, try to choose the closest option, but in the end it may well turn out that its installation/gluing will cost more
- If you are interested in a major kitchen renovation, which involves new wiring, plumbing, replacement of batteries, door frames, tick the required work
- It can be difficult for many to assess whether it is necessary to level the walls in a particular case - we authoritatively declare that in most apartments of old buildings it is impossible to do without leveling
An important point is the type of baseboard. There are no problems with installing plastic skirting boards, but installing wooden ones is a labor-intensive process that requires the involvement of experienced specialists and special equipment.
Are all items filled in? Click “Next” and the calculator will automatically calculate the preliminary cost of kitchen renovation. Just below the amount you can see a form: by filling it out, you will receive a free consultation with a specialist and the development of an individual estimate.
Criterias of choice
Drawing a conclusion from all of the above, when choosing, you need to pay attention to the following parameters:
- Reliability of the material. The kitchen must have an apron that can withstand sudden temperature changes, exposure to moisture, and is not afraid of high temperatures.
- Easy to clean. The surface must easily withstand the contact of grease and the effects of aggressive chemicals.
- Compliance of the material with the overall interior of the kitchen.
- The quality of the materials used. It is better to purchase only proven products to avoid manufacturing defects.
Layout type
There are three layout options:
- Classical.
The room is divided horizontally into two parts. They are separated by a border and differ in color. The lower part is usually made dark, and the upper part lighter.
Classic layout Source profiplitka.ru
- Plain.
Tiles of the same color are used. As a rule, the presence of decor is assumed.
Plain layout Source eto-vannaya.club
- Combined.
For the layout, tiles of several colors are selected, most often three.
Combined layout Source otdelkino.ru
What to do with sockets?
Issues of power supply cannot be raised for a number of finishing works. Above the line marked at an angle of 850 (or another size - the horizon of the table top), the placement and number of sockets are outlined, taking into account that the decorative rim has its own width. Most sockets have a 2cm rim. Euro-nests have a standard diameter of 4 cm. This means that each nest (or group of nests) should be 4 cm, and when a plinth is provided 4 + 2 cm = 6 cm. ) + 850 mm (pedestal and tabletop) + 60 mm (socket body, its edging, plinth) = 925 mm.
The sockets of the sockets should fall into the crosshairs of the tile seams. It is impossible to make cutouts inside the tiles. In the case of skinali, sockets are made within open shelves, walls adjacent to the apron, even in the bottoms and sides of cabinets.
Nuances of materials and installation
It’s not so difficult to decide the issue of the size of the apron as to choose the appropriate material for finishing it: there is plenty to choose from, and pros and cons follow each one relentlessly.
For example, PVC panels. Perhaps the easiest way to close an area, which does not require any special installation skills:
- cut well;
- fits perfectly;
- visually impressive.
But at the same time, they are absolutely not suitable for a kitchen with a gas stove - the material is very susceptible to high temperatures. And over time it loses its attractive appearance.
Expert advice
Vitaly
master finisher:
For thin panels if there is a plinth on the floor, it is best to make an allowance of 1-2 cm at the top and bottom. This will protect the edges of the material from damage under various impacts on the cabinets and will allow the set to be placed tightly against the wall.
Most often in houses you can see ceramic tiles on the backsplash. Moreover, they specially select such variants that, based on the sum of the stacked rows in height, give exactly the same 60 centimeters. Or they increase the boundaries of the overlap so as not to make tedious trimming.
The good old “hog”, for example, is still in trend - and does not even think of going into the shadow of more recent solutions.
Recently, the demand for large-format tiles has increased significantly. This is no longer just ceramics, but thicker and stronger porcelain stoneware. The size 60x120 fits perfectly on the apron, and its “thoroughbred” stone textures make the interior more expensive and noble.
From other materials:
- skinali - expensive, but practical and beautiful, and custom-made glass panels can make the decor unique;
- mosaic - again, it can be made of glass, stone or ordinary ceramics, but it is recommended for installation only by the most hardy housewives, because caring for such a solution is many times more difficult;
- MDF is a more expensive analogue of PVC and at the same time the simplest and most unsophisticated in decorative terms.
There are certain nuances with the location of sockets. So, they should be placed no higher than 1-1.5 meters from the floor and no lower than 15 cm from the tabletop level.
The first value is related to the location of the power cables, and the second is related to the need for protection from water and grease. In this case, you cannot mount the socket directly above the stove or sink - again, for these reasons.
If you are doing a complex repair and changing the wiring, be sure to make sure that the supply wires are routed with a reserve. Often the length is not enough, especially if thick finishing materials are used.
Useful tips from the master
If you have less than zero experience working with tiles, or have very little time for repairs, you should choose large-format tiles, although they are more expensive. It will be easier for a beginner to handle it, and the installation time will be noticeably reduced. But if everything is in order with your skills, you can choose a cladding with a side of 10 cm - it looks best on the kitchen wall.
When calculating the required amount of tiles, you need to rely on measurements of the walls for cladding. But the final result will have to be increased by another 10% - that’s how much will be spent on pruning and possible combat.
The instructions for tiles usually indicate which adhesives or solutions are suitable for working with them.
For the mixture you will need cement (1 part) and sand (4 parts). The sand needs to be clean and very fine so that the solution holds the tiles well. First, the dry ingredients are thoroughly mixed, and water is added to them in small portions. As a result, the mixture should be homogeneous and quite viscous.
Watch this video on YouTube
To summarize the above
If we talk about practicality, then an apron protecting the wall along the work area can be called a necessity. This is especially true for kitchens whose walls are decorated with wallpaper. Many may say that this area can simply be covered with oil paint, but such a finish will clearly not add aesthetics. As for the material for arranging the apron, the choice here should be based on the financial capabilities and preferences of the owner. The main thing is that savings do not come at the expense of practicality and durability. And the color will depend only on the owner’s imagination and how it fits into the interior.
PHOTO: ferma-enotov.ruAnd here is a completely unusual and exclusive example of an apron
We really hope that today’s information will help our reader make the right choice and install an apron that will not only fit into the interior, but will also last a long time. If you have any questions on the topic, feel free to ask them in the discussions below. Homius will respond to each of them as quickly as possible. There you can leave your comment, express your personal opinion or share your experience with other readers. Surely this will be useful for them.
Watch this video on YouTube
Previous Do-it-yourself Cleaning a frying pan: how to remove carbon deposits in various ways Next DIY HomiusTop 7 most interesting Instagram pages of interior designers
Hemming the edges
To obtain an even seam, a bevel is made at the junction of the fragments - cutting the ends at 45°. This can be done with an angle grinder, a roller tile cutter or fine-grained sandpaper. The trimmed pieces are placed in the corner end to end so that they coincide and form a solid transition. To do this, the wall at the corner must be perfectly evenly processed.
Decorative solutions
The design of the apron is determined by the style of the kitchen. Tile is available in such a variety of colors, shades, sizes, textures and patterns that it is much easier to decide on the interior of the room, and then select the decor of the tiles. Solutions can be very diverse.
- Monochrome design - in this case, both the border and the tiles are made in one, most often neutral color, combined with steel countertops. For a Provence or country kitchen, the decor will be similar, but the shade of the tiles will be more cheerful - orange, red, lavender. The baseboard is usually white.
- Tiles imitating marble or granite are a universal decor. Large slabs are selected and laid without seams to form a single surface. Often the countertops have the same design, and the baseboards are light-colored.
- The photo shows the decor of a marble apron with a white border.
- Contrasting - burgundy and white, black and red, green and orange, a universal solution for modern, high-tech, country, eco-style and so on. The finishing is selected taking into account the visual effect.
- Ornamental pattern - most often this decor is used as separate elements of the apron - a decorative border, vertical or horizontal stripes. The combination of white tiles and tiles with a Provence style pattern looks good. But if the size of the zone is small, then it is possible to lay patterned tiles over the entire surface. In the photo there is a patterned apron decorated with a plinth. Interesting decor is created by three-dimensional images on a piece of ceramics. Here you need to be careful: three-dimensional figures accumulate dirt more strongly, and it is more difficult to wash them.
- An original and simple solution is a combination of smooth tiles with mirror ones. This is one of the most effective ways to expand your kitchen space.
- The photo shows the decor of the mirror apron.
Calculation methods
Using a calculator will make the calculations much faster, but the results may be somewhat inaccurate. Therefore, when buying expensive luxury tiles, it is better to independently check the result obtained on the calculator.
Before starting the calculation, you need to determine:
- layout type;
- tile colors and their quantity;
- the need to use decorative elements;
- the presence of a pattern to which the material will need to be adjusted;
- tile size.