An indisputable fact is that the most used room is the hallway. Its exploitation occurs daily, and with the greatest intensity. Exposure to dirt, dust and moisture, various types of shoes that destroy the surface, and a host of other impacts. That is why the selection of flooring for this room should be carried out as carefully as possible, taking into account all the nuances. Note that the coating itself should not only be strong and durable, but also beautiful, which can be the tiles at the front door. And it’s worth saying right away that this is one of the best options, and then we will look at why this is so.
We lay tiles around doors, windows and other obstacles. Practical advice.
When you are going to cover a large enough area of wall or floor, it seems that there will be no problems.
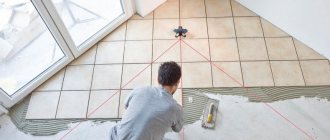
However, this is not so - in order to foresee possible problems in advance, you need to plan in advance (it is advisable to even make markings) how the tiles will be positioned. It is easy to imagine that there may be obstacles on the surface under cladding, which are extremely important to take into account. For the sake of economy and appearance, it is necessary to think about how to go around these obstacles, if possible, with whole tiles, so that you do not have to split them into an incredible number of halves. According to the standard scheme, markings should begin from the midline of the wall or floor. On a flat surface without obstacles this will not be difficult. But what to do if on the way there is a kitchen window, a door for the bathroom and toilet, a switch, an outlet, a ventilation vent, or a battery? Theoretically, all of the above-mentioned obstacles claim that the cladding begins precisely from them. It is much more difficult to correctly mark a wall when there are several similar obstacles on one surface. To solve this problem, you need to work through several options in order to then select the most suitable “central point”, acting from which you will not have to use a tile cutter often.
For marking, a special wooden ruler approximately 1.2 m long with the dimensions of the tiles and the gaps between them already marked is best suited. You can check how the tiles will be installed, for example, around a doorway, and whether the cut strips on both sides will be the same width. Follow the same procedure, marking the tiles in height, starting from the baseboard to the top of the doorway and beyond. For each door, it is necessary to take individual measurements - interior doors from the manufacturer for the bathroom may differ in the properties of the frames, trim, etc.
We lay tiles around the doors. Step by step.
- In the case where the door is located close to the corner of the room, you need to start with a full tile from the door frame. We install the bar plumb if the platband is not strictly vertical.
- Lay the tiles over the entire surface area; We cut the tiles to the corner of the room and to the ceiling, carefully measuring the distance.
- We install one plank above the door in line with the tile row, and the second one exactly above the level of the baseboard between the first and the opposite corner of the room.
- We lay solid tiles above the door. We lay cut tiles to the corner of the room and to the ceiling.
- We remove the strip above the doorway and fill the empty spaces with tiles.
- If the door is located in the middle of the wall, take the opening as the center, from where we lay out the tiles. We fix the planks and marking slats in an identical way.
We lay tiles around the window. Step by step.
- First select the center. If there is one window in the wall, then the center of the installation will be a plumb line in the middle of the window opening.
- If there are two windows in the wall, then you will need to center from two lines at the same time, but you need to take into account that between these lines a whole number of tiles must fit.
- Alternatively, we take the line laid through the middle of the gap between the windows as the center of laying the tiles.
- We always lay tiles across the wall and upward, starting with whole tiles under the window sill, and then along the sides of the windows.
- We fix a strip over the window opening to fix the strip of uncut tiles.
- After removing the planks, we cut the tiles and lay them on the wall plane on each side of the opening.
It is laid out inside the slope in such a way that the edges of whole tiles coincide with the edges of the tiles outside the slope. After this, we lay out the remainder of the cut tiles up to the window frame.
Color variations
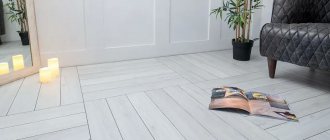
Interesting tile design for the hallway floor.
Light shades for the corridor are impractical. Especially the presence of texture will lead to clogging of the tiles and seams with dirt and to frequent treatment with abrasive agents. On a dark surface with deep shades, scratches and dust will be visible. Black color is not acceptable at all. Cool shades visually increase the area, while warm shades make the room cozy. The color palette of the slab for the corridor should be in unison with the flooring throughout the house/apartment. On the contrary, zoning can be enhanced through color contrast.
The combination of colors in the flooring for the hallway.
If the corridor is small, then multi-color flooring will further reduce the area. The ideal colors to use are beige, gray and coffee with milk. Alternating stripes of dark and light tiles also expands the space of a narrow corridor. Combining white and black areas has its own rules. When the hallway is small, light colors predominate. The large one has black tones.
Patterns
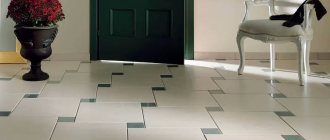
Using patterned floor tiles is beautiful and practical.
The large area of the corridor makes it possible to let your imagination run wild in laying out a pattern that immediately captures all attention at the entrance to the house. The panel in the center looks original, with mosaic edging on the sides.
The pattern on the floor itself should be in harmony with the pattern on the wallpaper, ceiling or furniture. The design style of the entire house is taken into account. The classic style uses marbled tiles. In a corridor with a predominance of oriental features, tiles with ornate patterns look appropriate. Tiles with contrasting shades, laid out in a checkerboard pattern, decorate homes decorated in high-tech style.
Decorating doorways with decorative stone - step-by-step instructions
There is an opinion that this method of designing openings is not suitable for residential premises. However, many experts recommend in some cases finishing the door jamb with decorative stone. A detailed examination of this technology leads to the idea: this type of framing allows you to realize original design ideas, and with your own hands.
The feasibility of using decorative stone is determined on site; it depends on many factors - the overall interior, the appearance of the door installed in the opening, its geometry and others. But in some cases this material is simply irreplaceable.
- For decorating openings in large, spacious rooms. As an option - small, but with a minimum of furniture.
- If the walls in the area of the door jamb have significant, difficult-to-remove defects, decorative stone perfectly masks them.
- In cases where this finishing material is an integral part of the decor. For example, if the room is stylized as antique.
There are two types of decorative stones on sale – natural and artificial. The former are not used so often in the interior of residential premises due to the high cost and complexity of the cladding; they are characterized by heavy weight. And this includes the load on the ceiling and certain difficulties in fixing the samples on the jamb. The tiles are an imitation of natural analogues; moreover, they do not contain “chemistry” (or its concentration is negligible and is not taken into account). The raw materials are crushed rocks; Dyes are added to the mixture prepared for molding to give the desired shade. To reduce the weight of samples and increase fracture strength, some manufacturers add granular polymers.
Other publications in the “Question – Master’s Answer” section
Cladding the facades of a building is an important question, the answer to which determines not only the future appearance of the house, but can also solve many practical problems. By separating the functions of cladding, insulation and load-bearing structures of the building facade, it is possible to achieve good protection of the house from destructive air.
The final step in installing the flooring is installing the baseboard. The plinth is not just an element of the interior; in addition, it is assigned both functional and aesthetic tasks. First of all, the main functional purpose of the plinth is to close the compensation gap, etc.
No matter how much chimney protection is installed, some small amount of moisture will still get into the pipe. It all depends on what cross-section the chimney has and what dimensions the “skirt” of the umbrella or deflector installed above it has. It should be noted that the use of a deflector is additional.
Source: blogstroiki.ru
Advantages of artificial stone
- A variety of shapes, shades, textures of decorative slab products.
- Easy to attach. The imitation of natural material is characterized by correct geometry, low weight and is easy to cut, which makes it easier to fit fragments when finishing door jambs.
- Increased sample strength and resistance to abrasion.
- Inertness to climatic factors and aggressive chemical compounds. Consequently, finishing doors with decorative stone can be done in any room, regardless of its specifics. Even in those where there are sharp changes in humidity/temperature and their high/low values.
- Convenience of choice. All artificial stones differ in standard sizes and thickness. In addition, they have smooth edges, and this makes it easier to calculate the required number of products for finishing a specific area.
- Consistency of color over time. The dye introduced at the stage of preparing the mixture is evenly distributed throughout the entire structure of the material.
- Decorative stone does not burn and does not block the base; it “breathes”, which has a beneficial effect on the microclimate of the room.
- Good maintainability of the jamb lining.
Surface texture
There are several texture options.
- Glossy. Despite the fact that glossy surfaces are similar in properties to mirror ones - they also reflect light and visually enlarge the room, they are not used in corridors. The risk of damage and scratches that will be noticeable is too high.
- Matte is a non-slip surface that is quite suitable for the entrance area.
- Relief - for example, porcelain stoneware with imitation stone or wood. On the one hand, it’s a good choice, since it definitely won’t slip. On the other hand, fine dirt and dust are not easy to wash off. But cleaning is indicated for any cladding, so you shouldn’t be too scared about it.
Design: Alisa Svistunova
Design: Alisa Svistunova
- Hallway
Design of a hallway in an apartment: making a small space stylish and comfortable
Features of choice
- The color must contain at least two shades. The uniformity of color neutralizes the naturalness of the decorative stone. It is immediately clear that this is just an imitation, and not the most successful one.
- Edges. The front surface is free of large fractions, dye clots, stains and stains. On the back side, the base should not be perfectly smooth - this will reduce the quality of adhesion of the decorative stone to the door jamb; or rough, or with notches (grooves).
- Sample edges. You need to decide on the type of seam between the stones. If it is chosen to be even along its entire length, then chips of up to 2 mm are allowed. Some owners prefer to lay masonry with a visible seam; in this case, edge defects can be more significant - up to 6 mm.
- Surface treatment level. First of all, this relates to the moisture resistance of decorative stone. If there is no protective layer, it is better not to purchase; independent application, and high-quality one, is a complex process that requires practical experience.
Basic rules for decorating jambs with stone
- Symmetry. Both sides of the opening, regardless of whether there is a door jamb in it or it is dismantled, are finished identically. Only this approach will ensure the completeness of the composition.
- Height proportions. Priority is given to the bottom of the door. This applies not only to the vertical, but also to the horizontal axis. That is, the base of the opening, with any method of its design, should visually look more massive. In accordance with this, a scheme for decorating the jamb is drawn up, taking into account the size of the purchased samples.
- A combination of texture and seams. The task of a master working with artificial stone is to achieve complete naturalness of the cladding. Experts recommend that before starting installation, lay out the “picture” on the floor and evaluate the effect it gives. How to position the products relative to each other, with what interval or offset - all such nuances are calculated in advance.
- Compliance with the jamb material. This must be taken into account even before purchasing decorative products. If the door frame and slopes are well polished and varnished, then stones with a smooth front surface are used to decorate the opening. And it is advisable to attach textured samples around a jamb that is untreated (made independently) or with a “rough” wood pattern.
Finishing of metal door leaf
Decorative cladding of steel doors, as a rule, is carried out only with special paints - polymer. They have a large selection of shades and various structures. There are those that, after drying, burst on the surface and thereby create an interesting and unusual design for the door leaf. So:
- It will not be possible to apply such a coating yourself, since there are special instructions for this, according to which the entire work process is carried out in a special chamber and under the influence of high temperatures.
- At the moment, analogues of such a product have begun to appear, which are used independently, but with a spray bottle. It is not possible to paint the surface efficiently with brushes.
On the inside, all work is performed using:
- Leatherette.
- Laminate.
- Plastic or wooden lining.
Note. In the same work, the door is insulated and insulated using expanded polystyrene or polystyrene foam; mineral wool is rarely used.
The procedure for designing the opening
Decorating the slopes of the front door with decorative stone is done using the same technique as the interior door. The only difference is in the choice of material - not every imitation is suitable for these purposes.
Preparing the base
- The excess is removed - old paint, plaster, and in some cases the door is also dismantled if an arched opening is planned. The task is to achieve a flat and durable surface on which the tiles will adhere securely.
- Marking the wall according to the diagram for fastening the stones.
- Applying notches (grooves) to the base. This increases its adhesion to the cladding.
- Treat all segments to be finished with a primer. The goal is the same; Plus, this composition prevents the absorption of moisture by the wall material.
- After drying, it is advisable to apply concrete contact to the base. This product will further increase the level of adhesion, which means that the fixation of the stone will be as reliable as possible.
Door jamb trim
- The tiles are laid out on the floor according to the diagram. This will make further installation easier and will allow you to once again evaluate the correctness of the choice of location of the fragments.
- Removing the baseboard. The stone is laid to the floor, and therefore the lower molding will be a hindrance; Upon completion of the work, it is easy to return it to its place.
- Determination of the horizon line. Task: to ensure that all seams are located in this plane. Using a level and a long strip, a line is drawn on the wall that corresponds to the lower cut of the stones of the first row.
- Fastening the tiles. Cladding work always starts from the corner. To fix the samples, adhesives recommended by the manufacturer are used (tile, “liquid nails”).
The nuances of the work depend on the design intent. During the finishing process, stones will have to be cut, edges polished, and bevels made; but these are details that are not of fundamental importance. If platbands are installed later, then indentations are made for them.
- Finishing the joint
To make the stone more natural, it is advisable to spray the prepared composition over the entire area of the cladding, as well as adjacent areas of the wall: acrylic varnish + tinting paste. The mixture is diluted with water to the desired consistency and applied to the surface. It is not difficult to choose a recipe.
Decorating a jamb with decorative artificial stone does not require professional training. But if this option is unacceptable for some reason, you can use materials that successfully imitate such a finish. There is a large assortment of polymer texture panels on the market, special wallpaper of the appropriate texture; working with them is much easier, as well as updating (reinstalling) damaged samples. But still, they are not able to completely replace decorative tiles. This design solution can be considered the most preferable.
When to change a door - editorial opinion
Everything is individual and everyone makes decisions for themselves. And we will share our opinion.
The optimal stage for installing an entrance door not in a new building is after finishing rough work and before finishing work begins. The floors have already been poured, but the laminate has not been laid. The walls are erected, but not yet painted and without wallpaper. We securely pack the door in vacuum film.
In a new building, we change it immediately when we start making repairs. This makes it easier for both you and the workers. We use the “Temporary Door” service and do not worry about its safety.
How to lay tiles on the floor with your own hands
General construction work, which includes laying tiles on the floor, is the domain of professionals. However, if you know certain rules and the sequence of work, even such a complex task becomes accessible to everyone. How to lay tiles on the floor yourself is described in this article.
Any major renovation ends with the installation of the floor. A huge number of flooring options ensures uniqueness, both in terms of color and texture solutions, and in terms of operational characteristics, of renovated premises. The only obstacle in choosing may be a lack of imagination. However, there are rooms and areas in which you don’t need to invent anything or reinvent the wheel - the best option already exists. Such premises include the entire sanitary and utility block: hallway, bathroom, toilet and kitchen. Common requirements - increased wear and water resistance and ease of cleaning - determine the optimal type of flooring - tiles.
Anyone can choose a tile so that it fits perfectly into the interior, but putting it in place requires very specific skills. How to do this will be discussed in this article.
Requirements for hallway flooring
The floor in the hallway is constantly dirty, and in winter it is subject to pressure from heavy shoes.
Sand, salt, snow and water fall from the road 365 days a year. In this regard, the type of roof is selected before the main part of the renovation and before the design of the room begins.
The requirements for floor finishing include high strength, moisture resistance, as well as ease of maintenance, resistance to stains and dirt accumulation.
Experts add to the general recommendations such a parameter as durability, in other words, wear resistance.
The most unsuitable types of flooring are natural parquet and artificial parquet.
Floors made from these materials will gradually deform due to contact with water. In this case, the best options are ceramic tiles, porcelain stoneware and linoleum.
Required tools and materials
1. Levels: one meter and two meters.
2. Tape measure and pencil.
3. Notched spatula (tooth height 5 millimeters), regular spatula.
5. Mixer with a nozzle for mixing bulk mixtures.
6. Rags for cleaning tiles.
7. Brush or broom.
8. Angle grinder (grinder) with a cutting wheel for stone - necessary for cutting hard tiles, for example, porcelain stoneware.
9. Tile cutter - necessary for cutting regular ceramic floor tiles.
10. Rubber mallet.
Laying tiles
1. Prepare the floor for laying tiles. The ideal surface would be a concrete screed. We clear the screed of debris and cut off all the cones. Sweep the surface to be prepared with a broom soaked in water. Using a brush, prime the floor surface. Mix the tile mortar with a mixer and use a spatula to smooth out all the unevenness of the floor.
2. We place lighthouse tiles in the corners of the room and, using a two-meter level, measure the floor for horizontalness. This is done in order to find the highest point of the floor. Here the layer of glue will be minimal. We estimate the required thickness in other places using a level.
3. Using a square, measure the corners of the room to determine the direction of laying the tiles. The fact is that the tiles have right angles. If you move from a wall that forms an angle of less than 90° with another wall, you will either have to cut each tile to the width or move each row relative to the previous one, which will spoil the appearance of the finished floor. You should start from a right or slightly larger than 90° angle - a small gap can then be covered with a plinth. When choosing a starting angle, you should also consider how visible it will be. A row of solid, uncut tiles should be in the most visible place.
4. If there are obstacles on the floor, for example, a sewer pipe, then mark the tiles and cut a hole in it with a shape corresponding to the obstacle. This is best done using special crowns. If they are not there, then a hole can be made in soft ceramic tiles by biting off small pieces of the tile using pliers. The risk of splitting the tile is quite high, but when you put even the cracked tile back in place, the seams will be practically invisible. If you are laying porcelain stoneware, you need to understand that it is almost impossible to make a hole in it at home. In this case, just skip this place. Subsequently, it can be covered with something, or laid out as a mosaic from scraps. In any case, when cutting tiles, it is important to follow safety precautions and be very attentive and careful. Safety glasses and gloves should be worn.
5. Mix the solution. To do this, take two liters of water into a bucket and only then add glue to it, bringing the solution to the state of thick sour cream. Let the solution sit for five to ten minutes.
6. Using a comb spatula, apply a layer of mortar to the floor, the width and length corresponding to the expected number of tiles to be laid, optimally three to four tiles. To remove dust and ensure better adhesion to the floor, wipe the tiles with a rag soaked in water.
7. We begin to lay the tiles, taking into account the required layer of adhesive and controlling its position in the horizontal plane, using a meter level. We press down the tile with the same level, evenly distributing the load over the entire plane. If necessary, tap the protruding tiles with a mallet.
8. We insert spacer crosses between the tiles, and immediately use them to clean the seams. Periodically wipe the surface of the tile from excess glue. Once dry, this will be much more difficult to do.
9. Having finished laying the tiles, wait three days and grout the seams using a rubber spatula.
The article mentioned that the best base option for floor tiles is a concrete screed. However, even a wooden plank floor can also become the basis for tiles. To do this, it must be prepared. The simplest option would be to lay at least two layers of cement particle boards 10 mm thick with the obligatory spacing of the seams directly on top of the boards. The surfaces of the layers are coated with tile adhesive and fastened to each other and to the wooden base with self-tapping screws. This option will slightly raise the final floor level, but will allow you to lay tiles, even where there is no concrete screed. Naturally, when calculating the required number of layers of cement particle boards, it is necessary to take into account the rigidity of the base - for a wooden floor mounted on top of a concrete screed, two layers are enough, for floors in wooden houses - at least three.
Evgeny Dubinin, rmnt.ru (based on materials from the competition entry of user chugaiigor)
Installation methods
Let's consider the technology of each installation method.
Method for cutting tiles and laminate
When the border line of two surfaces is straight, there are much fewer problems with their fitting, but curved joints are difficult to trim. To do this, a template is made from a dense material, for example, cardboard, and the joining line is marked according to the template.
Laminate boards are cut to a template using an electric jigsaw or parquet saw. You can cut the tiles using a grinder with a diamond blade inserted into the tiles.
Next, you should draw a joining line between the trimmed and leveled two coatings. This is possible in several ways:
- End-to-end fastening without threshold.
- Using flexible PVC profile.
- Using a flexible metal profile.
Butt mounting without threshold
The joint of tiles and laminate without the use of a threshold and profile is a beautiful, reliable and fast connection method, but at the same time there is a certain risk and requires skill and experience.
The junction of tiles and laminate in a hallway without a threshold
Here accuracy and correct selection of grouting material are of great importance. Two coverings, previously very well adjusted in height and, if necessary, cut according to a template, should be located at the closest distance from each other. To seal the seam, a sealant or installation paste is used. The composition of the grout mixture for the joint is selected according to its adhesive characteristics, i.e. it must have good adhesion to the two connecting coatings.
Disadvantages of this method:
- it is very difficult to achieve an ideal joint for an inexperienced person;
- there is no possibility of dismantling.
So, the use of a permanent joint should be performed by a specialist with experience.
Outdoor threshold tiles: what is needed before installation?
It is important to properly prepare for such a responsible job as laying tiles on the porch. There is nothing wrong with the fact that after reading this article, you decide not to experiment with tiles and grout yourself, but invite a professional. External steps, terraces and porches present significant challenges when facing. Without the appropriate experience, freshly laid tiles can not only quickly fall off, but also cause injuries to residents of the house, relatives or guests.
The porch and its steps are constantly subject to mechanical stress - provided that the house is residential. Exposure to rain, frost, dust or heat is also mandatory and does not depend on the presence of residents. To ensure decent quality of cladding work outdoors, the following conditions must be met:
- The base of the porch and the steps themselves must be made of durable concrete or reinforced concrete, without cracks, signs of shrinkage or play;
- The entire porch structure should be protected from moisture - increase the roof overhangs, lay waterproofing on areas in contact with the ground, even if you only plan to lay tiles for the threshold on the street;
- It is necessary to carefully follow the cladding technology: the use of high-quality grouts, primers, solutions and adhesives - saving on such materials is inappropriate and financially unjustified.
Nuances of technology
There is a special paving slab for steps, consisting of ready-made treads with a rounded front and narrow risers. Special paving slabs for steps.
For public buildings and offices, economical FEM porch technology is often used:
- the staircase is made of metal (central stringer or two on the sides, treads from the corner without risers);
- the tiles are glued to the mortar laid inside the angle frame.
Tile for outdoor porch: choosing material
A prerequisite is that the tiles for the porch on the street should not slip underfoot , even if the shoes are slippery (and in snow, rain or humidity, they will certainly be slippery). When choosing a material, its “anti-slip” qualities are a priority. The impact strength of facing ceramics and its resistance to frost can be judged from the accompanying documentation; these indicators should be maximum.
It is equally important to choose the right tile size. Decorating the porch with tiles looks attractive if the cladding is made of solid elements. If necessary, you can “move” the tiled edges beyond the porch area - but no more than a few centimeters. It is important not to make a mistake with the texture. Relief patterns look great on a stand in a store - when installing such tiles on the street, they will definitely become clogged with dirt and will require daily and labor-intensive cleaning. Color preferences when choosing tiles for outdoor work are taken into account last, although they are important for aesthetics and design.
To finish the steps, it is best to choose special ceramic elements with a rounded surface. They not only look beautiful, but are also designed to evenly distribute the load during operation. Regular tiles are less durable and will require careful filling of the entire internal space with mortar. For the riser, any tiles or mosaics are chosen - here you can focus on the aesthetic appearance of the future staircase.
Mayakovy row
After all this has been done, you need to create a beacon line.
Why apply the initial tiles with a distance of five or seven millimeters from the wall, if tiles have not yet been laid on the walls, put a T-shirt signaling the end of the laying, then apply it to the far corner of the floor, also put a notch and connect the marks with a line.
The lighthouse first row will be laid along it, focusing on which all further layout will be carried out.
Source: freegameinfo.ru
Tiling the porch - step by step diagram
Step 1: Preparing the Porch
Even when building a house, you should consider the possibility of tiling the porch and its steps in the future - that is, giving the surfaces concrete strength and the necessary slope. If this has not been done, preparing the porch will require almost more effort than all subsequent facing work. You cannot apply a “slope screed” made of cement-sand mixtures to a finished concrete surface - it will peel off along with the laid tiles. It is necessary to attach a metal mesh to the concrete of our porch and perform the screed using “layered” technology (see below).
An ordinary chain-link made of wire 2.5-4 mm thick is suitable as a mesh. To fasten the mesh, dowels, mounting or U-shaped brackets, etc. are used. in increments of about 20 cm. Next, we set up the beacons, otherwise a uniform slope will not work. It is best to make beacons from ordinary sand, mixing it with tile adhesive - then the entire structure can be walled up directly into the screed. After that, layers of mortar and tile adhesive are alternately applied to the slope frame. Moving from the door to the first step, we fill the entire surface and wait for it to dry, usually at least a day.
Step 2: Laying tiles on the porch
We check the new concrete base for the presence of “humps” or cracks, rub and cover the defects. On the first day after pouring, the concrete is still soft and easy to grind. After grinding, carefully sweep and prime the concrete surface with an aqueous solution of PVA glue using a brush. The primer must dry completely; in air this happens in 15–20 minutes.
We lay out our ceramic beauty along the porch, starting from the door. Ideally, the entire surface should be occupied by solid tiles. Small cuts around the perimeter are acceptable, within 20-30% of the overall tile dimensions - otherwise the appearance of the porch will suffer, and small tiles will fly off quite quickly under heavy load.
We install the ceramics on a thin (up to 1 cm) layer of tile adhesive with a “hover” of 1.5–3 cm above the edges. We ensure that the mounting gaps are completely filled with the solution, especially as we approach the edges of the porch. Do not be afraid to remove the element if the filling with mortar seems unreliable or the tiles are uneven, and lay it again.
Step 3: Preparing the Riser
For the strength of the steps and porch, it is important to tightly fill the space under the overhanging tiled “overhang” with mortar. To do this, use a special stencil - a corner with a cutout to match the thickness of the ceramic tile. With its help, the end of the step is quickly and easily leveled.
If the riser depth is significant (from 3-3.5 cm), it must be reinforced with the remains of the mesh or scraps of reinforcement. The filling of such ends is combined, first - a layer of glue, after it hardens - cement mortar.
Step 4: Cladding steps and ends
While the first end is drying, the tiles are laid on the steps. First, the tiles are laid out without glue to evaluate the appearance and installation sequence. It must be remembered that the slope must be maintained to allow water to drain. Each step after cladding is subjected to an end-filling procedure.
As a result, on the second day of repair efforts, the porch itself was lined, and the steps received a ceramic vestment. All that remains is to decorate the ends of the surfaces underneath. For this, mosaics, various tiles, marble or granite are used. Unlike the porch and the steps themselves, facing the ends begins from the corners (yes, with trimmed tiles!), otherwise the symmetry of the appearance may be disrupted.
Step 5: Finishing Touches
All joints should be grouted the next day. It is performed using a solution with the addition of liquid glass or special fugues - frost-resistant compounds for external use. Sharp corners and turns can be lined with thin metal corners, using special glue and carefully removing its remnants from under the chrome surface.
The tiles for the porch steps can be laid in a few days; the work requires significant repair skills. It is wise to first try your hand at working with tiles indoors, on small and flat surfaces. If the result is positive, you can move on to independent cladding work on the porch and steps.