When planning a major home renovation, you almost always have to make a difficult choice of the most suitable flooring in front of the front door. Both materials, tiles and laminate in the hallway, look equally good. To determine the best one, you have to spend a long time delving into the network, looking for shortcomings and compromise options. As a result, the combination of tiles and laminate in the hallway is chosen, which in itself is a difficult task for a home designer.
Decorating the hallway with “contrast”
Which is better - tiles or laminate in the hallway?
The easiest way is to do it the old fashioned way, the threshold is made of tiles, and the rest of the hallway floor is finished with laminate. But the design of old schemes already looks rather dull, and most apartment owners would prefer to see a comfortable and at the same time beautiful floor on the floor in the hallway. You can use just one material. Moreover, laminate and tiles have their own strengths:
- The tile is extremely resistant to abrasion, which is especially important for houses and apartments on the first floor, where the exit from the hallway leads directly to the street. A huge amount of dust, salt and sand that gets into the room on the shoes of residents can erase the decorative layer on the floor to the ground in a few months;
- Laminate provides maximum comfort even after rain and snow; drops of water on the laminated floor do not make the coating slippery and traumatic. The slats retain heat well, dampen noise and sounds, while the tiles only reflect and enhance them.
Both types of flooring can be equally effective from both a decorative and utilitarian point of view. If the house does not have a porch area, then the best solution would be to use quartz vinyl tiles or very expensive class 33-34 laminate in the hallway. In all other cases, either laminate flooring or regular tiles can be used.
Advice! You should not compare finishing the corridor with laminate and tiles. Both materials have approximately the same positions, so it is not recommended to buy and install tiles just because you like the color.
It might make sense to try using a combination of tiles and laminate in the hallway. Both materials are available in a huge range of textures and colors. If previously slats were made exclusively with an imitation of wooden or parquet flooring, today there is a huge number of textures of a wide variety of types, from granite to lemon wood. The floor in the hallway made of laminate and tiles, photo, can look very unusual and stylish. At the same time, it remains possible to replace one of the coatings if the design of the room needs to be adjusted or updated.
Classic entrance door design
Finish options
When decorating the walls in the living room, remember that the interior should be stylistically verified and logical. If you have zoned the space, the interior of your living room must contain elements that unite different zones, otherwise the room will visually crumble into several unrelated elements of furniture and walls of the hall. The connecting link can be color, repeating texture or decorative elements played out in different areas of the room. A large living room may include a seating area with sofas and armchairs, a dining area and a fireplace area. To connect individual zones, you can use repeating decorative elements in each of them.
Paintings
Choose which area is the main one and hang a large picture there. Support the decor with smaller paintings that have a similar theme and color scheme. The frames of all paintings are also kept in the same style.
Panel
In the main part of the living room, place a large panel on the wall. To stylistically connect the auxiliary areas of the room with the main one, place smaller elements there that match the main decorative element.
Lepnina
Stucco molding can be located on the ceiling or on the walls. Let's consider the option of stucco ceiling placement. If the living room is visually divided into three zones, place three chandeliers in the same style on the ceiling. The largest of them should be located in the main part of the room, and two smaller chandeliers should illuminate additional areas. Attach proportionate stucco molding of the same design near each chandelier.
Painted
Painting is a decorative technique that allows you to decorate a living room in a classic or neoclassical style. Depending on the color scheme of the room, use contrasting tones for painting or keep the frescoes in primary colors. You can frame the painting with moldings painted in the main color of the walls. to give the interior solemnity, it is allowed to enclose the painting in gilded frames.
Skin
Using leather you can make a soft wall. Due to the high cost of natural material, eco-leather can be used. Make a frame from wooden blocks, nail a sheet of plywood or OSB to add rigidity. Secure foam rubber or other soft and bulky material. The piece of leather should have allowances for folds. Place the leather on top of the frame, fold it over the edges and secure it on the back with a stapler or furniture nails. On the front surface of a leather panel, imitate a carriage tie using large buttons covered with leather.
Decoration with natural wood
Wood is used to decorate the living room in a private house, less often in an apartment. Decorating the walls with unpainted clapboard or imitation timber from floor to ceiling is reminiscent of a sauna, while wooden walls covered with glaze paints in light shades organically combine with elements of Scandinavian style and Provence. Classic and rustic interiors use wood covered with dark stains in dark shades. Taking into account the high cost of natural wood, you can combine it with wall painting. Wooden panels are mounted at the bottom of the wall, to a height of 1.2-1.5 meters; above this mark you can paint the wall or cover it with wallpaper for painting.
Wall canvas
A canvas wall is a large-sized painting located on one of the walls of the living room. You can paint the entire wall directly with paint, or you can mount a picture in a frame on the wall.
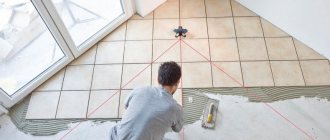
Features of the floor in the hallway made of tiles and laminate
Installing a double floor covering is more complicated than conventional laying of tiles or slats, both technically and stylistically. It will be necessary to lay two materials, completely different in structure, material and method of fastening.
In addition, when planning the installation of laminate and tiles in the hallway, you must consider the following:
- Tiles are traditionally placed in the area adjacent to the entrance door threshold. You can cover the rest of the hallway floor with laminate. This is done in order to leave most of the snow, water and sand on the tiled surface, since the laminate needs to be protected as much as possible from exposure to moisture and salt;
- The joint between the tiles and the laminate in the hallway is made hidden; usually there is little space in the hallway and relatively poor lighting, so the absence of a protruding lining adjacent to the slippery tiles will only increase the safety of the room;
- Under the tiles in the hallway you will need to do full waterproofing, and for a private house you will also need insulation. It is best to lay slats on a polystyrene foam backing; it does not absorb moisture and odors, and does not rot if water accidentally leaks into the hallway.
Moisture will enter the room along with street water and water vapor from cold air, so the area in front of the front door has always been the place where wooden floors and thresholds rot the most. Even with very good ventilation, condensation regularly appears on the floor in the hallway. Therefore, the scheme with tiles at the entrance, turning into laminate in the corridor, has become so popular even for ordinary apartments in multi-storey buildings.
Combination of white and chestnut colors
Large bathroom
A spacious room will provide more opportunities for implementing a variety of design ideas. Here you can experiment with unexpected solutions and color combinations.
In a large bathroom, wall decoration in both white and dark colors will look beneficial. And patterns and large panels will help highlight the necessary accents.
Bright contrast and the use of several colors at the same time would be appropriate here. In this case, it is desirable that the floor is darker than the walls.
However, the color of the floor should be present at least in small quantities in the decoration of the walls of the room. The mosaic cladding will also look beautiful.
How to choose tiles and laminate for the hallway
The selection of materials for finishing the floor in the hallway is somewhat different from the rest of the apartment or house. Of course, you can choose marble tiles and expensive premium class 34 laminate, but such a solution, even with significant financial expenses, does not always turn out to be the best in practice.
To select the right material, you must adhere to two requirements:
- The combination of tiles and laminate should provide protection from moisture and dirt, and safety in the hallway. Details such as comfort are usually paid less attention to, since the apartment owner spends only 1-5% of their stay in the entrance hallway;
- A professional combination with the interior of the hallway. The floor in the hallway remains an element of the furnishings and design of the entire living space, so you have to look for the most stylish flooring design options.
Important! The floor in the hallway, like the front door, can be called the hallmark of the apartment.
When entering a room, a guest or visitor automatically glances at their feet, so the design style of the corridor, walls and flooring turns out to be an even more powerful argument than the technical characteristics of the same tile or laminate. But any homeowner should have a general idea of what type of slab and slats are installed in the hallway.
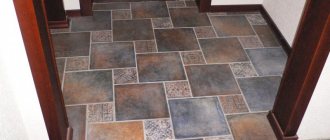
Laying tiles in the form of a honeycomb requires the experience of a master.
Choosing a tile
If you are looking for a material with the highest durability, then porcelain stoneware will be the best option. If for the floor in the kitchen or in the hall, on which you walk in slippers or shoes with soft soles, you choose tiles of class III wear resistance, then porcelain stoneware is at least class five. It will last for 30 years of operation, even if the soil near the house is entirely sandy. Unfortunately, such finishing cannot boast of a variety of colors and patterns; usually these are monotonous black, gray, brown tiles with jasper or granite texture.
The optimal tile option for combination with laminate is wear resistance class IV. This is enough to withstand the load from shoes with hard soles and even metal heels. The hardness of tiles is usually chosen within 7 units, this is enough to avoid painting the surface with gravel and ash chips, which are abundant on the streets in winter.
Sometimes soft tiles based on terracotta or sandstone are used for the entrance area in the hallway. The soft, non-slip and at the same time very beautiful porous surface wears out quickly, becomes dirty, and therefore requires constant care.
Selection of laminate coating
For hallways, one type of laminate is suitable, this is a coating of class 33, or in the European classification AC5. The thickness of the melamine or polyurethane film reaches 0.8-1.0 mm, which allows the material to be used even under conditions of severe abrasive wear.
The thickness of the lamella is 10-12 mm, so the material can be laid on a wooden floor even without plywood underlays; you just need to level and sand the joints and lay the underlay in two layers of polystyrene foam.
Vinyl materials
PVC-based tiles and laminates have been used for a long time; they are excellent as flooring in the kitchen, bathroom and even living room. The slabs turn out to be too soft for finishing the entrance to the corridor; the surface quickly becomes covered with scratches and darkens.
Quartsinil is easy to install even for a beginner
You can use vinyl and quartz vinyl laminate. It can be laid directly on the self-leveling floor or screed poured under the tiles. The material does not require insulation or substrates; with regular cleaning of water, PVC lamellas can last no less than a conventional cellulose-based laminate.
Panel laying methods
Not everyone has the money to hire a team of professionals who can handle laminate wall finishing in the kitchen. Installation is often done with one’s own hands, mentally preparing for a long and tedious procedure. In vain: beginners can finish finishing a floor-to-ceiling wall 2.8 meters high and three and a half meters wide in a day. Before covering the wall with panels, choose a suitable method for laying the panels.
Horizontal
This method is difficult for beginners in matters related to apartment renovation. After laying a board 1 m long, secure the plinth. It hides the joint and prevents the laminate from folding like an accordion. The folding problem is solved by alternating rows of short boards with long ones.
Vertical
Beginners prefer the vertical method. It is suitable for laying wall panels that have a square shape, pattern or imitate parquet made from different types of wood. It is correct to place the panels with the end shifted, i.e. randomly. By covering a wall with laminate in this way, you can achieve a visual increase in the height of the ceiling in the kitchen. Lathing and liquid nails are used to secure the laminate.
There is no need to pre-level the wall when attaching the laminate to the sheathing. This method is good for “Khrushchev” buildings, where the sound and heat insulation of the premises suffers. If the kitchen is small, then this method will not work, because it will make it even smaller. The laminate is fastened together with locks, and for fastening to the sheathing, glue or a hidden type of fastening element, clamps, are used. The structure holds better if, on one side, it is attached to the sheathing with screws/nails, and on the other, it is mounted on brackets placed in the groove of the lamella.
Liquid nails are often used when working with laminate flooring. This method is easy to implement, since you do not need to assemble the sheathing to attach the panels. So that they fit tightly to each other and the joints are not visible, prepare the wall by first leveling and drying. Having assembled part of the wall on the floor, glue it to the prepared surface.
How to combine tiles and laminate in the hallway
The transition line between the laminate flooring and the tiled surface in a corridor always becomes a source of dust and dirt collection. Therefore, the seam between them is covered with either a plastic or aluminum cover. The joint itself cannot be removed, since its presence provides compensation for the expansion of the lamellas under load.
When choosing a material, you will need to simultaneously select an overlay
The seam can be filled with colored sealant or pressed with a special polymer cord, which hardens after heating. Thus, it is possible not only to get rid of the protruding side, but also to make the transition line less prominent.
Pros and cons of combined flooring
Installing just laminate or just tile in your kitchen can be a challenging task. The first one quickly loses its original appearance. Without special heating, tiles remain quite cold and uncomfortable. After laying a combined floor covering, several problems can be immediately solved. Therefore you can:
- create a safe sanitary zone near the kitchen cabinet, which even the most durable and high-quality laminate will not allow. In terms of strength indicators, tiles are two orders of magnitude superior to laminated panels;
- Do not allow the floor covering to swell when water gets under the cabinet. The tile retains its geometric shape after prolonged contact with water, unlike laminate, which swells, losing its appearance and shape;
- prevent the floor covering from pushing through under the influence of the load created by the metal supports of the kitchen unit. When laying laminate flooring, this problem cannot be avoided. A layer of PVC or pressed paper is pressed quite easily;
- spread a comfortable and practical laminate over almost the entire kitchen area;
- visually divide the floor into separate zones, designating a work area for preparing lunch and a dining room for eating;
- optimize repair costs without sacrificing the practicality and functionality of the flooring;
- Make it easier to keep your kitchen clean.
Despite a number of obvious advantages, this option also has disadvantages. You need to think carefully about the design of the floor so that the materials look beautiful next to each other. Otherwise there will be a feeling of incompleteness.
Attention! The ideal combination of two different materials can only be ensured by the correct selection of their color, texture and color.
How to combine tiles and laminate in the hallway in color and style
Traditionally, two methods of combining materials are used. The first option assumes that the flooring, slats and tiles will be slightly darker from the colors of the walls and ceiling. With light coffee and cream walls, the floor in the hallway is only a little darker, for example, walnut or chocolate with milk.
The second option involves the use of contrast. For example, with a light laminate part, the tile is chosen dark, almost black. Contrasting couples can use red, white, yellow, coffee and even dark chocolate. Blue, green and blue shades are practically not used in the design of the hallway.
Poor color arrangement
Important! You cannot make the tile and laminate parts of the floor the same color. Firstly, it is unsafe for traffic, and secondly, the appearance of the corridor merges into one spot of color.
Styles
There are no restrictions when a creative designer gets down to business. He knows how to combine the incongruous in such a way that the combination of materials looks appropriate, demonstrating his commitment to any style.
If we take the ideas of professionals as a basis, we can perform this cladding in the style of:
- classic;
- modern;
- minimalism;
- high tech;
- avant-garde;
- English;
- Empire;
- Arab;
- art deco;
- loft;
- African;
- Biedermeier;
- bionics.
When choosing a style, color and texture are important: in some cases, the interior needs matteness and nobility, some modern trends breathe simplicity, ethnic styles need a touch of vintage.
Corridor design with tiles and laminate
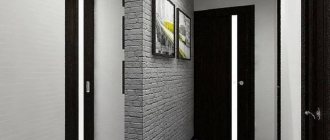
The rules for constructing the decoration of the hallway, taking into account the coating, are no different from the general interior planning scheme. The traditional light walls for the corridor are compensated by either dark tiles or laminate darkened to black.
Roman style
If the corridor space is relatively small, then you have to artificially increase the height of the baseboards or supplement them with dark wall panels. The walls and the laminate are separated by a “wooden” edging. This avoids the merging of the wall and floor surfaces.
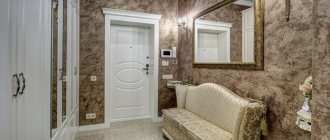
Contrast of light door and black tiles
The color and tone of the front door should always contrast with the tiled area. If the hallway is spacious enough, then the tiled area can be made with inserts of slabs of different colors, with a patterned edging.
Patterned tile edging
Using Thresholds
There are two types of special profiles designed for decorating the junction of laminate and tile. This is a metal profile and a PVC profile.
Plastic profile
This is a flexible profile that allows you to combine and combine coatings and consists of two elements:
- Latch base that secures to the floor.
- A decorative overlay that is inserted into the base and snaps into place.
There are profiles for connecting coverings of different levels and those located at the same height. In the first case, the height difference can be up to 10 mm. In the second case, an allowance for a difference of 1 mm is given.
The base is mounted flush against the laid tiles using dowel-nails or self-tapping screws. Its upper edge should not protrude above the surface of the coating.
Then the laminate is laid, taking into account the thermal gap, and the decorative overlay is snapped into place.
Ideas for combining tiles and laminate in the hallway
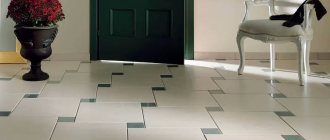
The shape and size of the area under the front door are limited only by the size of the corridor and the owner’s imagination. Most often this is a square or rectangular sector with a clearly defined transition boundary from tile to laminate.
In a long and narrow hallway, you can build a path from multi-colored tiles with a pattern. In this case, the side parts are sewn up with a laminate with a tiled texture.
The perfect combination of materials
In this arrangement, the laminate gets lost in a pile of tiles
Platforms with a curved transition line look very stylish and unusual. This solution allows you to walk along the corridor to the bathroom or toilet without taking off your shoes. Most of the light in the hallway is concentrated on the front door, so too light colors have to be compensated by a dark shoe cabinet.
The room is well set off by photo wallpaper on the wardrobe
Tile area with contrasting background at the seams
The tiled area in front of the door can be made in contrast. The main background surface is light, the threshold is dark brown. In the center of the hallway an insert is made in a stylish striped manner.
Hit of the season - striped floor
To arrange the threshold, you can use slabs with a mosaic surface. They are much more convenient and comfortable in everyday use, and in addition, they differ from laminate of any colors and textures.
Mosaic
General rules
When planning to repair the floor at the threshold and in the corridor, you should rely on a number of requirements for materials:
- they must be resistant to shock, scratches and moisture;
- the outer layer must be durable;
- Contaminants from them are easy to remove, and even more so not to be eaten away.
Most often on sale you can see laminate flooring for various types of wood. Although there are options for stone, and even with patterned colors. In order for this material to really last a long time, especially in the hallway with its high traffic, it is better to choose specimens with a class of at least 33. Under the influence of shoes at home, such a coating will last at least 15 years. The base for laminate flooring must be level.
High-quality tiles also have a long service life. Considering that there are digital calculations of the wear resistance of such a material, when purchasing, you should focus on grade 4-5 on the appropriate determination scale. At the same time, good tiles are easy to care for.
How to lay tiles with laminate in the hallway
The main problem when finishing the floor in the corridor is the need to ensure high quality waterproofing. Therefore, the subfloor is insulated with EPS slabs, on the surface of which a self-leveling floor is installed. No filler or other insulation that can absorb water.
The next step is to place the seam line and lay the backing. After installing the laminate, a beam is sewn along the joint, the waterproofing is folded in and the tile area is filled with self-leveling mixture.
The tiles are laid with glue or mastic waterproofing, no mortars or masonry mixtures. After the binder has cured, the seams are rubbed with an adhesive mass to insulate floors in bathrooms. The joint line can be caulked with a sealing cord.
It is better to seal the joint between the laminate and tiles
Interior style solutions
There are many design options for floor tiles. But when it comes to a certain style, it all comes down to a few, but rather profitable options.
Classical
Floor tiles can help bring classics to their most luxurious interpretation, especially if the living space supports it. This is the time when shine will look appropriate, especially in combination with marbled porcelain tiles or classic patterns.
In more modern interiors, you can limit yourself to light natural finishes with several decorative elements that are in tune with the color scheme.
Modern
The visual component of directing is not inferior to the practical one and often draws aesthetics from it. It is worth emphasizing the practicality of the material, as well as its compliance with the geometry of the space.
Matte floor tiles of light colors with a uniform or structural surface will harmoniously fit into such a corridor. But for interesting experiments, the modern style is suitable, for example, a black glossy floor surrounded by white walls.
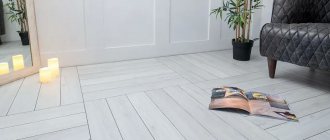
Scandinavian
The dominant color in a Scandinavian interior is white, so you can stop overthinking it and continue it at the base of the room. In addition to standard square fragments, you can pay attention to tiles of different shapes with geometric patterns or lay them out in the form of bricks. Natural textures are also suitable for hallways.
Loft
Inspired by an industrial aesthetic, loft is the perfect canvas for a variety of combinations.
You can purchase wood, stone or even concrete floor tiles. Against the background of brick walls, detailed fragments of different shapes look interesting, contrasting with other compositional elements.
High tech
Despite their commitment to high technology, high-tech does not shy away from traditional solutions.
Here you can use large massive blocks with deep texture, matte products or those that softly reflect light.
The colors are strict, natural, continuing the monochromatic palette characteristic of the style.
Advice from professionals
Usually, for aesthetic reasons, homeowners lay the tiles at a level higher than the surface of the laminate. At first glance, the tiles look very beautiful and stylish, making it easier to remove sand and dirt.
If the exit from the room leads directly to the street, then it is best to recess the tiles a little, making it lower than the level of the lamellas. This design option is somewhat less spectacular, but protects the slats well from moisture. To hide the difference, you can make a slight slope towards the door. A difference of a few millimeters will not affect the design of the hallway in any way.
Placement methods
There are several methods for placing laminate flooring on hallway walls. Let's take a closer look at each of them.
Horizontally
By fixing the slabs parallel to the floor, it is possible to visually stretch the room and expand its boundaries. Corridors decorated in this way become more spacious, light and airy; such a solution looks especially impressive if it is reinforced with small inserts of darkened mirrors.
The slats can be placed exactly above each other, or they can be laid in an intricate mosaic - here everything depends only on your personal preferences and the stylistic decision of the decor as a whole. The panels can be the same or have different lengths, but in any case their thickness must be the same, otherwise the pattern will be shifted and the design will lose its decorative effect.
Vertical
Vertical fixation of the slats visually lifts the ceiling, especially when the shade of the boards is combined with the finish of the floor. Moreover, the smaller the ornament on the slab, the more conceptual the entire room looks. It is advisable to choose only one wall opposite the window for vertical design - solar lighting will create stylish accents on it and make it much more catchy.
Vertically located lamellas are most often used for cladding hallways - this room in typical high-rise buildings is small, and thanks to a simple technique this shortcoming is visually compensated.
If you like unconventional solutions in the interior, then try installing laminate diagonally - such a design looks harmonious in both large and small spaces, the main thing is that the slats have the same width.