Photo: podarokvtochku.ru With a key holder in the hallway, you will forever forget about the keys lost somewhere in the apartment. You will no longer have to urgently search for them in all the nooks and crannies 15 minutes before leaving. And your beloved pet will definitely not drive them under the refrigerator or behind the sofa. Finally, order will reign on the table with small change, cards and wallets. Moreover, you can make a beautiful wall-mounted key holder with your own hands!
Advantages of making your own key holder
Having a housekeeper for the hallway with your own hands has the following advantages:
- Its size, shape and number of hooks - all these parameters fully correspond to your taste.
- Its creation requires a creative approach and the absence of restrictions in actions.
- Its production will cost much less than buying a store-bought product.
- Possibility of adjusting the accessory if you decide to change the style of the corridor.
- The ability to give the interior of a room an unusual and interesting look.
Decor features
The most popular are open models. You can often see products with various hooks on sale. Furniture hooks, nails, bolts, etc. are used for decoration. Thick copper wire or an ordinary wooden knot can act as a fastening element. Old cutlery and furniture handles are also suitable for decoration.
An original key holder in the shape of an old key.
A product with painting or old keys that are bent into a hook looks quite interesting.
Old, unnecessary keys can be used instead of hooks. Such a homemade key holder will not take any special expenses or much time.
For people who love non-standard things, this is a great chance to realize all their fantasy ideas. When creating, it is not necessary to use the same elements, because a composition of different elements in color and texture can pleasantly surprise you.
An unusual key holder for him and her.
Types of key holders
As you can see in the photo of handmade key holders, there are a lot of possible options. The choice of a specific solution must correspond to the interior style of the hallway.
The product can be made:
- from sawn wood;
- from unnecessary trash;
- from branches;
- from wine corks;
- from plywood sheet;
- made of wire;
- leather.
Non-standard homemade key holders on the wall
Making a wall-mounted key holder does not necessarily have to be long and arduous. And no one said that non-standard materials cannot be used. As always, in needlework, everything is possible, sometimes even what is prohibited. A few ideas that may please you with their simplicity and unusualness.
The first number is the use of connectors and suitable plugs. We make key rings from the plugs, and screw the “waste” connectors near the front door. All in all - about twenty minutes.
Connectors and plugs - and almost nothing needs to be done
An ordinary stick can also be turned into a key holder. Make hooks from aluminum wires, wrap them around a stick, decorate it with colored twine, and paint it with paints. Fixing it to the wall is also not a problem - the rope is tied at both ends and clings to a nail or hook.
From an ordinary stick
Throwing away wine corks is an unheard of waste. They make a very interesting key holder. The corks are glued together, and then screws with hooks are screwed into them. Stylish and unusual, minimum time and cost.
From wine corks
If you just have a piece of good wood, you can polish it and coat it in several layers of wood oil with pigment. It's already turning out beautiful. Finding or making small hooks is not a problem, and the board itself can be decorated with something.
Well crafted piece of wood with decoration and hooks
The photo above is a stylized key, but it could be anything. Some interesting thing that resonates with the interior or reflects your hobbies. At least glue a couple of magnets you brought from your travels. It’s already unfashionable to hang them on refrigerators, but here they will be just right.
Tennis balls also work very well as key holders.
If you cut a tennis ball about halfway, it will hold small objects perfectly. From several of these “holders” you can make a key holder in a sports house. The second option is in the picture on the right. If you can secure the balls to the rod (with glue, for example), inserting small hooks is not a problem. The problem is that they will most likely spin. To prevent this from happening, you can pour a compound inside the ball, which will become hard after drying/polymerizing. The first thing that comes to mind is tile adhesive. You just have to fill it in carefully. If it gets on the surface of the ball and hardens, you won’t be able to wash it off.
Popular ideas
Nowadays, a large number of different ideas for making key holders have been invented. Let's look at the most popular models:
- Shelf. It is in greatest demand among the population and is suitable for standard housing.
- Box. Installed mainly in private buildings.
- Key holder for large farmsteads. Allows you to store keys in whole bunches.
- Organizer. Organizes other small items in addition to house keys.
Napkins
For this technique, napkins or decoupage cards are indispensable. Sometimes needlewomen use printouts on a laser printer.
Napkins for decoupage are:
- three-layer. Mainly sold in supermarkets. They have different motifs: floral, New Year, etc. The main advantage of such napkins is their low price.
- four-layer. The size of these napkins is 21x21 cm, they are easy to find on sale. The price, like the previous option, is low.
- special for decoupage. Mainly sold in handicraft stores. There is a variety to choose from.
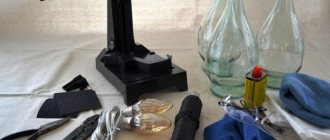
Required materials and accessories
To make such a useful piece of furniture, you will need a number of different materials. Below is a sample list:
- wooden or cardboard structure as a base;
- leather or textiles;
- holder;
- key hooks;
- pendants;
- picture frame;
- branch of non-standard shape;
- acrylic lacquer.
You may also need:
- plywood sheet;
- branch of non-standard shape;
- cork;
- MDF or chipboard sheet;
- tree.
Tools worth preparing:
- drill;
- jigsaw;
- screwdriver;
Blanks
Blanks for decoupage are sold ready-made in creative and handicraft stores. The price of the product is quite high: from 400 rubles onwards. Craftsmen can make their own blanks for needlewomen, cutting them out of wood or assembling them from slats.
Selection of design and construction solutions
The appearance of the accessory depends on where it will be used. For an office, the best solution would be a sleek steel cabinet with a lock.
For your home, the best option would be a model that fits harmoniously into the interior. It can be either luxuriously decorated or simple.
Note!
- DIY feeder - step-by-step instructions for creating a feeder + detailed diagrams with photo reviews
Do-it-yourself rugs - TOP 120 simple patterns with master classes on how to make them yourself + photo reviews of finished rugs
- Do-it-yourself dolls: a master class on making a beautiful doll. Simple instructions with photo examples of ready-made options
If you are not going to focus on such a product, you don’t need any particularly magnificent appearance from the key holder.
If you want to make the process of creating such a product as easy as possible, it can be made from an ordinary birch or oak branch.
No special skills are needed here. You just need to clear the tree of bark, drill the required number of holes and install hooks. The finished accessory should be varnished.
Advantages of choosing plywood for ceiling finishing
Covering the ceiling with plywood in a wooden house Those who prefer the smell of the forest, the warm brown or fresh light straw color of natural wood, if possible, will purchase or build from scratch an entirely wooden house. And it is unlikely that it would be appropriate to install a ceiling made of PVC panels or modern hanging systems in such housing, as in offices.
Here you need something truly homemade, natural, natural. Plywood is perfect for the ceiling. A beautiful and neat coating will not look cheap and boring, as some might think, if you treat the surface with special compounds, giving it color, gloss, and expressiveness.
Plywood consists of several layers of veneer. This finish undoubtedly outperforms other materials, as it has a number of unique advantages:
- simple installation - you can install such a ceiling without outside help;
- savings - the cost of the material is quite reasonable, which is good news, especially when a large amount was invested in the construction of the house itself;
- natural appearance – visually good quality sheets cannot be distinguished from natural wood;
- masks flaws - will hide an unsightly rough ceiling, ventilation, cables, and other communications;
- leaves space for auxiliary elements - it is easy to fit several layers of insulation and sound insulation into the opening between the plywood and the main ceiling;
- the material is harmless - however, the formaldehyde resin in the composition is a strong toxin when heated, so a plywood ceiling is not suitable for a bathhouse.
Plywood is susceptible to cracks and delamination, so this ceiling will last an average of 7–10 years. In addition, the material is afraid of fire, and sheets treated with a special fire-resistant composition are not safe for human health.
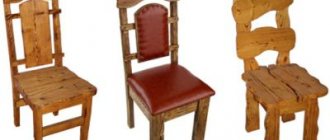
Key holder made from sawn wood
The style and originality of a wooden key holder will not go unnoticed by your guests. This is an ideal option for anyone who loves working with wood. Order of steps:
- Process the cuts using sandpaper.
- Remove dust, moisten the workpiece with water, dry it and sand it again.
- Cover the wood with several layers of stain.
- Print any picture, go over it and the base with acrylic varnish, put the image on the cut, roll it with a roller.
- After some time, roll up the paper layer, after moistening it with water.
- Make holes for fastenings and secure the finished product to the wall.
Decoupage of a key holder: important points and tips
It is important that clear patterns are made on a monochromatic background that do not intersect with each other. Napkins with small patterns or stripes are good for processing and decoupaging the internal surfaces or sides of boxes. If you decide to glue the canvas completely, then you need to choose beautiful drawings and collages.
1
5
Advice! If the printed main design is clearly visible on the second layer, then it can be used for gluing to the back side of the product.
Vintage black and white photographs will serve as an excellent decor for a key holder
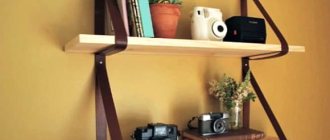
Model with shelf
This is a combined piece of furniture, since in addition to the key holder it includes a shelf for storing various small items. Most people are captivated by the simplicity of its creation. Need to:
Note!
- DIY satin ribbon bows - step-by-step instructions for creating unusual bows + detailed diagrams with photos
- Do-it-yourself furniture restoration: step-by-step master classes on restoration at home (120 photo ideas)
- Do-it-yourself rack: step-by-step instructions with photos and descriptions on how to make an unusual rack
- sand the prepared wooden block;
- fix the suspensions in its rear part, and make openings 10 mm deep in the front part;
- attach the block to the base board.
If necessary, you can connect a couple more bars to the structure and get several ergonomic shelves.
Brushes
The main brushes for decoupage are:
- wide synthetic brush. Its size should be approximately two 2 cm. The rigidity should be such that it is pleasant to drag the brush across the face.
- fan brush. The width of its fan is about 3 cm. It is used for gluing small motifs.
Small brushes are also used for painting.
A few rules to make your brushes last longer:
- Do not mix paint colors with brushes;
- When working, keep a container of water at hand.
- after work it is necessary to wash all brushes with soap;
Brushes whose width is less than 8 cm should not be left in water for a long time. They experience deformation under their weight and bend.
Leather key holder
A leather-covered accessory for keys is considered a status item, the purchase of which will cost a pretty penny. Therefore, it would be more advisable to make it yourself. To do this you will need three things: a piece of leather, scissors and glue.
If you decide to make a pocket key holder, here are the instructions:
- Take a piece of leather of the required size, a zipper, and a carabiner for attaching the key.
- Make a template for the future product, apply it to the skin and outline it with an awl.
- Cut out the workpiece. Attach the zipper, having previously fixed its position with glue.
- Install the carabiner.
- Decorate the craft to your liking.
This item can be a great gift for a colleague or friend.
Where is the best place to place a key keeper?
The main rule that should be followed when choosing the location of the key holder is ease of use and the principle of “always in sight”. Owners often lose their keys, and it turns out that they were always lying in one place. Many people will find it convenient to carry a pocket key holder - it is always nearby and fits compactly in a bag or jacket pocket. But the loss of the entire set occurs at once.
The types and purposes of such convenient key holders vary.
If the product is intended for storing household keys (outbuilding, garage, bars on windows and balconies, basement), place it near the front door or on the inside of built-in cabinets. This way, the risk of losing or being stolen is minimized - the structure is separately locked. The hallway (corridor) is an ideal place to attach a key holder. You won't forget your key fob when leaving for work and won't remember in the car - your eyes will focus on the key keeper intuitively.
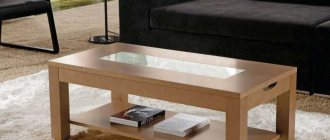
If you don't feel like drilling into the wall, choose the tabletop type.
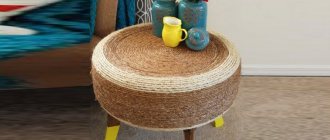
Variant of their traffic jams
If you have wine corks lying around your kitchen, don’t rush to throw them away. They can serve as material for a key holder. Here are the instructions:
- Cut out the fiberboard base.
- Cut the corks in half and glue them to the plate, maintaining a minimum distance.
- Install hooks.
- Hang the accessory on the wall.
Note!
Corrugated paper flowers: TOP 100 photos of ready-made options + instructions on how to make them yourself- DIY family tree: instructions for creating a family tree + DIY design ideas
- Do-it-yourself sun lounger: photos with instructions for creating sun loungers + detailed diagrams of the stages of work
The key advantages of this type of cork decor are functionality, originality and environmental safety.
Key storage is a practical and useful thing. There is nothing complicated in creating it yourself, because the Internet is full of detailed master classes on making key holders with your own hands.
In addition, the design process will take very little time, and the end result will fully repay the invested effort and money. Therefore, if you are free, then it makes sense to organize a similar solution in your corridor.
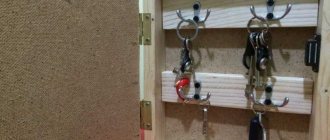
Key holder as a work of art
You can make an interesting fantasy wall-mounted key holder with your own hands from a picture frame, a wooden base and various hooks. Such a key holder will decorate a hallway in an eclectic style, which allows for a mixture of different styles.
Construction stores have a wide range of hooks of different shapes and colors. Select a dozen hooks of different shapes, paint them in different colors if desired. Choose a baguette with a laconic or, conversely, elaborate design. As a base, you can cut a piece of plywood or use a ready-made wooden kitchen board. Attach the hooks to the base in a chaotic manner using small self-tapping screws. Attach the picture frame with special wood glue or nail it with thin nails.