Assembling furniture yourself at home is a labor-intensive task, but at the same time it is an excellent help for saving the family budget, as well as an opportunity to demonstrate an original design approach and aesthetic flair. Making cabinet furniture with your own hands is not very common, but it brings noticeable benefits and moral satisfaction. The created product can be very stylish and advantageously emphasize the overall interior design.
Select fasteners after you have decided on the base material.
In order to cope with this not very simple but fascinating task yourself, you must have at least initial skills in working with the tool and be attentive and accurate. To create cabinet furniture, you can choose inexpensive parts or use materials available in the house.
The created product can be very stylish and advantageously emphasize the overall interior design.
General rules for assembling cabinet furniture
To assemble a cabinet or chest of drawers, you must first calculate the parameters of the future product. To make cabinet furniture with your own hands, the first thing you need to do is make a drawing with the dimensions of all the parts.
Before making furniture, prepare a drawing of the future product.
You also need to determine what material you will use during assembly. Depending on this, fasteners, tools and auxiliary arsenal (sandpaper, etc.) are selected.
You also need to determine what material you will use during assembly.
Wood as a material can be “capricious”; it is important to choose high-quality boards with a good, even texture, dried and processed. Birch, poplar, maple, aspen and other hardwoods are suitable. Conifers require special conditions, so pine or spruce must be selected in combination with some other variety. Try not to select layered rocks so that the base does not split during processing.
When making cabinet furniture, pay attention to the fact that laminated chipboard may crumble during insertion of fasteners.
Do-it-yourself cabinet furniture can be made of chipboard, MDF or laminated chipboard (the latter option is the most common). These materials are processed differently.
The material requires accuracy and precision in outlines and actions.
All details of the future cabinet must be carefully checked against the drawings and carefully adjusted to the intended dimensions.
Wood as a material can be “capricious”; it is important to choose high-quality boards with a good, even texture, dried and processed.
A specialized store will help you make adjustments (trimming). This can also be done using a ruler, pencil and a wood saw at home.
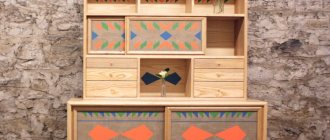
If desired, you can improve the appearance with original inserts.
Chipboard panels must be coated with a protective compound - this will reduce the risk of evaporation of resinous substances. Other materials do not require this approach.
Do-it-yourself cabinet furniture can be made of chipboard, MDF or laminated chipboard (the latter option is the most common).
When to call a professional
It’s better to spend money once on calling a specialist than to incorrectly assemble a kitchen cabinet with a closer or a fold-out sofa - sooner or later the mistakes will make themselves known, and you will have to replace the expensive mechanism. You should not make cuts under the sink and kitchen appliances yourself: firstly, you need a special tool (grinder), secondly, you can easily miss the size, and thirdly, without proper skill there is a risk of injury or damage to the part. By the way, a good craftsman will wipe out the scratches that inevitably appear during assembly - you are unlikely to be able to do this as carefully.
How to work with laminated chipboard - the main material for cabinet furniture?
Material such as laminated chipboard is quite actively used in the manufacture of furniture. Laminated chipboard has a number of undeniable advantages over chipboard:
- holds fasteners better;
- inhibits the evaporation of formaldehyde;
- looks aesthetically pleasing;
- You can choose an interesting texture and color.
When using natural wood, it is recommended to coat it with varnish.
Do-it-yourself cabinet furniture requires the ability to process the material, for example, to clean and cover the cuts with an edge that matches the overall surface (this must be done to avoid evaporation of the adhesive composition of the chipboard. It must also be remembered that when cutting to size, chips and cracks of the laminated part are possible. For assembly Cabinet furniture made from laminated chipboard will require care, attentiveness and accuracy.
Material such as laminated chipboard is quite actively used in the manufacture of furniture.
You can use a power tool in your work, which simplifies the attachment of a particular part to the body.
The panels should be coated before assembly, not after, to avoid smudges.
Furniture made from laminated chipboard is not always appropriate for a child's room, especially if the room is small, poorly ventilated or located on the sunny side, and the base itself is not of very high quality. Resins and chemical compounds can evaporate quickly and create an unfavorable atmosphere. This also applies to chipboard. It is better to prefer solid wood and plywood.
Do-it-yourself cabinet furniture requires the ability to process materials.
What tools are needed?
The tools available in the house are suitable for assembling cabinet furniture:
- screwdrivers;
- screwdrivers;
- Sander;
- jigsaw;
- wood hacksaw;
- ruler;
- simple pencil.
The popular design with craquelure varnish makes the facade of the cabinet look original and expensive.
Sandpaper is suitable as a material for cleaning surfaces. In order to measure the elements correctly, it is necessary to do this not on the floor, but on a table, preferably a carpenter's table or something similar. You can use stools as supports when cutting off extra centimeters from the board.
To assemble a cabinet or chest of drawers, you must first calculate the parameters of the future product.
When you can handle it yourself
If the number of parts does not exceed 5–10, assembling the furniture most likely will not take much time. The instructions for office chairs, tables and chairs usually consist of several simple points, the holes for the screws are already drilled, and the hexagon and all the necessary fittings are included in the kit.
— The general rule: wherever accuracy is needed, it’s unlikely to be done on your own. But even a young mother can assemble a crib from several parts. If you intuitively understand what and how to do, do it. If it’s unclear where to start, don’t skimp and contact a specialist. By the way, don’t forget to put felt protection on the legs of new furniture so that they don’t leave scratches on the floor.
Preparation before assembly
The selected material - chipboard, chipboard or solid wood panels - must be properly processed. Preparing the parts of a cabinet or chest of drawers involves leveling the surfaces, if it is not a laminated base, as well as cleaning them from roughness and burrs. The cut edges of the chipboard can simply be sanded and covered with a matching laminated edge.
Spot lighting is also a practical addition.
Any material that you are going to use must be of high quality and well dried so that after production the product does not create dangerous chemical fumes in the room.
Before assembling cabinet furniture, you need to carefully measure the area where the structure will be installed. For a cabinet with doors, you need to leave a little free space so that the doors can open without the possibility of friction against the walls.
You can use a power tool in your work, which simplifies the attachment of a particular part to the body.
Repeated parts of the future product must be symmetrical to each other, otherwise misalignment is likely.
Select fasteners after you have decided on the base material. Try to purchase reliable connecting parts. They should be purchased with a reserve so that if they fail, they can be easily restored.
Sandpaper is suitable as a material for cleaning surfaces.
Main assembly steps
Before making furniture, prepare a drawing of the future product. It is necessary to once again check the dimensions of the cabinet schematically marked on paper with the proportions of the prepared parts.
- Mark the extra centimeters of the laminated chipboard panels using a simple pencil, saw off along the lines with a wood hacksaw, clean the edges and cover them with an edge.
- Attach the side, bottom and top panels to the rear panel using a screwdriver and self-tapping screws.
- Before hanging the doors, mark the locations for the hinges. If the sashes are heavy, increase the number of fasteners, otherwise over time the panels may warp under their own weight. The distance from the edge to the bottom and top loops should not be less than 12-13 cm.
- Fasten the hinges and check the operation of the doors. They should fit tightly, without gaps or displacements. Don't forget to embed the mini-lock.
- For a cabinet with sliding doors, you should choose a roller mechanism that will be located at the top and bottom of the panels. Most often, aluminum elements are used for this.
- If legs are intended, then they need to be made before hanging the doors. After assembling cabinet furniture with your own hands is completed, check the stability of the structure, how level the cabinet is and whether it “sinks” to one side or another.
- Using self-tapping screws and strips, make supports for the shelves. The latter are adjusted to size after assembling the cabinet body. Special holders are sold for glass shelves that will not damage the base.
- It is better to equip drawers (if any) with guides, then they will slide out easily and freely, without the possibility of warping and getting stuck.
The selected material - chipboard, chipboard or solid wood panels - must be properly processed
When making cabinet furniture, pay attention to the fact that laminated chipboard may crumble during insertion of fasteners. The material requires accuracy and precision in outlines and actions.
Drying time is required after each coat is applied.
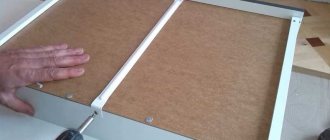
Back walls and bottoms of drawers
The back wall and bottom of the drawers are most often made of HDF. The smooth side of the sheet should face the inside of the cabinet/drawer. The thickness of the sheets is 3-5 mm, the color is selected to match the chipboard.
Some people prefer to attach HDF to a furniture stapler, but this cannot be done. Over time, the brackets will become loose and the structure may warp. It’s not worth talking about the bottom of the drawers - a stapler is clearly not suitable for fastening.
Furniture LDVP
Sometimes it is inserted into a groove prepared with a milling cutter, but all dimensions must match down to the millimeter.
Most often, HDF is attached to nails or self-tapping screws. It is better to use self-tapping screws with a press washer, but before screwing them in, you must drill a hole, otherwise the product may crack.
In rare cases, for example, to create a “stiffener” in a tall cabinet or in drawers with high loads, fiberboard is replaced with laminated chipboard. These materials can also be combined.
Furniture fittings
The choice of fittings for cabinet furniture is a moment no less important than the assembly itself.
| Cabinet hinges | Poorly selected loops can negate the results of your efforts. |
| Hinge mechanism with four hinges | Today this detail is being used more and more often. Adjustment is carried out both at the fastening stage and after completion of the installation work. |
| Drawer guides | You can take roller or ball ones. |
| Handles for drawer lids and cabinet doors | They need to be matched to each other. They may differ in style - it is important to adhere to a single design for the facade or interior content. For children's cabinets or chests of drawers, it is recommended to choose streamlined handles so that the child does not get hurt while moving or playing. |
Any material you are going to use must be of high quality and well dried.
Location of parts
A detail is any element of cabinet furniture: lids, tabletops, walls, facades, shelves. Each part can be either nested or invoice. Choosing the right type of location is very important.
Let's look at examples of two kitchen cabinets: one of them will stand on legs, and the second will be hanging.
Base cabinet:
As can be seen in the photo, the operating stress in the floor-standing cabinet is directed downwards from the lid and in the first option is naturally transmitted through the parts to the cabinet legs.
Correct and incorrect options for assembling a floor cabinet
In the second, incorrect option, the load is transmitted through the confirmat (furniture screw), and because of this it will be torn out of the part at a fracture.
Wall cabinet:
In the second example, the opposite is true: the load will go to the bottom shelf, and the attachment point will be on top.
Correct and incorrect assembly of a wall cabinet
If we use the same fastening scheme here as in the floor cabinet (option 1), all 4 bolts will be constantly under the load of being pulled out of the wood. Therefore, it is better if the confirmations experience stress on the fracture (see diagram “correctly”).
Furniture finishing
If desired, you can improve the appearance with original inserts. These can be mirror panels, dividers, various patterns or stencils, or ornaments. Spot lighting is also a practical addition. In addition, it looks quite stylish, especially if there are glass or frosted inserts.
When installing furniture, make sure that it is not exposed to direct sunlight.
When using natural wood, it is recommended to coat it with varnish. Finding the right shade is not difficult. To fix, apply the coating two or three times, then the surface will look smooth and even. Drying time is required after each coat is applied. This will make the surface resistant to abrasion and fading. The panels should be coated before assembly, not after, to avoid smudges.
Repeated parts of the future product must be symmetrical to each other, otherwise misalignment is likely
The popular design with craquelure varnish makes the facade of the cabinet look original and expensive.
With the help of decoration, you can not only add style to a new piece of furniture, but also elevate an old product.
With the help of decoration, you can not only add style to a new piece of furniture, but also elevate an old product.
Tip: when installing furniture, make sure that it is not exposed to direct sunlight. This will avoid fading of surfaces and drying out of the wooden base.
To create cabinet furniture, you can choose inexpensive parts or use materials available in the house.
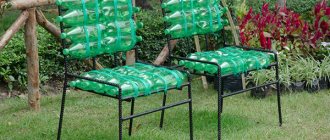
Here's what you can do!
Install the wheels.
“Rollers” on the legs of furniture will not only make it taller, but also easier to move. Screwing on the wheels is usually quite simple and there are no problems with it.
“Knock off your skates”!
Many bookcases have additional furniture legs. Do you want your furniture to look more modern? Then take them off!
“Reflashing” the fasteners
Unfortunately, many furniture models use unsightly, unaesthetic door handles. When buying a new headset, make sure that it fully matches not only the design of the furniture, but also the available connectors.
Let's change the color!
You can paint any furniture in any color, even laminate. In this case, you should use oil paints. Before using them, the surface must be sanded and primed.
Good luck! But it’s better to contact us - call right now ☎(499)394-03-19!
Tell your friends about us!
Return to list of articles