Why is wood preferred?
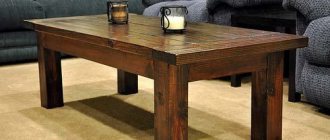
Given the variety of materials used to make garden furniture, the best option is wood. It is preferred for its ease of processing and affordability.
- In addition, the wooden bench is not heavy, so it can be easily moved around the site.
- Sitting on a wooden bench while drinking tea is much more comfortable than sitting on a metal or plastic surface.
- Due to its low thermal conductivity, wood does not heat up or cool down quickly. Even in hot weather, its temperature remains average.
If the technology for assembling wooden parts is correctly followed, the result will be a voluminous, strong and durable structure. All its elements can be easily mechanically affected. Even if you have no experience in making a bench, giving it the desired shape will not be difficult.
Under the influence of precipitation, as well as as a result of damage by various insects and bacteria, the bench can become unusable and rot. Therefore, it is very important to take proper care of it.
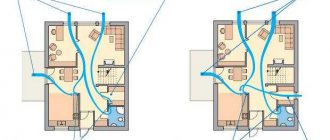
How to find a place
The benches are surrounded by greenery, among climbing flowers or against the backdrop of a magnificent tree. Choose a place protected from the wind, where you can relax or read. Greenery and flowers calm the nerves and give rest to the eyes, which is why garden benches are important for anyone who needs relaxation.
- Several people can sit on a bench placed in the yard at the same time.
It is usually made from wood, but can easily be made from metal, stone or synthetic materials.
- Many benches have armrests and backrests, but some are made without them.
- Seats are sometimes placed on both sides of the back.
Requirements for a future shop
The constructed bench model should have the following properties:
- Comfort. To make the bench comfortable, it is better to make it with a back or armrests on which you can lean.
- Reliability. The bench must be safe when exposed to heavy loads. Therefore, it is necessary to use high-quality wood and fastenings.
- Moisture resistance and resistance to temperature changes. The bench is usually installed in an open space, so it will have to withstand all seasons of weather. Therefore, it must be free of defects and damage.
To ensure that the product meets all the required characteristics, only high-quality, well-dried material is used in its manufacture. Damp wood is unsuitable.
Choosing a style and shape
To get the most out of your design, choose your own style.
- Curved benches are preferred when planning to create a fireplace or fountain in your yard. They are also a way to sit people in a circle to form a comfortable space for conversation.
- Rustic-style outdoor furniture is perfect for lounging around a log cabin or on the farmhouse lawn. Personalized and modern, the romantic addition of rugged lantern designs adds a touch of elegance, enticing you to spend a romantic evening on the bench with someone special.
- If there are small children living in the house, they will often walk outside, so an outdoor bench with a canopy for a child will be an excellent addition to the lawn. And even if there are no children in the house, the combination of a standard-sized bench and a low bench creates an original “decorative screen” in the yard.
Materials for building a bench
- Boards;
- Supports;
- Beam for reinforcement;
- Marker, level, tape measure;
- Self-tapping screws;
- Nails;
- Wooden pins;
- Wood glue;
- Fine-grained abrasive;
- Priming;
- Brush;
- Varnish or oil paint;
Canopy ideas
If you can’t do without shade and protection from rain on your lawn or garden, you can make a canopy for a bench.
- The awning is a modern classic; its fabric, made of durable material, not only protects from the sun, but also from rain, even snow! It can be a continuation of the traditional roof, which immediately becomes much more than just a stylish way to create shade.
- Who said you can't use tents throughout the summer? By placing a tall tent over the bench, you can create a dome that will completely protect everything that is under it.
- Consider also the true classics. Awnings became popular from the mid-eighteenth century. They protect us not only from excessive sun, but also from rain.
- A canopy made from climbing plants is a reinterpretation of traditional structures. Well-defined structure, beautiful design and undeniable excellence - all this will give a stylish look to any garden. The good old pergola, the image of which has been completely changed, will appeal to all nature lovers. The wooden structure not only provides shade, it brings us back to nature.
- You can protect yourself from excessive sun exposure with a simple homemade umbrella. This is one of the most flexible methods. Umbrellas can be round, angular, large, small, the choice is huge.
- Those who love permanent structures and Mediterranean style can create a gazebo and seating area in the garden.
- An arch is a circular structure with a roof, the perfect way to create a space for a barbecue or a nice lunch with cool tea.
- A delicate bamboo rug with cast iron brackets, combined with rustic-style furniture, will decorate any relaxation area.
Design ideas
To create a beautiful natural corner of nature on your site, when making a bench with your own hands, various styles are used:
- Original design. Homemade benches look wonderful with wicker fences. You can make the back in the form of a dense weave of branches.
- Moroccan style The product will be colorful if the details are decorated with carvings;
- Chinese style. The design is complemented with bamboo.
- British style. Involves making a bench from solid wood species such as oak and ash. They decorate it with intricate patterns.
Any wooden bench can be transformed with textiles. For example, pillows and bedspreads. It will feel like home.
Bench - flowerbed
Lovers of wild blooms surround themselves with flowers everywhere. For them, we can recommend making a bench - a flowerbed.
Even a novice master can work on such a bench. It is necessary to build a wooden floor between two boxes. It’s simpler - there’s just nowhere. The boxes are filled with soil and your favorite plants are planted there. A green corner made in this way will decorate any summer cottage.
Bench options
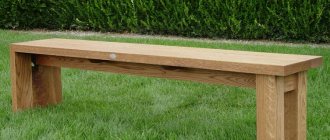
No backrest. This is a simple shop. The manufacturing assembly process includes the following steps:
- Legs. Cut 4 pieces from the board. Saw off the internal corners to stabilize the bench. Using two bars, the legs are sequentially secured with wood screws.
- Supports. The legs are connected using a beam made of timber.
- Seats. Boards are placed on the supports, leaving a gap of one centimeter. Screw them to the ends of the legs. The edges of the seat should protrude by 10 cm.
- Strengthening. For stability, side strips of arbitrary length are screwed to the bench. To do this, use a marker to mark the points and grooves for the slats. Insert the planks and secure them with nails.
With log legs
Collection is carried out in the following sequence:
- Boards for sitting are cut to the same length. You can round the edges. Place the boards at equal distances. Make marks at the places where the legs are attached. Do not drill holes through the marks.
- The logs for the legs are made equal in length. Measure the distance between the holes in the boards for the seat. Measurements are taken on the first row of logs, and non-through holes are made. In all other rows, holes are drilled in a checkerboard pattern, with a mirror image. The logs are connected to each other using wooden pins treated with wood glue. The seat is attached to the legs.
Corner shop
Ideal option for a small area. The bench takes up little space. Made from two separate benches.
The assembly method is as follows:
- First step. Preparing parts from boards.
- Second step. Two separate benches are assembled from the parts. The legs are screwed on both sides of the support. The seat is nailed to the frame so that it protrudes about five centimeters from the edge.
- Third step. The benches are connected in the form of the English letter “L” using steel brackets.
Wooden pallet bench
Such a bench is assembled from pallets as follows:
- To make the back and seat, the pallet is cut into two parts. A little more for the seat, a little less for the back. They are fastened with self-tapping screws.
- To increase strength and stability, struts are attached to the resulting structure on both sides.
- Legs are made from the remaining boards and attached to the base.
Types of finished products
To improve the area around the house, many furniture stores offer summer residents to buy all kinds of comfortable and beautiful benches and benches with polycarbonate roofs at affordable prices:
- a miniature portable gazebo that combines a table and benches under polycarbonate under one canopy; the photo shows a metal base;
- a garden wooden bench with a polycarbonate canopy on 4 timber supports supporting a stylized gable roof made of honeycomb polymer sheets;
- a bench suspended on supports with a polycarbonate canopy, combining a swing and a bench under the roof - an ideal place for mother and baby;
- a decorative polycarbonate bench under the roof, made by a skilled craftsman.
The last option looks in the photo like a real oriental tent.
Wooden bench made from old chairs
Sometimes there are chairs left on the farm that are useful for making a rather comfortable bench. If you have two identical chairs, you can safely assemble it.
The assembly process is divided into:
- Disassembling chairs. Only the parts with the back and legs are left.
- The backs are connected using a box of bars of the required section.
- They make a frame that will provide the bench with reliability. Install it at a distance of 20 cm from the floor.
- Cut out the seat.
- Install the seat on the frame.
You can add interesting ideas to any of the manufacturing methods based on your experience working with wood.
In the end, all that remains is to saturate your creation with special preparations for protection, and then coat it in 2 layers with waterproof wood varnish or oil paint for external work.
Shop - sandbox
Another bench option that will definitely make your children happy is a sandbox with a lid.
A very convenient option that will fit into the country landscape design, will not take up much space, and will appeal to children and adults. Approximate dimensions: 1.20x1.45x0.3 m.
When making such a sandbox bench, you can rest assured that country cats will not get to the sand, and the ubiquitous magpies will not steal small toys.
Photo of a homemade bench
Preparatory work is half the battle
First you need to take a piece of paper and make a sketch or drawing of the proposed product. Even at this stage, questions may arise: what is the optimal height or how many legs should the bench have? There are general standards that should be followed when drawing up a diagram:
- 400 mm – 500 mm – seat height;
- 500 mm – 550 mm – seat width;
- 350 mm – 500 mm – back height.
If you plan to create a product with a backrest, you should determine for yourself how the backrest will be attached to the seat. Depending on whether the bench is portable or not, the legs are planned: for a non-portable product, they are firmly fixed in the ground.
It is not difficult to fix the bench legs: you need to dig holes of the required size and fill them with cement mortar, lowering wooden parts into them
From the drawing you can estimate how much material is needed for the job. Typically, a product of this kind requires a minimum of financial investment: at the dacha there is always a lot of wooden blanks left over from the construction of a house or bathhouse, fasteners (screws, nails, bolts, staples), paints and varnishes for wood processing.
If you collect the remains of wooden products and blanks from around the dacha, you can come up with an unusual model
You will also find the necessary tools in the utility room. If the main material for production is wood, you should prepare: a plane, a saw, a jigsaw, a hammer, sandpaper, a tape measure and a pencil.
Unusual ideas
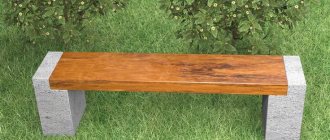
As supports, you can use not only boards or square beams, but also rounded logs and double-edged beams. They are laid horizontally, with the bench seat on top.
You can place the cuttings of the trunks vertically and secure the seat with dowels. The design without a single nail will perfectly perform its functions. For the back, the logs are cut longer and placed close to the bench. A sanded board is fixed vertically to them. If you select the middle of a large-diameter log and smoothly trim the inner surfaces, you will get an original, authentic bench.
Is there a luxurious spreading tree growing on the site? This can be successfully played around by installing a bench in a circle near the trunk. You don't have to cut entire boards. If the old but strong pieces of wooden chairs are firmly secured to the log, the garden bench will be ready in a matter of minutes.
A lightweight design with an openwork back is what you need in a small but cozy country courtyard. You will need very little material - an unedged board, round slats and branches freed from bark. You can even use the remains from pruning garden trees.
For gatherings in the gazebo or on the veranda, corner benches are useful. If you install them near the table, you will get a spacious dining area. It will be appropriate not only in the garden, but also on the terrace or veranda.
The bench, placed on wheels, is mobile and easy to carry. Just roll it to a new place - and you won't have to lift anything heavy.
From the benches you can build a whole complex with sitting and lying areas. A large company can be accommodated here comfortably, and for a fun party it is enough to place a low table and organize refreshments.
An unusual composition of scraps of untreated trunks will add originality to any garden plot. True, you will have to try and hollow out a rounded seat with a comfortable backrest in each pair.
Armrests can be made from anything. For example, from cart wheels, as in this picture.
There is nothing unnecessary on the farm. From a couple of pallets of building materials you can make a decent, and most importantly, free bench. The pallets need to be disassembled, the slats sanded and coated with paint and varnish.
DIY making
To make a bench from metal with your own hands, you do not need to have practical skills in construction or furniture assembly. Adequate knowledge of using hand and power tools. There are several ways to manufacture metal structures.
Material and tools
Before starting production, you need to prepare:
- metal corners, profile pipes, forged elements;
- welding machine;
- grinder with metal discs;
- metal brush;
- brushes, roller, primer, special paint.
If the seat will be covered with wood, you will need boards, a hacksaw or miter saw, a drill, bolts or screws.
Bulgarian (Photo: Instagram / tovarka.ekb)
Preparation and drawing up of drawings
Before assembling the structure, you need to draw up a diagram. It should indicate the dimensions and the appearance of the finished structure from different sides. When calculating sizes, you must take into account:
- minimum backrest height - 30 cm;
- minimum bench width - 30 cm;
- length of the structure - 60 cm must be allocated for one person;
- bench height is about 45 cm.
Forged benches
To make a forged bench, you can buy ready-made parts or make them yourself. If the second option is chosen, there are two types of forging that can be used:
- Cold forging. Involves performing work on manual machines. In order not to spend money on purchasing equipment, you can assemble it yourself.
- Hot forging. It requires a forge and an anvil. The workpieces are heated to maximum temperature and processed with hand tools.
After preparing the parts, you can begin assembly:
- Weld the sidewalls through the longitudinal guides.
- Weld the back frame.
- Weld individual forged parts to the finished structure.
When the rough work is completed, you need to clean the welding seams and coat them with an anti-corrosion compound.
Forged bench (Photo: Instagram / lazarrgo)
Bench made of profiled pipe
This material is easy to work with. You need to prepare the required number of tubes. It is better to choose structures with a square or rectangular cross-section with a wall thickness of 3 mm. Assembly steps:
- Cut the tubes with a grinder.
- Clean the ends from burrs.
- Weld the parts.
- After making the frame, cut the lumber to size for the seat.
- Clean the boards with a sander.
- Secure the boards over the frame with bolts.
All that remains is to cover the wood with two layers of varnish or special paint.
Bench made from corners
The easiest way to make a bench for the garden. Assembly:
- Mark the corners and cut with a grinder.
- Clean the ends with a file.
- Lay out the parts on the table in the form of a finished structure.
- Weld the corners.
- Cut the boards for the seat with a hacksaw or miter saw.
- Sand wooden surfaces.
- Secure the boards to the metal frame with bolts.
Protect the wood from moisture and temperature changes with varnish or special paint.
Bench made from corners (Photo: Instagram / maksimliashchynski)
Scrap metal bench
To make your fantasies come true, you don’t need to buy sheet metal, corners, profiles, pipes. It is enough to go through the contents of the garage, basement, shed and select scrap metal. Any designs can be made from it.
Assembling a bench without a back
This is the simplest design option. You need to assemble a U-shaped metal structure from corners or profiled pipes and cover it with boards in the seat area.
How to make a bench with a back
It is more comfortable to sit on a bench with a backrest. It can be assembled from profile pipes, angles, forged elements:
- Prepare a template according to which the sidewalls will be assembled.
- Assemble the sidewalls from corners or profile pipes. Check the angle on the parts.
- Connect the sidewalls with horizontal guides in the area of the back and seat.
- Secure the boards over the guides.
- Treat joints and paint wooden surfaces.
Bench with back (Photo: Instagram / _kmcby_)