Types of benches
There are many types of benches. The master brings something special and unusual to the appearance of this simple element for the garden. However, all models can be divided according to some common characteristics.
Benches without backrest
This type is considered the simplest, as it consists only of a seat and several supports. Only this can all be implemented in different ways.
- We have before us a reliable, but not very attractive solution. However, the creator of this design still provided for a certain asymmetry - one edge of the seat protrudes beyond the legs, and the other is level with them. The bench is made of thick integrated boards and laminated veneer lumber. Externally, the material is roughly processed. This bench is suitable for many rustic styles, such as American country.
Simple wooden bench without back
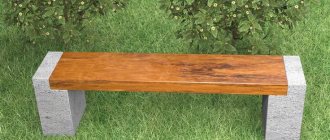
- This bench is made of wood and concrete was used for the supports. Such composite structures look good in many landscape design styles, for example, high-tech, minimalism or loft. Concrete parts have clear geometric shapes. Against their background, the varnished board contrasts perfectly and looks very advantageous. Such a bench will also be very stable, but extremely heavy - moving it to a new place will be difficult.
Concrete wooden bench legs
- The back of this model is purely symbolic, so we will assume that it does not exist at all. It is not clear whether it will be comfortable, but it definitely looks impressive. Frame type construction. The basis was steel strips, which were looped and sheathed with a narrow lath. For stability at the bottom, additional stops are welded from a steel corner.
Outdoor benches made of metal and wood
A common disadvantage of benches without a back is the inability to completely relax while resting. You have to either keep your back tense, or create support with your hands on the seat or legs.
Benches with wooden backs
These models have a complicated structure, but they are more pleasant to relax on.
- A master of his craft clearly put a lot of effort into this model. The building material used was wooden beams, unprocessed branches and boards, which were given a rounded shape. All lumber is treated to appear aged and untreated by man. The absence of right angles and straight lines hints at unity with nature. Even the seat itself is slightly rounded inward along a wide radius.
Wooden bench with backrest for 2 people
- To achieve an aged effect, the wood is brushed. All soft fibers are removed from the surface of the material. This reveals its internal structure. A beautiful relief remains, which is further emphasized when processed with paints and varnishes or during firing. On this bench there are brushed boards in a composition with raw cuts of the trunk.
A trunk cut was used for the backrest
- Such designs are not suitable for every garden. Some styles value lightness and grace. An example of such a shop is shown in the photo below. The bench is clearly of factory origin, but if you have the right tools, you can do something like this yourself. In the photo there is clearly a lack of flowering vegetation around the bench.
Lightweight bench made of treated lumber
Assembly of such benches is also not the most difficult. Next, drawings will be presented and methods for their implementation will be described.
Bench with table
Such seats are installed mainly on terraces (read the article about arranging a terrace in a dacha), verandas and gazebos. The combination of furniture pieces forms the finished dining area.
- The photo shows an option for children. The tabletop is mounted on trusses with widely spaced legs. Crossbars are installed across them, to which the suspended bench seats are attached. Such a bench does not require a lot of material; its design is quite simple. In this case, the parts are securely connected to each other.
Wooden garden tables and benches for children
- These benches will withstand more serious loads, since they are not transferred to the table body, as in the previous case - the base under the structure is loaded. In fact, we see three separate objects connected at the bottom by a common strap. This solution gives stability to the thin legs of the bench. The seats and table top are made in an interesting way - a neat frame is formed from the board, the inside of which is filled with flooring. It looks very neat and beautiful.
How to make a wooden bench with a table for 4 adults
- The next model is complicated by the fact that it has backrests. The seats are held in place by common jumpers. It will be awkward to sit down and leave such a table. And if you consider that a backrest has also been added, then the options for this are even more limited.
These wooden benches have comfortable backs
. In general, the inconvenience of placement is a drawback of all such structures. Different people have their own sizes, so hosting guests at such a table can be a bad decision. Also, these beautiful wooden benches require a large and flat area for installation, so they are rarely placed on the ground.
Bench-sofa
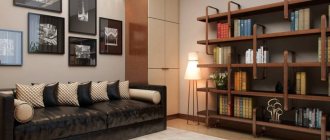
This is the same bench with a back, but there are design differences. Firstly, soft pillows are always laid on top of the seat and under the back, secondly, they are made lower and are not placed in front of the dining tables, and thirdly, the seat is made deeper so that you can literally lounge on it.
- Like the previous option, these benches, due to their large dimensions, are installed on spacious terraces. This sofa is made from sanded and varnished boards. The pillows are stuffed with several layers of foam rubber and have removable covers so they can be washed (read the article on how to make pillows for garden furniture).
Bench-sofa corner
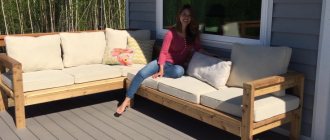
- Such structures usually have angular shapes, so processed timber of the correct cross-section is used for their manufacture. They do not differ in elegant shapes, so assembly will not be difficult - it is enough to build a strong frame, which is then covered with boards. These sofas look good in new style gardens.
Sofa with closed sides
- Old pallets are suitable as the main material for such a sofa - their shape and design correspond to the style of similar structures. Furniture made from pallets is a godsend for a loft-style garden. This material is inexpensive and very durable.
How to make a bench: photo reports
We won’t make benches out of stone—not everyone has the equipment, but we can make them out of different pieces of wood. Let's talk about making simple but unusual designs. So that a handmade bench can be a source of pride.
Bench without back
The design is simple, but looks interesting due to the specific material. For the legs, timber with rounded edges was used. If you have small logs, you can trim them on the sides. You'll get almost the same effect. THIS material is not so rare; the legs are assembled from it in an unusual way: the bars are laid flat on top of each other. This adds zest and appeal.
A simple bench looks interesting due to the material
This bench without a back has a length of about 120 cm, a width of about 45 cm, and a height of 38 cm. You can round the edges of the beam using a cutter, or you can find a similar profiled one. It costs more, but it will be easier to work with: it is already well processed and is easy to connect.
Depending on the found cross-section of the timber, calculate the length you will need. Determine how many bars will have to be stacked on top of each other to achieve the required height. In this case, 5 bars were used for one leg. Total 45 cm * 5 pieces - 2.25 m. Two legs required 4.5 m of timber. A board 40 mm thick and 90 mm wide was used on the seat. For the seat you need 5 boards 1.5 meters long. It turned out 1.2 m * 5 pieces = 6 m.
First we cut and process the boards for the seat. Their edges must be rounded. If you don’t have a sanding machine or a router, you will have to work with sandpaper, but you can find such a board or arrange at a sawmill to have it processed and sanded for you: it will be much less work. So, we cut the boards to the same length, sand them and varnish them (with or without tinting - your choice).
Treated boards
Place the bars for the legs one next to the other, aligning their edges. Using a square and a pencil, draw lines where the fasteners will be placed. The distance between the lines is 7-10 cm.
Lines where the pins will be installed
You can take metal pins, or you can make dowels - carved from wood. Holes slightly smaller in diameter are drilled for them; the depth of the hole is half the length of the pin. Then they are hammered into one part, and a second part is inserted into the same hole on top. The connection is reliable, but to be sure, you can add glue, although then the structure will turn out to be one-piece.
With a pin connection, the main task is to make the holes strictly one above the other so that the parts mounted on the pin give a smooth edge. We've done part of the work - we've drawn lines where we'll drill, now we need to measure the same distance from the edge. For this we will create a template. We take a piece of plank about 1.5 cm wide. We will drill holes at this distance from the edge of the bars. Having placed it exactly along the edge, we mark the places of intersection with the drawn perpendicular lines.
We make holes in the bars in a checkerboard pattern
We will install the pins in a checkerboard pattern, so we will drill holes through one intersection. We also make holes on one block from different sides in a checkerboard pattern. In a similar way, using pins, the legs are connected to the seat: two pins for each plank.
Technologically, this type of connection is correct, but it is complex and requires a certain skill. It could be easier. Place all the bars one on top of the other, secure with clamps, drill through in two or three sets - in the center and along the edges, connect with a long pin, with washers placed under the head and nut. You can nail the seat strip legs to the legs assembled in this way with nails from above or try to make a pin connection.
The bench is made by hand. Finishing work remains
If you nailed the seat, take some wood mastic of a suitable color, add some very fine sawdust and stir. Apply this mixture to the joints. When dry, smooth it with sandpaper. Sand all parts smooth and coat with varnish or wood paints for exterior use (preferably not covering ones, but those that leave the wood texture visible).
How and with what you can paint wood, read this article. It talks about lining, but the painting techniques remain the same, and the compositions must be taken for external use.
DIY bench made from broken chairs
In any household you can find two old chairs. They should be the same and still strong enough. We disassemble the chairs, leaving the part with the back and legs. We connect the two backs using bars of a suitable cross-section.
Bench made from old chairs
For greater rigidity at the bottom, at a distance of about 20 cm from the floor, where previously the chairs also had jumpers, we make another frame with transverse crossbars. It can be used as a footstool or to store some things.
We paint the completed structure
After sanding, we paint the resulting structure. This time the paint should be ordinary: different types of wood can only be painted over with covering paints. Apply with a brush or from a spray can.
All that's left to do is cut the seat to size from thick plywood (8-10 mm thick) and cover it with foam rubber and fabric.
Finished bench made from strusses
Garden chair/bench made from pallets
Everything is useful on the farm. Even cargo pallets can be used to make garden furniture. Moreover, there is no need to disassemble them: we use one for a seat, and from the second we will make a backrest. You will only need well-processed planks for the armrests and bars for the legs.
This is what should happen
In one of the pallets we strengthen the fastening points by inserting pieces of bars. Having inserted it, we fasten it with self-tapping screws on one side and the other.
Strengthening the corners of the pallet
From a timber with a cross-section of at least 100*100 mm, we cut four identical sections 80 cm long. We screw them in those places that we have just reinforced. We leave 20-25 cm on the legs. We fasten with four long screws - 150 mm and no shorter.
Screwing the legs-supports for the armrests
It is important to maintain verticality and leave the same distance on the legs. Then the seat will be level. If there are errors in height, you can try to file it down, but then you will have to cut it from the top too - so that the armrests are even. So try to screw it straight. Deviations from the vertical can only be dealt with by screwing the leg back on.
The legs are screwed
We attach a second pallet to the rear posts, and boards for armrests on the sides.
Almost done
All that remains is to cut a piece of furniture foam rubber and cover it with fabric. You can also make pillows for the back. If you are not going to process everything thoroughly, but make a loft-style chair, use sandpaper or a sander, sanding all surfaces until smooth. You can coat it with paint, giving the wood a dark color.
Finished product: pallet chair
Materials for making benches
We have already seen what materials are used for garden benches, but there are no specifics yet. In this chapter we will analyze everything point by point.
| Material, photo: | Description: |
| Treated lumber | Available in the form of slats, boards and beams. All this is used in structures of different sizes and complexity. Selecting the type of wood, the correct cross-section of parts and proper processing of materials allows you to create strong benches. Glued and bent wood is a separate category. This material is incredibly durable, moisture resistant, and does not deform due to changes in humidity. |
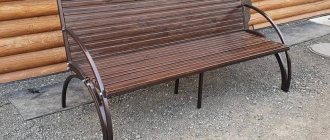
| Benches for summer cottages made of metal and wood | Wood combines beautifully with metal, which is known for its durability. The frame of the structure is most often made of iron, which is covered with wood, but there is another option when only metal inserts are used as decoration of the product. The structures are assembled from various parts. Are used:
Benches with forged inserts look very nice (options of forged garden furniture are presented in our article). |
| Block piece material | The base of the bench can be built of brick, or these hollow concrete blocks. The last option is considered the easiest to implement. In the photo on the left you can see that the blocks are simply folded into certain shapes, and the timber is inserted into the voids in them. To prevent the bench from being flimsy, it is better to tie the materials together. The brick base is placed on the mortar - it will be very reliable. This bench will be stationary. |
Hand-cut bench made from solid logs | Uncut wood is also often used for benches. These include driftwood, branches, and logs. Log models are extremely difficult to make, since you have to work with solid wood, precisely adjusting the gaps of the parts. It is difficult to do this without proper experience. Such benches are suitable for many national styles of Europe and Russia (you can see options for furniture made from logs at the link). |
Pallet bench | We included furniture made from pallets in a separate category, since they are used containers and are already put together according to a certain principle. On our website there is a separate article on garden furniture made from pallets, be sure to read it. |
The work can also use concrete, natural stone, metal mesh, hemp, logs and much, much more. Products made from other items look interesting. An example of this is shown in the following photo.
Bench supports from cart wheels
Do-it-yourself benches for a summer cottage made of wood
Now let's talk a little about making such pieces of furniture. Let's look at two options.
Wooden bench without backrest
Basic parts of a simple form.
For work you will need the following materials:
- 4 boards with a section of 80*30 mm, length 1500 mm
- One beam with a cross section of 70*40 mm of the same length.
- Two 40 cm pieces of 40*30 mm timber.
- Glued board measuring 1000*1000 mm or larger, 40 mm thick - shaped supports will be cut from it.
Finished drawing of a wooden bench
All parts will be fastened with self-tapping screws.
- To begin with, a template is made from a sheet of cardboard that follows the shape of the legs of the bench (you can develop your own design).
- The shield is marked on it - two identical parts are needed.
- The edges of the workpieces are sanded and rounded with a milling cutter to add beauty.
- Next, a rectangular hole with a cross section of 70*40 mm is made in them, and the corresponding beam is hammered into them. The parts fit tightly and can additionally be joined with PVA glue.
- A short block of wood is placed on top of the posts to create a wider support for the flooring.
- The boards for the seat are mounted with a certain indentation.
Wooden bench with backrest
Again, the complexity of the job will depend on the type of structure.
Drawing of a wooden bench with dimensions
Do-it-yourself wooden bench drawings
A very clear and fairly simple plan. It indicates the dimensions of all parts and shows their shape. Despite the fact that the structure has a curved appearance, it is assembled from a rectangular beam and slats. There is not enough information on the type of fastener, its dimensions and installation points, although all this can be modified yourself.
Bolted connections will hold the best quality. Options for dowels, grooves and ridges are also reliable, but without being a carpenter, you won’t be able to make them well. Also, feel free to use stainless steel self-tapping screws - they are durable and not subject to corrosion.
Assembling a garden bench from a pipe
A garden bench made of a profile pipe is considered more difficult to manufacture than, for example, a bench made of wood. But thanks to its practicality and durability, it still remains popular and one of the favorites among consumers.
To assemble it you will need:
Note!
DIY country washbasin - review of simple and complex designs (97 photos of the best ideas)
- How to make a garden (construction) wheelbarrow with your own hands: detailed instructions with description + 85 photos of fresh ideas
How to make a hot smoked smokehouse with your own hands: drawings, dimensions, choice of material, photos of finished options
- rectangular pipe measuring 2.5x5.5 cm and 5 m long;
- soft metal sheet measuring 2.5x20.0 cm;
- soft metal sheet measuring 10x30 cm;
- flat head screws (26 pieces);
- screws 3 cm (4 pieces).
All elements are connected using a welding machine. If it is not there, then parts for the bench will have to be ordered from special workshops.
In addition to the metal frame, this bench also uses wooden slats. You can paint it either with paint or varnish. This will give the bench a more aesthetic and attractive appearance.
How to process wood
Since many tree species are not “friendly” with a humid environment that causes rot, products used outdoors must be carefully processed. Such protection will also protect against exposure to ultraviolet radiation, from which the material can fade and change its true color. Finishing is also done to transform the appearance of the wood. To do this, take the following compositions:
- Colored opaque paints that completely hide the wood texture. Various compositions are used, from which we want to highlight acrylic-based options. This material creates a durable and long-lasting coating. It comes in different colors. The material hardens in the form of a film.
Opaque paints
- This material looks like varnish, but it is not. In contrast, a vapor-proof film is not created on the surface - the wood still breathes. Azure saturates the wood with deep tones. It penetrates its structure and reliably protects it from moisture and ultraviolet radiation.
Azure
- Varnishes create a film on the surface and prevent water from getting under it. This material can be transparent or colored. For outdoor use, it is best to choose the option for yachts, as it will last a very long time and create an even, glossy finish that shines very beautifully in the sun. Clear varnishes are used in combination with various impregnations, for example, stain.
Wood varnish
- One of the oldest and best ways to protect wood is to coat it with oils. This material penetrates deep into the wood structure, giving it water-repellent properties and a beautiful deep shade. Oils are used to treat decking near swimming pools and even on piers, which indicates a high degree of protection (the choice of oil for garden furniture is discussed in the article).
Wood oil
Additional functionality – awnings over benches
If there are no shady areas on the site, then an additional canopy can be provided for protection from the sun. Let's look at several options for its implementation.
The canopy can be installed separately or made part of the structure, as in the presented photo. Here we see 4 racks made of timber, on which the top trim is made. The roof is formed by boards installed on edge - the classic form of a pergola. Lath trellises were added to the sides of the structure. All this will become a reliable basis for climbing plants, which after a while will provide beautiful and cool shade.
Pergola canopy
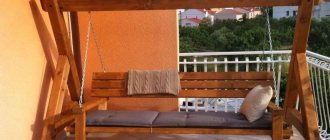
Installing a large canopy can be made from a simple bench into a swing. This functionality will be appreciated by both adults and children.
Bench with a wooden canopy in the form of a swing
Drawings of wooden benches
Bench with back: drawing with dimensions
Bench made of boards: dimensions and drawing
Bench without backrest made of timber: drawing and dimensions