A dressing room is better with it than without it! And it is true! When there is a separate place to store things, then you don’t have to run from room to room looking for clothes or a hat.
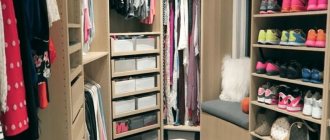
Probably the most convenient device for storing things is a dressing room. After all, it’s really great when all the details of the wardrobe are in one place and you can immediately assess how well the set you’ve just chosen fits together, rather than running from room to room - take it, try it on, look. Moreover, you can make a dressing room in a very small area: the minimum is 1.5-2 square meters. EVEN in a small apartment it is possible to fence off such space. Moreover, it has been noticed that it is more convenient to use them if the dressing room is assembled with your own hands. It's simple: no one knows your habits better than you and can put things in the right order. So, let’s start creating our own dressing room.
Wardrobe sizes
Our realities are such that most people live in small apartments, where every centimeter counts. Therefore, issues of size often play a decisive role. The smallest dressing room can have an area of 1.2 - 1.5 square meters. meters. It is a rectangle with sides 1.5 * 1 meter or so. Also, a small dressing room can be corner - this option is even more spacious than a rectangular one of similar size: with an equal area, the length of the sides on which shelves and storage systems can be placed will be greater.
Small dressing rooms: 1.5 by 2.5 m and 2 by 2 m
A rectangular mini-dressing room should have a width of at least 1.2 m when things are placed on one side, and at least 1.5 m when placed on both sides. The depth should be such that it is possible to “enter” there. This is what mainly distinguishes dressing rooms from sliding wardrobes, and also the ability to install any doors.
Ventilation and lighting
Even in mini-dressing rooms, and even more so in large ones, ventilation is necessary: in a closed room, a musty smell quickly appears, which no perfume can mask. Therefore, even when planning, find a way to make ventilation in the dressing room.
The principle of its design is no different: in the upper part of any of the walls, preferably further from the door, an exhaust hole is made into which a fan is inserted. The inflow is provided either into the gap under the doors or into special inlet openings located just above the floor level. They are closed with decorative grilles. The outlet of the ventilation duct should be into the general ventilation system; you can use plastic boxes to take it outside or under the roof of a private house. Air exchange organized in this way effectively maintains the normal state of things.
Principles for organizing ventilation of a dressing room through a bathroom
When choosing a fan, you should pay special attention to the noise level. Since dressing rooms are often located in or close to bedrooms, noise should be kept to a minimum. It can be controlled automatically or turned on/off using conventional or walk-through switches.
The lighting should be bright. Firstly, this is necessary to quickly find things, and secondly, dressing rooms are often used as fitting rooms to immediately see how well the selected items fit together. The mirror is usually placed on the door or mirrored doors are made. In this case, the light should be directed not only to the shelves and storage systems, but also to the fitting area.
One of the lamp options
You can use lamps of any type, but it makes sense to make them turn on from motion sensors. They opened the doors - the lamps came on, there was no movement, they turned off. There is another option for swing doors: there are lamps with buttons that light up when the door is opened and turn off when they are closed.
Shelving for the garden
After renovation, not only polypropylene pipes may remain in the house, but also a metal profile, from which you can try to make a shelving for your summer house without using welding. To work, we only need a tape measure, a pencil, a screwdriver and a hacksaw.
First of all, it is necessary to design the future rack. Draw a diagram on paper, observing all dimensions.
Let's look at the manufacturing process using a specific example:
- Take the profile and cut it into pieces: 4 vertical posts, 8 front and 8 rear crossbars;
- Assemble 4 frames that should become shelves in the future;
- Using self-tapping screws, secure the resulting frames to the vertical posts;
- If you wish, you can screw the rack to the wall and paint it, after which you can lay plywood on the frames to make shelves.
Where to do
Even in small apartments there are “appendicitis” that cannot be used normally. This is where you can make a dressing room.
Another popular option is a pantry. In this case, everything is generally simple. You remove everything unnecessary, change the doors and install the appropriate content: racks, racks, baskets, shelves.
Dressing room from the pantry
If there is nothing like this in the apartment, they fence off part of the room - the end or the corner - you need to look at the layout. The good thing about a corner dressing room is that it allows you to use the most difficult areas to arrange, namely the corners. Especially if there are closely spaced doors in two adjacent walls. This zone is considered “dead”: you can’t put anything there except a small corner shelf: everything will get in the way. About the same option - two windows or a window and doors.
Corner dressing room
If the area turns out to be too small, it is possible to increase it a little, making the wall not flat, but with the middle extended slightly. This will not reduce the area of the room much, but much more things can fit.
A way to increase the area a little
They are also made on the loggia - by making part of the glazing opaque or by building a wall. Only here you can’t do without insulation - it’s unpleasant to wear cold clothes in winter.
Dressing room at the end of the balcony or loggia
The second option is suitable for wide loggias. In them, shelving can be placed along a long wall.
Option for using a balcony
In the corridor or hallway, a corner or “appendix” is also fenced off, if the layout allows. Here everyone can decide only by location: there is a place for this or not.
A dressing room is most appropriate in the bedroom. This is simply the best place to store things: in the sense that it’s more convenient to dress here. Therefore, for these purposes, part of the room is fenced off. In this case, a partition is needed and most often it is made of plasterboard. This technology has long been known and worked out to the smallest detail. It won’t take much time even if you have no experience: a maximum of two to three days for assembly and finishing.
If you make a partition from gypsum board or gypsum board according to all the rules, you will need double cladding, and this will “eat up” centimeters, or even meters, of area. Therefore, most often they are sheathed only on the outside, but in two sheets with overlapping seams. When assembling the frame, do not forget to make reinforced racks for fastening the door. With single cladding, exposed profiles remain inside, but it is convenient to hang shelves-baskets for things on them. If you plan to do this, then take them with a thick wall so that they can hold the weight properly.
Plasterboard partition for dressing room
The partition can also be made from laminated chipboard or OSB, or MDF board. This is an option for those who do not like to bother with putty. But you need to choose a lamination that will fit into the interior without any problems.
The interior design of a one-room apartment is described here.
Doors for dressing room
What’s great about a DIY dressing room is that you can install any kind of door: sliding, “compartment” type, accordion type, regular hinged, hinged on rollers. You can even get by without them at all. This option is called a wardrobe-rack, but then everything will have to be kept in perfect order: everything is in sight. The most budget option is thick curtains or something like a Japanese curtain.
Installation options for sliding sliding doors
If the front wall is large, part of it can be stationary, and part can be occupied by doors. In this case, you can also somehow use it on stationary walls. If desired, the doors can be made full width, or consisting of fragments.
Option for a dressing room in the attic: a side part with a low ceiling is occupied for it. Full-width doors make it easier to get to things
The design can be anything as long as it fits into the appearance of the room. If desired, they can be made to match the walls so that they are not visible, or they can be bright and conspicuous.
Beautiful bows
1 / 0
2 / 0
3 / 0
You can make a beautiful bow from a PVC pipe - give it to a friend or have fun yourself, testing your accuracy. A practical guide can be read here or here.
If you have already tried making furniture, home decoration or other DIY projects from PVC pipes, please share your experience in the comments.
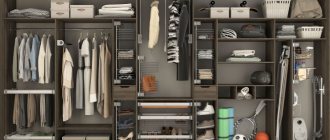
Arrangement: filling and storage systems
If the area is limited, there is no point in making furniture from wood, MDF or chipboard into the wardrobe. They take up precious centimeters of space and also interfere with air movement. Another disadvantage is that redoing something is problematic.
“Standard” type furniture takes up too much space
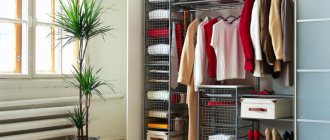
Recently, the general trend is the installation of lightweight metal storage systems. They are modular and assembled on special racks. Racks can be attached in two ways - to the walls or to the ceiling and floor: different manufacturers make different systems. And everything that is needed is hung on these racks.
The racks can have notches along the entire length, which makes it possible to install any element at any height. These are the most mobile systems that can be modified easily and simply - simply by moving them from one row of notched hooks to another, arbitrarily changing the height of the shelves and baskets, and other elements.
Convenient modular system
There are racks of rectangular cross-section, with grooves cut on both sides. The necessary components are attached to the clamps in these grooves.
Different type of racks and different mounting system
Please note that there are different shelves and drawers - made of wood or wood materials, metal - chrome-plated or painted. They can be retractable, they can be placed one on top of the other or on shelves.
All these systems are sold: racks and a list of various components. But they are produced mainly in European countries, so the price is high. An economical option for dressing room equipment can be made independently from a round chrome-plated furniture pipe and various fasteners for it. It turns out that this furniture is not as mobile as we would like, but it costs significantly less.
Accessories for a wardrobe made of round furniture pipe
Devices for placing clothes
In addition to standard and not so standard drawers and shelves, there are interesting special options. For example - skirts or trousers. Special guides on which the transverse strips are attached, sometimes they have clips. They allow you to hang your skirts/pants straight and not be afraid that they will fall. It is convenient if such a hanger extends, allowing you to inspect all the contents.
One of the options for filling a dressing room is a bracket for skirts or trousers
This device can be replaced with a simpler one, but much cheaper - a hanger with crossbars located one below the other. It's not as convenient, but it allows you to organize your clothes just as well.
Budget option for hangers for trousers and skirts
There is a retractable design for ties, only it is usually oriented differently and extends out in length, although not everyone likes such a system, but prefers folded drawers into cells.
Tie devices
There are several ways to place hangers. The simplest are pipes, the more economical (in terms of space use, but not in terms of money) are tie-like retractable brackets.
Pull-out brackets for clothes hangers
Another device is a pantograph for clothing. This is also a pipe, but capable of descending. A kind of lift for clothes. This device allows you to use the space right up to the ceiling, without compromising your comfort. It can be attached either to the side walls (the more common option) or to the wall. There is a handle-bar attached in the middle of the pipe, by pulling which you lower it to a horizontal position. The carrying capacity of such devices is usually small (up to 18 kilograms), so they are used for lightweight clothing.
Furniture pantograph - for light (by weight) clothes
Shoe storage systems
Problems often arise with storing shoes: some people have dozens of pairs of them, so it’s time to arrange separate dressing rooms for them. But among the standard sets of equipment there are several interesting ones for storing shoes.
Let's start with the retractable system. IKEA has it. Pins with shoe modules mounted on a movable frame. Convenient, compact.
Retractable shoe system
There are mini chests of drawers that do not take up much space, but are hung on the walls, and there are hanging organizers that can be easily placed on a horizontal pipe.
Shoe storage systems in the dressing room
These are mini chests of drawers on the wall
In general, there are many interesting ideas for shoes that allow you to place them compactly and at the same time conveniently. See photo:
Wheel for storing shoes
Swivel round cabinet. Great use of corner space
Such “rotating” drawers are very convenient not only for shoes, but also for small items and linen
The way to store boots is on hangers with clothespins
Devices for compact shoe storage
Such systems are mounted on doors or walls
There are very inexpensive options. For example, the seasonal one, which is currently in use, can be stored on a grid with rearrangeable hooks or wire shelves. You've probably seen similar ones in stores. This is a mesh or perforated panel on which hooks/shelves are hung. Convenient: you can move it under any type of block, make the distance larger or smaller.
An economical option for storing shoes - a mesh with hooks and shelves
Hanging such a grid is not a problem - even on a wall, even on the side surface of a cabinet or door. Hooks and shelves simply cling to the crossbars. This option is ideal if you are short on money and space. If you like the idea but need something more presentable, make or find a perforated metal shield on the frame. Hooks are also inserted into it with a bang.
Modification - shield with hooks
In general, when arranging a dressing room and on a limited budget, you should look for storage systems not in furniture stores - online or offline. It’s better to look at sites that sell commercial equipment. There are many interesting devices that save space: stores also try to display the maximum amount of goods in a minimum area. For example, these are shoe racks.
Shoe stands
If you attach wheels to the first one, you get an excellent retractable system. The price of such equipment is much less than similar equipment, which is sold in furniture stores.
Making a dressing room project
As you can see, there are a lot of ideas for equipment and storage systems. But so that it doesn’t turn out that the great thing you bought simply doesn’t fit into your wardrobe, you need to draw a plan on which to indicate all the dimensions and dimensions. It is drawn to scale, then you mark on it those parts that must be present. They are drawn to the same scale. If everything “fits in”, armed with the dimensions (you have them, or you can measure them in the drawing and, using the scale, calculate the real values), you can go to the store to choose systems.
There is another approach. Find out the dimensions of the devices and systems you like (installation dimensions), cut them out to scale from cardboard or thick paper and try to combine everything. If it works, great, you can buy it. No - look for other options. As a result of your efforts, you should end up with a layout approximately like the one in the photo.
An example of organizing space in a dressing room (indicating the minimum sizes for different types of clothing)
To make it convenient to use the equipment and get things out, you must maintain the following distances:
- minimum distance from shelf to shelf: when storing things - 30 cm;
- when storing shoes (without stilettos) - 20 cm;
- folded in half - 100 cm;
At the very top we reserve space for clothes from a different season or rarely used items. There is often space for a vacuum cleaner at the bottom, and a built-in ironing board is installed in one of the cabinets.
For those who like to work with their hands, here are several diagrams with dimensions so that you can equip your dressing room with your own hands (at least partially).
Drawing of a shoe rack with dimensions
How to make shoe holders
Shoe storage system made of plastic pipes…
Office desk with plastic frame
Buying even the cheapest office desk can be a big hassle for some people, so we'll show you how to make a desk out of plastic pipes. This project differs from the previous one in its complexity, so you will have to think through some parts yourself, but we will try to explain everything to you as clearly as possible.
First of all, you need to decide on the size of the table. In our case, we take a ready-made tabletop (915×2030 mm), under which we will assemble the frame. When choosing a tabletop for your own table, pay attention to its weight and follow the rule: the lower the weight, the better for your table. The best solution for a countertop would be a hollow door leaf. You can also assemble the tabletop yourself using flat boards, fasteners, a saw and a drill.
First of all, prepare 12 meters of plastic pipe and cut it into the following parts:
- 5 parts of 7.5 cm;
- 10 pieces of 30 cm;
- 4 parts of 50 cm;
- And 4 pieces of 75 cm.
Among the other parts for the frame you will need the following:
- 4 T-fittings;
- 4 four-way fittings;
- 2 cross fittings;
- 10 plugs for pipes and fittings.
Having prepared all the necessary parts, you can begin to assemble a table from polypropylene pipes. It is better to perform the first assembly without using glue, and after assembly, glue all the connections one by one. Begin assembly by constructing the sides of the frame on which the tabletop will rest.
Next, assemble the back part, which will connect the two already assembled. To give the table additional stability, we recommend adding a third leg to the back wall. When assembling the table, carefully monitor the parallelism of all elements in order to ultimately obtain an even structure.
At the final stage, it is necessary to connect all the parts into a single structure, obtaining a table frame. Check it for strength, correct any unevenness, and then glue all connections.
Having made the frame, you can begin installing the tabletop. This can be done in many different ways, but we will consider the most reliable and aesthetically correct of them.