To give the interior of the apartment a complete look, a variety of decorative elements and accessories are used. Mirrors play a similar role. They not only decorate the room, but can also change the visual perception of space. With all the variety of shapes and design solutions, sun-shaped accessories are especially popular and sophisticated.
What it is?
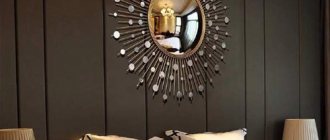
Mirror sun or “sunburst”. A shaped mirror consisting of a round plate and rays of different sizes and widths emanating from it. Most often, the central disk is made small and the rays long .
They can be decorated with small mirrors, small LED flashlights, glass, rhinestones, and look like a snowflake, flower or star. The golden mirror symbolizes the sun, the silver one – the star.
The design of sun-shaped mirrors is very diverse, so such an item can fit into almost any interior.
Frame color palette
Popular colors used in frame design.
White
Thanks to its versatility, the white color of the frame looks very harmonious, restrained and elegant, and adds aristocracy and elitism to the atmosphere.
Gold
This shade has subtle golden notes that allow you to breathe newness into the interior and create a charming atmosphere in it.
Silver
Silver color has a clear, clean and concise appearance, characterized by multi-color reflection, delicate and slightly mysterious radiance.
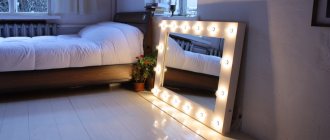
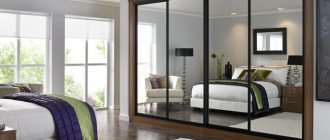
The photo shows a modern bedroom with a floor mirror decorated with a massive patterned frame in a silver tone.
Brown
Represents a natural palette, has natural beauty and simplicity in perception. A mirrored canvas framed with a brown frame will add warmth and coziness to the atmosphere.
"Sunburst" and "Starburst" in the interior
A solar mirror will fit perfectly into your interior if you choose the right place for it.:
- For example, above a sofa, bed, nightstand. This solution will place emphasis on the wall where the mirror is located.
- In America, such mirrors are often hung on one of the walls in the dining area.
- Also, such a “sun” will look great above a desk in a woman’s home office.
- If the house has a fireplace, then an excellent solution would be to hang a mirror above it.
- In addition, such mirrors are used to decorate the walls above the doorways in the bathroom. And also near the front door.
- Most often, “sunbursts” are used as interior items, but in some cases such a mirror can also fulfill its original function, for example, in the bathroom, above the washbasin.
Although the sun-shaped mirror does not allow you to see small details, it is good for looking at yourself and quickly correcting any imperfections in your makeup or hairstyle.
A large sun mirror will perfectly decorate a wall in any room, but small mirrors are used in a duet or trio.
Such mirrors are hung on the wall in a row or randomly, which gives the room a designer flair.- Similar products can also be combined with other types of mirrors, for example round or oval.
- Paired mirrors can be placed above symmetrically arranged furniture, such as a bedside table or armchairs.
LiveInternetLiveInternet
—Categories
- WITH YOUR OWN HANDS (827)
- Jewelry, accessories (145)
- Paintings, panels (102)
- Lamps, lamps, chandeliers (93)
- Candles, candlesticks (84)
- Dishes, vases, flower pots (73)
- Watches (55)
- Miscellaneous (40)
- Rugs, rugs (37)
- NEW YEAR (474)
- Christmas trees (23)
- HOROSCOPE (457)
- DIY FURNITURE (415)
- HOLIDAYS (345)
- LIFE HACKS, USEFUL TIPS (277)
- PAPER, CARDBOARD (272)
- Paper Christmas (69)
- Packaging (58)
- Miscellaneous (50)
- Postcards (35)
- Cardboard chests of drawers (29)
- Quilling (5)
- PSYCHOLOGY, SELF-KNOWLEDGE (217)
- SLAVS (143)
- EMBROIDERY (126)
- New Year embroidery (9)
- HOUSE, Cottage, VEGETABLE GARDEN (107)
- SIMORON, DREAMS, DESIRE (92)
- STONES (ZODIAC, TALISMANS) (66)
- DIY REPAIR (54)
- MUDRA (43)
- AROMATHERAPY (43)
- MISCELLANEOUS (42)
- MEDITATIONS (38)
- HOUSE PLANTS (38)
- AYURVEDA (27)
- Yoga (23)
- VIDEO (27)
- FABRIC DYING (26)
- DECOUPAGE (23)
- PLASTIC BOTTLE (18)
- DRAWING LESSONS (13)
- NUMEROLOGY (12)
- WIRE (12)
- STYLE (10)
- INTERIOR (10)
- FOAMIRAN, PORCELAIN, CLAY (9)
- INTERESTING (8)
- LIFE HACKS FOR PHOTOGRAPHERS (7)
- AFFIRMATIONS, MANTRAS (7)
- MACRAME, WEAVING (7)
- GIFTS (5)
- CONGRATULATIONS, POEMS, TOASTS (5)
- STAINED GLASS, MOSAIC (5)
- PAINTING (4)
- ART THERAPY, COLORING BOOKS (4)
- DREAM INTELLIGENCE (4)
- ISONIT (3)
- ANIMALS (3)
- DATES (2)
- FELTING (2)
- PAINTING (1)
- LEISURE (1)
- PHOTOSHOP (1)
- TRIP (1)
- POSITIVE, HUMOR (0)
- COOKING (1388)
- Salting, pickling, pickling (149)
- Jam, compotes (43)
- Sauces, ketchups, gravies (37)
- Fried baked goods (26)
- Snack (22)
- Salt, seasonings (11)
- Unbaked pastries (8)
- Dairy recipes (7)
- Creams, glazes, mastic (6)
- Porridge (5)
- Cheeses, sausages, pates (5)
- Cooking in a slow cooker (4)
- Dough (3)
- Products (2)
- Recipes for diabetics (1)
- First courses (34)
- Main courses (69)
- Salads (65)
- Baking (256)
- Desserts (145)
- Drinks (170)
- New Year's recipes (166)
- Various recipes (34)
- Useful tips (101)
- HEALTH (1098)
- Therapeutic massage, gymnastics (103)
- Runny nose, colds, flu (31)
- Stress, nerves (20)
- Insomnia (15)
- Teeth, gums, bad breath (5)
- Diet (5)
- Miscellaneous (1)
- Traditional recipes (16)
- Teas, drinks for weight loss (17)
- Women's health (12)
- VEGETARIAN CUISINE (413)
- Fried baked goods (8)
- Dough (3)
- Miscellaneous (1)
- First courses (81)
- Main courses (56)
- Salads (93)
- Sauces, mayonnaise (3)
- Baking (35)
- Desserts (36)
- Drinks (82)
- Multicooker (3)
- Snack (1)
- Useful tips (2)
- BEAUTY (764)
- Beauty calendar (62)
- Cosmetics (40)
- Body (23)
- Feet, pedicure (22)
- Miscellaneous (9)
- Tips (7)
- Neck (7)
- Bust (4)
- Face (163)
- Eyes, makeup (54)
- Hands, manicure (68)
- Hair (103)
- Bath bombs (28)
- Soap (72)
- RAW FOOD (2)
- SPORT (105)
- Stretching, warm-up (9)
- Breathing exercises (3)
- Articles (1)
- Fitness (8)
- KNITTING (6308)
- Summer pullovers, blouses (652)
- Tops, T-shirts (522)
- Men's pullovers, sweaters (427)
- Hats, berets, caps (357)
- Two-pieces, suits, sets (289)
- Magazines (287)
- Knitting for home (188)
- Men's jackets (156)
- Men's hats, scarves, snoods (148)
- Patterns, elastic bands (139)
- Magazines without translation (118)
- Vests, sleeveless vests (110)
- Men's vests, sleeveless vests (83)
- Knee socks, socks, shoes (79)
- Summer jackets, bolero (71)
- Miscellaneous (69)
- Polantinas, scarves, shirtfronts (68)
- New Year's knitting (68)
- Bags, backpacks, cosmetic bags (62)
- Mittens, mittens, gloves (33)
- Shawls, scarves, bacti (27)
- Toys (25)
- Knitting for children (15)
- Men's socks, slippers (15)
- From yarn and thread (14)
- Pants, leggings, shorts (14)
- Accessories, decorations (11)
- Swimwear (10)
- Men's sets (7)
- Knitting without description (5)
- Plus sizes (4)
- Knitting without translation (3)
- Men's mittens, mittens (3)
- Chanel style jackets (2)
- Jackets, cardigans, coats (673)
- Pullovers, jumpers, sweaters (1418)
- Dresses, sundresses, tunics, skirts (450)
- CROCHET (702)
- Knitting for home (181)
- Bags, backpacks, cosmetic bags (62)
- New Year's knitting (56)
- Tops, T-shirts (53)
- Summer pullovers, blouses (51)
- Magazines (46)
- Dresses, tunics, skirts (38)
- Men's pullovers (33)
- Jackets, cardigans, coats (33)
- Caps, berets, hats (29)
- Pullovers, jumpers (28)
- Miscellaneous (20)
- Accessories, decorations (17)
- Sets, suits, two-pieces (15)
- Toys (14)
- Swimwear (10)
- Summer jackets, bolero (7)
- Vests, sleeveless vests (2)
- Men's vests (1)
- Patterns (1)
- Men's socks (1)
- SEWING (1053)
- For home (235)
- Patterns (221)
- Miscellaneous (198)
- Bags, cosmetic bags, wallets (142)
- Dresses, sundresses, tunics, skirts (71)
- New Year's sewing (46)
- Shirts, shirts, blouses (25)
- Clothes alterations (23)
- Coats, jackets, jackets, blazers (20)
- Toys (19)
- Accessories (13)
- Shoes (13)
- Pants, capris, shorts (8)
- Hats (8)
- Swimwear, underwear (4)
- T-shirts, tops, blouses (2)
- Hoodies, sweatshirts (2)
- Video sewing (2)
- MAGIC, SIGNS, DIVINATION (811)
- BEAD (288)
- Earrings (79)
- Bracelet (64)
- Necklace, necklace (34)
- Miscellaneous (29)
- New Year's (24)
- Sets (16)
- Pendants, pendants (13)
- Animals (10)
- Flowers (9)
- Ring, ring (5)
- Accessories (4)
- Brooch (2)
- QUOTES, APHORISMS, SMART THOUGHTS (7)
A little history
It is unknown when exactly the first sun-shaped mirrors appeared , but they can be seen in the paintings of ancient artists starting from the 15th century. For example, the painting by artist Jan Van Eyck “Portrait of the Arnolfini Couple”. In the background you can see a mirror that vaguely resembles a sunburst. At that time, such mirrors were made convex, so they greatly distorted the image.
In the Middle Ages, such mirrors were hung in churches; they symbolized deity. They always “looked” at the parishioners.
the highest popularity under the “Sun King” Louis XIV . There is an opinion that it was he who came up with this design, but this is not so, he only made it very popular. Such a mirror is fun in royal chambers. Every morning the king looked into it. The mirror disk was not large, so it looked as if the rays were emanating from the king’s very face. It’s as if he himself is the sun.
After Louis, sunburst mirrors came into fashion only 200 years later. Then mirrors ceased to be a luxury, so designers began to actively experiment with shapes and sizes, also inspired by the heavenly bodies.
At the beginning of the 20th century, the Art Deco style became popular , one of its main features was its appeal to the sun's rays. Therefore, it could not be done without solar mirrors. And already in the middle of the 20th century, mirrors - suns became mirrors - stars, due to the fact that the whole world began to actively become interested in space.
And even in the 21st century, interest in mirrors in the shape of the sun does not fade away. People actively use sunburst mirrors to decorate their homes. For more than two centuries, the mirror sun has found its connoisseurs.
Setting the light
The most important condition for a successful makeup session is properly installed lighting from the mirror backlight. Do not take this as obscene, but please note that since makeup mirrors came into everyday life, the expression “Painted like a port whore” has almost completely fallen out of use. Because in the old days, cheap priestesses of free (but not from material remuneration for it) “love” had to put on makeup in any kind of lighting. Arranging light for the purposes of cosmetic personal care ultimately comes down to selecting light bulbs for the backlight of the mirror. We will further deal with this issue specifically, but in order to choose them wisely, it is necessary to familiarize yourself with some information on the organization of working lighting in general and in relation to makeup in particular.
To make a mirror with light bulbs with your own hands, providing lighting of the required quality, you need light sources that meet certain requirements for:
- General rules for the location of illuminators (lamps);
- The spectrum of light from them;
- Directional pattern (DP).
What is the spectrum of light, we will assume that everyone knows. And DN is a characteristic of the distribution of light intensity in different directions from its source.
General rules
Correctly placed illumination of a person in front of a facial mirror illuminates him in two ways: obliquely directly from the side illuminators (side incidence) and by re-reflection from the mirror. Side-incidence rays highlight shadows and, with a sufficiently large number of light sources, make them completely invisible. But not too large: in addition to overheating (see above), completely shadowless lighting will make the reflection of the face in the mirror flat. Shadows invisible to the eye must be visually perceived subconsciously, then the face in the mirror will not turn into a pancake. Based on these considerations, the generalized geometric and colorimetric characteristics of the human face, and the limits of the intensity of the luminous flux from ordinary household lighting lamps, the optimal step for their installation on the mirror frame, in connection with its dimensions, was determined.
The lateral incidence of light alone is not sufficient to ultimately optimize the illumination of a person's face in front of a makeup mirror. Lateral “shadowless” lighting (there are other ways to organize it) will not penetrate deep and/or very small skin defects. They will stand out excessively, while in normal lighting they will most likely not be noticeable. This visual illusion encourages you to apply and apply cosmetics when you have had enough of it for a long time. Finally, everything seems to be as it should be - in front of a mirror with the wrong lighting. And I looked at myself in ordinary light - a caricature, and that’s all.
The role of frontal illumination with reflected light in this case is simple: it muffles deep microshadows, and the face maintains a natural appearance. Subject to two conditions: the ratio of the intensity of side and front illumination must be quite definite, and the light reflected from the mirror should not be perceived as a glare, even subconsciously, otherwise the eyes quickly get tired. The first condition is determined by the DN of the illuminators (see below), and the second by their luminosity (the total intensity of the light flux). In order to comply with the latter, incandescent lamps for dressing room mirrors are used with a power of 15-40 W, and LED lamps with a power of 4-8 W. The smaller the number of lamps on the mirror frame, the greater, within the specified limits, the power of one must be so that the total light flux remains approx. one and the same.
Note: the optimal total luminous flux is provided by 15 incandescent lamps of 25 W or LED lamps of 5 W on a horizontally oriented mirror 70x110 cm without bottom lighting. The total power of lamps for a fitting mirror with bottom lighting increases by 1.25-1.5 times.
Range
Lighting for makeup that is incorrectly selected according to the spectrum can also give a result like... mmm... “a budget lady of unusually easy virtue.” The requirements for the evenness of illumination of the face in front of the mirror in terms of the spectrum are significantly more stringent than in terms of the distribution of light intensity.
The main types of spectra of various light sources are shown in Fig.:
Spectra of various light sources
A smooth (thermal) spectrum is produced by incandescent lamps. The distribution of brightness by color in it is somewhat different than in the sun. But it is precisely to light with a thermal spectrum that our eyes and the entire physiology of vision are adapted by evolution, so that the eyes adapt to such differences completely naturally. Therefore, a professional-level makeup artist’s mirror is illuminated with incandescent lamps. However, the makeup studio room should be quite large, with a high ceiling and supply and exhaust ventilation. Another disadvantage of lighting with incandescent lamps is that when adjusting the light intensity (for example, with a thyristor regulator), the spectrum of the lamps changes greatly, even to the point of being unacceptable, so lamps for mirrors in dressing rooms are selected individually for each.
Smooth spectra are characteristic of modern LED lamps. Small dips in the yellow-orange and blue-green zones generally do not interfere with normal vision and perception of what is seen, because The color sensors of the human eye - cones - are configured for red, green and blue colors (RGB); this is the so-called primary colors. We largely subconsciously “complete” details in the complementary colors yellow, blue-green (turquoise) and purple. However, long-term regular work associated with strained color perception under island lighting is contraindicated: vision deteriorates and nervous disorders may begin. But this is a matter of many years and decades, and even under not entirely favorable general conditions, so it is possible and necessary to illuminate the mirror for your own home make-up: the spectrum of LED lamps remains almost the same when their brightness is adjusted within a wide range. That is, if the face illumination from the mirror seems too bright or dim, it can be adjusted without fear.
Note: For the same reasons, do not use LED bulbs in light fixtures for delicate, small work. Negative effects from a continuous spectrum will appear much faster, because in this case, both color perception and vision accommodation are strained.
Light with an island spectrum is emitted by fluorescent lamps; however, “housekeepers” with a 3-layer phosphor have an almost continuous spectrum. But in those that are cheaper, the gaps in additional colors are so deep that when looking at small multi-colored details, a continuous “twitching” accommodation of vision occurs. The eyes become very tired, the head becomes heavy. Therefore, lighting with an island spectrum is only suitable for public spaces in which no regular work is carried out that causes eye strain. Even master plasterers and finishers who worked an extended shift (12 hours) in a room with “island” lighting with little or no natural lighting complain of headaches and pain in the eyes. Quite justified: an outsider can see how their eyes turn red and watery by the end of the work.
And the last one is the “line” spectrum. The name is conditional, since such a spectrum does not consist of individual lines, but RGB “islands”. But the gaps between them are “bottomless abysses”; there are no additional colors in the spectrum at all. The “line” spectrum was provided by the first economy light bulbs with a single-layer phosphor, and their current light sources are provided by cheap LED strips. They are applicable only for general decorative lighting of ceilings, shop windows, etc., and you should not read or work under “line” light in any way.
Note: LED strips and single-piece LEDs are not suitable for illuminating the face from a mirror for another reason, see below.
DN
The directional pattern of light bulbs for illuminating the face during cosmetic procedures in a plane perpendicular to the longitudinal axis of the lamp (conventionally horizontal) is preferably circular or close to it, which is generally observed for any household lighting lamps. And in any plane passing through the same axis of the lamp (conventionally vertical), its pattern should look like either a clown wig or a ceremonial loaf of hearth bread with a dented bottom. In a section along a vertical plane, such a pattern is shown in Fig. on right.
Directional pattern of a lamp for illuminating the face from a dressing room mirror
To prevent mirror glare, the total radiation “downwards” (backwards, towards the base) should be approx. 5% of the total or 8-15% of the frontal one (in the figure - “up”). The proportion of “front light” needed is approx. 0.5-0.7 from the side. There are no difficulties with either one - ordinary lighting bulbs are made with just such a pattern. A small “back light” is needed for background illumination of the ceiling when installing lamps in chandeliers, so that the room does not look gloomy, and the side light is stronger than the front light - for the most even illumination.
Note: 30-40% of the production of household lighting lamps have a figure-of-eight pattern, with a depressed top. For lighting a makeup mirror, this is not important.
What's worth knowing
Before decorating a room with such a mirror, it is worth knowing that first of all it will serve a decorative function. This product can easily replace a painting or any other decoration. It is advisable to hang it on plain walls in neutral shades. If you do this on wallpaper with prints, then the “sun” will simply be lost on them.
The accessory can be hung in almost any space, the main thing is to choose a specific color palette and design for it. It can also be combined with other mirrors with handmade frames to create a unified composition.
Where and how to hang it
There are several options for the location of the accessory:
1. On a plain wall to create an accent.
2. Instead of a painting or photo frame.
3. In combination with other mirrors in the same style.
What style will it suit?
This decoration will look most impressive in a classic-style interior, which is characterized by light shades with the addition of gold and silver. A mirror in moderation will add a touch of luxury and chic to the space, especially if it is combined with other elements in the same color palette. The product is also suitable for eclectic and art deco styles.
Now you know how to make a sun mirror yourself and you can decorate your room with a new trendy decor.
Mirror-sun
As children, we all made wonderful handmade gifts for our mothers on March 8th. Andrey Volkov suggests remembering this wonderful tradition and making the famous sun mirror with your own hands.
Andrey Volkov:
You will need : a round mirror, wooden dies, plywood, a jigsaw, a pencil, glue, gold spray paint.
1. Place the mirror on the plywood and trace its outline.
2. Let's cut the plywood along the resulting contour.
3. Let's draw a second circle on the plywood - the outline for the frame.
4. Let's cut that out too. We will get a round picture. The mirror is a canvas, the plywood is a passe-partout. Let's decorate it using wooden dies.
5. Let's cut some wooden dies in half.
6. We attach the oak bars to the plywood base of the frame using glue. The bars of different lengths help create a radiant and joyful shape.
7. Let's make the sun golden with spray paint.
8. After painting, glue the frame to the mirror using the same superglue.
Material of manufacture
When making mirrors, different materials are used (wood, plastic, metal, etc.) it all depends on the interior into which the mirror should fit, as well as on the desired cost of the product.
The mirror panel comes in silver and aluminum.
It is best to choose wood or MDF as the material:
- Wood is an expensive and practical material that can be adjusted to any design.
- MDF is an excellent material, in no way inferior to wood, but its price is lower, which does not affect the quality at all.
- Metal - such a mirror will fit perfectly into a cold interior, but a metal mirror will be heavy, bulky and expensive. An excellent replacement for it can be a mirror made of MDF and painted to look like metal.
- Plastic is the cheapest and not very practical material. The choice of plastic products is small, because it looks very cheap and designers rarely start working with this material.
New option
And still, problems remain. Complexity, labor intensity, a large amount of chips, and a common fire hazard for all previous options (including the traditional one). Electrical wiring can only be laid in wooden structures impregnated with special compounds - fire retardants, which give the wood some fire resistance. You cannot impregnate plywood with fire retardants; it will delaminate. But there is a material that does not burn even without fireproof impregnation, it only chars - MDF. MDF trims and extensions for interior doors are perfect for the mirror frame; they are already textured to resemble valuable types of wood. The standard width of both is 60, 80 or 120 mm; extensions are available in widths up to 350-381 mm (15 inches). Thickness – from 6 to 16 mm. Length – 2.2-2.7 m, i.e. for a small mirror you will need one board, for a professional one a pair, and for a fitting room 3. If you take platbands (they are cheaper), then the so-called. euro, with a flat front surface.
Illumination of the dressing room mirror from lamps in carbolite sockets
We will not make a box frame; we will use wall sockets without recessing. The backlight on the mirror frame in carbolite sockets looks so-so (see picture on the right), but now there are a lot of elegant white and ceramic plastic sockets on sale. The advantage of this solution is that you can use oblique cartridges and achieve the best illumination from flare. Technological advantage - no need for wide holes, there will be significantly less chips.
There is also a technological drawback - when processing MDF with power tools, it reeks of burnt wood, so you need to work in the summer on a balcony or in a garage or a separate workshop. The design disadvantage is the low rigidity of MDF. But it can be easily eliminated; it is enough to install stiffening ribs made of wooden slats on the back sides of the boards; They also form a cable channel. The slats can be impregnated with fire retardants. The most affordable purchased or homemade composition is a strong solution of boric acid. Boric powder must be dissolved in water at a temperature of 80-90 degrees; Boric acid is insoluble in cold water.
The design of a makeup mirror in a frame made of textured MDF is shown in pos. 1 pic:
It is assembled using glue (preferably PVA, liquid nails dry too quickly) and small nails or wood screws. Assembly order (items 2-5):
- Blanks for the sidewalls, top and bottom of the frame are cut from the extensions or platbands for butt assembly with a bevel of 45 degrees.
- The slats - stiffening ribs - are applied with glue and attached with hardware (item 2) separately to the side, top and bottom boards of the frame.
- Glue is applied to the mating surfaces of the corner joints. The sides, top and them are moved into one on a flat surface covered with film.
- The frame blank is tightly tied crosswise with a strong cord.
- Measuring the diagonals checks the squareness of the frame. If necessary, the workpiece is corrected with light blows of a mallet or rubber hammer.
- Weights are placed on the corners of the frame.
- After 1-2 days (after the glue has dried), the whiskers (“tails”) of the stiffeners are attached to the mating boards with steel fasteners, pos. 3.
- Holes are drilled for entering wires into the sockets, a switch and (optional) light intensity regulator are mounted, wiring is laid, pos. 3 and 4. The ends of the wiring extend outward by 12-15 cm so that installation of the cartridges occurs without difficulty. Wiring is carried out using a two-wire cable in double insulation. The cross-section of current-carrying conductors for 220 V LED lamps is from 0.25 sq. mm; for incandescent lamps 220 V and LED lamps 12 V from 0.7 sq. mm.
- An elastic gasket (sheet rubber, etc.) is laid, then, face down, the mirror itself, pos. 4.
- The back side of the product is sewn up with fiberboard (item 5) - this is also a non-flammable material.
Electrical circuit for switching on the lamps of a dressing room mirror with illumination - The product is turned face up, the circuit is installed (see figure on the right); all lamps are connected in parallel. If the mirror will be placed in the bathroom, you need to use 12 V lamps. A step-down transformer and, possibly, an adjustable power supply are placed outside the bathroom, in a room without increased danger (hallway, corridor, etc.).
- Lamp sockets are mounted in place. The lamps are installed and a test run is performed.
- Support legs (for a floor mirror) or a suspension are attached, the mirror is placed in place - ready!
Note : if you cut trim or trim with a jigsaw, cut from the rear, i.e. Turn the boards face down. But if with a circular saw, manual, lever cut-off or on a stationary saw, then vice versa, from the face. It is necessary that the teeth of the saw, during the working stroke, crash into the front surface of the board, and not jump out of it, otherwise the laminating decorative film will be severely torn. The working stroke of a jigsaw is from bottom to top, while for circular saws it is from top to bottom.
Option for acrylic mirrors
You cannot chisel or saw acrylic mirrors by hand - they will crack, although optical acrylic plastic breaks much worse than glass. But for careful processing of wood, laminate (better) or metal (even better) with power tools, acrylic mirrors are quite suitable. Therefore, an acrylic cosmetic mirror with face lighting can be made frameless, see fig.
Acrylic frameless makeup mirrors
Lamp sockets in this design are wall-mounted, straight or oblique. First, a strip of fiberboard along the contour is glued to the back of the mirror with silicone. A rough fiberboard thickness of 4 mm is enough to lay wiring for LED lamps. After installing it and testing it, the entire back of the mirror is also sealed with silicone fiberboard for furniture backdrops, with the white side facing out. The suspension parts are also glued with silicone. The shell (side surface) is painted in the desired color. There is no need to worry about the mirror breaking or collapsing - acrylic glass is much lighter than silicate glass and much more resistant to fracture. But it is also more susceptible to thermal deformation, so the illumination of an acrylic mirror must be assembled only with LED lamps.
Which design and construction should I choose?
There are a huge number of different types of such mirrors, for which there is no clear classification. Their main feature is the round shape of the glass itself and the rays framing it made of different materials. When choosing, you should consider two criteria: the material you have at home and the size of the desired item. For example, snack forks are ideal; they can be connected to each other, coated with paint, and now a magnificent mirror is ready!
IMPORTANT! The sun will suit many types of interior, but still not all due to its exotic appearance. Therefore, it is very important to imagine how the finished mirror will look in your room. Perhaps to make it more suitable, you only need to change the color of the so-called beams, or maybe it would be better to try hanging it in another room.
It is also important to understand that although this is a mirror, it is more of a decorative nature due to its very small size. You can, of course, make it larger, but then you will need a lot more materials, and also the rays, which should be quite long, will take up too much space. A massive sun mirror will look ridiculous. It's better to stick to the middle options.
Basic principles of decorating mirrors
DIY mirror decor is made using a variety of materials, including those that are usually sent to the trash container, and if purchased, cost very little. For example, tubes from old newspapers or magazines. In some cases they are used without dyeing, in others they are painted. Spray paint is more convenient - it is applied in an even thin layer, painting occurs many times faster than using a brush. You can also use broken china, mirror, colored glass, shells, pebbles, rhinestones, glass drops, buttons, ropes, plastic bottles, branches, wooden planks and sticks, plastic spoons and other strange things.
DIY mirror decor can be made to suit any style
All this wealth is usually glued onto transparent silicone. It is sold in construction stores and is available in small tubes or larger cartridges for a construction gun. It’s more convenient to work with a gun - it’s easier to control the force and get the right amount of glue, which is problematic with a regular tube.
Please note that silicone can be acidic or neutral. Acidic until it dries, it smells very much like vinegar and can only be worked with in a well-ventilated area.
Neutral silicone sealant does not smell like anything, but is more expensive. Still acidic, until it hardens, it can corrode the paint that is applied to the decor. When purchasing, pay attention to the setting time. This is the time during which you can still fix something, move it forward. As soon as the glue begins to polymerize, nothing can be done - it is covered with a hard film. The average time for the formation of a surface film is 10-20 minutes, but there are also more “long-lasting” compositions.
You can use the most unusual materials
There are two decorating techniques:
- The decor is outside the mirror. In this case, a base is cut out of thin fiberboard or thick cardboard, which is larger in size than the mirror. It can be any shape - round, square, arbitrary shape. The decor is glued to the base, after the glue has dried, a mirror is inserted into the finished frame.
- Decorating the mirror around the edge. In this case, the glue and all fragments are applied directly to the mirror surface.
There seem to be small differences, but the design looks different in different techniques. The second allows you to get an openwork decor of the mirror, which seems to be illuminated by reflection.
Determining the design
The choice of appearance and size of the future structure depends on you. The product can even be made from spoons, wooden kebab skewers, and branches. The decor of the frame and the amount spent will depend on the material chosen.
We prepare materials and tools
What we need to make a sun mirror with our own hands:
Manufacturing process
The process of work itself is simple, just make the decoration according to the instructions. This type of work can be done if you are new to needlework.
Preparing the stencil
First, we place the mirror on paper, outline its outline, then cut it out with scissors. We mark the center on the workpiece and draw two straight lines through it along a ruler, horizontally and vertically, to form right angles. Then we divide each quarter into six more equal parts. As a result, we should have 24 divisions.
Next, draw another circle, retreating from the center by about 3 cm. Using our stencil, transfer the blank to cardboard and cut it out.
We take out bamboo sticks
We divide the set into 4 parts, each of which will contain 24 sticks. We do not touch the first part, cut the second by 7 cm, the third by 10 cm, and the fourth by 13 cm. To ensure that the edges of the workpieces are not sharp, we polish them with sandpaper.
Glue the rays
We mark 6 points on the contour of our circle, between which there will be the same distance. Glue the longest sticks on them from the center. Next, we take the second part, which we shortened by 7 cm, and glue it to the edge of the inner circle. Thus, we continue to work with the third and fourth parts of the sticks.
Painting the rays
Take the paint of your choice and apply it to the rays. Gold or silver shades will look most impressive. After painting, wait until the material dries.
Assembling the finished product
Take the mirror and glue it to the inside of the workpiece. Next, we attach a brass ring so that it matches the contour of the mirror or is slightly wider.
Adding a mount
Decorating
The product itself can also be supplemented with various decorations, but in moderation. If you have chosen a golden or silver color for the mirror, then it will be enough to chaotically glue pearl beads or rhinestones.
How to do it yourself: step-by-step instructions
To make a sunburst mirror we will need:
- Thick cardboard.
- Scissors.
- Bamboo sticks in the amount of 100 pieces and at least 30 cm long.
- Spray paint.
- Glue for a glue gun.
- Brass ring (can be purchased at a craft store).
- Fastening for the finished product.
- Glue gun.
- A small hacksaw.
- Sandpaper.
- Compass.
- Ruler.
- Pencil.
- We cut out a circle from cardboard that completely matches the size of the mirror.
- From the center of the circle we draw straight lines to the edge so that we get 24 sections of equal size.
- Inside the large circle, draw a smaller one, moving 3 cm from the edge.
- We divide the set of bamboo sticks into four parts.
- Each contains 24 pcs.5. We leave the first stack of sticks at the original size, shorten the second by 6 cm, the third by 10, and the fourth by 12.6. We saw off the sharp edges of the sticks and sand them with sandpaper.
- We glue the longest sticks from the center of the circle according to the drawing. Glue short from the edge of the inner circle.
- We paint the rays using a spray can. You can choose any color, the main thing is that it matches the interior.
- We are waiting for the paint to dry completely.
- Glue a mirror on top of the rays so that its edges coincide with the edges of the cardboard circle.
- Glue a ring on top of the mirror; if it is a little larger in size than the mirror itself, the work will be more accurate.
- Fasteners are glued to the back of the product.
- Decoration. Here you can give free rein to your imagination. Various mirrors, glass and rhinestones can add zest to the finished product.
Garden decorations from mirrors
Decorations made from a mirror, especially a mosaic made from its fragments, look very impressive on the site. It is enough to cut the reflective surface into uneven pieces and lay them out, for example, around tree trunks, frame flower beds, and mixborders. Such a mosaic is also beautiful in a rock garden or on an alpine hill.
Another unusual design option is to use pieces of mirror in the design of a dry stream. To do this, place them between the stones. Shimmering in the sun, the fragments will create the illusion that a real stream is flowing through your area!
If you have pets or small children, it is better not to use mirror mosaics in your garden design.
Things that have served their purpose can and should be given a second life. This will help you save on buying new ones and also help you do your part to protect the environment. You can use not only old mirrors for various needs, but also flower pots, nylon tights, and plastic bottles. You will find even more ideas in the articles:
- Don't throw it away! 20 things that can be reused in the garden
- Country life hacks: new life for unnecessary things
- Flower pots made from unexpected objects, or the second life of old things