Mounting a mirror on the wall is an element that is not always needed, since you can fix a mirror with your own hands using several methods; here you need to take into account the characteristics of the wall material and the parameters of the mirror itself. Even a beginner without any experience can handle the process of installing a small mirror; in other cases, you will need to study detailed instructions. Today we will look at the basic methods of installing mirror structures.
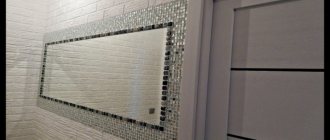
Wall mirror mount
Basic methods for mounting mirrors to the wall
When arranging your home, sometimes it becomes necessary to hang a mirror on a wall or cabinet. You can do this in the following ways:
- using special glue or sealant;
- install structure holders;
- make holes and secure it to the wall or to the door with screws or self-tapping screws;
- attach using adhesive mounting tape.
Using these methods, you can install this accessory in a room for any purpose without using the services of a specialist. Let's look at the installation options in more detail.
We fix the canvas to the wall
Consumption of double-sided foam tape for gluing mirrors
The final touch is to remove the protective film from the glued pieces and install the mirror in its intended place. Manufacturers of this type of tape provide a guarantee for 10,000 adhesives, so if it is installed incorrectly, you can correct it.
Fastening the mirror to the wall using 3M adhesive tape is reliable - this material is used in industry for gluing smooth fragments. This compound is not afraid of ultraviolet radiation and has a wide temperature range of use (from -40°C to +90°C). The adhesive composition has excellent resistance to water. The only limitation is that this tape adheres much worse to porous surfaces. But with ceramic tiles, laminated MDF or chipboard, adhesion is excellent. If in doubt, you can conduct an experiment - glue something heavy, then try to tear it off. Based on the results, you can draw your own conclusions.
Using sealant and glue
Products weighing about 8-10 kilograms can be safely fixed to the wall using glue or sealant. This way you can quickly hang the product without damaging the wall surface.
During the installation process, a special glue is used; it differs from standard types in that it does not damage the coating. At the same time, it must have good adhesive properties, otherwise the product may collapse at any moment.
Table No. 1. Popular types of glue.
| View, illustration | Description |
| Mounting adhesive “Moment” | This glue is made from synthetic rubber. Thanks to this feature, it does not become hard after drying, but remains flexible, like silicone. It is best suited for application to plaster, natural wood and other surfaces. |
| SOUDAL 47A | This glue, like the previous version, is made on the basis of rubber. It is suitable for tiles, concrete surfaces, various plasters. Its main advantage is that it quickly sets and securely fixes the canvas to the wall. At the same time, it contains a minimum content of acetone (a large amount of it leads to damage to the low-quality mirror coating). However, if the mirror is thin, it is better to test on an inconspicuous place or similar unnecessary piece before using such glue. |
| Tytan | Glue is made based on resin and rubber of synthetic origin. It is best suited for attaching products to porous walls (decorative plaster). It hardens in about 15 minutes, so after attaching the mirror you need to support it with something or just hold it. |
| Penosil | A durable adhesive that can be used on both stone and wood surfaces. It is most often used for products coated with epoxy. It is distinguished by its fast setting - it hardens in about 10 minutes. |
Quite often, for gluing mirrors, silicone sealant is used, which has almost the same properties as specialized adhesives. Before purchasing, it is important to carefully study the composition of the sealant - it should not contain acids. Any acid instantly or over time eats through and damages the mirror coating.
Silicone sealant
Accordingly, a sealant containing any components (except acids) is suitable for installing mirrors, but when installing a mirror in a bathroom, it is better to choose options with antifungal additives. This sealant is often used in rooms with a swimming pool, in saunas and baths. The only difference between waterproof sealant is its higher cost.
The main advantages of the sealant include the following:
- installation will take no more than 60 minutes;
- the product will last on the wall for about 12 years;
- no need to purchase additional fasteners;
- if glue accidentally gets on the front side of the mirror, it can be quickly removed;
- the mirror will fit securely to the wall;
- you will not need to use any additional tools or accessories. You can “plant” a mirror using either special glue or sealant.
There are also some disadvantages of sealant:
- this method of gluing the product is only suitable for a flat surface;
- it is often impossible to remove the mirror without damaging it;
- in the presence of frequent temperature changes, the strength of the sealant is compromised.
Mirror gluing technology: step-by-step instructions
Fixing a mirror on the wall with glue is not difficult; you just need to know some nuances.
Step 1. First, the surface on which you plan to attach the mirror must be cleaned of all kinds of dirt and dust. Then you need to wait some time until the wall dries.
Removing dirt from the wall
Step 2. Now you should put markings on the wall that will make it easy to align the mirror.
Apply level markings
Step 3. Next, you need to apply glue or sealant to the back side of the mirror sheet. You can distribute it in a zigzag or in small dots.
Apply glue to the canvas and then fix it on the wall
If we are talking about gluing a mirror that is too voluminous, then the installation method will change slightly. In this case, the glue is applied directly to the surface itself and then spread using a special spatula. Only then is a mirror attached to the wall. You can move it using suction cups.
Apply glue to the wall using a spatula
Installing a mirror using glue can be considered reliable. In this way, they even glue products to the bathroom, where the tiles and the canvas should be located in the same plane. When renovating, it is better to leave room for the mirror so that it can be mounted flush.
You will need to leave some free space where the canvas will be fixed.
Another feature is that not all types of glue set immediately, as a result of which the mirror will slide down. Therefore, several pieces of double-sided tape are first attached to the back side of the canvas, or mechanical fixation of the canvas is provided while the glue dries.
Video - Gluing the mirror with sealant: rules
Glue selection
Glass glue is usually sold in tubes. It is convenient to squeeze it out using a special construction gun. The choice of which glue to use remains with the consumer.
Professional furniture makers use the following compositions:
- "SOUDAL WORLD-O-BOND." The highest quality adhesive specifically designed for mirrors. After hardening, the composition forms a plastic seam, which is important when two surfaces that are not uniform in terms of rigidity are glued together. The only disadvantage of this glue can be considered its high price.
- SOUDAL 47A. Another product from the Belgian brand for glass structures and mirrors. The glue dries quickly, does not spoil the amalgam, and ensures reliable fastening of glass to rough surfaces made of natural wood. The manufacturer does not recommend gluing a mirror to a smooth laminated compartment door.
- "SOUDAL FIX ALL" . Glue from the same line, which has a slightly different composition. Some furniture production professionals have doubts about this product due to its lack of plasticity after drying.
Sometimes on the Internet you can find advice on gluing a mirror with super-strong Moment Montazh glue. However, experts recommend this brand only if there is a special mark “for mirrors”. Regular assembly adhesive becomes too hard after hardening. Because wood and glass have different coefficients of thermal expansion, tension can develop between the bonded surfaces, causing the seam to pull away from the mirror and damage the amalgam.
Using double-sided tape
The miniature product can easily be fixed to the wall using double-sided tape, on both sides of which a special adhesive composition is applied. The thickness of such tape can vary, but on average it is about 10-20 millimeters.
Installation technology: step-by-step instructions
Even a beginner can handle this installation method, because all the steps to install the product are very simple.
Step 1. You need to attach pieces of tape to a clean mirror sheet. However, you should not cut off large strips. It is better to place small fragments throughout the canvas (as shown in the image).
Glue the tape to the mirror cloth
Step 2. Next, you need to stick the mirror on the wall, using preliminary markings, as in the previous case.
It is necessary to remove the protective layer from the double-sided tape and attach the mirror to the wall
The following advantages of using double-sided tape when installing a mirror can be highlighted:
- it is possible to remove the canvas at any time and secure it in another place;
- Scotch tape is inexpensive and requires very little;
- it has good resistance to temperature changes;
- Using this tape, you can hang a mirror on any surface. Scotch tape perfectly holds miniature decorative mirrors
According to manufacturers, adhesive tape can be safely used even for fixing medium-sized mirrors. Despite the ease of installation, this is a fairly reliable mounting method.
Among the disadvantages of double-sided tape are the following:
- the mirror will not stick to an uneven wall;
- It is not advisable to abruptly remove the tape from the mirror, otherwise the coating may be damaged.
At what altitude
The installation height of mirrors depends on the installation location and its purpose. In the bathroom it is hung so that the middle of the mirror surface is at eye level. The height of residents may vary, but on average the center is at a height of 160-165 cm from the floor.
Bathroom mirror installation height
When hanging in the hallway or dressing room, mirrors are usually installed long and narrow. In them, a person should be displayed in full height. To do this, its upper edge should be slightly above the head - 3-5 cm. When hanging on cabinet doors, use its upper edge as a guide. If the closet is tall, the mirror is also fixed a few centimeters above the head.
Mirror holders
Quite often, mirrors are hung on the wall using special devices. This includes various brackets and clamps.
These fabric holders come in two types:
- Through. They are used if the canvas already has a corresponding hole. Essentially, these are the same self-tapping screws, but only with decorative overlays. They come in various shapes and sizes.
- Non-through. Holders of this type are attached both to the cabinet door and to the wall, and the mirror is already fixed through the edges. They can be attached tightly or left a small gap (the second option is especially suitable in the case of curved walls).
Various options for mirror holders
In our special article you can learn how to glue a mirror to a cabinet door.
Such devices have the following advantages:
- they can be installed in any room using mirror sheets of various sizes;
- such fasteners have maximum stability and are “indifferent” to temperature changes and high air humidity;
- if necessary, the mirror can be dismantled without any damage;
- Clamps and brackets are easy to attach to any surface.
The only disadvantage is the cost of fasteners, which will be higher than that of glue or double-sided tape.
Installation features: step-by-step instructions
Installing a mirror using such auxiliary fittings is extremely simple. Any person can handle such actions if desired.
Step 1. First of all, you should mark the installation locations of these fasteners on the wall. It is important to take accurate measurements here, otherwise you will not be able to hang the canvas evenly. Usually, two fasteners are fixed at the bottom, two at the top in the corners, one on both sides. Moreover, if the mirror is too voluminous and heavy, then more fasteners will be needed.
We put markings on the wall
Step 2. Next, you need to drill holes along the marks left. It should be remembered that they should be slightly larger than the dowels themselves.
Drilling holes for dowels
The dowels must be inserted into the holes, and then the fasteners must be secured to them.
We fix the mirror on the holders
Step 3. The final step is to hang the mirror on the holders. If the mirror is held unsteadily, then at this stage you can immediately adjust the fasteners. Then decorative plugs are attached to the clamps.
Video - Hanging a mirror in the bathroom
General Tips
When working with a mirror, there are specifics that must be taken into account. Professionals advise:
- Glass is a fragile and smooth material. The mirror may accidentally slip out of your hands and break. Before you get down to business, you need to put on gloves (preferably with pimples on them). In this case, the glass will be held securely in your hands. But it is better to cut off the fingertips of gloves in order to maintain the sensitivity necessary when checking the quality of the connection.
- If the temperature and humidity conditions in the room often change (for example, household members like to ventilate the room), strips of glue and tape are applied vertically. When they are placed horizontally, air pockets are formed in which moisture will accumulate, which can lead to detachments.
- It is better not to use markings on a white cabinet, otherwise you will have to scrub off noticeable marks later. In this case, masking tape will come to the rescue. It can be easily removed after gluing and does not harm the surface at all.
- The table on which the cabinet door is placed before work must be of such dimensions that the entire part fits on it. If the tabletop is shorter, the piece may bend under its own weight, causing the edges to droop slightly. As a result, a gap is formed between the door and the mirror, and the quality of the gluing will suffer.
The mirror canvas is afraid of damage on both sides. To avoid accidentally scratching the front part or the amalgam layer, the mirror is always placed on a base covered with soft material (a blanket, a rug, a bedspread). Especially if you place it on the floor, where there may be small grains of sand.
Installing a mirror with dowels and screws
Fasteners of this type can withstand any weight. So, if you wish, you can even fix the canvas to the entire wall, starting from the ceiling. Installation accessories can be purchased at any hardware store.
The advantages of this installation method include the following:
- strength of fastenings;
- long service life;
- Possibility of installation anywhere.
Important. The main disadvantage is that the master often has to drill a hole in the mirror sheet himself, and this, in turn, is very difficult, because due to careless actions, cracks can appear on the surface of the mirror.
Installation technology
First, we need to make holes in the mirror sheet for through fasteners. So, there are some ways to make this process easier:
- It is necessary to first rub the mirror with turpentine, and only then drill - this will avoid the appearance of cracks.
- It is better to first make holes in the right place using a diamond glass cutter.
- While working, do not put too much pressure on the drill. All actions must be as careful as possible.
- It is recommended to use an electric drill with adjustable speed, because you will only need to drill the mirror at minimum speed.
Step-by-step instruction
Step 1. First of all, we treat the surface and let it dry normally. The mirror should be placed on as flat a surface as possible. Next, you need to mark the hole using a marker.
We put markings on the canvas
Step 2. Next, you need to make a small rim of plasticine around the future hole, into which you can pour water, and only after that should you start drilling.
It is important to ensure that the drill is always in water. This way it will overheat much less.
Step 3. Once the hole is ready, you will need to sand it down with sandpaper.
Sand the hole with sandpaper
Important point! Of course, it is better to turn to professionals in order to make the most even holes in the mirror. If you still decide to do this yourself, then it is better to practice in advance on a small piece of glass.
Next, you will need, as in the previous case, to make holes in the wall, and then place fasteners there and only then install the canvas itself.
What other methods of fastening are there?
Hidden fasteners require some effort. In this case, you can do without nails and will not damage the wall. It is best to glue the product onto a plasterboard surface. For a brick wall, you can use nails.
So, the mirror can be glued or hung.
Glue
Sticking a mirror panel is a fairly easy process. You can paste it in several ways.
The advantage of this group of methods will be the absence of visible fastenings on the surface of the mirror, the possibility of using the product without a frame, the ability to decorate the interior using small figured models in the form of butterflies, flowers, polygons and other things.
Gluing is a relatively simple method, perfect for small products.
At the same time, this method of strengthening a mirror in different applications will have three serious disadvantages:
- In many cases, a glued product will not be able to be removed from the wall - it will have to be broken.
- The surface on which you intend to place your mirror must be level and stable. And if the first is easy to check, then it is quite difficult to predict that a wall (especially a newly erected or newly plastered one) will not shrink, which will lead to the destruction of the product.
- It cannot be glued to all surfaces and not in all rooms. It will not stick, for example, to tiles, and changes in temperature and humidity in the bathroom or kitchen can destroy the adhesive layer over time.
For work you need to use a special mirror glue - it does not contain acids that could spoil the amalgam. Before using another adhesive, the back side of the product should be treated with a sealant. Neutral silicone sealant can also be used instead of glue.
When gluing the product in the bathroom, you should use a special silicone sealant for aquariums, which costs a little more than usual, but contains antifungal additives and is originally intended for use in a damp environment.
Prepare, level and degrease the surface. If you are gluing the product to a vertical surface, be sure to prepare supports that will help hold the canvas in place until the glue hardens. For this purpose, you can use planks, or several screws, temporarily screwed in along the lower edge of the marking so that the mirror sheet rests on them.
The glue can also be combined with several strips of mounting tape, which will serve the same purpose and additionally secure the canvas before the glue hardens.
If you want to glue the canvas to the front door or cabinet door, it is better to place them horizontally, removing them from the hinges - this is more convenient. You will not need to use supports, and the mirror sheet will definitely not move before the glue has completely hardened.
You cannot paste canvas onto wallpaper - there is no guarantee that it, in turn, will stay on the wall. Therefore, the wall must be cleaned of wallpaper and other unstable coatings and primed.
Apply the glue in strips, leaving a gap of 8-12 centimeters between them, depending on the size of the canvas. Glue can also be applied in a “snake” pattern, in a checkerboard pattern, or dotted along the entire back side of your mirror. Try to avoid the edge - the glue may bleed out untidy and be difficult to remove from the wall later.
Be sure to put markings on the wall where you plan to glue the mirror, it will help you navigate. Use a level to check that it is applied evenly.
- Place the mirror against the wall, following the markings.
- Be careful: the glue hardens quickly, and you may not have time to adjust the position if you applied the mirror incorrectly.
- Hold the mirror for a few minutes, pressing it tightly, then place supports - they can be removed in a day or two.
You cannot stick a mirror onto a tile: therefore, usually when installing tiles in a bathroom, a free section of the wall is left in advance to fit the size of the future mirror.
If you haven't done this, you will have to remove the tiles or choose another method of attaching the mirror to the wall. To compensate for the height difference, if the thickness turns out to be different between the tile and the mirror (most often, the mirror is thinner), an additional layer of plaster is applied under the product, or a sheet of waterproof plasterboard is installed between it and the wall. The joints can be treated with glue or sanitary sealant.
If the canvas is large, then you need to take additional precautions. So, the surface of the wall under it should be very well leveled, and a special film should be glued to the surface of the mirror: now, if it breaks, it will not be fraught with serious injuries.
Mirror walls made of several large canvases are mounted with a small gap between the canvases so that the mirrors do not break during installation or if the walls shrink slightly during use.
Small mirrors can be glued without glue, only using double-sided mounting tape. The advantage of this method is that the foam base of the tape compensates to some extent both the unevenness of the surface under the mirror and its possible movements.
This method of gluing, in addition, allows for the dismantling of the mirror.
But the mounting tape must be wide, of high quality and designed to withstand heavy loads. The mirror amalgam must withstand the same loads: in some cheap models it may begin to peel off during operation, and there is a risk of damaging it during installation. It is generally not recommended to glue these mirrors.
Just as before using glue, first you need to prepare the surfaces - clean them from dust and wipe them with alcohol to degrease. The adhesive tape is glued to the surface evenly, but it should not be placed around the perimeter or in horizontal stripes - the pieces of adhesive tape are placed vertically in a checkerboard pattern.
Closer to the top edge of the mirror, you can add a few additional stripes.
Hang
If the mirror is without a frame, then you can use various types of fittings available in stores: brackets, profiles, brackets, clamps and strips. With their help, the mirror can be attached either close to the wall or placed remotely - with a gap of 5 mm to several centimeters between it and the wall.
This may be useful if the surface under the mirror is uneven and cannot be leveled.
There are two types of fasteners for mirrors: through and through.
The through method of fastening involves installation using dowels through holes made directly in the mirror sheet. If your mirror already comes with special holes, or the store provides a glass drilling service, all you have to do is install dowels into the wall and screw the mirror.
Typically, a dowel for attaching mirrors (and not only) consists of:
- A sleeve made of hard plastic, placed in the wall, expands and is well fixed in the wall when screwing in the screw.
- Vinta.
- Special clamping pads that are placed between the glass and the wall, the glass and the screw head, and do not allow damage to the mirror when tightened.
- Decorative plugs, which are made of metal or plastic and hide the heads of the bolts.
When hanging the canvas using dowels on ceramic tiles, a wall covered with wood or covered with PVC panels, be sure to keep in mind that fastening to the tile is not enough - you need to go deeper into the base wall, for which longer dowels are used, or it is better to clear the wall of the coating in the place where you plan to mount the mirror.
If the type of surface allows you to directly screw a screw into it (wooden furniture), then you can do without a dowel sleeve.
If the wall is fragile (chipboard, plasterboard), use special dowels.
If there are no ready-made holes in the product, but the through-the-hole installation method suits you, and you want to make them yourself, you will need a special diamond drill for glass, a low-speed drill and a little patience.
Before drilling, secure the blade to a flat, preferably wooden, surface so that it does not move, degrease the surface with alcohol and mark with a marker the places where you will drill holes.
The product may crack due to heat during the drilling process. To avoid this, you will have to work at low speed - from 250 to 1000 rpm of the drill. To prevent the fabric that heats up during the drilling process from cracking, mold a “cup” of plasticine around the markings and fill it with water or turpentine.
The liquid will cool the glass and retain the glass dust generated during operation.
If you want to mount the product with non-through fasteners, then the installation algorithm for all types of such fasteners is approximately the same. The larger and heavier the canvas, the more fastenings you will have to use.
Pay special attention to the lower fasteners - they must withstand the greatest load.
Typically, the fastening elements are installed from below - at a distance of 2-3 centimeters from the intended angle of the mirror. And on the sides, so that the mirror is held in this “pocket” under its own weight. It is possible to install the fittings in which the fasteners are installed at the bottom and top, and the mirror is “nested” on the side.
The lower elements are installed strictly horizontally according to the markings, the side ones - usually so that the mirror on one side fits freely into their grooves. Usually this is 2-3 mm from the intended side edge of the mirror, but the distance depends on the specific type and style of fittings you have chosen.
Be sure to check that the mirror cannot fall out when moved to one side as much as possible.
Sometimes, for reliability, a decorative profile is used as a lower element of the fittings, which can be combined with any other method of attaching the upper edge - staples or through dowels.
If you want to give the mirror canvas additional strength, you can glue it to a sheet of plywood or chipboard: such a measure will not only prevent the mirror from breaking simply with careless pressure, but will also make it thicker; take this into account separately during installation.
When hanging a mirror, stick adhesive pads on its corners on the back side: they are sold in stores, they are often glued, for example, to furniture legs. With this precaution, the mirror will not “dangle” in the mounts.
If you are installing a mirror in the bathroom or kitchen, treat the back side and ends of the glass with sanitary sealant.
Mirrors placed in a frame are most often already supplied by the manufacturer with rings or hinges; all you have to do is install a suitable counter part, for example, hooks, on the wall.
You can also purchase hinges or hanging plates from the store.
A mirror in a heavy wooden frame without ready-made fasteners can be mounted on a wall at the top edge using two slats with a cross-section of approximately 50 by 20 mm, with longitudinal cuts at an angle of 45 degrees, which interlock into a “lock.”
One of them is attached horizontally to the wall, the other to the back of the frame at a height of approximately 4/5 of the mirror (at some distance from the top edge). The mirror will be held in the “lock” under its own weight.
When installing wall-mounted models, be sure to take into account the features of the room. So, in a nursery, even small mirrors should be covered with anti-fragmentation film to avoid injury.
In small and dark rooms, install a mirror on the wall perpendicular to the window. Horizontally placed mirrors visually expand the room, and vertical ones make the room appear taller.
Before installing the mirror, be sure to check what it will reflect.
Installation of mirrors in frame
Most often, the mirror with the frame already comes with all the necessary fasteners, but even if they are missing, you can independently purchase hinges at any specialized store, which will be fixed to the self-tapping screws.
Products that are too massive are installed using metal plates - they make the fastening more reliable. Otherwise, framed mirrors are hung in the same way as paintings - a nail is driven into the wall or a hook is screwed in, on which the frame is then hung.
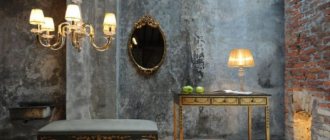
Mirror in frame
Recommendations for placement
When choosing a method for attaching a mirror, based on the wall material and its reliability, do not forget about the place in which this mirror will look most advantageous. It's no secret that sometimes it is not possible to place the mirror canvas where you want.
The reason may be the design features of the room, lack of footage.
In small apartments, each piece of furniture has its own place, which limits the space for the mirror itself. To simplify the task, you can pay attention to some nuances:
In a small darkened room, it is worth placing a mirror opposite the window opening to give more light to the room. A mirror on the entire bedroom wall will double the size of a small room.
- You should not hang a glass product in the kitchen near the stove: high temperature and fumes will provoke frequent maintenance and will affect the appearance of the mirror.
- Before hanging the canvas panel in the bathroom, cover its ends and back with a special sealant.
- Cover the mirror in the children's room with a special film that will prevent the product from flying apart if it breaks.
- Place stylized lighting fixtures on the wall near the mirror in the hallway; this will visually expand the walls in the room and give a stunning effect of diffused light.
- You should not hang decorative elements of this type at an angle to a vertical surface, so as not to distort the reflection.
- To properly fix the mirror in the hallway, choose a place where you can look into it at full height and keep in mind that this distance should be at least 1-1.5 m from you.
- The canvas, which has a height of 0.6 m, guarantees a waist-high view, a product from 1.2 m provides a full view of the entire figure. The choice of mounting height for a mirror in the hall will depend on its height and width. The bottom of the mirror for a full-length view should be placed no higher than 0.5 m above the floor level.
- For high-quality gluing of a mirror, the wall must be level. The thin product will adapt to the shape of an uneven wall, since the glass can take the shape of the base. To stick the product correctly and avoid such a nuisance, you need to choose thick glass or level the wall.
Features of attaching mirrors to various types of surfaces
When installing mirrors, the material from which the wall surface is made is of great importance. So, during the work, some differences will be observed, because there are more fragile and, conversely, stronger surfaces.
Table No. 2. Types of surfaces.
| Type | Installation Features |
| Concrete | In this case, you can attach the mirror to the surface in any way. In this case, the wall is first primed. The main feature is that this is a very reliable ceiling, so in order to make holes in it, a hammer drill is used. |
| Plastic panels | This material is most often used to decorate the bathroom. There is no point in drilling holes in such a wall; it is better to secure a small mirror using moisture-resistant glue or sealant. |
| Brick | In this case, any type of fastening will also be suitable, and you will only have to pre-prepare the wall (sand it, putty). If you use glue or double-sided tape, you must apply any degreaser to the surface in advance, and only then proceed with installation. |
| Tile | It is recommended to attach the mirror to a tiled wall using the gluing method (if you have not previously left space for the mirror). A sealant is suitable for such purposes. Drilling tiles is quite difficult, and cracks may appear from the hole. If it is necessary to make a hole, use a special tile drill. |
| Drywall | This is a rather fragile material, so it is not recommended to install a massive mirror on such a wall. In this case, it is better to choose double-sided tape and glue. |
| Wallpaper | Hanging a mirror on the wallpaper using adhesive tape is not the best solution. This method is only suitable if it weighs about one and a half kilograms. In this case, it is recommended to use different holder options. |
You can hang a mirror on a wooden wall in any way.
Spectacular examples in the interior
The mirror must be selected taking into account the existing interior and the overall design of the room. Below you can see several examples with the help of which the deficiencies in the configuration of the room were corrected or the emphasis was placed on successful features of the layout.
The mirror can be mounted on almost any surface. The main thing is to correctly calculate the amount of fasteners and make sure that the wall can withstand the load.
Did you manage to solve your problem using the recommendations from the article?
Yes!
46.44%
No. More answers required. I'll ask in the comments now.
38.03%
Partially. There are still questions. I'll write in the comments now.
15.52%
Voted: 773
How to choose a mirror?
In order to choose the highest quality product, it is important to listen to the following recommendations:
- the thickness of the canvas should be more than 6-7 millimeters, then the image will be more realistic;
- the mirror coating must be applied evenly on all sides, in addition, it is important to check that there are no scratches or chips on it;
- the mirror side must be perfectly smooth; the presence of sagging indicates a low-quality product.
Important. It should be remembered that low-quality canvas can easily be damaged during the installation process, so you should not save on such a purchase.
A high-quality mirror should not be too thin
Tips for mirror placement
When making a choice towards one or another method of installing a mirror, you should also remember the rules for placing such products. Of course, not in all cases we manage to hang it exactly where we originally planned. Here the features of the room, and in particular the lack of square meters, are also of great importance.
In small apartments, it is important to allocate the optimal area for each piece of furniture and accessory. Therefore, you should carefully consider the following nuances:
- In a very small room, it is recommended to hang the canvas directly opposite the window. This way it will reflect sunlight, making the room larger for visual perception.
- It is not recommended to mount a mirror in the kitchen near the stove, because due to regular temperature changes it can crack.
- When installing a mirror in a bathroom, its edges must be treated with silicone sealant.
- The mirror in the children's room is covered with a special protective film. This way, even if it breaks, all the pieces will remain in place, so the child will not get hurt.
- If you plan to hang a mirror in a narrow living room, then you can install lamps opposite it - this will also visually enlarge the space.
- The mirror must be hung as level as possible, exactly according to the markings, otherwise the image will be distorted.
- If the wall is too crooked, then before starting installation work it will need to be leveled using putty.
- When choosing a place for installation, it is important to consider that the mirror should not interfere with cabinet doors and other elements.
- It is worth noting that panels that are too large must be fixed to several fasteners of different types at once, which will increase reliability.
You can hang lamps opposite the mirror in any room
For some people, installing a mirror with your own hands may seem like a very time-consuming task, but in fact there is nothing difficult about this process. You just need to purchase all the necessary fasteners, accessories and carefully study the instructions.
Rules for caring for mirrors
Peculiarities
Before moving on to methods for installing mirrors with your own hands, we will dwell a little on the features of the surface on which they are supposed to be attached.
Concrete is the most commonly found material in most building structures.
To work on concrete, you will need a hammer drill, and before gluing anything to the concrete wall, it needs to be primed.
Drywall is not a very durable material and may not withstand heavy loads or repairs. Therefore, you need to carefully monitor the weight of the product: the weight of the mirror cloth should not be more than 20 kg, and you will also need special fittings.
On average, the weight of 1 square meter of mirror, depending on its thickness, ranges from 7 to 15 kg. This must be taken into account when choosing the mounting method and type of fittings.