You probably won’t find a single house that doesn’t have a mirror. Everyone needs it, because we need to know what we look like. But in addition to its direct function, reflection, it can become a very stylish decorative element. There are many mirrors of different shapes, sizes and with original frames. What is also very important is that mirror surfaces are simply necessary in cramped rooms - thanks to the reflection of light, the space visually appears wider.
But glass must be handled very carefully. Something as simple as installing glass has many nuances, which will be discussed in this article.
How to hang a mirror on concrete
Concrete walls, as well as brick, are found in most homes. You will probably have to mount the mirror on just such a surface, so get a hammer drill - you won’t be able to do without it. Special drills are also needed to make holes in concrete. If you plan to glue a mirror, the concrete wall needs to be primed before doing so.
How to attach a mirror to drywall
Drywall is a fragile material, so traditional methods of installing mirrors will not work in this case. Buy special fastening systems - they make the fastening stronger and will not damage the wall. Pay attention to the weight of the product - it should not exceed 20 kg, otherwise the material simply will not withstand the load.
1 square meter of mirror exerts a load on the wall in the range of 5-15 kg. Measure the area of the canvas and calculate whether it is suitable for your wall. Secondly, the mirror needs to be hung at a height convenient for all family members. To do this, choose it according to the following formula: the upper edge should be 5 cm higher than the height of the tallest person, and the lower edge should be lowered 3 cm from the chin of the shortest person.
Conclusions on the topic
Thus, we briefly examined something so funny to him as the smooth installation of a shelf or mirror or something else. Of course, from the point of view of the modern world, this topic may not seem so funny, since many people prefer to call craftsmen for any little detail or reason, but if the master in you nevertheless awakened and you decided on your own or under the pressure of your wife to hang a shelf or mirror, but I’ve never encountered this before, then this article should have helped you.
In case you still have questions and would like answers to them, we recommend that you comment on this article and write your questions, and our authors or readers will be happy to share their thoughts with you.
Good luck with your renovation!
Which mirror mounting method should you choose?
The set of tools depends on the chosen mounting method. It is better to glue or hang mirrors on a plasterboard wall using special fittings. Fastening this piece of furniture to concrete is much more difficult, but also more reliable. If you want the mirror to look minimalist, use hidden fasteners. Another advantage is that you don’t have to use nails, which means the wall won’t get damaged. The mirror can be removed and rehanged at any time.
Bonding technology
The entire process of installing a mirror using glue can be divided into several main stages:
- you need to prepare a place to install glass. It must be cleaned and degreased with alcohol;
- when installing on a concrete wall, it is necessary to prime the walls;
- If there is already wallpaper pasted in place of the mirror, then it is advisable to remove it, otherwise the mirror may fall and tear off the wallpaper. You can also fasten a piece of plywood to the wall in that place and glue the mirror onto it;
- it is necessary to mark the place where the mirror will hang;
- prepare supports, profile and liquid nails. The supports and profile will help keep the mirror level while the glue hardens;
- liquid nails must be applied either pointwise at the same distance from each other, or in vertical stripes at a distance of 10-15 cm from each other;
- When the mirror is leaning against the wall, you will need to press it lightly for a while. Then put up supports and remove them after a couple of days;
- After removing the supports, look to see if there is a target between the wall and the mirror. If available, be sure to use sealant.
Through-hole mounting for mirrors
As the name implies, the fastenings here pass through the mirror. For this purpose, four holes are provided in it at the production stage. You just have to install dowels in them and fix the mirror on the wall. If there were no holes when purchasing, you can ask the store to drill them.
Typically, dowels consist of:
- sleeves. it is placed in the wall and firmly fixed in it;
- screw;
- pressure pads that ensure installation safety; they are placed between the canvas and the surface on which it is attached;
- decorative plugs.
When attaching dowels to tiles, wood paneling or PVC panels, it is worth remembering that you need to go deeper into the base of the surface. This requires special long dowels. Another option is to remove the covering from the wall and mount the mirror on a bare surface. There are special fittings for fragile materials like drywall or chipboard. Such dowels are called “butterfly”, Driva dowel.
You can make holes in the product for through fastening yourself. To do this, you need a diamond drill designed for working with glass and a low-speed drill. Place the mirror on a stable, comfortable surface, degrease the drilling areas and mark them with a marker. When drilling, the mirror will heat up, which may cause it to crack. To avoid this, set the speed to 300-1000 rpm and place cold plasticine or other similar material around the markings. It will cool the drilling site and prevent damage to the glass.
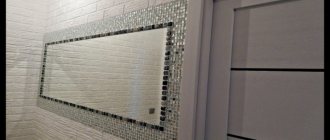
Design options
It is not necessary to decorate the mirror with a frame or using unusual shapes. Alternatively, you can apply a design directly to its surface. Execution techniques can be as follows:
- sandblasting - the surface of the mirror will be matte and rough;
- photo printing - the drawing will be colored, but the mirror surface will remain smooth.
Additionally, decor can be applied using the decoupage technique, which will give the mirror a stylistic direction. The advantage of this solution is the possibility of bringing the idea to life with your own hands. If you show your imagination, you can decorate the frame or mirror surface with multi-colored decorative stones, a beautiful oriental-style mosaic of broken tiles, or stucco elements.
The decor can also be themed. For example, on New Year's Eve, coniferous tree branches decorated with Christmas tree decorations and shiny ribbons will look spectacular at the top of the mirror. If there is any holiday taking place at home, you can further emphasize the event by placing a colorful inscription made from tinted toothpaste on a smooth surface. This technique will create a good mood immediately upon entering home.
Sandblasting
Photo printing
Decoupage
Mosaic
Thematic design
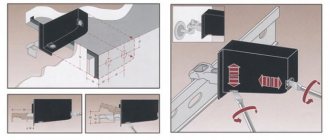
Non-through mirror fastening
This method requires the correct choice of fastening. Its size depends on the size and weight of the mirror: the larger these indicators, the correspondingly larger the mount. The lower mounts bear more load, so they must be able to withstand it. Consider this point when choosing fasteners.
There are two options for installing fasteners. In the first case, the elements are located at the bottom of the mirror in each corner at a distance of 3 cm from the edges, as well as on the sides. The second method is to install fittings at the top and bottom. The location of the lower fasteners is strictly determined by the markings, and the side elements are installed in such a way that the web easily passes through the grooves. This distance depends on the type of fasteners used. Make sure that if you move to one side, the mirror will not fall.
If you want to be sure that the mirror is securely fastened, you can additionally glue it to a plywood sheet. But this method will increase its thickness - pay attention to this when installing. You can purchase protective corner stickers for mirrors. They do not allow it to move freely, and at the same time make the appearance of the canvas more beautiful and neat.
Framed mirrors are hung in the same way as paintings. As a rule, they are sold with ready-made hinges, so the only thing required to install them is hooks with dowels on the wall. In addition to them, suspension loops or plates are used.
If the mirror is heavy, it can be hung by the top edge on special slats. When fastened, they form a “lock” that securely holds the frame. One part of the rail is installed on the surface of the wall, and the second - on the back side of the frame.
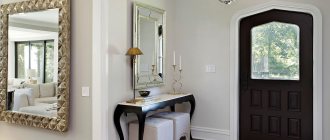
Features of backlit products
It’s rare that an owner can boast of having a window in the hallway. Therefore, most often it is necessary to install additional lighting here. You can select the mirror area to place the backlight. Examples of successful solutions:
- spotlights on the ceiling are a traditional option, but it is important to remember that light falling on the face directly from above leaves large shadows;
- sconces on the sides, with which you can emphasize the color or stylistic design;
- a floor lamp, which is the main attribute of creating comfort;
- rotating spots, the lamps of which can become the main source of lighting;
- LED strips creating a soft, pleasant light.
The choice of lighting devices should be made in accordance with the style of the hallway and the color of the walls. In a classic interior, where bronze color predominates, steel spots would be inappropriate. And in a high-tech style, it would not be the best idea to place cute sconces in folded fabric lampshades with ribbons.
Spotlights on the ceiling
Sconces on the sides
Floor lamp
Rotating spots
LED strips