Which mirrors are suitable for the bathroom?
It is impossible to find a definite answer to this question. A lot depends on tastes, finances, the size and style of the room, the height and age of household members, and some also try to take into account beliefs associated with mirrors.
In large rooms, full-wall mirrors look impressive, and in standard small bathrooms such a mirror can “eat up” half of the usable space. You should also remember that mirrors are susceptible to splashes of water and soap. This means that when choosing a model you have to think about how to protect the glass from contamination.
So, the first conclusions suggest themselves:
- Whether we believe in the mysticism of mirrors or not, we try not to place them directly above the bathroom;
- We hang it above the sink;
- We choose a mirror framed with a wide frame, thanks to which some of the splashes will not reach the glass.
Combined with style
Any mirror can and should serve as a full-fledged decorative element, and not just allow you to see your appearance. In this regard, frameless models are lucky - they fit into almost all styles. They are often decorated using sandblasting, when a matte, slightly rough floral or geometric pattern is applied to the surface. Engraving gives things an interesting look without changing over time.
In a modern style Source roomester.ru
A bathroom with a large mirror can be decorated in any style; For the mirror itself, the following decorative techniques are used:
- Bathroom in a classic style. For such an interior, choose a classic-shaped model: rectangular or oval. For framing, a smooth (straight) frame or a frame with a neat carved pattern is suitable.
Classic design Source static.wixstatic.com
- Palace luxury. Styles such as baroque or shabby chic are rare in the design of a small bathroom, and the main emphasis falls on the frame, which is decorated with stucco, carvings and gilding. In a spacious bathroom, such a mirror can be as large as desired, and it will be complemented by a painting in a similar frame and a multi-tiered “palace” chandelier.
White splendor Source st.hzcdn.com
- Country, retro, Provence. A mirror in a simple wooden frame with scuffs should have a homemade look. The decoration will be mosaic, brass, bronze or forged elements. The oval model will have a harmonious look; From rectangular ones, it is better to choose options with rounded corners.
In retro style Source pistoncars.com
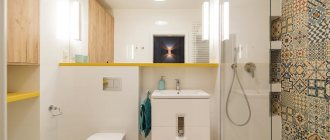
- Minimalism, modern, loft. A model of a strict rectangular shape with a dark one-color frame or without a frame is suitable. The illumination of the mirror cloth looks good; it can be replaced with a lamp (sconce) in the appropriate style.
Loft Source archidea.com
- High tech. The modest frame (or lack thereof) and simple shape are also appreciated here. Large mirrors in a high-tech interior are complemented by a frame made of polished stainless steel, unusual contour or LED lighting built around the perimeter.
In high-tech style Source media.decorateme.com
Where are mirrors placed in the bathroom?
Interior items with built-in mirrors are placed depending on the dimensions of both the piece of furniture itself and the characteristics of the room.
Mirror cabinets can be located anywhere in a sanitary room; the height of their placement is determined structurally, but individual mirrors, which are not part of the furniture, are most often hung above the sink.
There are no strict rules for placing mirrors, except for one thing: everything should be harmonious and convenient.
Material
When choosing a mirror for the bathroom, it is better to give preference to models with a silver base rather than an aluminum one. Such mirrors are not afraid of exposure to steam and moisture deposition, plus they are much more attractive. Be sure to pay attention to the back of the mirror - it should be perfectly smooth.
Calculate the exact cost of repairs using an online calculator
and receive a free detailed estimate for repairs
Calculate
1/3
2/3
3/3
Rules for placing mirrors
The main rule is that the mirror should hang at eye level so that a reflection at least up to the shoulders can be seen in it. But sometimes this norm is difficult to fulfill. Small mirrors cause the most problems.
Especially if there is a significant difference in height between family members. In this case, you first need to conduct an experiment: determine the upper limit for the shortest person and the lower limit for the tallest person.
It is important to choose a position so that an adult does not have to bend over backwards when trying to see himself, and the child does not try to reach the mirror while leaning on the sink, as this is fraught with falls.
Such problems are unlikely to arise with large mirrors. It is convenient for both a child and a basketball-sized man to admire his reflection in them. With such objects, the “at eye level” rule does not work. This is where the laws of harmony come into play.
They prescribe the following:
- The top edge of the mirror matches the top of the doorway;
- The distance between the sink and the bottom edge is 20-30 cm.
Why is this so? A gap of 20 cm is necessary to accommodate soap dishes, cups with toothbrushes and other necessary small items. A minimal amount of splashes will fall on the glass, and preschool children will not be able to touch it with their hands.
That is, even such a small distance solves two important problems:
- Safety;
- Frequency of cleaning.
Optimal shape
According to many designers, the optimal geometric shape of a dressing mirror is considered to be a circle. It has long been believed that this type of mirror has supernatural characteristics and protects against the evil eye, as well as damage. The round mirror acted as a kind of magical talisman.
Psychologists are convinced that a round mirror surface reminds many people of the sun or a huge loaf.
- Glass curtain for the bathroom: photos in the interior of different options
- Bathroom design in a modern style with photos for inspiration
- Bathroom tiles - which one to choose? 100 photos of the best new products!
In addition, a large mirror accessory installed in the bathroom visually expands the small room.
So if your toilet room is of minimal size, then equip it with a large round-shaped accessory. And you don’t have to worry that the large mirror surface fogs up, because a sufficiently powerful hood will prevent such a problem from occurring.
Using a mirror, there is a unique opportunity to create an exclusive and cozy bathroom interior, especially by decorating this decorative element with original objects. For these purposes, you need a minimum of free time and some interesting ideas brought to life.
How craftsmen determine the installation height of mirrors
The installation height of plumbing fixtures and experience with the use of mirrors has led to the emergence of an unofficial standard. Craftsmen and designers advise choosing canvases with a height of 80 to 100 cm and hanging them so that the top of the mirror coincides with the top of the door frame.
This size allows you to hang the mirror not right next to the sink. And the distance remaining to the ceiling can be filled with a shelf or a small wall cabinet.
The lower contour of the reflective surface is also important. The optimal height from the floor is 100-120 cm. It provides comfort for both adults and children.
The installation height of a small mirror is calculated using the formula:
- Eye level + 5 cm.
- Let's say a person is 170 cm tall,
- His eye level will be 150 cm,
- Therefore, the mirror must be hung at a height of 155 cm.
- If the canvas is in a frame, then when hanging it is necessary to take into account its width.
Mirror styling: master class
It would be unfair to leave you without an interesting idea for decorating a mirror, so I offer you a master class that will certainly appeal to lovers of the Mediterranean and Egyptian style. The main technique used is painting, so feel free to arm yourself with brushes and let’s get started.
Finished mirror in a painted frame
Ethnic motifs are difficult to imagine without an abundance of beads and glass beads, but for a bathroom this option is a failure; after just six months, the relief surface will be covered with a layer of dirt that is difficult to remove.
Is there a way out? Eat! I decided to cover my brainchild with a layer of epoxy resin.
Egyptian motifs themselves determined the color direction of the design: black, light and dark gold.
If you have a large mirror in your hands, do not start working without a sketch. A little prep work will save you from rework and wasting time and materials.
Necessary materials
Materials:
- black artistic acrylic;
- dark gold;
- contours (I took the Marabou brand);
- mother of pearl (when mixed with gold it allows you to get a lot of shades);
- glossy acrylics;
- glue;
- stained glass paints;
- glitters;
- tassels;
- gold leaf;
- glass beads, beads;
- epoxy two-component adhesive;
- syringes;
- alcohol for diluting metallic acrylics.
Working with epoxy glue requires an absolutely flat surface. If you don’t have one at your disposal, you will have to level the table.
- The edge of the cut mirror (about 10 cm) was matted using sandblasting. This is the only procedure that was entrusted to glass workshop specialists. I covered the center of the mirror with film.
- Having placed the mirror on a leveled table, I thoroughly washed the location of the decor (the same 10 cm around the perimeter). Before applying the adhesive base, I recommend walking the surface with alcohol.
- Armed with a foam sponge, I paint the edging with gold paint, which creates an opaque, dense coating. I consider a sponge to be the optimal way to apply paint; it not only gives an even coating, but also significantly saves material.
- I dry the painted surface with a hairdryer and reapply golden paint.
Creating a background
If you value your instrument, wash your brushes immediately. Acrylic paint tends to “hide” at the base of the pile, mercilessly bringing the demise of brushes closer.
- I squeeze out black paint around the perimeter of the mirror and go over it with a sponge.
- Using a ruler, I mark the border into squares and secure the borders with paper tape. For this job, I recommend using window tape, which will not damage the paint.
- The design of the mirror involves the use of glass beads; for my masterpiece I took three shades: brown, light and dark gold. When it comes to using glue, you have a choice; it can be silicone glue or special glue for rhinestones. I chose the second option, applied it in a thin layer to the surface and let it “set.” Each corner of the mirror took 5 small bags of glass beads.
To prevent damage to the laid out glass beads, spray it with hairspray, for example, the most common “Prelestya”.
- I use a gold outline to go around the previously marked lines. If you lack clarity in your movements and your hand is trembling, place a short ruler and rest the tube on it. After removing the tape, I send the mirror to dry.
Laying out bugles
- After the mirror has dried, you can begin preparing the epoxy resin. My mirror required 200 ml of resin and a full jar of the hardener that came with the kit. Remember that you can only stir the resin with a wooden or bamboo stick.
- I pour the prepared glue into the corners of the mirror, lined with glass beads, and leave it to dry for a day.
Application of hieroglyphs and drawings
- I continue decorating the mirror by tinting the fragments with gold, on which the design should be black, and proceed to the most creative stage - drawing.
- I advise you to start with simple hieroglyphs, this will help your hand get used to small movements. I redraw the hieroglyphs with a black outline. Oh yes, pay at least a little attention to their meaning, let it be positive or neutral.
- The central bottom drawing became the second most difficult for me. I make a sketch with a pencil (pastel), put gold paint on a thin brush and paint the outlines of the animals using the “double stroke” method, which creates the effect of ancient frescoes.
- I add glossy black paint to the gold paint and outline the figures. The combination of colors allows you to create the effect of darkened metal. The upper central fragment is worked out in the same way as the lower fragment.
Drawing silhouettes
- To draw silhouettes I use a brush with elastic long bristles and black paint. I apply a layer of gold on top.
- I continue to decorate with my own hands by working on color drawings; here gold leaf will come to my aid, which I glue onto a section of the mirror. I make a sketch using pastels, mix the necessary shades on a small piece of plastic/glass or a palette and draw out the shapes. You will have to act quickly, acrylic is a material that does not give you time for reflection and philosophical conversations.
These are the pharaohs and priestesses that appeared on my mirror
- To obtain natural shades, for example, skin color, I add gouache; for the body - ocher, red, white acrylic and a little dark green. I paint the remaining parts with pure colors without mixing, using the “double stroke” method.
- Having completed the drawing, I add a golden outline, decorate the images with beads and fill them with epoxy glue.
- A day later I glue the stones and refill them with epoxy glue.
Decoration with beads and glass beads
Well, the frame for the built-in or hanging mirror is ready, all that remains is to fix the structure on the bathroom wall.
How to markup
The reliability of the fastening, the convenience of users, and the favorable visual perception of both an individual object and the space as a whole depend on the correctness of the markings.
It is first necessary to determine and draw on the wall the central axis and the border of the lower or upper edge of the mirror canvas.
Apply an existing mirror to these boundaries to outline the corners. After this, make markings for the fasteners. If space allows, then simultaneously make markings for additional lighting fixtures.
It can be difficult to determine the center of mirrors with complex configurations, so it is advisable to call an assistant who will assess the location “by eye.” After the marking stage, you can proceed to choosing the method of fastening and directly to installation.
Warming up: technical question
Say "No!" fogging mirror
Having dealt with design issues, you can move on to the technical side. If you have already purchased a mirror, you can improve it by installing heating. How? More on this later.
Before you install a heated mirror in the bathroom, let's figure out why it fogs up. This is where physics comes into play and the process of condensation forming on the surface, cooling the water vapor that hits it.
As a result, water is transformed from a gaseous state into a liquid state, settling on the mirror. So, we see a scattering of small droplets that turn into unattractive streaks.
To get rid of this phenomenon, you will need to install heating on the back of the bathroom mirror. What can I use?
Heating with "warm floor"
- Electric floor heating system . Sold in the form of mats 0.5 m wide, the length is determined by the size of the mirror. The minimum length is 1 m, so this method is not used for small mirrors, but is relevant for built-in mirrors and mirror walls. The mat is installed on the wall and glued using tile adhesive, a section of the wall is puttied and only after drying the mirror is fixed. The connection is made via a thermostat.
Cable underfloor heating system
- Film electric floor . There is a significant advantage to using this method - the film can be glued directly to the mirror. But among the significant disadvantages it is worth noting open end heating elements that require additional insulation. It is better to make the connection outside the bathroom, leaving only two wires near the mirror.
To prevent the bathroom mirror from sweating, purchase a special film (price - from 2,200 rubles)
- Infrared film floor . The principle of its operation does not differ from the two methods described above. However, it can only be used in large bathrooms, where the mirror is located at a considerable distance from the water.
Connection diagram
If you are planning a DIY installation, choose a special heating system that is the safest for the bathroom. A film with outgoing wires is glued to the mirror, the wires are connected to a thermostat, the latter can take on the role of a step-down transformer.
A mirror wiper with a rubber suction cup can easily solve the problem without heating.
Safety requirements when hanging mirrors
A mirror is perhaps the most dangerous piece of furniture.
- Firstly, it may fall and crumble into small fragments;
- Secondly, glass is quite heavy and can injure a person.
Therefore, when installing mirror panels, it is important to follow safety precautions. These include:
- Reliability of fastenings;
- No chips or other damage to the glass edge;
- Tight fit to the surface of a wall or other solid base.
Advice: before mounting, it is advisable to cover the back surface of the mirror with a special film, which in case of an emergency will prevent the glass from shattering into pieces.
Wardrobe with mirrored fronts - the perfect combination of different functions
A set of wall mounted bathroom mirrors will rob you of valuable storage space. However, you can combine the two functions into one by choosing a cabinet with mirrored fronts. Thanks to this equipment, you will have an ideal place for cosmetics or chemicals and you will optically increase the space.
A bathroom mirror connected to a cabinet can be used above the sink. If the room is very small, choose a small closet. A depth of about 20 centimeters is suitable - this will allow you to place the necessary bottles of cosmetics.
You can also hang a cabinet with mirrored fronts directly above the toilet. This will give you a place to store chemicals. A cabinet with mirrored fronts above the toilet will allow you to use a mirror of any size. Hanging glass will no longer serve as an extension to the interior.
- If you don't have enough storage space, choose a cabinet with a mirror front. A model with a depth of about 20 cm can be used above a sink or above a toilet.
A mirrored cabinet in the bathroom is a very practical solution.
Tips for harmoniously arranging mirrors in the bathroom
Aesthetics are affected not only by the height of the mirror, but also by its position in space. It is important to equip the bathroom so that the mood is not spoiled by the contemplation of an unkempt and inconveniently located mirror.
- The ideal option is a mirror in the center of the wall, and shelves and cabinets are placed so as not to block visibility, that is, below, above or to the side of the reflective surface.
- Beautiful framing, good lighting, free access to hygiene items - all this must be taken into account at the stage of choosing a mirror.
Careful planning and proper arrangement of interior items is the key to ensuring that one of the most visited places in the house will be comfortable and harmonious.
Frame
You need to pay attention not only to the material from which the mirror itself is made, but also to the material of the frame. The bathroom is a place with high humidity, where not all materials will feel comfortable. Give preference to frames made of stainless steel, chromed metal or plastic. As we have already said, you can choose a mirror without a frame, especially since it will fit perfectly into any bathroom.
Separately, you need to focus on wooden frames, since this material is especially susceptible to water. Choose frames only from natural wood, which has been treated with a special water-repellent solution, or from moisture-resistant chipboard.
1/3
2/3
3/3
Photo of the ideal placement of a mirror in the bathroom
Advantages and disadvantages
The placement of the mirror above the bathroom has its strengths and weaknesses. The advantages of such an installation include:
- Effective use of the free wall above the bathtub. This allows you to save wall space in living rooms and use them from a more practical side (installation of shelves, wall cabinets, racks, etc.).
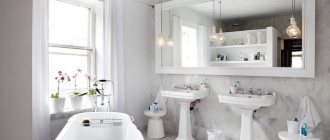
- Visual increase in space. Using a large mirror above the bathtub in small rooms allows you to expand the space. It looks especially advantageous to have two mirrors - above the sink and above the bathtub.
- Several location options. The large area of the wall above the bath allows you to experiment with the placement of the mirror. It can be located horizontally, vertically, or at an angle.
- All family members have the opportunity to see themselves in full growth. The standard placement of a mirror above the washbasin usually allows a tall person to see himself up to the waist, and a short person to see himself up to the shoulders. The mirror above the bathroom can have such a location and size that it will reflect the full height of any family member.
- Additional conveniences during hygiene procedures. The ability to shave, apply masks, and perform other manipulations in front of a mirror directly while taking a shower or bath is a big plus.
- An abundance of shapes and design solutions. The absence of size restrictions allows designers of such mirrors to experiment to the maximum. The mirror can have a traditional shape (square, round, oval, rectangular), or it can be more original (wavy edges, irregular shapes, silhouettes of animals or plants, etc.).
- A large mirror allows you to hide the imperfections of the wall panel.
Despite the large number of positive aspects, it is important to pay attention to the disadvantages of this arrangement of equipment:
- The need to frequently wipe the mirror, since constant contact with water will lead to streaks and drip marks.
- Installing a large mirror close to the top edge of the bath makes it impossible to seal the joints. The lack of overlap at the joints leads to water penetration under the bathtub and the appearance of dampness.
- The possibility of using a mirror directly during water procedures appears only with the installation of a special heating system, which significantly increases the cost of the product and the work on its installation.
- Most people prefer to use a mirror above the vanity and may have difficulty positioning the element above the bathtub.
How to make a countertop for a sink with your own hands? Read in this article.
Advantages and disadvantages of a corner sink with a bathroom cabinet.
Mirror installation process
The installation procedure for the product depends on the selected installation method.
Glue mount
The advantage of this method is that there is no need to use fasteners that may be visible on the front of the mirror.
Special liquid nails or adhesive-sealant are used as fasteners. You need to choose only those compounds that are suitable specifically for fastening mirrors.
Any unsuitable glue will damage the surface of the mirror or not provide a reliable result.
Before gluing, it is necessary to apply putty and primer to the wall surface. It is prohibited to mount the mirror on top of acrylic paint and plaster, as they have a negative effect on the moisture-resistant coating. If installation is planned to be carried out over tiles, then it must be thoroughly cleaned and degreased.
The glue should be applied to the back surface of the mirror, after which the product is pressed against the wall for 10-15 minutes until the glue has completely hardened.
Screw mounting
This fastening method is chosen when the product weighs significantly. Screws can be included with the mirror or purchased separately. The number of screws is calculated based on the size and weight of the mirror.
In addition to the screw and dowel, rubber gaskets must be available. Also, to achieve greater aesthetics, you should use special decorative plugs that best suit the style of the bathroom.
If the mirror is sold with ready-made holes for fastening, then all that remains is to attach it to the wall with screws. The absence of such holes greatly complicates the task.
You can drill them using a diamond drill of the required diameter. While drilling, it is necessary to constantly cool the surface of the mirror so that it does not crack. The resulting holes should be sanded.
Be sure to use rubber gaskets on the back side between the wall and the mirror, as well as between the mirror and the plug on the front side of the product.
How to decorate a bathroom using shelves with a mirror and lighting? Read the link.
Advantages of waterproof lamps for bathrooms over conventional ones.
Is it possible to place a washing machine under the sink? https://vannaja-komnata.com/tehnika/stiralnaya-mashina/s-rakovinoj-v-komplekte.html There are special kits. Find out about them by following the link.
Layout
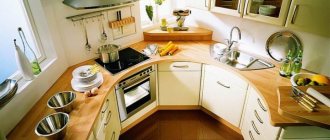
Niches in the kitchen in a panel house are becoming increasingly common. Most often they are made in the wall, but other options are possible.
A built-in niche in an apartment in the kitchen is practical and convenient if designed correctly. When determining the size of the “cache,” be sure to take into account the area of the room.
There are practically no apartments with an original layout in which the kitchen area does not include a window. This result can be achieved through redevelopment.
Usually a window in a kitchen room is sacrificed when:
- there is a need to allocate a compact but isolated additional room in the kitchen;
- there is a need to separate the walk-through kitchen area from the living area in a studio apartment or apartment with an open plan;
- the kitchen is moved to the corridor, creating a living room in its place;
- the kitchen area acts as part of the living room and needs to be hidden in a niche.
A kitchen in a niche without a window in a new building must be ventilated. It is impossible to do without natural lighting - these are the requirements of SNiP. When including a kitchen niche in your project, analyze all the pros and cons.
If desired, a recess in the wall can be designed above the door, in a corner or near the sink. If the rooms in your apartment are small, consider one of these options
Take into account the fact that the minimum size of a niche for convenient placement of all kitchen items should be 5 square meters. m
Preparatory stage
Before installing a mirror above the bathroom, it is important to understand all the intricacies of choosing the piece of furniture itself, as well as the features of its installation and surface preparation.
If you initially plan to install a large mirror mounted into the wall, then you must leave space for the product when laying the tiles. Accordingly, the mirror itself must be purchased in advance to determine the size of the recess. The surface allocated for the mirror panel must be perfectly level.
If the thickness of the tile together with the glue is large enough, then there is a risk of obtaining the effect of a recessed mirror. To avoid this effect, you need to attach special strips under the mirror that will allow you to adjust the installation level.
Taking into account a person's height
If you decide to hang a mirror above the bathroom, then give preference to the one that is as large as possible. Hanging a mirror above the bathroom, in which you won’t be able to look full-length, is pointless. You can give preference to vertical mirrors that will go from floor to ceiling.
It is advisable to make a full-length mirror.
What you need to know before buying
There are a few things to consider before purchasing a large bath mirror. First you need to choose a mirror. First, pay attention to moisture resistance. On the front side it is unlikely to deteriorate, but on the back there should be a special coating.
The bathroom mirror must be moisture resistant.
It is very simple to determine whether the mirror has the necessary moisture-resistant composition; the back side should be blue or green. This is a special coating film that prevents damage. But if the back wall is purple, then such an element is not at all suitable for a bath.
The reverse side should have a blue or green coating.
Before purchasing, measure the wall above the bathtub so that the mirror does not turn out to be wider or taller than itself.
The mirror must fit the size of the wall.
Check all fasteners and the surface of the mirror itself for defects. Even a small chip can lead to a large crack and ultimately failure.
The mirror itself must be free of defects and chips.
Advice. If you are purchasing a framed mirror, be sure to note that the frame must also be moisture resistant. The wooden version is not suitable at all; over time it can swell, which will render the frame unusable.
The frame should also be waterproof, not made of wood.
Common installation methods
In fact, we need to fix a glass sheet of certain sizes on the wall; a reflective surface is an additional option. There are several methods, but there are 2 general directions, this is removable, when the glass is mounted in such a way that it can be removed and a stationary mount.
Removable option
Here the instructions are extremely simple; this option is often chosen, since it can be done much faster. If necessary, the mirror can be dismantled, plus it does not require deep professional knowledge.
Set in natural wood.
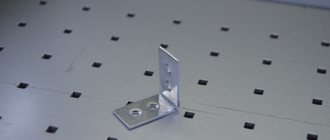
Most of the ready-made headsets sold are equipped with special loops or holes for fastening. The owner just needs to drill a hole in the wall and secure the set. You should start as usual with markings; to do this, just attach the frame to the wall and mark the mounting points.
After this, construction tape is glued to the location of the future hole; it is necessary to protect the tile from splitting. The drilling point needs to be punched, that is, a small notch must be made. Next, using a conventional drill with a Pobedit drill bit, a hole is made and a dowel is inserted, an anchor or a special fastening screw is screwed into it, on which the structure is hung.
Location of headset parts.
Stationary option
This installation is carried out once and until the next mirror replacement, it will most likely not be possible to remove the sheet without damaging the surface.
If you want to make the sheet recessed into the tile, then the thickness of the glass must be selected in accordance with the thickness of the tile, this is 6 - 10 mm. After this, the tiles are knocked down, the surface is cleaned and puttied. We will glue it using tile adhesive. It is applied with a notched trowel with a tooth height of 6 mm, without gaps, in a continuous ball. (See also the article Sealant for sewerage: features.)
Bookmark in tile.
You can stick a border along the contour, crosses are placed between the tile and the sheet, after which the sheet is pressed tightly and fixed for 10 - 15 minutes. The next day, when the glue has set well, you will need to pull out the crosses and rub the cracks.
In the video in this article you can familiarize yourself with materials on this topic.
Modern tendencies
The times when all mirrors were simple and of little functionality are long gone. The modern consumer has the opportunity to purchase a non-trivial mirror model for the bathroom, complemented by various functions and configurations. You can choose an ultra-modern version with Ambilight lighting or Bluetooth speakers.
A smart touch mirror with built-in speakers and microphone might be interesting. With such an amazing device you can listen to music, view photos or videos. The smart mirror synchronizes with other gadgets. When turned off, such a device will turn into an ordinary mirror without unnecessary functionality. Such options are not only multifunctional and useful, but also attractive. With such a detail, the bathroom interior will sparkle with new colors, become more expensive and modern.
A mirror equipped with built-in sockets will be useful. These options are convenient when there is a need to use some kind of electrical appliance in the room, for example, a hairdryer or curling iron.