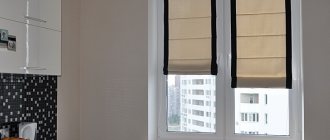
Roman blinds are popular among connoisseurs of modern and stylish window decor. They come in various sizes and colors, and delight buyers with all their qualities except the price, but this is not a problem for those housewives who love and know how to make things.
As it turns out, sewing Roman blinds with your own hands is not very difficult, the main thing is to be patient and have the necessary materials. We will tell you how to make them in this article with a detailed master class. Of course, you can order curtains to be sewn in an atelier, but the things that we ourselves make for our home carry a special, positive energy. Don’t be lazy and read the article carefully and to the end, and then you can create your own masterpiece.
How to take measurements correctly
Making Roman blinds at home is not that difficult; the main thing is to choose the right material and take accurate measurements. The measurements also affect the amount of fabric needed. So, the frames can be installed both inside the opening and on the wall above the window. We measure the height and width of the window where the curtains will hang and add 5-7 cm to the sides, and about 10 cm at the top and bottom to fix the weighting material.
In order for the folds to be even and the distance between them to be the same, you need to calculate it correctly. To do this, use the approximate calculation table. We determine the number of folds by eye, divide the height of the curtain by their number and get the distance between them, it should be no more than 30 cm.
Table of approximate calculations of the number of folds on the curtain and the width between them
What you might need
To make Roman blinds, you will need the necessary materials and tools that you will need to buy in advance, and perhaps something from the list will be at your home.
- Fabric, thread, scissors, needles.
- Tape measure for measuring and cutting.
- Wooden or plastic weight strips.
- Velcro tape for fixing the canvas on the cornice.
- Rods made of wood, plastic or metal that will pierce the curtain and form folds.
- Plastic rings, there should be two or three rings per twig.
- Nylon cords: 3 pieces, 2 of which are twice the length of the curtain, the third is the length plus the width.
Prepare fabric, a sewing machine and all the necessary tools and accessories for sewing Roman blinds
Required Tools
To sew Roman blinds for windows yourself, you must have:
- a piece of fabric from which you will make a curtain. If your goal is thicker curtains with good light protection, also purchase lining fabric;
- a wooden plank, the length of which should be equal to the expected width of the product, the width should be 5 cm, and the thickness should be about 2.5 cm;
- thin wooden or metal slats that will be sewn horizontally into the fabric. Their length should be a couple of centimeters less than the width of the fabric, and the number depends on how many folds you want to make on a classic Roman blind;
- weighting agent - a wooden block or metal plate with a length equal to the width of the curtain;
- lace made of synthetic material (best nylon). Its size should be no less than the length of the curtain, multiplied by 5 times;
- furniture stapler;
- a roll of Velcro tape;
- a skein of finishing border, about 2 - 3 cm wide;
- plastic or metal rings;
- cord retainer (bracket or hook);
- needle, thread, scissors;
- sewing machine.
Step-by-step instructions for making lifting curtains
Now that everything is ready to make your own Roman blinds, you can safely start sewing. Detailed step-by-step instructions accompanied by informational photos and videos will help you with this.
1. Take measurements of the window and buy the required amount of fabric. You can sew your curtains in one layer of fabric or in two. This depends primarily on the density of the fabric; if it is thin, then it is better to sew a double fabric. Then you will need twice as much material.
2. Calculate the number of folds according to the height of the opening to sew curtains that will suit your window.
3. Cut out the product as shown in the photo. Don't forget to leave allowances for finishing the edges. There should be a large allowance at the bottom, as this will later be a pocket for the weighting material. From the inside out, mark the places where the rods will be inserted and the plastic rings will be attached.
Approximate pattern of Roman blinds. For your window, the height and width of the product may vary, but the recommended allowances should be adhered to.
4. Cut out the workpiece and trim the edges with a double hem. You can also use spider web adhesive tape, which glues the fabric together with a hot iron.
Fold the edge of the product along the marked line and stitch. Iron with a hot iron for greater precision.
5. If you have a double curtain, then fold the two parts with the right sides inward and sew them together, leaving one edge unsewn.
6. Now you need to make special drawstrings for inserting frame rods. To do this, you will need specially cut strips of fabric or ready-made border braid. We sew it like a pocket on three sides, leaving one unsewn so that the pins can be easily removed before washing. The rods should be smooth and easily slide over the fabric, so it is better to choose them from plastic or metal.
According to the marks for the rods, sew pockets for those same rods
7. Having marked the location of the rings, sew them to the pockets by hand, they will serve as the basis for the lifting mechanism. Attention! There should be as many rings for threading cords as you think necessary, but the curtain should be easy to lift.
The photo shows how to properly thread nylon cords to lift curtains
8. Sew one part of the Velcro to the top edge, and glue the second to the future cornice.
9. Fold the bottom edge so that you get the same drawstring where the weight strip will be threaded.
10. Thread the cords into the rings from bottom to top, bring them out to the outer ring with the shortest cord. Tie all the cords into a knot, and roll the curtain itself and tie it with a ribbon.
To prevent the cords from falling out or coming apart, tie them into a knot and secure them at the bottom
11. Fix the cornice in the form of a strip to the frame or wall above the window, depending on where you planned to hang your DIY frame. On plastic windows, if the curtain will be attached to the frame, the curtain rod can be hung using double-sided tape.
12. Hang the Roman shade on the curtain rod using Velcro. Remove the tape and adjust the tension level of the lifting cords, check the serviceability of the mechanism. Tie the cords into a knot at the top and bottom and trim off any excess edges. In order for the curtain to remain at the desired level, it is necessary to fix the cords on the side on a wall hook.
Step 8. Connect the lining to the front side
Place the lining on top of the facing fabric. The lining should extend 2 cm on the sides from the edges. Secure the fabric with pins. Check with a ruler whether the pocket spots match the front side.
Fold the bottom part of the facing fabric in half to form a pocket for the weighting material. Cover the resulting pocket with a lining on top.
Hand sew the lining to the facing fabric using a hidden seam.
Sweep the corners, but so that there is room for inserting the weighting agent.
The lining in the corner should not be completely sewn. This will make it possible to insert and remove the weighting material.
Fold over the top part with Velcro and sew it also using a hidden seam.
Converting old blinds into Roman blinds
Plastic blinds have long been out of fashion; many people had them on their windows at some point in time, and they always broke quickly. So, if you or your relatives have such unnecessary blinds, then you can give them a second life by turning them into homemade Roman blinds.
You will learn how to make Roman blinds from old blinds by reading the detailed description.
1. As in the previous case, we take measurements of the window, note that the width of the curtain will be the same as that of blinds, but the length may be the one you need.
2. Cut out the cut part and finish the edges with a hem with a stitch or using adhesive tape. Here you don't need a large allowance on the bottom edge, as it will be folded under and glued to the placket. We sew the product slowly, taking into account all the nuances.
To prevent the cords from falling out or coming apart, tie them into a knot and secure them at the bottom
3. Blinds need to be rid of unnecessary slats, leaving as many folds as you plan to make. To do this, you need to remove the locking lock from the cords, untie all the knots and remove unnecessary strips. You will need approximately 6-7 of them, depending on the height of the window. Trim off any excess rope.
Having untied all the interfering knots, we free the ropes from excess slats
4. Fold the top edge and sew one piece of Velcro onto it. We glue the second one onto the curtain rod.
5. Apply glue along the marked lines and glue the slats to the frame, fold the bottom edge and also glue it to the weighting material. Remember: the distance between the slats must be the same.
Glue the plastic slats to the fabric and let the glue dry
6. We hang the finished product on the window opening. Check the serviceability of the curtain lifting mechanism and enjoy the new decorative item you have made yourself in your home.
Once you are sure that the parts are glued securely, the product can be hung on the window
homemade cornice
homemade cornice
Hot glue the hard part of the Velcro tape to the bottom edge of the fabric-covered block. To be safe, you can go around in several places with a stapler:
I attached fasteners to the back of our block so that the block could be hung on the wall. But this method is only suitable if your curtain will hang outside the window opening. To fasten the bar inside the window opening, it is better to use corners.
If there are men in the house, they will figure out how to do this:
That's it, our homemade cornice is ready. And we will attach our curtain to it with Velcro tape:
Now we insert the weight strip and slats into the curtain pockets:
This is what the curtain looks like from the inside out now:
Decorate the top and bottom edges
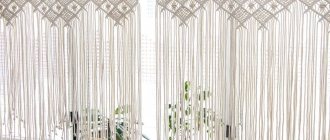
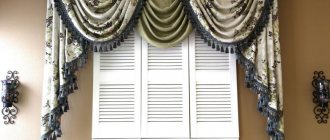
To prevent your Roman curtain from looking boring and monotonous, we suggest considering several ways to decorate it. So, the top edge can be decorated with a traditional lambrequin. Moreover, it can be both hard and soft, with both a straight edge and an oblique one.
To make a solid lambrequin with your own hands, you will need a rigid base, it can be in the form of thick cardboard. We are making a pattern for the decoration, keep in mind that this type of lambrequin should be long and completely cover the upper part of the side edges of the Roman canvas. We cut out the blank, use glue to place the fabric on a cardboard base of the same shape. Let the structure dry. To install a Roman blind with a lambrequin, you will need a special double cornice, which you can make yourself or order from a specialized store.
A solid lambrequin gives the image a strict and complete look.
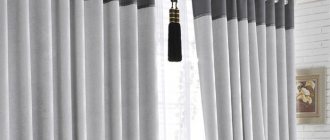
With a soft lambrequin the situation is simpler. Its production does not require much effort and time. To do this, first decide what shape it will be, perhaps even from another similar fabric. You can make a simple lambrequin in the form of a long flounce along the entire width of the curtain. Or it will be a decor in the form of a strip of fabric hanging beautifully in the center, and its edges on the sides. In general, your imagination has no limits and you can come up with a completely extraordinary way of decorating.
It is more common for us to decorate the upper part of curtains of any type, but everyone has forgotten about the lower part, but we have not. That is why we will tell you and show in the photo how to do it beautifully and tastefully. For a rustic-style kitchen with the presence of strict Roman blinds, which you even sewed yourself, a certain cold appears, and to melt it, decorate the lower edge of the canvas with romantic wide lace or flounce made of the same fabric. Tassel fringe, to your surprise, is a great way to add variety to the traditional look of lift curtains.
Methods for attaching strips to fabric
It is precisely at this point that you need to pay special attention. The appearance of the Roman blind will depend on how you secure the duplicating fabric, as well as sew on the “pockets” for the rigid rods. First, let's look at how to sew on the pockets. The easiest way is to sew ready-made tape or strips of fabric (with hems). But in this case, the seams will be visible on the front side and, moreover, they will probably “wrinkle”. Decide for yourself whether such a curtain will look beautiful.
But, nevertheless, such a method, as in this figure, will be less noticeable. In any case, there will be only one securing stitch on the front side. In addition, you can secure this area not with a seam, but with a double-sided web, then the front part of the curtain will be completely without seams. And so that the edges do not bend into a hem, you can connect the side seams of both panels and then turn them out. It will be enough just to iron these seams and you don’t even need to finish them with stitching. Decide for yourself which option suits you best.
Why housewives choose Roman blinds
A unique way of decorating a window has been known since the times of Ancient Rome. Both self-sewn Roman blinds and ready-made ones from the manufacturer have gained popularity these days. But why did they love them so much? How were they able to get ahead of traditional plastic blinds? Let's figure it out.
- Roman blinds are suitable for small rooms and equally small windows.
- They take up little space and allow you to fully use the window sill, unlike classic long curtains.
- Easy to care for: they do not require frequent washing and are suitable for dry cleaning using a rag and a vacuum cleaner.
- They free up the approach to the window and make it possible to place a sofa or bed near the window, when this would cause inconvenience with long curtains.
- Easy to hang and take off.
- They are economical to make yourself, as they require less fabric than regular curtains.
As you can see, there are no obstacles to sewing Roman blinds with your own hands, so feel free to get down to business.
At first glance, Roman blinds seem to be a simple and inconspicuous decorative element. But once you choose the right fabric and color, a window with such a curtain becomes a real asset