Crafts made from napkins are perfect for any holiday, because they are unusual, creative, and most importantly convenient. This material is very easy to work with and can be purchased at any store. It is worth noting the variety of bright colors, because they give a feeling of celebration and the opportunity to show your artistic style. In this article we will look at how to make crafts from paper napkins with your own hands. And also at the end of the article you will find a whole gallery of photo instructions on how to easily, quickly and interestingly fold fabric napkins.
Applications for the little ones
Even the smallest children can handle creating paintings using the appliqué technique. If you devote a little free time to these crafts from napkins, kindergarten with its endless competitions and exhibitions will no longer take the family by surprise.
The main principle is to tear off pieces of napkin, roll them into balls and glue them according to a pre-prepared template or freely.
Bright monograms and animal figures
A multi-colored monogram decorated with bright napkin balls will be an excellent decoration for a child’s room.
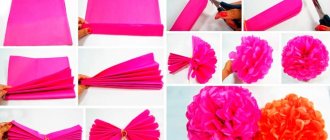
Decor of this type can also be used in the living room with the first letter of the family's surname applied. The technique of rolling thinned paper can be used to make various animal figures on a plane. To make a simple craft, you will need a sheet of cardboard, multi-colored napkins, and PVA glue. First of all, we make a sketch. If it is a monogram, we draw curly letters and make slits. Prepare paper lumps. It's better to make them as small as possible. This will make the craft seem more magnificent. We attach the pieces of napkins randomly or according to a planned plan. On the back side of the monogram we add a cord and hang the bright product in a visible place.
We transfer the animal figurine through a stencil onto cardboard. Now we mark the drawing and determine the location of each multi-colored ball. Unfold the napkins, cut them into squares and roll them into balls. We distribute them in the picture according to the diagram and glue them. Pre-glued ears, eyes, and noses will look beautiful.
Sequencing
- On a sheet of cardboard, use a simple pencil to draw the outlines of future branches.
- Cut the napkins into squares with a side length of 3 cm (you can carefully tear them).
- Crush each square into a tight ball.
- Cut out lilac stems and leaves from green paper and stick to the base.
- Coat the base with lilac flowers, stick paper lumps. Make sure there are a lot of them and they are located tightly.
- Do the same with white flowers.
- The application is ready.
You can do a similar job, but place the lilac branches in a vase. Then at the preparation stage you will need to draw its outlines and stick on a vase cut out of colored paper.
Carnation
A similar technique is used to make cloves. The work is done with white napkins, but the edges of the “accordion” must be colored red, blue or pink using a felt-tip pen. This small touch will give the carnation craft a special charm.
It makes sense to fix the finished flowers on a stem, so they will make an excellent composition.
Group work
A good option for keeping a small group busy or organizing work in groups would be group crafts made from napkins for children.
How to organize group work
You need to prepare templates with simple drawings and clear outlines. It would be better if these were coloring books for kids without small image fragments. Think in advance about what colors each part of the design will be laid out and prepare napkins of these colors.
All that remains is to distribute the colors (and tasks) between the children and joint creativity can begin. Each child is given napkins of the same color, and an area of common work is specified.
Master class for children from one year old
- Prepare white and blue cardboard and white napkins.
- Cut three circles of different sizes from white cardstock and glue onto blue cardstock to create a snowman.
- Together with your baby, tear the white napkins into small pieces.
- Spread the entire surface of the snowman generously with PVA glue.
- Throw white napkins randomly over your work.
- After drying, brush off excess pieces of napkin and use a marker to draw eyes, a nose and a bucket for the snowman.
- The work is ready.
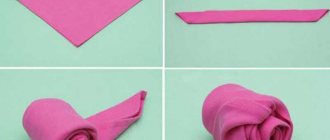
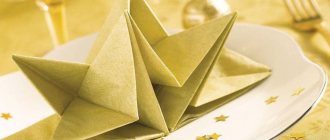
Water lily assembly diagram
These crafts are created from paper napkins like this:
- Unfold the napkin in one layer, bend and straighten it diagonally.
- Fold all corners of the figure towards the center.
- Fold the resulting corners towards the center again.
- Repeat this action again (for the third time).
- Turn the workpiece over and bend all corners to the center.
- Turn the workpiece over. For convenience of further work, place it on an inverted cup.
- Bend all corners sequentially from the center to the edges.
- Remove the flower from the glass and, if necessary, straighten the petals further.
- The water lily is ready.
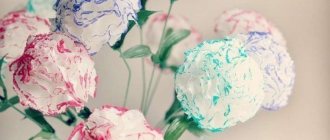
Air poppy
A red poppy can be made as follows:
- Cut petals from red napkins;
- There is a small circle in the middle of the black bag;
- Make small circles from green paper that will be on a cellophane base;
- Fold and fasten everything one by one: red petals in a checkerboard pattern, black and green circles - fluff everything up.
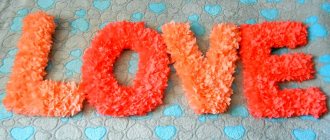
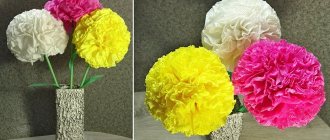
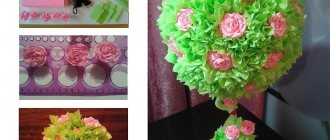
Options for using fluffy flowers
The photo of crafts made from napkins shows some options where such flowers can be used:
- voluminous souvenir baskets;
- postcards;
- panels and applications;
- wreaths on the head for themed holidays and matinees.
Often such flowers are associated with carnations, so they are used in creative projects for the May holidays. But not only.
Ballerina
The first master class is a ballerina. Looking at such a craft, it seems that it is the work of a real master.
You will need:
- Thin wire - about one and a half meters.
- Napkins (preferably plain, but you can choose any).
- A thread.
- Scissors.
- PVA.
I suggest watching a video on this topic.
Manufacturing:
- We weave a skeleton from wire. To do this, we need to divide our wire into several parts: long (about 90 cm) and short (40 cm). From the long one we form the legs, back and head, and from the short one – the arms.
- Now that there is a skeleton, we make it a little more human-like. We tear the napkin into small long pieces and paste them over our base.
- In order not to wait for the torso with the “muscles” to dry, we make a dress. It can be molded into a lush one - this will look more impressive. To do this, make a couple of flounces, which you then attach to the “waist” of your ballerina. All that remains is to decorate it the way you want.
Holiday decorations - numbers
Large volumetric numbers symbolizing the age of the birthday person are very popular. Photos with them are always spectacular.
To make any number you will need:
- cardboard (boxes from household appliances work very well);
- regular or masking tape;
- pencil and ruler;
- scissors and stationery knife;
- stapler;
- napkins;
- PVA glue or “Moment”.
Decor elements
Using toilet paper rolls, you can make incredibly beautiful decor for wall clocks, mirrors or paintings. Believe me, such artistic compositions will definitely amaze your friends and loved ones.
Instructions for creating numbers
- Make a three-dimensional frame. Draw out the number template in duplicate, the side panel is a strip of cardboard of equal width. Glue the structure with tape.
- Prepare a sufficient number of fluffy flowers from napkins as described above.
- Glue the flowers to the frame.
The number is ready. Additionally decorated with ribbons, bows, crowns and memorable symbols for the birthday person.
Musical instruments
You can build your own musical instruments, or, more precisely, musical equipment: a microphone or create “the sound of rain.”
It’s easy to make a microphone, first – take and pull out an egg, dry it and cover it with dark varnish and, thanks to glue, attach it to the sleeve.
To create noise (which will resemble rain), you need to close the passage in the sleeve and pour in any cereal - rice, buckwheat, small pasta and close the other hole. Now everything is ready.
Volumetric roses on stems
Another option for making crafts from napkins with your own hands is a bouquet of roses. To make it you will need:
- napkins of different colors;
- knitting needle or thin pencil;
- wire;
- green corrugated paper.
Note!
- DIY paper crafts: TOP-200 photos of exclusive ideas and craft options
- DIY paper origami craft step by step: ready-made diagrams for creating beautiful origami at home (90 photo ideas)
- Crafts from paper and glue for children: step-by-step instructions for creating interesting crafts with your own hands (90 photo ideas)
How to make a rose
Depending on the size of the finished flower, the napkins need to be cut into squares of different sizes (or not cut at all if the rose is large). Wind each square halfway onto a knitting needle, then squeeze it from the edges and remove the knitting needle. Make 6-10 such blanks.
Wind all the petals one by one onto the wire, opening them more and more as the flower grows. Secure the workpiece with a strip of green paper. Wrap it around the entire length of the wire, imitating a stem. If desired, weave several sheets. The rose is ready.
Gift packaging
If you want to give small gifts to your friends, then you can come up with original packaging for them. To do this, you need to bend a toilet paper roll on the sides in the shape of a crescent, and then simply add decorative elements. These can be beautiful ribbons, strands, sparkles and other elements.
Where to put roses
You can't make a reliable rose stand out of napkins. You can continue your paper creativity and make a vase using the following technique:
- simple origami;
- modular origami;
- decoupage
Either glue it together from cardboard or use a real vase.
Advent calendar
Every year the tradition of making advent calendars becomes more and more popular. Most often they are made for children to make the anticipation of the new year interesting. To do this, you need to make separate cells according to the dates of the month. And then put various goodies and small surprises there. Why not use toilet paper rolls instead of cells?