Not all needlewomen know that you can decorate the interior or prepare an inexpensive gift for your family or close friends using ordinary paper napkins. Decorations for the holiday table, New Year's toys, snowflakes for the Christmas tree, origami animals, Christmas decoupage and other decor are just a small part of what can be made from this simple material. Detailed and step-by-step master classes, as well as visual photos presented in this article will help you quickly and correctly make crafts from napkins with your own hands. Your children can also participate in this exciting process, since a common craft activity not only brings the family closer together, but also contributes to the development of the creative abilities of your kids.
Flowers
Crafts from paper napkins for children are easy to make. For example, decorate elegant flowers.
Step-by-step process for making them:
- Fold an accordion out of a regular napkin so that each fold is 1 cm. For accuracy, it is recommended to mark the craft on both sides.
- Without unfolding the created configuration, you need to place it on a flat surface with the flat side and bend it in half to see the middle. Along the middle bend, you need to tie the workpiece with a strong thread.
- Round off the free edges of the accordion using scissors.
- At the end, the inflorescence should be fluffed, and the folds should be connected together with glue to form a corrugated circle.
- If desired, you can attach several flowers of different sizes to each other.
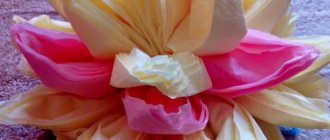
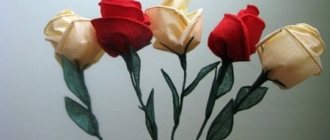
Master class on making an elegant rose:
- Take a single-layer source material and cut it into 4 identical segments. Bend one of them in half and twist along the short edge into a weak cylinder. Tie it with a thread from one edge to form the core of the inflorescence.
- Cut the remaining pieces diagonally. In the resulting triangular figure, the right corner should be bent, and the free ends should be loosely wrapped around the core and the created petal should be secured with a thread. Their number is determined during the work process.
- To make a bouquet, you need to form stems from thick wire, which you need to wrap with a strip of cellulose of the chosen color. It is recommended to attach a piece of paper while wrapping.
Step-by-step poppy design technology:
- Fold a red napkin into quarters. Cut the petals with scissors (like snowflakes) and unfold the blank with 4 leaves.
- From the pink source material, make 4 more petals in a similar way, only slightly smaller in size.
- Bend the green cellulose in four and cut out the base using a round template (4 cm in diameter).
- Then you need to cut a circle with a diameter of 6 cm from a black bag.
- Stack the red and pink pieces on top of each other.
- Cut the formed circles around the circumference, the main part should be intact.
- Place a black and then a green circle on top of the connected inflorescences. Secure them in the center with threads.
- At the end, the composition should be fluffed.
Butterfly
Step-by-step process for making a butterfly:
- Prepare a base from a regular napkin: lay fold lines along the 2 diagonals of the workpiece, then bend it in half.
- Using the laid folds, you need to form a triangle.
- Fold the ends into a triangular shape with the apex on one side.
- Turn the craft over and connect the top point to the base of the figure.
- Bend the product in half.
- Take a piece of wire and fold it in half; it should be slightly longer than the body of the insect. Wrap the cellulose material on both sides, twist it a little and form antennae. Cut off excess length.
Another option for making a butterfly:
- For the upper wings, you need to unfold the napkin fabric and form it into a triangular shape, then fold it like an accordion. Secure the center of the part with a small colored clothespin.
- The lower wing segment is made from a different cellulose material. Place it unfolded in front of you like a diamond. Fold the workpiece like an accordion, the center of which will be long and the sides will be short.
- Connect both prepared configurations, remove the clothespin and secure with colored wire.
Popular ideas from the Internet
In addition to appliqués and serving figures, the following crafts can be made from napkins:
- butterflies made of corrugated napkins, fastened with wire;
- voluminous carnations on stems;
- wire ballerinas;
- topiary in a flower pot;
- voluminous Christmas trees;
- cartoon characters.
Even a junior kindergarten student can work with materials such as napkins.
Having step-by-step instructions, it is not difficult to make an applique from napkins with your own hands. As a result of this fascinating process, you can get a nice product that can become a cozy interior decoration.
Bird
To make a dove of peace, you need to follow these instructions:
- As a background, you need to select a sheet of colored paper in green, blue or dark blue.
- Draw the outline of a bird of the world on the base. If you take a white blank, then you should make a background on it using watercolor paints.
- Cut ordinary snow-white table napkins into squares, the dimensions of which are 10-20 mm. Roll them into balls.
- There should be a large number of pellets.
- It is necessary to apply glue over the entire figure of the dove, after which it is necessary to paste it over with round napkin blanks. The layer may be uneven, but with a volumetric effect.
- You can paste an image of the globe from colored paper on the bottom.
Topiary
Have you already tried to make topiaries like this?
You will need a beautiful flower pot (plant pot), a stick for the trunk and a round foam base on which you will need to stick flowers from napkins.
Tree
Crafts from paper napkins for children can be made both in preschool and school institutions, and at home.
To design a napkin tree of happiness you will need the following materials:
| Name | Quantity |
| Newspaper sheets | as needed |
| Napkins | 1-2 packs |
| Flowerpots | 1 PC. |
| A mixture of sand and cement | small volume |
| Threads | coil |
| Rope | 30 cm |
| Thin cord | 2 pieces of 35 cm |
| Glue gun and glue | |
| Stapler | |
| Branch | 3 pcs. |
| Accessories | optional |
Step-by-step registration procedure:
- In an old bowl, thoroughly mix the cement-sand mixture with water. Pour a small amount of the resulting composition into a flowerpot.
- While the mixture is still soft, place 3 tree branches in it so that they are tightly located next to each other. Wait until the ingredients become solid.
- The hardened surface must be greased with a gun and decorated with any material on top (shells, pebbles, dry moss).
- 2 branches must be twisted around the third and secured with tape. This will be the trunk.
- After this, the stage of forming the crown of the plant begins. To do this, crumple a sheet of newspaper and then straighten it. Apply glue to the newspaper.
- Wrap the paper tightly around the top of the barrel. Wrap the crown with paper in this way to form a dense ball. It is advisable to wrap the finished configuration with thread and fix it with glue. It is important to ensure that the newspaper sphere is smaller than the flowerpot, otherwise the structure will become unstable.
- While the craft dries, you can make paper inflorescences.
- Fold several napkins in half and secure them in the middle with a stapler.
- Using scissors, cut out the shape of the inflorescence in a circle. Remove the top tier and lift it vertically. The remaining layers need to be lifted one by one, giving them a wave-like configuration. As a result, a lush flower should form.
- It is necessary to form 40 flower heads from cellulose material.
- Spread a newspaper ball with glue and attach the inflorescences to it with a light pressure of your hand. It is desirable that the workpieces fit tightly to one another.
Ballerina
Step-by-step master class on making a ballerina:
- Take a wire of medium thickness and form the outline of the doll from it: the body, the head, as well as the upper and lower limbs.
- Tear regular white table napkins into strips. Moisten the edges of long blanks with glue and wrap them around the frame of the wire figure.
- Let the craft dry. For a dress, you need to take a 3-layer colored or snow-white napkin and divide it into layers.
- Fold 1 layer of cellulose material as for forming a New Year's snowflake to form a triangular blank with sharp corners.
- The edge of the part should be rounded using scissors.
- Straighten the napkin, then fold and twist again to make the skirt textured.
- It is necessary to make 3-4 such pieces of underwear so that the figure has volume. In the last pack you need to make 3 holes (for the arms and head). Then it needs to be transformed into a dress and carefully put on the ballerina.
- Wrap the doll's waist with white thread.
- You can create pointe shoes and a tiara from white napkin material. It is advisable to decorate the crown with small beads.
heart
Crafts made from paper napkins for children can have different configurations. For example, in the form of a voluminous heart.
To complete it you will need to complete the following steps:
- Make a heart blank on thick cardboard, then cut it out.
- Make inflorescences from red and white napkins.
- The more layers they have, the fluffier the workpiece will turn out.
- Take the original material and fold it 4 times, which should form a square.
- Draw a circle on the resulting figure and cut it out.
- Secure the part in the middle with a paper clip.
- In turn, push each paper layer up, a fluffy flower will come out.
- The number of flower blanks depends on the size of the cut out heart.
- Spread the cardboard base with glue and gradually attach the fluffy parts to it.
- It is better to start the process from the edges and finish in the middle.
- If desired, you can decorate the central part in red, and lay out white inflorescences on the sides.
- When the entire base is filled with flowers, you should staple the ribbon and tie it with an elegant bow.
Necessary materials and tools for manufacturing
The most common material for crafts, due to its availability, is paper, and the most convenient for children is napkins. The latter are easily torn and crushed into lumps, which are used to fill the contours of drawings. They can also be cut or twisted into bundles, which allows you to create three-dimensional images.
By crumpling pieces of paper napkin with your fingertips, you get lumps that children use to fill in the outline of the design.
Another advantage of napkins is their wide range of colors, which allows you to create paintings in any palette. To make most applications, the following materials and tools are required:
- a sheet of thick paper or cardboard for the base;
- colored napkins;
- simple and colored pencils;
- glue, PVA or pencil;
- scissors.
Some crafts do not require additional tools.
Note! Different types of glue are suitable for different appliqué techniques.
Doll
Master class on making a Maslenitsa doll:
- Take 4 cellulose squares of different colors.
- Unfold one napkin and bend the opposite corners of the workpiece towards the middle.
- Place a ball made from a napkin inside the unfolded cloth.
- Turn the part over and place a circle cut out of white cellulose in the middle.
- Shape the doll's head into a ball shape and tie it with thread.
- Roll another napkin with a weak roller to make puffy sleeves.
- Draw the ends of the rolled figure with a thread like candy to create hands.
- Place the roller into the prepared base and secure it with a thread underneath.
- Cut a triangular shape from the raw material - this is a scarf.
- Tie a napkin and secure the ends with glue.
- For a full skirt, you can add another colored napkin at the bottom.
Star
Progress:
- Lay out a paper napkin of any color, and then fold it so that the two edges meet in the center.
- Turn the workpiece 900 and bend the remaining 2 free sides again so that they meet along the middle line.
- Bend the resulting rectangle along the central border, a dense long strip should come out.
- Unfold the paper completely.
- Fold the pulp along the visible crease lines like an accordion.
- Straighten the craft again and fold it like an accordion only in the opposite direction.
- Fix the created workpiece with wire in the middle.
- Bend all corners of the product (4 from each edge) at an angle of 450 inwards.
- Connect the ends of the accordion on both sides to form a lush origami star.
Dandelion
A cheerful dandelion can be easily made from yellow napkins. Manufacturing procedure:
- The napkin is folded several times until a square is formed (size: 5-7 cm).
- In the center, the workpiece is fastened with staples using a stapler.
- Using scissors, all layers are cut along the fold lines.
- A circle is formed from the squares.
- Numerous cuts are made along the entire perimeter, and the workpiece is fluffed. The flower is fixed on a wire stem. It is better to use copper wire with green insulation. You can plant a flower not on a stem, but on a “lawn”, creating a three-dimensional clearing.
Openwork crafts
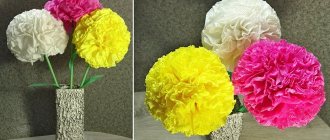
Crafts made from paper napkins for children are simple and original. An elegant bouquet of roses can be made from openwork cellulose.
Craft technology:
- Cut out the middle part of a white napkin, and fold the openwork segment into the shape of a rose, securing the edge with glue.
- To decorate the red inflorescence, the round napkin must be cut from the edge to the center point, then rolled up into a ball. The resulting bud needs to be carefully straightened.
- The decorated flowers should be attached to wooden skewers using narrow tape.
- Cut out leaves from green corrugated paper and fasten them into a branch consisting of 3 parts.
- You need to attach 1 branch to each flower detail.
- Wrap the stems in green paper and secure them with glue.
- Having prepared the desired number of roses, you should make a bouquet, wrap it in transparent packaging material and tie it with ribbon.
Step-by-step method for preparing Christmas angel:
- One snow-white napkin needs to be rolled into a cone, attached with glue and allowed to dry.
- From the second white openwork fabric you need to cut wings in the shape of triangles. Glue them just below the top of the cone on the side of the joining seam.
- Flatten the tip of the pyramid a little and sew a bead to it. On the other side, attach a halo made from a white circle.
Instructions for creating numbers
- Make a three-dimensional frame. Draw out the number template in duplicate, the side panel is a strip of cardboard of equal width. Glue the structure with tape.
- Prepare a sufficient number of fluffy flowers from napkins as described above.
- Glue the flowers to the frame.
The number is ready. Additionally decorated with ribbons, bows, crowns and memorable symbols for the birthday person.
Interesting figures
Interesting crafts are made from napkins, for example, a New Year tree:
- Form a cone for the cardboard base; it must be stable.
- Place the starting material (dark green or purple) on top of each other. There should be several tiers. Then you need to cut a circle from the workpiece and fix it at the central point with a stapler.
- Lift each layer of a rounded configuration up one by one and roll it up like a rose to the very bottom. There should be 5-6 roses, after which they are glued in a circle onto the cone.
- Using a similar method, you should make 1 more flower group, only smaller in size. Decorate the next row with smaller inflorescences.
- Fill the entire surface of the cone with roses of different sizes. Finally, attach one flower blank on top. The Christmas tree is ready.
To design an old forest man, you must complete the following steps:
- Cut out a bowling pin shape from thick cardboard.
- Then place salad and snow-white napkins one on top of the other.
- Place children's palms on a folded napkin stack and trace them with a pencil.
- Cut out the outlined parts and separate all the layers.
- Glue your palms onto the finished cardboard part in tiers so that your fingers point down. It is advisable to start from the bottom, and, alternating 2 shades, reach the beginning of the head of the future old man.
Crafts from paper napkins for children: step-by-step production of a forest tree
- The upper rounded part should be pasted over with blanks in a circle, with the thumb of the element being glued facing in one direction.
- Glue a loop on the back of the craft.
- Cut out a nose, mouth, hands from colored paper material and glue them onto the resulting figurine.
Master class Plate
- Grease the back of the soup plate with baby cream.
- Next, gradually cover the entire surface of the plate with pieces of napkin. It is necessary to dry every three layers, if you are too lazy to wait a long time, you can put it on the radiator.
- After drying the 10th layer, use scissors to even out the edges of the plate.
- Apply the desired design with acrylic paints and spray with varnish on all sides.
Other children's crafts
Children's paper crafts made from napkins can have different configurations. The garland can be hung in the room not only for the New Year, but also for any holiday.
Decor manufacturing technique:
- Cut out figures in the form of geometric shapes, flowers or hearts from bright multi-colored or lace napkins.
- Make a small hole in the center of each piece and thread a garland light bulb through it.
- You can hang the decoration near the wall or under the ceiling.
Step-by-step process for chick registration:
- Divide a 3-layer yellow napkin into tiers and fold each sheet at the folds. Fold 2 of them into quarters.
- Fix the 2 folded parts in the center with a stapler (apply 2 staples crosswise).
- Then cut the workpiece frequently to the staples.
- Fluff the ball, then drop glue into the center of the sphere (near the paper clips) and glue it onto the backing background.
- Fold the remaining napkin in thirds in width and length (in fact, 6 r.). Repeat the same steps as with the previous ball: fix, trim and stick.
- Make a beak and scallop from red paper. Attach a black dot in place of the eye.
- At the bottom, in place of the legs, lay out grass with green corrugated paper.
In a similar way, you can make a snowman from ordinary white napkins.
Serving ideas
One of the main options for decorating a holiday table is beautifully placed napkins. You can use both simple addition and spectacular twisted shapes. Single elements are placed in glasses or on plates, and compositions are given a separate place in a napkin holder.
Napkins can be folded in the shape of animals.
The following serving options can be offered:
- Easter Bunny. Created from a plain square napkin of any color.
- Christmas tree. You can make either a craft of any thematic focus or a classic green Christmas tree for the entire plate.
- Flower. It can be made from napkins of various colors and using techniques of varying complexity.
Decorating a room with napkins
Cellulose crafts are used to decorate the room during festive events.
Step-by-step decor:
- Choose napkins in the desired color palette. If you combine several shades, the decoration will come out more elegant.
- Unfold the folded paper completely and begin to form an accordion out of it. The workpiece must be folded so that each subsequent fracture converges with the previous one. The width of the finished bend (strip) should be 2-3 cm.
- When the entire piece is folded, it is recommended to iron it with your palm on both sides so that all folds are clearly defined.
- Mark the center and fold the napkin in half. Make 2 more such blanks in a similar way.
- Round the edge of the paper element with scissors. It is advisable to perform this action so that the edges of the accordion remain in place and the cut remains smooth. You can trim the future product in different ways.
- Take the edges of the napkin and connect the upper and lower segments to form a semicircle. Fix the configuration with glue or a stapler. Repeat similar actions with the remaining accordions.
- Fasten all the parts together with glue. The result is a flower-like corrugated circle.
- Hang the finished crafts on a thread or attach them to the wall with double-sided tape.
It’s quite easy to make any crafts from paper napkins. If you involve children in this activity, joint creativity will unite the family and become good practice for the kids. For this process, you just need to find free time and show your imagination.
Article design: Natalie Podolskaya
How to organize group work
You need to prepare templates with simple drawings and clear outlines. It would be better if these were coloring books for kids without small image fragments. Think in advance about what colors each part of the design will be laid out and prepare napkins of these colors.
All that remains is to distribute the colors (and tasks) between the children and joint creativity can begin. Each child is given napkins of the same color, and an area of common work is specified.