Weaving unusual crafts from newspaper tubes is one of the most popular types of home crafts, to master which you just need to study a few step-by-step master classes. There are many weaving technologies that allow you to make a unique decoration from paper wicker without extra costs. By following detailed instructions, you can make a real piece of art that will be useful in everyday life. The tips, photos and ideas presented in the article will be a good help for you in this interesting, entertaining and exciting process. Involving children in making crafts from newspaper tubes will help facilitate and speed up your creative endeavors.
Pros and cons of newspaper weaving
DIY crafts from newspaper tubes, like any creativity, have characteristic features.
pros
- Availability of material.
- Cheap, because old newspapers are worth nothing.
- Simple technique.
- Possibility to paint products in different colors.
- Unlimited number of options.
Minuses
- A large amount of material is required.
- Long preparatory stage.
- Crafts are afraid of dampness.
- Fragility and relative fragility of products.
Materials
Old newspapers, glossy magazines, advertising brochures, in a word, everything that relates to single-use printed products are used.
Usually, after reading or leafing through a newspaper, they throw it away, or at best, hand it over to waste paper. And craftsmen and craftswomen practically have no concept of “waste”. Everything will be useful for business.
You will also need:
- PVA glue, moment glue;
- acrylic paints;
- varnish
Tools
- knitting needles, wooden sticks of different diameters;
- stationery knife;
- scissors;
- a simple pencil;
- ruler;
- clothespins;
- paper clips;
- brushes for glue, paints, varnish;
- boxes, plastic containers, cylindrical, spherical objects, etc. as a frame;
- finishing elements for decoration.
Cutting blanks
The paper is cut into strips 5 to 10 cm wide. The wider your strip, the thicker the twisted tubes will be. It is clear that one product requires tubes of the same thickness.
The stripes are marked using a pencil and ruler. But this is a very long task. Since newsprint is thin, it is better to cut it in whole stacks at once in several layers.
Let's spin
To prepare the tubes, you must first cut the paper into pieces of the desired size. We cut newspaper strips or magazine spreads into several parts. Aspect ratio - 1:3 or 1:4 (for example, 27 * 9 cm, 35 * 10 cm). The exact dimensions are not important.
Divide the page into several parts so that they are approximately the same aspect ratio as above.
Take a knitting needle and a strip of paper. We twist the corner of the paper around the knitting needle, and gradually, layer by layer, roll it into a tube. Secure the edge of the strip with a drop of glue. To make the tube the desired density, we lay the paper at 45° relative to the knitting needle.
Then it will be quite dense, but at the same time it will bend well.
- We take out the knitting needle. The tube is not too long; to work, you will have to splice them together. If everything is done correctly, one edge will be thin, the other will be thick and hollow from the inside.
- To connect two newspaper tubes, drop a few drops of PVA glue into the thick part and insert the second tube with a thin edge. Now we wait until it dries.
Twisting
The workpiece is twisted tightly and evenly, moving diagonally from the corner. Wrapping is usually done on a knitting needle, which is placed at an angle of 45-60 degrees relative to the edge of the paper sheet. The ends of the winding and in several places in the middle are fastened with glue.
Having twisted the entire sheet, the knitting needle is removed. Dry the tube thoroughly. This will be the main material for weaving products.
- Craft mug: 135 photos and video master class on how to make beautiful crafts with your own hands
- Crafts from spoons - 125 photos and videos, tips and tricks with step-by-step instructions on how to make crafts
- Crafts from cotton pads - 125 photos of beautiful crafts, features and videos of new cotton crafts
Painting
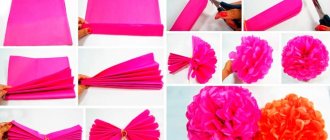
Don't forget about old fashion magazines. You can either get rid of them by throwing them in a landfill, or you can create a bright picture.
You don't need to do anything extra complicated. Just find and cut out the photos and pictures you like from spreads. Then, having chosen a good arrangement of the elements, glue the cutouts onto a paper base and hang them in a visible place.
Coloring
Rolled newspaper tubes contain printed elements. If you start weaving right away, the product will not have a beautiful finished look. Therefore, the working material should be painted beforehand.
You can also color the finished product. But painting the joints of layers and all the work from the inside is very inconvenient. It will take too long. It is much more rational to paint the working material in advance.
To do this, take a tray, pour a thin layer of paint, put a dozen or more tubes (a handful) at once and roll them over the surface of the paint. This must be done quickly so that the paper does not have time to get wet and lose its shape.
Dry the tubes horizontally on supports or in a vertical position by placing them in a container of suitable size (jar, glass, etc.).
- Cardboard crafts - 135 photos of useful and beautiful crafts for children and adults
- Unusual crafts: we make cool and original things from scrap materials (120 photos and videos)
- Beautiful crafts: examples of very stylish and unusual options for homemade crafts (125 photos)
Types of weaving
Crafts are woven from newspaper tubes in different ways. The choice of a specific technology depends on your skills and features of the design of the future craft.
Typically, the tubes are divided into a base - a frame or guides for the future product - and workers with which the frame is braided.
Coloring
There are two main methods of coloring: coloring the finished product and separately each paper twig. The choice is made by the master himself, depending on the color of the paper, its structure, as well as his own preferences. Suitable for coloring:
- wood stain;
- tint varnish;
- color diluted with primer or water;
- any paint on paper (acrylic, gouache);
- food colorings.
After painting, the finished product is opened with varnish. This will give it strength and resistance to wet cleaning.
Simple
The technique resembles conventional weaving of fabric. As a basis, take several tubes along the planned width of the product and place them at a distance of 1-2 cm from each other. They are braided with working tubes, alternately passing over or under the guides of the base.
Weaving is done from left to right, lengthening the working tubes as necessary.
Layer-by-layer
The technique of execution is similar to simple, but denser without gaps. In addition to the main working tube, additional ones are used, which are also actively involved in weaving. They work according to a certain scheme.
If you use additional tubes in contrasting colors, you get noticeable decorative layers.
Round box with lid
Cut out two circles from thick cardboard, coat them with glue and cover them with newspaper or any other beautiful paper. To carefully wrap the edges in a circle, make cuts along them. If you wish, you can immediately paint and dry the workpieces well.
Using double-sided tape along the entire diameter, place stand tubes, the number of which must be calculated in advance. Fill everything with glue around the perimeter, place the second bottom piece on top and dry it under pressure. To start weaving, insert a working tube next to the stand or connect two and loop it on.
Braid the entire base around the perimeter with two tubes of a spikelet, pressing tightly. Moisten it a little, bend the racks, and lift them up on the next lap. To make the box more interesting, add a second working tube of a different color.
Photo: berkem.ru
Build up all the details so that these places are hidden on the wrong side. And so that when weaving the box itself holds its shape, use a blank of a suitable size. You can braid any round box of the same diameter. Weave the last row, bending the racks inwards as much as possible parallel to the bottom.
Then carefully bend each post one after the other and cut it to the same length. Lift them back and braid them again with two long working tubes, just like the sides before. After three rows, cut all the posts as close to the edge as possible and tint the ends.
Make a beautiful decorative cover from cardboard, wrapping paper or napkins. Glue the posts into it in the same way as into the bottom, and use the same principle to weave a small lid. Calculate the number of rows during the process, based on your box.
Scrapbooking for Beginners: 8 Step-by-Step Ideas
Rows
It is also performed on a simple basis, but three or more tubes are used as workers. They work alternately. When the length of one tube runs out, they do not extend it, but start working on a new one, but not from the first, but from the second base post.
They work in this way until the desired height of the product is reached. The principle is reminiscent of weaving a wreath of flowers.
Second bottom option
In the second case, we place an odd number of paired guides on the table and begin to braid them with two tubes, one of which is threaded from above, and the second from below.
Having reached the end, the tube is bent, and then the following guides are inserted into the edges. When inserting the guides, help yourself with scissors by cutting one of its ends.
Openwork
Particularly beautiful crafts from newspaper tubes are made using the openwork weave method. Unlike the solid one, there are gaps between the paper tubes in the openwork, which play a decorative role.
There are a lot of openwork weaving patterns - from simple ones, reminiscent of a picket fence, to very complex ones with an intricate multi-layered pattern.
Fungus
- To make this craft, you will need to take 8 tubes and cross them two at a time. Additionally, two vines need to “hug” each tube from the base, extending them to the end.
- To get a semicircular shape for a hat, you need to weave it on a saucer. Having made several rows, the edges of the cap are secured by cutting the remaining posts and threading them inside.
- For the leg, 5 tubes are taken in a bundle, their ends are glued together. For a while, this whole thing is fixed with a clothespin. The twigs are spread in different directions, after which the weaving of one of them begins, bending the selected newspaper tube through the next two.
- From two intertwined tubes, you need to take one more and intertwine the next two. In this way, you need to weave to the end so that the leg is not very tight; you need to insert a stick with a diameter of no more than 5 mm in the middle.
- At the end of the weaving, the tails need to be tucked into the middle of the leg and glued with glue. After which the leg should be generously greased with glue and attached to the cap.
Spiral
This method stands apart; it is often isolated as a separate type. It is in many ways reminiscent of another paper craft technique - quilling.
The point is that the tubes are flattened and a spiral is twisted from flat newspaper strips, then, if necessary, they are given a convex shape and the spirals are connected to each other.
In a similar way, children of the 20th century made various toys from New Year's paper streamers.
Crafts
Using different weaving techniques, different patterns, design ideas, decorations, a wide variety of products are obtained:
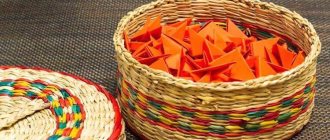
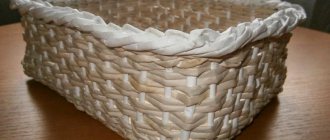
- baskets;
- flowerpot;
- caskets;
- panels, frames;
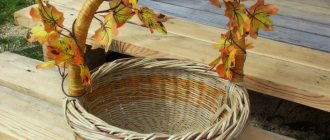
- topiary – Christmas trees, flowering trees;
- jugs;
- vases;
- trays;
- candy bowls;
- cups;
- flowers;
- voluminous souvenirs - bast shoes, hearts, mushrooms, berries, etc.
Several days pass from the idea of a serious product to its final implementation. But the result is worth the effort.
In the photo, you can hardly distinguish crafts made from newspaper tubes from real ones woven from wicker. If you are a creative person and love crafts, you can create beautiful and useful things from waste paper - old newspapers. Truly, imagination and hard work work wonders
Owl
To make an owlet you need:
- 7 tubes - 5 dark and 2 light;
- glue.
How to make an owlet:
- The ends of two light tubes must be flattened, twisted in a spiral and secured with glue.
- We place a dark tube bent in an arc over the eyes, and above it another tube, with the ends glued to the middle.
- We place the working third dark tube from below, as in the photo.
- We begin to braid the owlet’s body using the “swaddling” method, passing either the right or the left end of the tube through the middle.
- Having completed two rows in this way, we move the wing-loops to the sides and continue working until the body reaches the required length.
- We glue the ends of the tubes on the back side of the product.
- The light tube-legs must be cut off at an angle, and the tassel ears of the owlet should be made from the remains. We make a beak from scraps of dark tubes and glue it to the owlet.
Photos of crafts made from newspaper tubes
Tell your friends