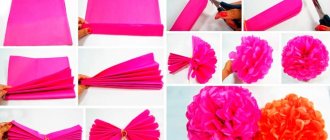
Patchwork is the creation of products from various pieces of material. Various patchwork techniques are discussed here, as well as a small course for beginners and beginners in this business. Any child can do this. You can use any old unnecessary bedspread, cut into small pieces. An experienced craftsman can make a beautiful pattern for a pillow cover or a potholder for a teapot. Any magazine for housewives has a section where various crafts, embroidery ideas and much more are described.
In fact, patchwork is a very fun activity. From old unnecessary strips you can organize sewing from scraps.
General cutting rules
The key to any beautiful thing is its neatness and geometric accuracy. Just like when assembling a mosaic, patchwork requires perfectly calculated and cut pieces that, when combined, will not turn out to be incompatible.
To do this, you need to follow some cutting rules:
- To avoid deformation, change in size and color, after washing a manufactured item, the fabric you just purchased should be washed and then steamed with an iron.
- Before working with previously used pieces of fabric, they should be soaked in a solution of water and starch (it is better to do this with a spray bottle), and then ironed.
- To draw the fabric into scraps of the desired shape, you should use soap or special chalk, or, in extreme cases, a pencil with a soft lead. But under no circumstances should you draw on fabric with a pen: the ink, being absorbed into the fabric, remains there forever.
- Fabrics should be cut in the direction of the grain thread, otherwise the parts may become deformed when sewing. When working with new fabric, you need to focus on the edge.
To cut fabric into elements, you first need to make 2 templates of the desired shape from thick paper or cardboard: one with indents, the second without them. Apply each of the templates to the material one by one and trace it using the above tools.
Tools
First of all, if you decide to do this permanently and professionally, you need to take good tools right away and spare no expense. For beginners, you can take inexpensive supplies.
Of course, we should start with the basics. This is a sewing machine. Next, you need to purchase special patchwork feet. They are necessary at work. This foot must have a spring. You will also need a BSR stitching foot.
Sewing machine
For patchwork, you can use regular universal sewing needles.
A patchwork mat is an indispensable tool. You will also need a circular knife for cutting fabric.
Important! The circular knife is available in several basic diameters.
It is worth purchasing a ruler for sewing from scraps. Also scissors, needles for hand sewing, pincushion, safety pins and basting pins. That's basically all you need to get the job done.
Which fabric is best for the job?
Any fabric that is close to the soul of a beginning seamstress can be suitable for patchwork sewing. However, each fabric has its own characteristics and characteristics, which can subsequently affect the ease of use, and, consequently, the quality of the finished product.
Cotton fabric is considered the most popular, since its characteristics allow even novice needlewomen to work with it:
- Optimal density and weight;
- does not shrink when washed;
- when circumcised, it does not crumble or spread;
- does not change color;
- easy to stitch;
- immediately takes the desired shape, which it retains for a long time.
Due to its quality, linen also occupies the top position in the choice of material:
- Durability, wear resistance;
- hypoallergenic;
- high thermal conductivity and breathability characteristics;
- practically does not electrify, even with strong friction.
Patchwork silk products look beautiful and expensive, but they are difficult for beginners.
It is very difficult to work with the material: it is very highly electrified, any mistake made when sewing or cutting will immediately catch your eye. In addition, it is not suitable for creating things for the home (blankets, pillow covers, etc.), as it wears out very quickly and becomes unusable, losing all its luster and beauty.
Today, the trend is warm, homely looks, due to which the popularity of wool products has increased. In addition to the aesthetic function, this material also has a practical one. It’s easier to work with than silk, but you’ll have to get your hand a little used to it first, as problems often arise when stitching.
Among the advantages of this matter are:
- Maintains a neat appearance, as it does not wrinkle;
- resistant to various stains;
- absorbs excess dampness in the house, which does not affect the appearance of the material;
- elastic;
- can last for many years.
One of the advantages of patchwork is that you don’t need to choose only one type of fabric; they can be combined with each other, creating original things.
Basic principles of this type of sewing
The main rule in patchwork for beginners is the skill of the craftswoman to select different fabrics according to texture, color scheme, pattern, so that the end result is a beautiful thing, the appearance of which corresponds to the sketch. At the same time, there are no specific patterns common to the manufacture of products, no conditions for the selection of fabrics, or design of the finished product.
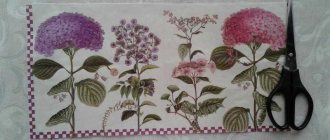
patchwork photo materials
Almost any materials are suitable for patchwork:
- chintz has a wide selection of colors and patterns;
- denim looks original with tartan and chintz. Patchwork from jeans can be trimmed with multi-colored braid, decorated with buttons, fringe;
- soft drape is an ideal basis for rugs and tapestries. Embroidery, trim with piping, ribbons, and lace are appropriate across the field;
- thin airy fabrics (silk, chiffon, moiré, wool, crepe de chine) are covered with non-woven fabric from the inside out for ease of work.
To sew, you need to prepare the following tools:
- measuring devices (ruler and elastic measuring tape);
- large tailor's and manicure scissors;
- chalk or a bar of soap for cutting material;
- It is convenient to cut large pattern pieces with a special roller knife on a thick mat;
- It is advisable to prepare thin and long needles for handmade work;
- sewing machine with quilting foot;
- pins for securing product parts;
- multi-colored threads of varying thickness and strength.
New scraps must be washed before use to allow the material to shrink. At the same time, the color quality is checked to avoid shedding when washing the finished product. It is recommended to iron all parts well. Pieces of worn items should be lightly starched and ironed thoroughly. All seams are also ironed during the work process.
For finishing, it is advisable to immediately prepare an assortment of ribbons, braid, and buttons. It is definitely worth purchasing lining and cushioning fabric.
Patchwork technique and its varieties
This sewing technique has a long, rich history, during which patchwork has acquired new forms and varieties, thanks to which every beginner can choose their favorite sewing patterns using step-by-step instructions and photos.
Traditional version of the patchwork technique
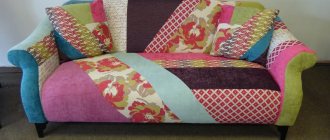
Things in traditional patchwork are made using pieces of fabric shaped like simple geometric shapes with regular silhouettes. In this option, you can make things both small (pillowcase, potholder) and large (blanket, rug).
A distinctive feature of classic patchwork is that the front side consists of patches , while the lining can consist of solid material.
Japanese patchwork
This version of sewing from scraps combines the traditions of the East and West. For the most part, large-sized items are made using this technique. Preference is given to silk fabrics, mostly expensive and of high quality. But to fill the arms, beginners can train on a cheaper variety of silk.
The basis of the elements, as in the traditional version, are geometric shapes:
- squares,
- rectangles,
- diamonds.
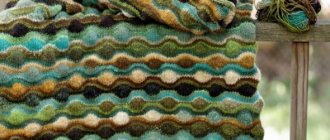
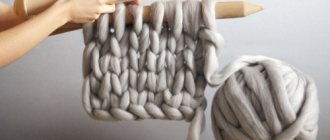
Knitted patchwork
This type of patchwork is in many ways similar to the traditional one, however, here the elements are not sewn together, but are connected using a hook.
Moreover, different materials can be used. The most common items used in this type of patchwork are women's bags and bedspreads.
Crazy patchwork
Unlike other types of patchwork, here the elements do not have clear geometrically regular shapes, rather the opposite - hence the name.
Threads in places of stitching are masked by various means: lace, ribbons, embroidery, etc. In addition, the use of beads, seed beads, buttons, and various pendants is common.
Quilt
In this technique, using machine stitching that reproduces various patterns, 2 fabrics are sewn together, between which a soft lining, for example, made of padding polyester, is placed. This type of patchwork attracts craftswomen with greater elegance.
The concept of "patchwork"
And yet, what is patchwork in sewing? Patchwork is patchwork sewing. That is, a strip of fabric is connected into small blocks, and the block forms the appearance of a geometric figure. What can you sew from scraps of fabric with your own hands? This is the creation of pillows, capes, pincushions, potholders and much, much more. This allows you to give a second life to clothes that were planned to be thrown away.
Patchwork pincushion
Watercolor technique
The basis of the product in this technique are squares, the colors of which are combined from light to dark. The correct selection of colors and placement of patches creates the effect of painting with watercolors.
For beginners, it is best to choose medium-sized printed fabrics to get a beautiful pattern.
Technique for sewing strips “Log Cabin”
This ornament has a number of other names, for example, “well”, “American square”, “labyrinth”. A special feature of this technique is the assembly of colored stripes in a circle of the so-called “hearth” in the form of a small square located in the center. It symbolizes the hearth in the house, and, as a rule, the square is made in red or yellow. The shades of the stripes (“logs”) are also chosen for a reason: light ones symbolize the illuminated corners of the hut, dark ones symbolize the shadow ones. As a rule, blocks are divided into light and dark parts along the diagonal. The work begins by sewing a strip to the front side of the square, which is also applied with the front side. After this, you need to trim off the protruding edges of the fabric, if any. Then we turn away the strip and add a second one on the right side (the same exact width as the first) and also trim the excess edges. Sew on the third strip and shorten the protruding end. Thus, we perform similar actions until our block reaches the specified size.
Along with the above types of patchwork patchwork from stripes, there are others. Therefore, every needlewoman, both beginner and experienced, can choose the most suitable one for herself and create cute little things!
“Well” technique
This technique is also based on a square, however, unlike “Aquarium”, where the canvas consists of square patches, here the canvas itself has a square shape, thanks to the strips sewn together, which form a geometric figure. There are two ways to connect strips into a square, which differ in assembly patterns.
This technique is quite simple for beginners, as it has a simple stitching pattern.
And with step-by-step instructions and photos, patchwork sewing using this technique should not cause any difficulties.
Jacob's Ladder technique
This technique is performed from two geometric shapes: a triangle and a square. So, to create a canvas using this technique, you need 9 square-shaped flaps. 5 of them should consist of squares of 2 different colors (i.e. one square consists of 4 square parts), 4 - of 2 triangles, also of different colors.
All elements must be combined as follows: one flap with squares is located in the center, elements with triangles are sewn to each of the 4 sides of the central element, the remaining elements with squares must be placed on empty spaces (ultimately, the flaps sewn together should form a square).
What is this technique?
Instead of patterns, when making patchwork, templates are used, since the patterns mainly consist of repeatedly repeating blanks (squares, polygons, triangles, segments). It is recommended to make devices directly from durable material (hard cardboard, plastic). Externally, the template looks like a frame in which the inner figure serves as the desired part, and the outer part serves as a seam allowance (approximately 0.75 cm).
The most commonly used types of tailoring are:
- The traditional look is considered a derivative of the Anglo-American style. The parts folded in geometric patterns form a single piece. The products consist of a front side and a back side (lining). The method is equally suitable for sewing large and small crafts.
- A crazy way of joining parts is to haphazardly lay out multi-colored scraps. In this case, the seams of the product are finished with decorative stitches and wide ribbons of braid. The decoration is completed by sewing on buttons of various shapes, embroidery, pieces of lace, and beads.
- The Japanese method is completely handmade. Original motifs are created from expensive fabrics, resulting in elegant items and clothes.
- The translation of the word “quilting” means “quilted fabric,” which connects the sewing method to patchwork. The peculiarity of the method is the use of a convex stitch connecting the lining to the patchwork parts.
- Knitted patchwork connects separately knitted parts into a single whole. Ready-made items look more beautiful than those made from fabric.
Bargello technique
To make things using this technique, first of all, you need to cut fabrics of different colors into strips of equal length and width, which are then sewn together to form a complete fabric. Next, the fabric needs to be sewn into a “pipe”, which is then cut across the seams so that all strips have the same length and width and consist of different color elements.
The last step is to sew the flaps into a canvas, forming a pattern by “separating the ring” in a certain area, and each time it is different. At first glance, patchwork using this technique may seem too complicated and confusing for beginners, but step-by-step photos and diagrams will dispel these fears.
Denim pattern
Old, worn-out denim items make an original, funny toy:
- tear open the old item, wash and iron all the details;
- using patterns, draw a pattern, increasing the size if necessary;
- make seam allowances (up to 1 cm);
- cut out the parts and sew them on the wrong side, leaving a hole for stuffing the dachshund with a sealant;
- turn the sewn toy right side out;
- fill with sealant, sew up the hole.
Pizza technique
The name of the technique speaks for itself, because it is almost exactly like preparing a national Italian dish.
On the underlying base fabric you need to “scatter” (chaotically, but not forgetting about color compatibility) multi-colored fabric elements (as a rule, they are small in size), which then need to be covered with a transparent fabric. At the end, the “pizza” needs to be stitched so that it does not fall apart.
Boro technique
This technique is as follows: take fabric for the base, and sew various pieces of material onto it, similar to patches on old clothes.
Basically, the fabrics should match the type of material, but you can show your imagination. The most popular fabric for this technique is denim.
“Lyapochikha” technique
This is a fairly simple technique in which scraps of the same length are sewn in rows. Each of the elements is stitched in the middle, bending the edges to create the required volume.
In order for the product to keep its shape, the flaps are sewn very tightly. The splendor of the product depends on the length of the elements. The most popular item used using this technique is a rug.
Magic Triangles Technique
The essence of this technique is clear from the name itself: the canvases are sewn together from elements made in the shape of triangles. Thanks to the versatility of this figure, fabrics can be folded into a variety of patterns: from simple squares (when sewn with the long side) to a variety of colors.
For beginners, it is recommended to work with isosceles triangles ; in this format it is difficult to make errors when stitching elements together.
Secrets of sewing a pillow
Patchwork-shaped pillows can enliven almost any interior in the apartment. For beginning craftsmen, it is possible to choose a simple pattern.
The process of sewing a decorative pillow:
- select scraps of fabric, tools and accessories necessary for work;
- choose a work scheme that is available in terms of complexity;
- make templates for cutting out pillow parts;
- wash and iron the material for the product well so that the finished item does not fade and retains its shape after washing;
- Light types of fabric are sealed before sewing by gluing the inside with non-woven fabric or other suitable material;
- use the template when preparing parts for sewing a pillow;
- carefully cut paired blanks;
- carefully iron each seam in the spread;
- prepare 2 sides of the product;
- fold the patterns face to face and sew a pillowcase around the perimeter;
- Turn the finished product onto its face and fill the pillow with filling.
To wash a dirty pillowcase regularly, you need to zip the fourth side or turn it inward by 20 cm.
Patchwork sewing step by step for beginners
Not many people know how to make things using patchwork. For beginners, the technique, step-by-step photos, and diagrams proposed in this article will become indispensable assistants in a new business.
Blanket
Before actual work, you should decide on a pattern, choose a fabric (the best solution is one fabric of different colors, as well as a single-color fabric for the back side) and filler (usually padding polyester is used), make templates from cardboard or any other dense material (here we consider making a blanket from squares).
Step-by-step instruction:
- First of all, using templates, you need to cut out the required number of square elements. Their number and size depend on the personal desires and preferences of the needlewoman.
- Then, placing the scraps next to each other, you need to sew them together along the marking line from the wrong side. Having combined all the elements with each other, thereby creating the front side of the blanket, they should be carefully smoothed with an iron.
- The plain fabric for the backing should be laid out on a straight surface and the filling should be placed on top. The padding polyester needs to be cut out with a margin on each side. To prevent the filling from pilling in the corners, it must be quilted (from the center to the edges).
- The last step is to sew all three layers together. If the layers slip when stitching, they can be pinned down with pins or needles. To prevent the blanket from starting to fray at the edges over time, they can be stitched with braid.
Rug
To make a rug, you can use small trimmings of an unlimited number of colors. However, you definitely need to purchase a single-color fabric (2.5 times larger than the size of the planned carpet), transparent fabric and filling. A single-color fabric should be laid out on a straight surface, and the filler should be placed on top so that it takes up only half of the fabric.
The second half needs to be covered with the filling on top, sewn and topstitched. Next, on the resulting “pad” you need to randomly (but artistically) distribute scraps of different shapes, colors and sizes, which are then covered with a transparent piece of fabric. Now the rug needs to be stitched over the entire area so that it does not fall apart.
Tack
It is best to use denim to make potholders, as it is quite dense and takes a long time to heat up. It can be performed using any of the techniques described above, but the most popular is the “Well” technique. To do this, you need to cut 10 strips of different lengths from denim fabric of different colors. Then all the elements must be combined according to the appropriate scheme.
Patchwork for beginners is used for sewing oven mitts, blankets, pillowcases, etc. Step-by-step technique, photos, diagrams can be found on the website.
The final touch is the framing of the potholder: you can sew any tape along the edges, which needs to be turned into a loop at the edge. This version of the technique is intended for beginners, but after getting the hang of it and studying many step-by-step photos, instructions and diagrams, each needlewoman will be able to perform more complex work using patchwork.
Patchwork entered the life of the Russian people a very long time ago, but in recent years it has not only not lost its luster, but is also becoming increasingly popular. Moreover, today this method of sewing is used not only by needlewomen for home design, but also by fashion couturiers for branded clothing.
Basic patchwork patterns for pillows
Let's look at several pevchork patterns for beginners step by step for making a pillow.
Classic
For the classic version, 16 squares of different, compatible colors are selected. At the same time, the size of the elements is exactly the same. The squares are sewn together in stripes with the expectation that the back of the pillow will be a single color.
If you plan to sew a fastener into the pillowcase, it is recommended to decorate it before finishing sewing the pillow. You can use a regular fabric hem (20 cm) instead of a zipper.
Fill the finished product with foam rubber, padding polyester or old things that are not used.
Square within a square
An original pattern is formed from two types of contrasting colors:
- a smaller quadrangle is sewn onto a large square in the center;
- the tops of the corners rest against the middle of the side;
- the next square is even smaller, but is sewn in the same way;
- the last square in the center of the front side of the pillow with a side of 3-4 cm.
Triangle pattern
To decorate the outer side of the pillow, 32 identical isosceles right-angled triangles are cut out from differently colored scraps. The shapes are sewn in pairs to make squares of 2 colors. In this case, it is necessary to leave a gap for the seams.
Place the finished parts along the plane of the pillowcase and sew them in stripes. Then form the front side of the product by connecting the ribbons into one.
Dresden dish
A flower is formed in the center of the square base (15 petals with rounded or pointed tips are cut out using a pattern), and a bright circle of the core is located in the middle. The petals are sewn in a circle with a slight smell. The perimeter is finished with two stripes of varying thicknesses in contrasting colors.
Lyapochika
A technique that uses pieces of fabric of different structures. Assorted, unequally shaped patches are sewn onto a dense base with stitches on one side. The more often the machine stitches, the thicker and more original the product looks. A complicated version, when each piece of fabric is wrapped in a certain shape (tube, corner).