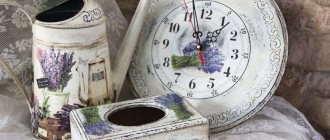
The popular technique of decoupage is a surprisingly elegant, but at the same time absolutely uncomplicated creative direction. Its essence comes down to decorating furniture, household items and wardrobes with all kinds of colorful applications. Images cut from napkins, newspapers and other paper sources are fixed using several layers of varnish, thereby creating the effect of complete and seamless fusion with the surface.
Many novice needleworkers who set out to master decoupage techniques are interested in the question of what objects can be applied to. Absolutely any questions are answered by professionals. The most inconspicuous thing can be transformed beyond recognition. All the things that can be found in the attic of a grandmother’s house or in a chest in her bedroom - boxes, bracelets, flowerpots, photo frames, dishes, candles - can become a unique work of art if they are skillfully given a second life. You don’t need much for this, just patience and imagination.
Decoupage is an incredibly exciting creative technique. It does not require the purchase of expensive materials or any professional skills. As you master this amazing decorative trend, you will learn how to turn boring, everyday things into unique masterpieces - intricate, spectacular and inimitable!
This lesson presents decoupage master classes for beginners using napkins with step-by-step photographs.
To date, decoupage masters have mastered many amazing techniques - this is artificial aging, and the application of 3D images, and gilding, and craquelure coating, and other man-made miracles. Creative people clearly have a lot of ingenuity!
Application of decoupage technique
Most often, this decoration option is used to create unusual things designed to charmingly decorate rooms in rural styles: Provence or country. Pretty items are also suitable for creating a feeling of coziness in a rather rough loft.
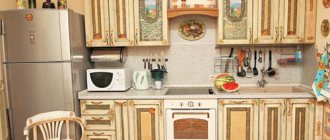
The technique is used to create completely unusual gifts from absolutely familiar objects: boxes, bread bins, cutting boards, wine bottles, New Year's glass balls. Decoupage will also give old furniture a second life, turning it into a real work of art.
Rainbow monogram
Once you've redecorated your children's room, as a finishing touch, you can place your child's monogram on the wall, decorated with a rainbow pattern made from paper napkins. For this we will need the following materials:
- Simple pencil;
- Napkins in seven colors of the rainbow;
- Thick cardboard;
- Loop cord;
- Glue - moment or PVA;
- Ruler and scissors;
- Additional decor for decoration - leaves, ladybugs, flowers, butterflies.
Step by step guide
- The first step is to make a sketch of the monogram from the intertwined initial letters of the last name and first name.
- Next, the image is transferred on an enlarged scale using the technique of cells onto an A4 sheet. You can do this part of the work on a computer.
- After carefully cutting out the letters, a monogram template is created, which is traced onto cardboard and cut out.
- On the front side, markings are made from top to bottom into seven equal intervals. It is better to mark the strips at an angle, although a straight, arced or zigzag arrangement is allowed.
- Multi-colored napkins should be cut into squares, the size of which is selected independently, based on the desired size of the resulting balls when rolling.
- First, red balls are made and glued to the top strip, then orange ones to the next strip, and so on until the end, in accordance with the order of the colors in the rainbow. That is, the next one will be yellow, then green, blue, indigo and violet.
- After drying the monogram under a stack of books, all that remains is to glue a loop to it on the reverse side, add decor and hang the decoration on the wall.
A bright and beautiful rainbow monogram made from napkins will be an excellent addition to the interior of a children's room, and the kids themselves will certainly be happy with such a decoration.
Elegant monogram in rainbow colors
Funny figures made from balls of multi-colored napkins
What is decoupage?
The beautiful word comes from the French language, where it is used as a verb to cut.
Currently, this concept refers to decorating a surface by gluing decoupage pictures.
Decoupage for beginners is accessible to anyone, regardless of age and preferences.
Getting ready for Easter
On the eve of the Easter holidays, a special theme arises in decorating objects, including Easter eggs. Decoupage of Easter eggs involves applying a beautiful ornament to a pre-boiled egg.
We will not use regular glue, as it penetrates through the porous shell. And for gluing, fresh, raw egg white is perfect. It is tapped a little to break up the fibers and applied with a brush to the base.
Attach the cut out picture, let it dry a little and cover the surface with protein again, but with a picture. The protein reliably fixes the decor, does not fade, does not give off odor and lasts for several days.
Materials
To start turning boring things into unusual objects, you will need to take care of the tools and materials that will help you create an amazing creation.
A novice needlewoman will need:
- basis for applying the image;
- paper napkins;
- glue;
- clear nail polish;
- paints;
- tassels.
All of this can be purchased at stores that specialize in selling craft supplies, or you can find most of the items on this list at home. For the first work, it is not at all necessary to purchase rather expensive professional materials.
Master class decoration for children's birthday
No1 Balls
- Fold a large napkin like an accordion.
- Using scissors, cut out the shape of the petal, not reaching the center 5 cm.
- Place the three pieces together and tie them with a strong thread in the middle.
- Fluff the parts, forming a light, weightless ball.
No2 Digit by year number
Make a number out of cardboard using patterns online, or cut out a flat piece.
Cut the napkin into strips 5 cm wide. Make a fringe on one side with scissors and roll it into a roll, securing it in several places with PVA glue. Fluff the dandelion. How many of these blanks you will need depends on the size of the figure frame.
Glue the parts onto the workpiece as close to each other as possible.
The basis
Any relatively smooth and even surface can be used as a basis for design. However, for beginning craftswomen, it is better to take a plastic or glass horizontal or vertical surface. Curved things like Christmas tree decorations, bread boxes, round boxes, decoupage bottles for beginners are best left for later, when experience allows you to decorate such complex details with pictures.
Features of the design of round surfaces
Surfaces with curves and slippery glass or glazed ceramic surfaces require a special approach to the technique. New Year's bottles decorated with appliqués look very elegant.
A gift option for expensive alcohol in a retro style will pleasantly surprise friends and employees. Decoupage of bottles with napkins, just like decoupage of plates with napkins, requires a different approach to application.
Napkins
To create stylish antique items, you can use special napkins, but a good option for saving the family budget would be to use ordinary multi-layer paper napkins. For decoration, you only need their upper part with a beautiful image.
Note!
- Ideas for LD (a girl’s personal diary): step-by-step instructions for making it yourself, photo reviews of the best options
- Educational soft books made of felt: materials for making, detailed instructions + reviews of plots for books (100 photos)
Original do-it-yourself valentines - design options, necessary materials, master class for DIY work
Often instead of napkins, newspaper and magazine clippings, postcards and other suitable images are used.
However, for the very first works it is better to buy napkins for decoupage. They have a special density that helps to glue the image evenly or, if necessary, quickly remove it. The paper of such napkins does not tear or deform when applied.
How to choose the right drawing
When choosing pictures, pay attention to:
Note!
- Kinusaiga technique - TOP-140 photos of the best ways to create crafts using the Kinusaiga technique with your own hands + instructions for beginners
- Do-it-yourself passe-partout - a master class with step-by-step do-it-yourself schemes. Making tips + photos of the best examples
- Amigurumi: features of do-it-yourself knitting technique. Step-by-step master class on making toys for beginners + 180 photos
- Stretching paper. Too thin will be easy to tear and inconvenient to work with;
- The top layer of napkins should be easy to separate, have a translucent structure, due to which an organic appliqué is obtained that imitates artistic painting;
- The degree of wetting, the formation of folds, irregularities;
- One of the advantages is the availability of the material and low price.
Glue
Decoupage for beginners from napkins will require the use of glue. In principle, this is one of the main elements of creating an unusual thing.
At first, you can buy regular PVA of the middle price category and slightly dilute it with water for better saturation of the picture. In the future, it is better to purchase special glue.
Multilayer option
A master class on the basics of volumetric decoupage with maximum preservation of classical techniques involves thickening the entire design or its elements using at least 5 layers.
The selected pictures must have clearly defined contours. In this case, three zones are distinguished: background, foreground, section of intermediate layers.
For application, several types of paper are used (thick in the middle), which are cut out using a stencil and glued together using PVA glue.
Raising the pattern can be done by gluing completely identical layers or using a pyramid model, gradually reducing the area of the part while maintaining the silhouette or highlighting accent areas.
Varnish
Decoupage for beginners from napkins is completed by coating the surface with varnish, which will protect the applied pattern from the negative effects of the environment.
Note!
- Do-it-yourself bead brooch: photos of the best options, step-by-step master class on how to create it yourself, weaving patterns
- Do-it-yourself felt toys - TOP-120 photos of toy ideas, do-it-yourself instructions for making them for beginners
- How to make a lapbook with your own hands: a detailed master class on how to make it yourself, reviews of lapbook elements
The best option would be water-based acrylic varnish. It dries quickly and does not smell much. To begin with, you can use regular construction varnish.
Sometimes a varnish with a craquelure effect is selected, giving the decorated surface a delightfully antique look.
Numbers and letters
Crafts in the form of three-dimensional numbers or letters (3D shapes) look impressive. They can symbolize various holidays and celebrations. In particular, birthdays. An example of such a figure is shown in the photo.
The three-dimensional base of the number is assembled from thick cardboard (number 2 in the photo). Flowers are made from red and white napkins using the above method. The flowers are glued to the cardboard, they fill the entire surface (front, back and sides). A crown is cut out of golden cardboard, then it is attached to the top.
Tools
The tools are:
- Sharp scissors, straight and curved.
- Stationery knife.
- Sandpaper for sanding the surface if something rough will be used as a base.
Note!
- Amigurumi for beginners - photos of the best toys, a master class on knitting items with your own hands step by step
- DIY bear costume: step-by-step master class for DIY sewing. Costume design options for the New Year
- Bead weaving patterns for beginners - step-by-step instructions with photos and descriptions
A glass of water for washing your brushes will also come in handy.
Christmas tree
To beautifully and originally decorate your home for the New Year holidays, it is not at all necessary to go shopping in search of souvenirs. You can make a beautiful and original Christmas tree for the New Year, which can become the highlight of your holiday table, at home.
You will need:
- A3 paper,
- napkins of green and light green colors,
- scissors, glue, pencil,
- ruler, stapler.
Step-by-step master class:
- We make a cone out of paper, glue it together, and level the bottom.
- We cut the napkins folded 4 times at the fold: you get two blanks per napkin.
- We fasten the resulting squares in the center with a stapler.
- Gently crumple the napkin towards the center, starting from the top layer.
- We straighten the resulting flower (in total you will need to make about 50 flowers).
- Glue the flowers to the cone in a circle, starting from the bottom. We glue alternately: green flower - light green, etc. There should be no space left between the flowers.
- Decorate the top to your liking.
Preparation
- The step-by-step instructions for beginners are quite simple. But the quality of the finished product is largely determined by the preparatory work.
- The wood is freed from knots and eyes, carefully sanded with sandpaper until a smooth surface is obtained.
- Glass, plastic and metal are degreased using alcohol or regular dishwashing detergent. Rust is carefully removed, damaged areas are lubricated with special compounds.
- The base prepared in this way is covered with any construction primer, ensuring better adhesion of the two materials.
- Painting the surface with white paint will help make the design more expressive and add additional depth.
While the primer and paint are drying (one by one, until completely dry), the drawings are prepared. To do this, suitable pictures are cut out from a napkin and freed from excess layers of paper.
Preparatory stage
Before you start decorating a wooden surface, it should be properly prepared for work. Typically, the decoupage technique is used to restore old wooden surfaces that need to be prepared for work. To do this, the workpiece is cleaned of dirt and dust using damp microfiber.
If there are cracks, irregularities and chips on the wooden surface, they need to be repaired with a special wood putty. Apply the primer to the surface of the wood using a spatula. When the putty dries, the wood needs to be treated with fine sandpaper.
After this, you need to prime the surface, dry it and sand it again. Afterwards, remove the working dust and begin gluing the paper image. If the wooden product that will be decorated using the decoupage technique is old, then the primer should be applied twice. This pre-treatment will make the wooden surface perfectly smooth and allow the paper decor to adhere firmly.
When the blank is prepared, you need to decide on the decor by choosing a suitable thematic image. You can use any napkins with a picture, the main thing is that the picture lies evenly during gluing. The easiest way for a beginner to work is with three-layer paper napkins, which have a certain paper quality.
Applying an image
There are several ways to fix a drawing on a base. But the simplest thing will be simply gluing a picture.
Decoupage for beginners step by step with photos will help you visually evaluate this method of decoration.
The whole process looks like this:
- A picture is applied to the prepared surface.
- The entire piece is carefully coated with glue, starting from the center of the image and gradually moving towards the edges of the picture (if the layer of paper does not allow the glue to penetrate to the base, then the picture is glued like a regular applique, carefully leveling out the folds and fixing all the ends).
- Leave the almost finished product to dry completely.
- Several layers of varnish are applied on top. Sometimes up to a hundred layers are used to achieve the result, but for simple homework you can limit yourself to 4-6 layers. Each of them must be dried.
Useful tips
To make decoupage decoration quickly and accurately, there are several small tricks when working with this decoration method. These tricks can also help avoid wrinkles on the product:
- All fragments of the pattern are pre-moistened with water using a spray bottle - with the help of moisture the napkin will stretch. If it has lost its shape, then you can carefully iron it, and then proceed to traditional decoupage methods. The entire further process is easier and faster.
- Fragments of the pattern can be moistened with varnish. The structure of the napkin will become more rigid, which means that wrinkles will be avoided. However, if this trick is used, then the glue can only be applied to the surface itself - the napkin will repel it.
- You can place a napkin on the surface and then start applying glue. More details about this method are in the video.
Correction of minor bugs
Even experienced craftswomen can make mistakes. But most of them can be corrected before varnishing. Slightly damp paper can be gently smoothed out with your fingers or a wet brush. Unevenness in the dried picture can be removed with soft sandpaper.
Inhomogeneity of the background or blurry image can be corrected with a brush with suitable paint. It will also help create a smooth transition between the picture and the base, and create unusual splashes.
A photo of decoupage will demonstrate the charm of works in this design style and will inspire you to create something similar.
We eliminate flaws
If the surface is decorated with small torn fragments, from which it is necessary to obtain a single whole, straighten the edges of the fragments with a brush or fingers. If there is color unevenness somewhere, dilute the paint of the desired shade and paint over the translucent base.
When the surface is no longer very wet, but has not yet dried, you can use thin brushes and acrylic paints to draw in the details, add brightness and clarity.
The next step is to decorate the edges of the product. There are different approaches here. In some places you have to trim the edges evenly, painting the sides, in others you can wrap the napkin on the back side and glue it there. In general, this is also a whole science.
Getting it to the finish line is an equally creative process.
After this, you can leave the product to dry. To speed up the process, you can use a hair dryer, but you need to keep it at a considerable distance, move it all the time and make sure that it dries evenly. If after drying you see that there is a fold on the glued napkin, you can still fix it. Take fine-grained sandpaper and sand it. We act gently so as not to damage the drawing around.
TOP 50 photos of beautiful decoupage
Spectacular Rose
Crafts made from napkins in the shape of roses are very beautiful and unusual. To make them yourself you will need:
- Single-layer napkins;
- Scissors;
- Decorative ribbon or thread;
- Soft wire;
Manufacturing Guide
- One of the napkins needs to be cut into four equal parts. One of them is folded in half and twisted along the short side into a loose cylinder. On one side it is pulled together with a thread. This will be the base of the flower core.
- The remaining squares are cut diagonally. The right corner of the resulting triangle is bent, and the remaining ends need to be wrapped loosely around the core, securing the resulting petal with thread. Their number may vary and is determined during the work.
- To make a bouquet, stems are made. This can be thick copper wire wrapped in a strip of napkin of the desired color. You can attach a piece of paper during the wrapping process.
A beautiful and delicate bouquet of scarlet roses will be a wonderful decoration for a festive table.
Rose is a symbol of love and perfection. This is an excellent decorative item that can become an original decoration for your interior.