Compared to the advantages, there are also some disadvantages. For example, such doors do not have good soundproofing characteristics, since the leaf simply covers the visible opening. If these characteristics are not critical, then you can begin the process of selecting doors, purchasing them, and then installing them.
Features of sliding doors
Sliding structures are an excellent solution for saving useful living space in small apartments. Their “ancestors” were Japanese shoji - sliding partitions made of wood and rice canvas. And the more ancient ancestors were massive sliding structures made of stone, wood and bronze that decorated the houses of ancient Roman and Greek gentlemen. Today you can find two options on the market:
- sliding-folding: door sections fold and slide simultaneously, following guides on special rollers.
- parallel-sliding: there can be either one or several doors that slide parallel to the walls also along guide rails.
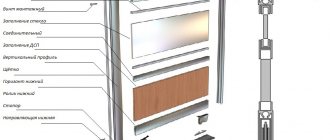
Regardless of the door design, sliding models are distinguished by the same set of elements: doors, decorated frames, fittings, moving components - clamps, rail guides, roller carriages.
Advantages
Sliding systems have important advantages:
- Saving usable space. A standard door takes up part of the room's area - the corner behind the door is actually useless. With compartment designs there is no such inconvenience - you can usefully use the entire space of the room.
- An original, aesthetic solution. Modern sliding structures are distinguished by a huge variety of styles - they fit into any interior.
- Safety. In families with small children, it is more advisable to install sliding structures - there is no risk that the child will be pinched by the door or the door will hit him hard.
- Possibility of automation. When installing the appropriate equipment, the door will open when a person approaches.
Flaws
Sliding systems also have a number of disadvantages:
- Cannot be installed as an entrance door.
- Poor sound insulation (especially for “books” and “accordions”): light, thin materials are often used for manufacturing, and there is no vestibule in the design itself.
- If there are niches in the walls, maintenance is difficult: even minor cosmetic repairs require dismantling.
Connecting bracket PU09
We fasten the PU09 bracket into the groove of the KR300N handle with a standard self-tapping screw in the upper part until final fixation. This must be done in such a way that the groove for the wheel screw head on the top shelf of the PU09 bracket faces the inner surface of the door. We perform a similar action on the opposite side.
We secure the installed parts to the other two corner joints with M6X30 self-tapping screws, using shock absorbers.
Types of sliding systems
The entire variety of sliding doors is divided into categories according to design features, material and level of automation.
The first group is sliding-folding:
- The main advantage is their compactness: such doors do not require opening zones at all, which is why the space along the walls can be used for useful purposes.
- The design allows the system to be opened in one or two directions.
- A simple device: several strips, of which only the outermost one is rigidly fixed, the rest are connected by a movable connection.
- Each strip has a roller: mostly on top, but there are models with lower roller elements.
- To increase the service life, such systems are equipped with locking elements that prevent the door leaf from hitting the wall or furniture.
Sliding-folding doors are available in two subtypes:
- "Harmonic". The system consists of narrow lamella strips, each with its own roller. The most common material is plastic. It follows that you should not expect good sound insulation from such a design - “accordions” are most often installed to zone large halls or delimit utility spaces. The design is not suitable for frequent and intensive use.
- "Book". This system, on the contrary, consists of large elements - 2-4 lamellas. As the name implies, the canvas closes like a book, positioned along the wall, occupying useful space. Such doors are made of solid wood, metal-plastic, glass or veneer. Here, stronger rollers are used, which is why the lamellas are not limited in thickness.
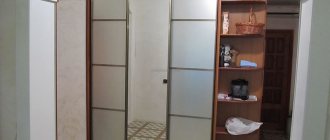
double-leaf sliding doors in the house
Parallel sliding structures are distinguished by reliability, long service life, and good sound insulation. There are subtypes in this category:
- Coupe: 1-, 2-leaf. One of the most popular models. In some variations, the door moves along two guides, in others - only along the top one. The canvas can move in one or two directions.
- Cassette. Like the coupe, the design can be 1- or 2-leaf. The difference is that when opened, the canvas completely disappears into a special wall niche. The latter is most often made of plasterboard.
- Telescopic (cascade). A complex system of several canvases, of which one is stationary and the others are movable. It is the stationary one that, when opening/closing, attracts the moving ones, somewhat reminiscent of a fan. Most often, cascade doors are glass - solid wood makes them somewhat heavier.
- Radial. Quite an unusual system - a rounded door leaf, an arched profile. Models with inserts made of organic, tempered glass, transparent polycarbonate or acrylic are common. Such designs are quite expensive: they require precise measurements and are made only to order.
- Intra-opening. A double-leaf system that is built into the door opening. When the structure opens, the doors move towards each other along opposite guides - as a result, only half of the passage remains free.
Sliding systems are also divided according to the materials used for their production:
- Tree. The classic solution: most often they choose valuable wood. Its advantages are aesthetics, beauty, disadvantages are heavy weight, high cost.
- MDF. The most popular material is relatively light and inexpensive. Such panels can be decorated with oak, walnut veneer, painted or carved.
- Shockproof glass. It can be both the main material and decoration. If the sliding door is made of a solid glass layer, it is framed in a plastic or aluminum profile, and installation is trusted only to specialists in their field.
- Combined material. The most popular combination: wood + glass. Wood and MDF, glass and plastic, metal and glass can be combined.
The last division is based on the level of automation:
- Manual systems. Such doors are opened/closed by physical force.
- Automatic systems. The structure is driven by an IR sensor, which reacts to the approach of people. An automatic special drive, a guide element and a battery are responsible for this.
Selection of materials
The reliability of the product will depend on the type of materials used. Aluminum, steel and plastic guides are the most famous in the furniture market.
In the first case, parts made of such metal will be useful if a weightless door leaf is being installed.
Steel and aluminum do not deform under load. This is a suitable option for arranging heavy structures.
Plastic is suitable for simple products.
The choice of door leaf material is also very important. The appointment will play a big role here.
Usually the cost of glass filling is quite high. The weight is significant, therefore, the installation of additional carriages will be required. To avoid distortions, you need a competent drawing. Such products are not the easiest to install. The same applies to solid wood.
If we consider panel materials such as chipboard, MDF and OSV, it turns out that these options are easier to install and their price is lower. Two carriages will be enough for each sash; weight is not a hindrance. If you need to restore a door leaf, you don’t have to contact a professional technician. It is quite possible to cope with this task on your own.
How to independently calculate the dimensions of a sliding door
It is important to correctly take measurements from the doorway:
- Height. Measure the space between the threshold and the top crossbar of the opening. It is advisable to take several measurements, retreating 50-70 cm. Minor differences in heights of up to 15 mm are allowed - when ordering a door, rely on the smaller value. Make sure that the floor in the installation area is level - even with a slight slope, the sliding door will open/close spontaneously.
- Width. The width of the passage is also measured in several places, taking steps of 50-70 cm. An unevenness of a maximum of 20 mm is allowed.
When ordering, doors here, on the contrary, are based on the largest of the values.
- Opening depth. The thickness of the wall in the passage is measured. Minimum - 82 mm. But to ensure the possibility of adjustment, a depth within 100 mm is still desirable.
Now it remains to calculate the main parameters of the future design:
- Door height = passage height - 4 cm (250 cm - 4 cm = 246 cm).
- Double door width = passage width + 26 mm / 2 ((1400 mm + 26 mm) / 2 = 713 mm). If there are three lines, then the amount is divided by 3, if there are four - by 4, etc.
In the case when you are installing a single-leaf structure, the calculations are even simpler: add 5 cm to both the width and height. This is enough for the structure to completely cover the passage. To find the required length of the guide, just multiply the found width of the blade by 2.
What else should you consider?
In order to be able to grasp the partition with your hand at the moment of closing, you should ensure that the handle protrudes from the mounted opening by an amount equal to 41 mm.
For glass filling with a thickness of 4 or 8 mm, a silicone seal is used. We put it on the edge of the glass. On one side of the filling we install the upper and lower horizontal profiles KR07 and KR08, for this we use a rubber mallet. Then the handle profile KR 300N is attached on both sides. As filling you can also use laminated chipboard, MDF, mirror and other types of materials whose thickness is 4, 8 and 10 mm.
Preparation and installation of sliding doors
Another advantage of sliding doors is that it is quite possible to install them yourself. The following is prepared for the work:
- the door leaves themselves;
- cashing;
- wood beams with a cross section of 5 cm;
- guides;
- false panels;
- stoppers and other fittings.
Also take care of the necessary tools:
- screwdrivers;
- centimeter tape measure;
- drill;
- plumbs, levels;
- self-tapping screws;
- wedges;
- polyurethane foam.
The installation of a compartment door begins with the design of the doorway: the slopes are leveled and plastered. Then they are either painted, varnished, or covered with wallpaper. A more modern and aesthetic option is to install a box made of decorated MDF panels. They are produced standard, which is why they are carefully filed with a jigsaw to suit the parameters of a specific pass. Then the box is placed in the opening, leveled to the building level, and then fixed in the correct position using spacers, wedges and pegs. The last stage is direct installation on polyurethane foam, screws or other selected fasteners.
Installation of guides
After preparing the opening, they proceed directly to installing the guides. It is divided into several simple steps:
- Cutting timber to the required length. The latter, accordingly, should be equal to the length of the guide.
- Fastening the guide to the beam using self-tapping screws.
- Finding the required height of the structure fasteners. Use a level and a tape measure - the guides should be strictly parallel to the floor.
- Trying on the guide. Attach the rail to the opening, make marks at the fastening points.
- Fastening the guides to the wall. Secure the structure according to the drawn marks. Please note that the middle of the guide strip should be exactly above the edge of the opening on the side into which the door will open.
For some designs, you will need to install not only the upper, but also the lower guide rail:
- Trim the standard profile according to the width of the door leaf.
- Attach it to the floor in the place of future installation - use a pencil to mark the attachment points.
- Drill holes in the floor using the marks you made.
- Place a plastic plug in each recess.
- According to the markings made, reattach the guide - screw it to the plugs with self-tapping screws.
Installing a sliding door leaf
The next stage is assembling the door leaf and attaching the rollers to it. Before hanging directly, measure the height and width of the door again - it should completely cover the opening. If everything is correct, the canvas is hung on the already attached guides.
Here you can use the instructions:
- At the upper end of the canvas, drill holes for further installation of the roller mechanism on the screws. It is best to use a “feather” attachment.
- Screw the metal plates under the rollers using self-tapping screws and a screwdriver.
- Carefully insert the roller mechanism, sliding it under the rack guide.
- If necessary, tighten the rollers to the desired height.
- Lift the blade in a vertical position on both sides (it is better to work with an assistant) and place the end with the rollers under the guide. The wheels are located parallel to the floor - in this case they will move smoothly along the rail.
If the door is installed without problems, moves freely, and does not open spontaneously, finish the work with the decorative frame: fill the spaces between it and the wall with foam, putty, paint, cover the spaces adjacent to the opening with wallpaper.
Installation of stoppers and seal
After installing the compartment door in the opening, they move on to auxiliary mechanisms and fittings. Start working with stoppers:
- Move the door leaf to the open position.
- At the required level, mark the door opening limit.
- At both edges of the guide rail, a stopper-limiter is installed according to the inscribed marks - it is screwed tightly into the metal beam.
The last stage is sticking special sealants onto the canvas. They make the opening/closing of the door smoother, softer, and quieter. They prevent the doors from clapping against each other - this is not only unnecessary noise, but also damage to their external design.
Installation of compartment door fittings
Installation work is completed with the installation of the necessary fittings:
- Flag rollers. Such fittings prevent unnecessary lateral vibrations of the door leaf when opening/closing the door. The element is screwed directly to the floor and fits into a special groove located at the bottom end of the door.
- Pen. For compartment structures, only mortise fittings are suitable. A recess is made in the outer covering of the canvas for the handle, and its base is screwed onto self-tapping screws. Then, if desired, a decorative overlay is inserted.
- Platbands. The easiest installation option is glue installation. An alternative is to nail it onto special nails without heads.
- False panel. This element is needed to disguise the wooden beam to which the guide is attached. The panel is also secured with glue or without head nails.
What mounting options are there?
Depending on the type of structure, the following installation methods are distinguished:
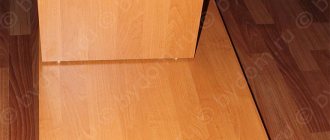
- With two guides. They are fixed on the ceiling to a wooden beam (which is previously installed there) and from below. Thus, the canvas is securely fixed, allowing it to move smoothly and without obstacles. The only disadvantage that can be highlighted is that for the lower profile in the floor you will have to make a recess in advance using the gating method. If it is not embedded into the floor, the structure will look unsightly and the profile itself will quickly become unusable. In addition, contaminants often accumulate in it.
Doors with two tracks - With one guide. For canvases of this type, special fasteners are provided. They are installed in the opening and move along the profile, which is located on top. An additional rail is not installed at the bottom, because usually such doors have a small mass.
How to adjust a sliding door
The last installation step is to adjust the blade. The instructions here are no more complicated than for the installation itself:
- Pay attention to the lower part of the canvas: under the anthers, on both sides you will see a couple of bolts. The first is a fixing one, with the help of which the desired position of the wheels is secured. The second is an adjustable one, with which it is possible to both raise and lower the desired edge.
- The adjustment consists of tightening these two bolts - the procedure allows you to place the leaf in the most correct position relative to the level, which ensures complete opening/closing and does not allow the compartment door to move spontaneously.
- Pull the blade all the way and determine where the gap is. If at the bottom, then lower the right roller down. If it’s at the top, on the contrary, lift the roller. When adjusting with the left roller, perform the procedure in reverse.
- Loosen the locking mechanism and rotate the adjusting screw until the blade adheres tightly to the end of the opening along its entire length.
- The last step is to tighten the retaining bolt.
Measurements
When installing, it is important that measurements are taken accurately. If installation is carried out in a new building, it is worth considering how the finished floor will be located. This is taken into account in the calculations.
If you are making repairs in a residential building, not only the frame, but also the platbands are first removed. After the existing section of the wall has been cleaned, you have decided that you do not plan to strengthen or expand the walls, the next stage begins - choosing an installation method.
This will help not only to take correct measurements, but also to understand how to position the structure.
The threshold-free system has gained great popularity. Its advantages are undeniable compared to systems with a lower support.
Height adjustment
To attach a single-leaf system partition to the ceiling, two upper PU10 wheels must be installed in the upper running profile PU01. We fasten the profile to the ceiling with M 3.5x 51 self-tapping screws. After this, the assembled system is hung on the tetrahedral head of the PU-10 wheel screw.
In this position, the system is secured with a fixation nut to the bracket. Manipulation is carried out by tightening it to the surface of the bracket.
Debugging is performed by rotating the height adjustment bushing of the partition. Afterwards, the wheel is secured with a nut to the bracket, while the partition bushing is held in height.
Preparatory work
To make compartment doors with your own hands, you need to do the following:
- Take preliminary measurements. All data must be accurate, since the design requires an exact fit, otherwise the mechanism may jam during movement.
- Prepare tools and materials.
- Make canvas and loot.
- Prepare the opening into which the structure will be installed.
- Assemble the door and install it.
- Adjust the design.
Preliminary measurements
Making compartment doors at home involves taking preliminary measurements. To determine the dimensions of the opening yourself, you need to take into account the dimensions of the wall, ceiling, and floor; Electrical appliances are not used in this case, only a tape measure. The design stipulates that the partition should exceed the opening by 5-7 cm in width. If there are 2 panels, each should be 2-3 cm wider than the opening.
Standard dimensions for the width and height of the opening are 0.6-1.8 m and 1.9-2.2 m, respectively. The opening is measured in 3 places: top, bottom and middle. This is due to the unevenness of the walls. Changes in size are taken into account if you plan:
- flooring;
- decorative wall covering, etc.
In order for the design of compartment doors to be correct, it is necessary to subtract the size of the covering from the obtained data or add it if the opening increases. Then the thickness of the walls is measured. If the walls are wider than 10 cm, install an additional element. This is a wooden plank that makes the loot wider.
If you use the cassette method of installation deep into the wall, you should dismantle part of the partition and erect a plasterboard box.
Tools and materials
Do-it-yourself installation of interior compartment doors is done using the following tools:
- roulette;
- pencil;
- hacksaw for metal;
- screwdriver;
- screws for fastening.
Tools needed to make the box and the canvas itself:
- jigsaw;
- a circular saw;
- hammer, chisels, plane, screwdrivers;
- electric drill;
- screwdriver;
- construction plumb line;
- sandpaper or sander.
The following materials and spare parts will be needed:
- Canvas. The material determines the weight of the structure, which affects the choice of fasteners and accessories. It is made from laminated chipboard with a thickness of at least 16 mm. Depending on the features, the canvas should be higher or lower than the opening. If you plan to install it on 2 rails, the door is chosen so that when open it is slightly larger than the opening, and when closed it is just as much smaller.
- Metal rail.
- Wooden beam 50x50 mm. Its length should be equal to the prepared rail.
- Rollers and fasteners for them. The mechanism must support the weight of the canvas.
- Platbands.
- Closers.
- Pens.
- Anchor.
- Self-tapping screws and decorative nails.
Installation of guide structures
We cut out a beam, the length of which should coincide with the length of the guide. Then we screw it to the beam with self-tapping screws from the bottom edge.
Using a level, we secure the structure at the required elevation above the opening. Moreover, we place the center of the strip on the edge of the opening on the side where the door opens.
Calculations before installation
To properly install the mechanism, you need to correctly calculate the dimensions and lifting height. First, you need to measure the opening itself and add 5-6 centimeters to this value so that the canvas completely covers the entire opening.
Note!
Do-it-yourself vegetable garden: new interesting garden crafts for the street at your summer cottage (photo/video review)
DIY ceiling installation: step-by-step description of how to make a ceiling. Review of modern structures and ideas for their design (105 photos)
Do-it-yourself garage doors - a detailed description of the construction of various types of garage doors (120 photos)
To calculate the length of the guide, you need to multiply the width of the door by two.