Currently, many rural residents cannot afford to purchase new furniture for their home. And city apartments do not always have a large area where it would be possible to place household items. But, despite this, people still learned to cope with these problems on their own. To do this, you can make a wooden cabinet with your own hands, without the services of specialists. Carrying out such a design at home is not particularly difficult, but in order for the furniture to have a long service life, it is necessary to become familiar with the sequence and nuances of the work in advance.
What is needed for production
Today, the consumer market provides various wooden materials for the manufacture of household items. Therefore, before you begin to consider the question of how to make a cabinet yourself, you first need to decide what material it will be made from. According to experts, the best products for this work are:
- plywood - this multilayer material has high wear resistance and strength. In addition, due to its environmental friendliness, it is absolutely harmless to human health. Plywood is produced in solid slabs, which simplifies the process of assembling household items;
- chipboards - chipboard sheets are considered the most popular products for creating home furniture. This is due to the fact that they combine good quality at an affordable price. These products are resistant to changes in temperature and moisture, do not deform under the influence of an aggressive environment and are characterized by increased strength;
- solid wooden boards - the material from the boards is cut from different types of wood. They are produced in different sizes, certain types of processing and quality of carpentry. For the construction of furniture, boards from pine, birch and oak are mainly selected. These rocks are endowed with high strength and resistance to changes in temperature and humidity.
Installing household items from pine with your own hands is a labor-intensive process, since the rock is not hard enough. But if you choose this material, you can create an extravagant design in any room.
Wooden boards
Chipboard
Plywood
So, having considered the options for materials that will be needed to make furniture, it is also worth familiarizing yourself with the tools for performing the work. The manufacture of cabinets is carried out using the following equipment:
- hand saw for sawing wood;
- grinding machine for polishing the surface of wood;
- protractor, for measuring the angle of inclination;
- ruler or meter tape for measuring dimensions;
- wooden dowels, for fastening the product and filling;
- metal corners for fastening furniture structures;
- wood slab for making shelving;
- mastic for sealing the structure.
In addition, in order to revive a household item with the desired shade, you will need to purchase water-based acrylic paint.
Furniture fasteners
Furniture fasteners are hardware (metal products) that are used to connect parts. Most often, connections are made at right angles.
- Wooden dowels - inserted into pre-drilled holes in both parts. They are used for preliminary fixation and increasing the shear load, then the parts are fixed in a more reliable way.
Dowels
- Furniture corners are a popular, but outdated type of furniture fastening. Among the disadvantages: appearance, loosening over time and bulkiness.
Furniture corner
- Euroscrew (confirmed) – furniture screw. This is the main fastener for parts in modern furniture. Furniture makers almost never use ordinary self-tapping screws. Confirmats have a larger thread, so they stay inside the chipboard much better. Confirmat
The holes for them can be drilled directly on site. To do this, use a special drill that makes a hole with different diameters for the thread, neck and head of the Euroscrew. The most commonly used confirmats are 7*50 mm. When drilling, special attention should be paid to the perpendicularity of the drilling, so as not to spoil the coating of the part with a through hole.
Drill for euroscrew
Furniture screws are tightened with a hex key or a screwdriver attachment. The caps for a Phillips screwdriver cannot be tightened tightly until the end.
The main disadvantage of this type of fastening is that screwed-in caps remain visible. To hide them, use plastic plugs matching the color of the chipboard.
- Eccentric ties are a modern and correct method of fastening. It leaves a hole only on the inside of the product, but requires very precise drilling. Eccentric coupler
Nuances of work taking into account the type of structure
There are several ways to build a wooden cabinet with your own hands.
Hull
As you can see from the photo, cabinet furniture consists of several component elements, which is why it is also commonly called modular. The peculiarity of such a cabinet is that the owners can, at will, supplement it with various internal and external elements. Initially, the design of the product is developed so that all parts are combined with each other and the body. To build a building, you will need elements such as a roof, bottom, back and side walls. All these elements can be made in the form of removable straight shelves on which things will be placed. It will also be possible to additionally build a pull-out shoe cabinet.
Preparing grooves for fastening shelves
It is better to assemble the structure in a horizontal position
We attach the top bar last
Vertical faceplates
Built-in
A distinctive feature of the built-in wardrobe is that it can be made from scrap materials. The fact is that it is mainly installed in niches of the room or in places where it is not possible to place standard furniture. A solid frame is not required to build the cabinet. It may be missing one or more walls, which are replaced by the floor, ceiling or walls of the building. Filling elements, as a rule, can be made in the same way as for cabinet furniture. But having constructed such a cabinet with his own hands from scrap materials, the consumer must be prepared for the fact that, unlike a cabinet product, this furniture cannot be moved to another place.
The design of each cabinet requires not only the presence of a body and internal filling, but also a front part. The main element of the façade is the door.
When making a built-in wardrobe, it is important to correctly mark the space for future shelves
Shelves must be securely attached
Special logs are required to secure doors
Filling
The internal content of the cabinet determines its internal layout. There are four rules here:
- Raw - set aside separately.
- The necessary and small things are before your eyes.
- Dry - higher.
- Valuables - in boxes.
For example, it is wrong to place a section for outerwear in the middle - dampness will go to the sides from it. If you place it on the side, the moisture from the clothes will go where it’s easier – out. In the bedroom, there is no need to place drawers or shelves for bed linen directly above the floor - dust and moisture are concentrated approximately 40 cm above the flooring. Well, it’s clear that a wallet or smartphone shouldn’t be lying around in plain sight near the entrance.
The ultimate goal of content placement is to achieve a minimum shelf width; this will be needed to calculate the doors. The placement procedure is quite responsible; the convenience and durability of the cabinet largely depends on the successful layout.
Video: internal layout of a sliding wardrobe
Door fastening
Today, the consumer market offers various systems for fastening furniture doors. Each element has its own specific purpose, which depends on how the cabinet is opened.
Swing
Hinged doors are the most common type of furniture design. It consists of a wooden canvas and fastening equipment. The number of panels for a cabinet depends on the number of internal sections. As a rule, if the cabinet has one common section, two doors will be required. If the furniture consists of one narrow and one wide section, three doors will be required. The doors are fastened to the side walls of the cabinet using the following hinges:
- detachable - such a mount is installed on the inside of the cabinet wall;
- universal - these products can be installed regardless of the sides of the cabinet. The hinges are attached simultaneously to the body and doors of the furniture.
After the hinges are attached to the product box, the doors are hung on them.
Hole preparation
Alignment and installation of hinges
Coupe
Compartment doors are a sliding system where, when the closet is opened, one door overlaps another. Installation of such a design requires certain knowledge and skills, so before installing a sliding wardrobe made of plywood with your own hands, you first need to familiarize yourself with the names of the components and their location.
The accessories set includes:
- special wheels for moving doors, installed in their upper and lower parts;
- upper hanging structure for guiding the canvases;
- a lower guide structure along which the door wheels will move in the grooves;
- cassettes for installing wooden panels;
- locks and closers for easy door opening.
This design is intended for cabinet furniture with a threshold. If a built-in wardrobe is installed, it will be possible not to install lower guide elements on the floor.
Main material: chipboard
Wood in its pure form is practically no longer used in cabinet furniture; solid wood is considered an expensive luxury material.
Now wood is being replaced with a cheaper material - laminated chipboard (abbreviated laminated chipboard). Most often, these boards have a thickness of 16 mm; chipboards with a thickness of 10 and 22 mm can also be found on sale. 10mm sheets are typically used to fill wardrobe doors, and 22mm sheets are used for bookcases and shelves where high bending strength is required. Also, sometimes the structure is decorated with elements made from 22 mm laminated chipboard.
Almost all furniture parts are made from 16 mm laminated chipboard (except for doors and facades).
Laminated chipboard
Laminated chipboard is cut on special machines along guides. Of course, you can saw it off at home using a jigsaw, but then there will be chips and wavy irregularities on the edges. It is almost impossible to saw off chipboard evenly with a jigsaw at home.
Edges
The most vulnerable place of laminated chipboard is when it is cut down. It is the easiest way for moisture to penetrate inside, so if the protection is poor, the ends may soon swell. Therefore, the ends are closed using edges; there are several types of them.
- Melamine edge is the cheapest, but of poor quality. You can stick it on at home using an iron.
Melamine edge
- PVC edge 0.4 and 2 mm is the best option. It can only be glued on a special machine, so it is done immediately when ordering a cut. To save money, 0.4 mm is glued to the invisible ends, and 2 mm to the external ones, which will experience constant loads and friction.
PVC edge 2 mm
- ABS edge is similar to PVC, but made from environmentally friendly material.
- Mortise T-shaped profile - inserted into a groove previously made with a milling cutter. Rarely used.
Mortise T-profile
- Overhead U-profile - can be easily glued to liquid nails at home. The main disadvantage is that the edges will protrude a few millimeters, so dirt will get stuck under it. On the other hand, this drawback allows you to hide a poor-quality cut.
Overlay edge
Markings and drawings
Before you make a cabinet out of lining with your own hands, you first need to mark its location in the room and draw up a design drawing. Such preliminary procedures will help you quickly assemble cabinet or built-in furniture.
In the cabinet layout diagrams, it is necessary to take into account its width and height. To do this, first use a tape measure to measure the intended installation location. When carrying out measuring work, it is important to consider the distance from baseboards, window sills, pipelines and connectors for connecting electrical appliances. If you lose sight of these points, the wooden cabinet may not fit into the allotted space, or in the future there may be obstacles when opening doors or accessing the power source.
For a DIY cabinet, the drawings can be created using an automated CAD program or by hand. In the first case, the cabinet diagram is drawn up by a special computer system; in the second option, cabinet drawings are made with your own hands. As practice has shown, the second option is simpler, so it is chosen more often. To create a drawing by hand, you will need a sheet of paper and a pencil. Next, sketches of the cabinet are drawn on the sheet.
Description of drawing up a drawing of a wooden product:
- front view of the cabinet - this sketch includes the width and height of the furniture, the height of the base, the size of the sections, the distance of the shelves from each other. When drawing up a drawing, it is important to take into account the thickness of the furniture walls and its contents. You also need to indicate the attachment points for shelves and doors;
- top and side views - in this case, the depth of furniture and shelves is marked on a sheet of paper. When applying filling depth values, it is important to take into account the fastening of the doors. To ensure that the shelves do not interfere with the installation of fastening equipment, they should be located at a distance of 10 cm from the edge of the furniture’s front wall. Also in this sketch you need to indicate the rounding of the shelves with a radius of R.
In addition to the indicated values of the furniture body, you need to draw the dimensions of the filling elements on a sheet of paper. Shelves can be made in different configurations and thicknesses, but they must be of the appropriate size.
Furniture fittings
- Handles - everything is clear here. They are usually attached with screws.
- Legs are convenient in rooms where wet floor cleaning is often done, for example, in the kitchen. Any wood, especially chipboard, will quickly deteriorate from daily contact with water. In addition, the legs can be used to level furniture on uneven surfaces.
- A silicone damper is a cheap but very useful part that can reduce the noise of impacts from cabinet doors. It is glued to the top and bottom of the cabinet door or end to soften the impact.
Silicone damper
- Furniture hinges. Round cutouts for them (additives) in the facades can be made in any furniture workshop, if the manufacturer has not made them in advance. The hinges differ in the degree of door opening. Standard hinges have an opening angle of 180° and a closed angle of 90°. The hinges have a special mechanism that allows you to adjust the doors in height and seating depth. Separate hinges are sold for glass doors; you can clamp the glass into them without drilling a hole.
Furniture hinges
Among the inexpensive manufacturers of accessories, we can recommend the Chinese Boyard, and among the serious global manufacturers, the Austrian Blum.
Manufacturing of parts
Having made a drawing of the cabinet design with your own hands and prepared the appropriate equipment, you can begin to manufacture its parts. To do this, transfer the dimensions of the furniture elements onto a sheet of chipboard using a meter and pencil:
- upper part of the cabinet in quantity – 1 piece;
- side walls in quantity - 2 pcs;
- bottom in quantity - 1 piece;
- back wall in quantity – 1 piece;
- furniture shelves in the amount of individual consumer preference.
Next, using a saw along the marked lines, they begin to cut out the parts step by step. When performing these works, it is necessary to take into account the thickness of the saw itself, otherwise the furniture elements will be smaller after sawing.
After the parts are ready, they must be covered with melamine film. To do this, a film is applied to the structural elements, which is then ironed. After the cladding has set on the parts, all its excess remains are cut off with a stationery knife.
Preparing parts
Edge fastening
How much can you win?
Now let’s figure out whether a homemade cabinet in a niche is really inexpensive. And will the savings be worth the time and effort?
If you make a cabinet in a hallway niche as described above, the materials will cost 5-8 thousand rubles, including cutting costs. Well, 10,000, if, as they say, from the belly. Time – 2-3 couples of weekends for an average home handyman. And ordering a wardrobe for the same niche is hardly possible for less than 12,000. Most likely, from 20,000. Completion time - 2 weeks.
The savings on a wardrobe covering the entire wall of the bedroom are even greater. Here, the typical regional ratio of homemade/custom cost is 13,000/32,000. But making something like this requires more serious skills.
But making a wardrobe partition yourself is no longer so profitable: the advantages of well-established technology are also felt by the pros. And the work is difficult - a skilled craftsman will have to tinker with it for a month, if he doesn’t have to redo it yet. You will be able to profit no more than 2000 on a closet in a one-room apartment of average size.
But it’s definitely better to make a wardrobe in a hallway niche yourself, even if you have to start with the basics of furniture craftsmanship.
Assembly
It is better to assemble the cabinet at its intended location. In this case, it will be possible to prevent deformation of the walls and floor of the room when moving finished furniture. Initially, sheets of cardboard are laid on the intended floor, on which the structure of the product will be sequentially assembled.
Step-by-step instructions for assembling the cabinet, carried out in stages:
- the first side sheet is located on the floor;
- fasteners are fixed vertically to connect the bottom and top sides of the cabinet;
- the top and bottom of the furniture are installed and fixed on the sides;
- the second side sheet of the cabinet is placed on top and secured;
- the strength of fastening elements is checked;
- the cabinet is turned over with the front side on the floor;
- the back of the furniture is laid and secured;
- The cabinet rises and is installed tightly against the wall in the designated area.
Next, using a level, you need to create a level position for the cabinet, then fasten the doors, as well as install the filling.
So, having learned how to make a cabinet with your own hands, many beginners will not make serious mistakes when designing the structure. A step-by-step manufacturing guide will help you correctly complete the furniture parts. And if the given assembly sequence is followed, wooden cabinets will be able to stand for decades without deformation.
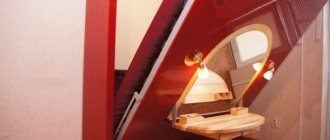
Cabinet back wall decor
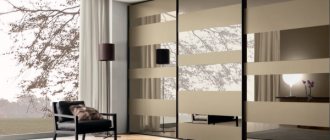
A classic technique for decorating the back wall of sideboards and glass display cases is the use of a mirror insert. Due to the reflective effect, the internal space of the shelves acquires a fascinating depth and allows for a more aesthetically pleasing placement of decor and items of pride of the owners for everyone to see.
The mirror can be attached to the provided strips in various ways: using double-sided tape, special clamps, or with through fastening. Mirrors framed with a narrow frame also look beautiful.
By analogy with kitchen aprons, you can decorate the back wall of the cabinet using frosted glass with diffuse lighting. Also in similar options, glass with photo printing, acrylate and translucent plastic are used.
Wide decorative possibilities are provided by MDF panels with various embossing and patterns, under PVC film and painted with enamel.
You can decorate the back wall of the cabinet with any sheet material and decor panels. To emphasize the sophistication and originality of the chosen solution, use contrasting combinations and do not forget about additional lighting: the lighting built into the open niches will benefit from the reliefs and make any design expressive.
When choosing a wardrobe there is no point in paying attention to which back wall is installed. In ready-made cabinet options, a standard solution is offered - overlapped fiberboard. But when ordering a built-in wardrobe, you can discuss the optimal solution.
Finding a location, optimal dimensions
The built-in wardrobe is convenient, spacious, but at the same time it takes up little space. You can find a place for it:
- In a niche. This is the most convenient option for using such an empty recess.
- In the corner. This placement makes it possible to expand the space inside the closet and use a not very functional area of the room. The advantage of this solution is the possible cladding of mirrors, which gives a chance to visually increase the area of a small room.
- Between walls - wide or narrow, at the dead end of the corridor. There are very original options: for example, rational use of empty space near the window.
Required Tools
It is impossible to name an exact set; much depends on the design of the cabinet and the choice of materials.
However, the main elements can be identified:
- Saw;
- Level;
- Roulette;
- Drill with a set of drills;
- Screwdriver and screws;
- A set of keys;
- Knife.