Deciding on the design and construction of the future bed
A bedside table in disassembled and assembled form, used in a small apartment.
Before looking for drawings and buying the necessary materials, choose what product you want to get and what model you can make. The transforming bed is divided into several varieties.
- Wardrobe bed: With the help of a lifting device, the bed is pressed against the wall and looks like a simple wardrobe. This type is the most popular among the others and is considered one of the most practical in small spaces. This type of transformable bed is easier to create with your own hands than other models.
Double bed-wardrobe with a comfortable orthopedic mattress
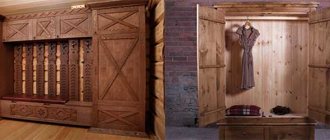
Wardrobe-bed with secretary and LED lighting
- A bed-workplace is popular for arranging children's rooms, as it includes a desk with all kinds of additional drawers, a wardrobe and a bed.
A table-bed for a teenager is functional furniture that can be transformed Bed and desk: two in one for a loft-style room
- A sofa bed can be found both in a regular version and as an option when the sofa transforms into a bunk bed.
Double sofa bed in the interior of a small cozy living room Sofa transformable into a triple bunk bed
- One of the new features is that the bed rises to the ceiling and is camouflaged there. It is known as transformers, as this design instantly frees up a large amount of space and becomes invisible.
An exclusive bed that rises when necessary White hanging bed near the ceiling in the interior of a loft room
If you are a small specialist and are starting to make a transforming bed with your own hands for the first time, then choose a simpler option. As mentioned above, this is a wardrobe bed. To begin, make or find a drawing of the future product with the necessary parameters, noting the attachment points and connections.
A bed that can be transformed into a wardrobe if necessary
The wardrobe-bed model is divided into three main parts, which will first need to be created separately and then combined into one. Below are the elements and materials needed to make it.
- The body can have any shape and appearance, the main thing is a large niche into which the bed will fit. The niche should be made based on the parameters of the mattress. Laminated chipboard sheets can be used as a material; they are quite easy to process and have an affordable price. To avoid chipping when sawing, it is better to ask the manufacturer to cut the chipboard according to the required parameters. This service is inexpensive, and all edges of the parts will be taped with edge tape. Bed frame with furniture to be attached to the main wall
- To make the base of the bed you will need a wooden beam, from which you will make a frame and slats or a sheet of plywood on which the mattress will stand. Chipboard or MDF sheets are attached to the bottom of the base; when folded they will serve as the front of the cabinet, so this detail needs to be worked out from a design perspective. A bed hidden in a closet is a great space-saving option
- The lifting mechanism combines the wardrobe and the bed. Since it bears the majority of the loads, it is advisable to purchase such a mechanism ready-made. This is one of the main parts of a transforming bed; you should not skimp on it; give preference to a high-quality system.
Disassembled wardrobe-bed transformation mechanism
Magic Rose – paper cube
Prepare 3 green squares and 3 red, orange or pink ones. Size 10x10.
Assembling orange modules:
- Fold the square in half crosswise.
- Expand.
- Bend the top edge towards the center line.
- Bend the bottom edge towards the center line.
- Unfold the last 2 folds.
- Position the workpiece so that the fold lines are vertical. Fold the top right corner to the left fold line.
- Expand. Repeat with the bottom left corner.
- Bend the top edge of the corner down.
- Fold the workpiece towards the center along the dotted line.
- Make a mountain fold along the dotted line.
- The figure shows the result.
- Turn the workpiece so that the folded corner is on the top right.
- Fold the bottom corner in the same way.
- Unfold the workpiece and at the same time fold it in the directions indicated by the arrows.
- Turn the corners to the sides and smooth them.
- Turn the workpiece over. Fold the protruding corners in the direction class=”aligncenter” width=”419″ height=”418″[/img]
- Fold the bottom corner up and the top down.
- The module is ready.
Assembling green modules:
- Fold the sheet in half crosswise.
- Expand.
- Fold the top and bottom sides towards the middle.
- Expand.
- Fold the upper right and lower left corners as in steps 6-7 of assembling the orange modules.
- Repeat steps 8-10.
- Fold the bottom right corner up.
- Bend the bottom corner towards the center.
- Rotate the workpiece 180 degrees.
- Make a valley fold along the dotted line.
- Fold the left corner inward and press it.
- Turn the workpiece over.
- Fold the corner sticking out on the left to the right.
- Fold the bottom corner up.
- Make a valley fold along the dotted line.
- The module is ready.
Transformer assembly:
- Connect the green modules together.
- Connect the orange modules.
- Connect the blocks together. Release the green triangles.
- To form a rose, bend back the green leaves.
- Release the orange petals.
Editorial Voice
Irakli
Lord of Paper Sheets
Ask a Question
The craft turns from a rose into a cube and vice versa. To do this, you need to smooth the petals or release them. It is better to take thick and smooth paper for such a transformer.
Manufacturing process
Connecting two parts for a double bed - frame and sleeping part
Installing a transformer bed consists of two steps: first of all, you need to make a frame for the folding mechanism, and then a bunk bed. On the Internet you can find ready-made sizes for single and double standard models, but if you need other parameters, you will have to calculate them yourself. The Furniture Designer program will be an excellent assistant for this.
We fasten the frame using corners to anchors if you have concrete or brick walls, or with self-tapping screws if the house is wooden
Firmly fix the strong metal strip to the wall with anchor bolts. This will be necessary to strengthen the frame with metal corners. For the base of the frame, take two reliable boards - they perform a load-bearing function; the average length for standard forms of transformable beds is about two meters. At the edges, top and bottom, use glue and self-tapping screws to secure them with a cross board. Attach the sheathing to the finished frame using glue and self-tapping screws. Remember: you need to match the depth of the drawer to the thickness of the bed. To avoid receiving a box that does not contain the finished product, it is better to make it a few centimeters larger.
Assembling a wardrobe-bed structure using a bed lifting mechanism
Next, you can begin assembling the clamshell. Take plywood that meets the required parameters as a basis. To avoid damage and deviation of the material, strengthen it from below by installing four boards along the length and width of the future product. For convenience, you can equip the base of the bed with various sides, but remember that nothing should interfere with the lifting mechanisms.
The frame and base are connected, with the structure reinforced with a wooden block in the middle
The next step is to attach the frame to the wall. For a long service life of the finished product, choose only high-quality fasteners. Attach the hanging part to the hanging frame and secure its free end with special fasteners; It is thanks to them that the transforming bed stays in the bend and does not break suddenly. If you are going to varnish wooden surfaces, then it is more advisable to do this until the hinged part is secured to the frame.
Finishing
If desired, the inside and outside of the box can be covered with a special material that does not allow moisture to pass through.
To give a decorative effect, a wooden product can be stained, varnished or painted.
To make the transforming bed look believable and when folded look like a real wardrobe, fittings are applied to the outside.
The ends are decorated with PVC adhesive tape, which is applied to the product, heated with a hair dryer and pressed tightly.
Tip: If you really want to save space in your apartment, try making a lift bed, wardrobe bed, chair bed or loft bed. Additionally, you may be interested in folding or folding tables.
Step-by-step diagram for assembling a transformer for a small apartment
Preparation
Having decided to turn your furniture into a transformer yourself, you need to think carefully. You should start with:
- create a detailed drawing;
- calibration;
- selection of materials;
- tool preparation;
- selection of color and design solutions.
Dimensions
The size of the bed is selected based on the available space in the room. If the room is spacious and bright, then you can make a fairly large piece of furniture from a large double bed. For couples, beds ranging in size from 1600x2000 to 1800x2000 are suitable.
But for children, teenagers and singles, you can opt for products ranging in size from 1200x1900 to 1500x1900.
Clue. For small and narrow rooms, it is better to choose models with a horizontal bed arrangement.
Drawing with dimensions
Drawing is an important part of furniture making. You can do this yourself using a pencil, ruler and paper, or you can order it from a special company, where they will give an accurate calculation based on the model of the bed-wardrobe.
Clue. If you are good with a personal computer, you can download a special program for cutting furniture. He will create a competent and accurate drawing of all furniture elements.
If you use the services of professionals or a computer program, then with the help of a well-drawn drawing it will be easier to assemble the furniture yourself, since there will be no inaccuracies in the drawings. And when doing the calculations yourself, without having skills in this area, you may encounter some difficulties. For example, the dimensions of parts and the like may not match.
Tools and materials
The preparatory stage of assembly includes the preparation of tools and materials. Most often, transformable furniture is made from natural wood or chipboard. As for the matrix, it has the following qualities:
- naturalness;
- duration;
- resistance to mechanical damage.
Agglomerate is:
durable and reliable;- cheap;
- packed with interesting textures, textures and colors.
The tools you will need to prepare or buy are:
- screwdriver;
- drill;
- electric puzzle;
- roulette;
- furniture screws;
- self-tapping screws;
- Bulgarian;
- hex keys;
- Screwdriver Set;
- folding mechanism and other accessories.
How to make it yourself at home?
After creating a drawing, purchasing consumables, and preparing tools, you can begin making furniture.
Some people prefer to make parts with their own hands, using an existing drawing and the necessary power tools. The rest use the services of companies where all the details are cut out. The second option is cheaper.
Once you have cut and trimmed the pieces, all you have to do is drill the holes in the right places and assemble the furniture in the correct order.
Assembling the wardrobe-bed is divided into several stages:
- First, the cabinet body is assembled, in the middle of which the sleeping area will be hidden. Such a body should consist of: a back wall, a plinth and a shelf for support. All parts must be fastened with self-tapping screws at a distance of 25 cm from each other. The assembled cabinet body is installed in a previously prepared place.
- The next step is to place the assembled box in place and secure it to the wall.
- Now you can begin assembling the bed base. It consists of a frame with slats and its height must clearly correspond to the size of the mattress.
- Now, having assembled all the other parts of the product, we securely fasten the base to the box with self-tapping screws.
- We secure the folding mechanism according to the manufacturer's instructions.
- The final stage of assembly is connecting the body with the remaining elements and installing the facade.
Important. Furniture must be installed on a perfectly flat surface. The base of the bed must strictly correspond to the dimensions of the frame of the assembled cabinet.
Installation of the facade is the final stage of finishing the wardrobe-bed. It is better to choose blank facades from chipboard.
After assembly, the transformable bed can be equipped with bookcases, shelves and other elements.
That's the whole simple process of making a separate bed with your own hands. Now you need to install the previously purchased mattress and securely fasten it with seat belts.
Important. Under no circumstances should mirrors be used on false doors. Since they are not designed for such loads, they can fail over time.
Transformable paper star
Prepare 8 squares, for example 4 yellow and 4 pink.
Step-by-step instruction:
- Fold the square in half diagonally in two directions to mark the fold lines.
- Bend the workpiece in half crosswise.
- Expand. Fold the top corners to class=”aligncenter” width=”520″ height=”460″[/img]
- Bend the workpiece in half from right to left.
- Tuck the lower right corner inward.
- Form the remaining elements.
- Nest one module inside another.
- Tuck the protruding corners of the red inside the yellow.
- Connect the remaining modules in the same way.
- When you press on the figure from all sides, the individual modules will begin to move outward and the craft will take on the appearance of a star.
Assembling the frame and box for the mattress
Installation of a built-in bed in a closet begins with the frame. Its main parts are 4 sides and a base. The latter will be the main element of the bed, and in the assembled structure - the wall of the closet. For ease of use, you should choose a mattress of a suitable size: 150 mm wide and 400 mm long under the base. Because:
- Cut out furniture panels according to templates.
- Cut out the parts with a jigsaw, sand with sandpaper and finish the edges.
- Connect the frame with self-tapping screws in increments of 25-30 cm.
The next step in creating a do-it-yourself bed built into a closet is installing the mattress. Its components: 3 sides and a bottom corresponding to the cabinet wall. Process:
- Circle and cut out all the parts of the box, sand and sand thoroughly.
- Connect the parts with self-tapping screws at a distance of 25-35 cm from each other.
- Place a wooden board around the perimeter as a base for a mattress pad. Attach it to the sides using self-tapping screws.
- Place the prepared boards on the tree - the mattress pad is ready.
The selected boards must strictly correspond to the width of the structure, and the distance between them should not exceed 20 cm, only then will the built-in bed be comfortable. It is quite possible to perform each action independently, even if there is no relevant experience.
Features of convertible folding beds, placement options
Which transformation mechanism is better?
When choosing a transformation mechanism, you must first take into account the intensity of use of your bed. To turn a sofa into a bed, they might answer:
- gentle;
- dampers (closers);
- bearings, mechanical elements.
The first step is to make a cabinet frame that is firmly attached to the wall.
The spring mechanism has the problem of stretching with frequent use, and the metallic sound of working springs is not the most pleasant.
Decide on the mechanism for lowering the wardrobe bed.
Gas shock absorbers (they are also called gas lifts, or less commonly closers) do an excellent job, but they can also fail, so when using them, it is recommended to provide for the possibility of easy replacement.
Everyone chooses for themselves the mechanism for lowering the closet to the bed.
Bearings are used less frequently than any other option due to the conversion nature of the design. This is due to the fact that the bearing is not responsible for smooth operation, that is, each time you have to manually lift the entire mechanism yourself.
Over the course of several years, gas will gradually leak from the strut, after which the strut or the entire mechanism will need to be replaced.
Transformers Information
Transformers are not only cartoon and movie characters, but primarily comic book characters.
It was the comics about these characters that appeared first, and then they were filmed. These heroes immediately became loved not only by children, but also by many adults, since after the comics, films appeared first.
Transformers are alien bots that can become earthly vehicles in a few movements.
Some become cars, others can become flying equipment, and still others become railway, construction and other options. The characters are divided into Decepticons and Autobots, who are at enmity with each other.
According to the plots of the films, the Decepticons attack the home of the Autobots, and they seek to protect it and other planets.
The most popular character in the Transformers universe is the Autobot Bumblebee. It has many features, the main one being its size.
Compared to other Autobots, this hero is very small, but more mobile.
Bumblebee's main color is yellow, but many parts of his design are black. The simplest solution would be to make a mini transforming robot from Lego, since it is simple.